WWDC 2020 was finished just a few days ago under unprecedented conditions for first time. Virtually, all developers around the globe had the chance for a seat in the front row, being able to learn about all new features and improvements that Apple had to announce this year right at the moment they were becoming available. As always, lots of new stuff and great advancements were introduced, and once again everybody has got really excited and eager to try many new things out.
This post is dedicated to the base that makes everything else real; Xcode and Swift. The first beta version of Xcode 12 was made available on day one to developers, so everyone had the chance to download and play around with it early enough. It carries great new features and tools that were definitely missing from previous versions, and all that will definitely help a lot the overall development process.
Xcode 12 contains the next Swift update bundled, version 5.3. The more the Swift language advances, the more features we all get, resulting to better, safer, clearer and more robust code. Once again Swift brings improvements that most of them will be proved useful to all developers.
So, here we are, ready to highlight some of the new Xcode 12 features, as well as of Swift 5.3. What is covered in the parts to come is just a subset of what really exists, and I tried to pick topics as general as possible so the majority of developers are interested in them. I really recommend to go through Xcode release notes and see the full list of what’s new, as well as to read Swift changelog for details left out of this tutorial.
New Features in Xcode 12
Changes in Xcode 12 are apparent right when Xcode starts. The first thing that you will notice once you run Xcode 12 is that the option to create a Playground is missing from the Welcome window:
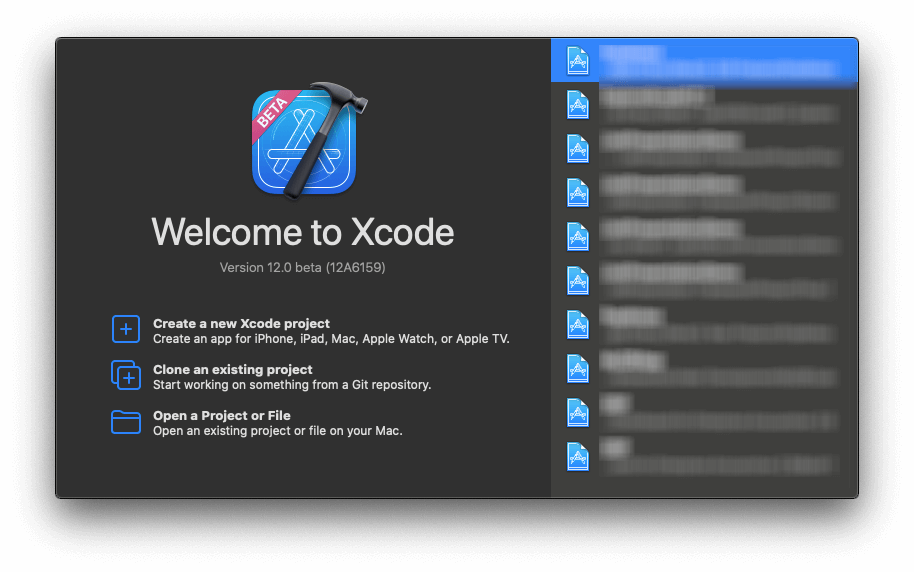
Besides the options to create a new project and clone from a Git repository, the third option is to open an existing project. To create a new Playground, you can now open the File > New > Playground… menu.
SwiftUI App Life Cycle
Creating a new SwiftUI project brings a new addition to the initial configuration: The Life Cycle popup menu.
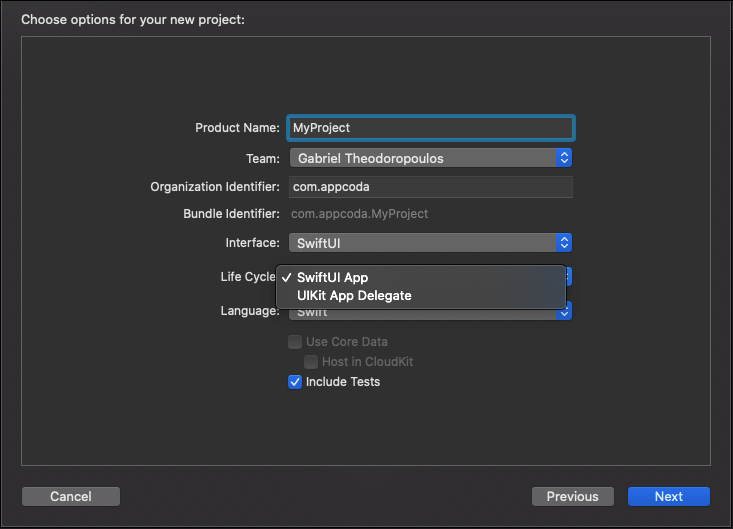
By choosing the SwiftUI App option there is no more AppDelegate or SceneDelegate in the project to handle the application life cycle and its various states, such as when the app is about to start, enter the foreground, background, etc. Both AppDelegate.swift and SceneDelegate.swift files are missing, and in place of them there’s a file titled as the project suffixed by the “App” word. For example, MyProjectApp.swift file:
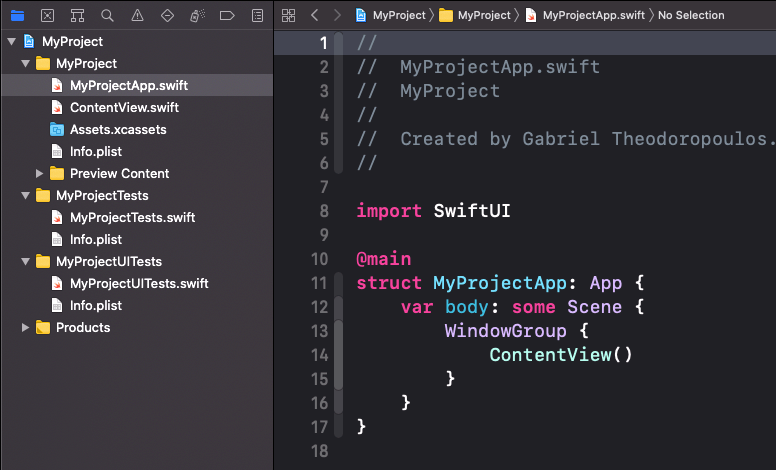
The entry point of an app now is a structure that adopts the App framework, a brand new type that according to documentation “it represents the structure and behavior of an app”. That structure is actual the base where the rest of the UI will sit upon when building pure SwiftUI based projects.
Notice in the screenshot above that MyProjectApp structure is marked with @main attribute to indicate that this is the entry point of the app, and it’s no possible to have more than one structure marked like that. Additionally, see that the body of the structure is of type Scene, another protocol that according to documentation it acts as a container for the view hierarchy that will be displayed to the user. Inside the WindowGroup scene there’s an instance of the view that should be displayed right after the app will start, the ContentView view here.
Use this small introduction to SwiftUI app life cycle, as well as the App and Scene protocols to find out more and to understand how to create projects with a codebase that can be shared across various platforms.
Xcode Appearance And Tabs
Once you open a project in Xcode 12, you’ll instantly meet a new look and feel made to blend perfectly with the new macOS Big Sur. There are new icons in several places such as navigators, assistants, or the Preferences window, an updated tab bar and lot more small or big changes that add up to user experience, usability and productivity.
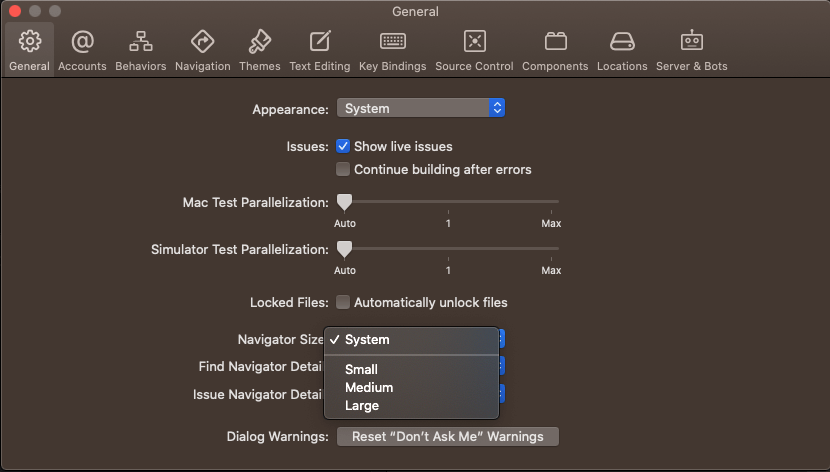
Regarding the navigators especially, displayed font size respects the Sidebar icon size setting made in the General settings in Preferences:
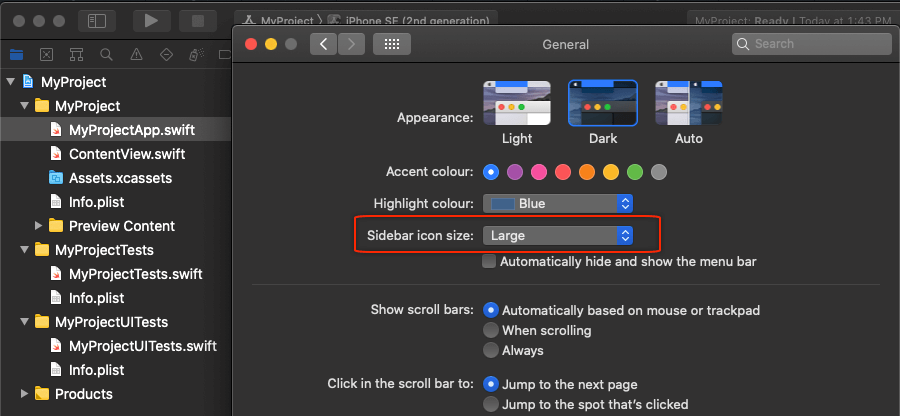
That means that if you choose small, medium, or large size for app sidebars, Xcode navigators will update accordingly. This behaviour can be overridden by selecting a specific font size if you desire so. Open Xcode Preferences, then go to General tab where you’ll find the Navigator Size popup menu. You can change the default System setting to a predefined size from small to large.
Besides the above, another interesting part of Xcode is tabs. Obviously, tabs is not a new thing in Xcode, but now it makes more sense to use them. First off, any file that is double clicked in Project navigator opens in a new tab; source code files, images, plist files, and so on. Tabs have now small width that fit each file’s icon and name and they don’t expand anymore to occupy the Xcode’s window width, and they can be re-arranged as needed.
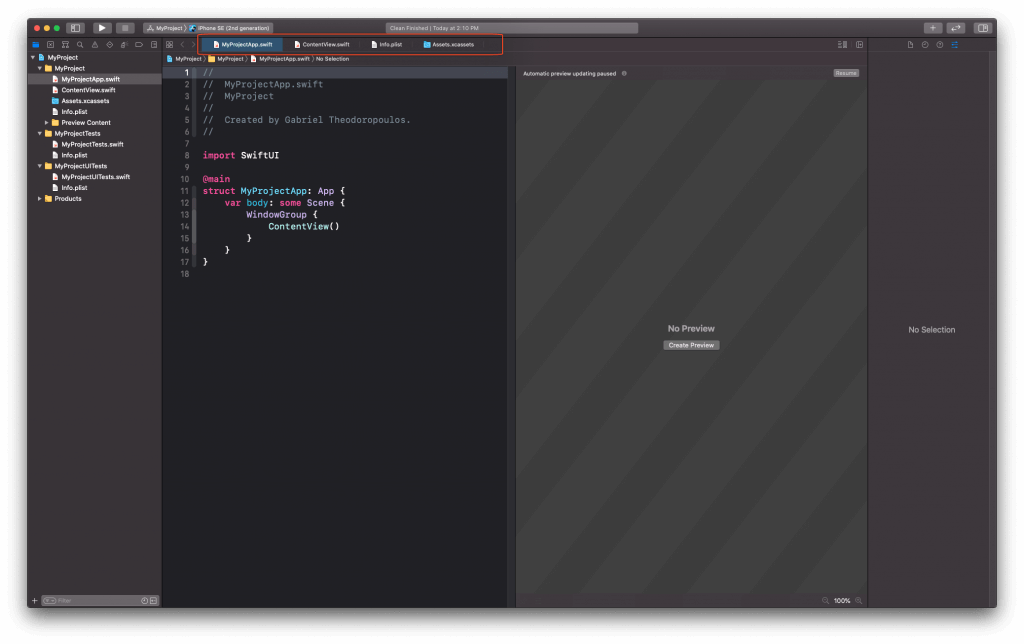
By default, tabs become visible when a second file is opened. However, it’s possible to have them always visible by going to View > Always Show Tab Bar menu.
Code Completion
Xcode 12 brings improvements to code completion too. Advancements obvious at first glance are:
- The new UI that takes up less space and looks more concise and informative.
- Suggested completions include only items related to the typed code, no additional non-matching items.
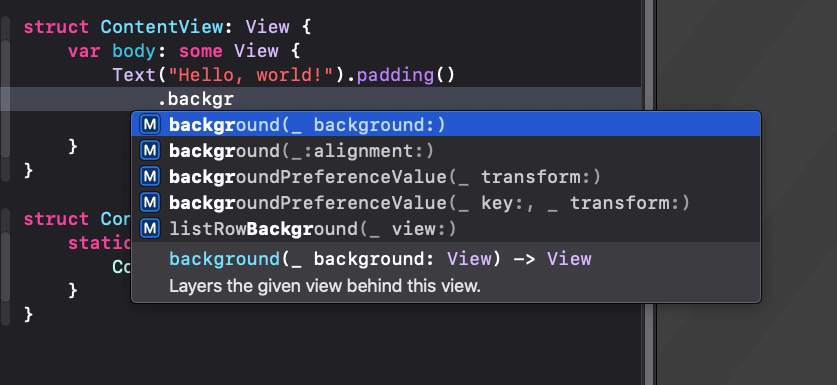
However, what’s not visible from the beginning until someone uses code completion in Xcode 12 is the fact that it has become much faster, and not just that; according to Apple:
Repeated code completion invocations inside Swift function bodies are now up to 12 times faster compared to Xcode 11.5
Well, all that is meant to be seen when we’ll be working with engines at full speed in Xcode 12! But the overall feeling regarding code completion so far is pretty good and the experience quite satisfying.
SwiftUI Previews
SwiftUI Previews consist of a great tool not only for previewing the UI parts of an app in real time without the need to run on a device or a simulator, but also for building great UIs fast. In Xcode 12 previews have got a new look and let’s start with that. Now there is a small bar with buttons above each preview on canvas that provides all functionalities one needs:
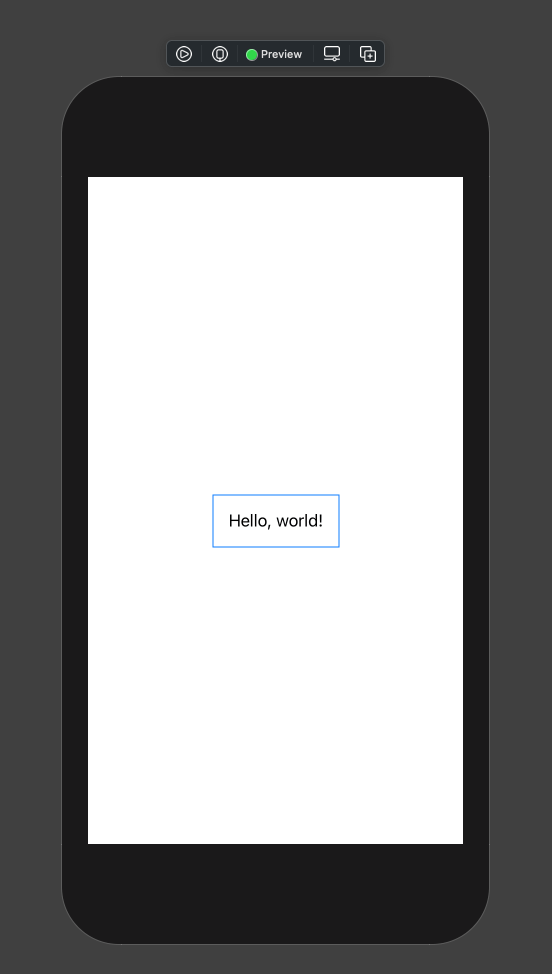
Starting from left to right, here’s what displayed buttons are for:
- The first button runs the live preview of the current SwiftUI view in Xcode. By doing a long click on it, a menu appears that allows to choose whether to run live preview or debug preview.
- Second button on the left can be used to run the preview on a device.
- Third is the Inspect Preview button. Click on it to add or edit modifiers for any selected view. Note that for any new modifier you add, the automatic code completion creates compilable code that can be previewed without being necessary to provide an explicit value; changes will be reflected immediately. In addition, the exact same actions presented with the Inspect Preview button can be found in the Attributes inspector as well.
- Last button can be used to duplicate the preview. Use this functionality if you want to try out variations of the view passing various arguments or see how it looks using a different color scheme.
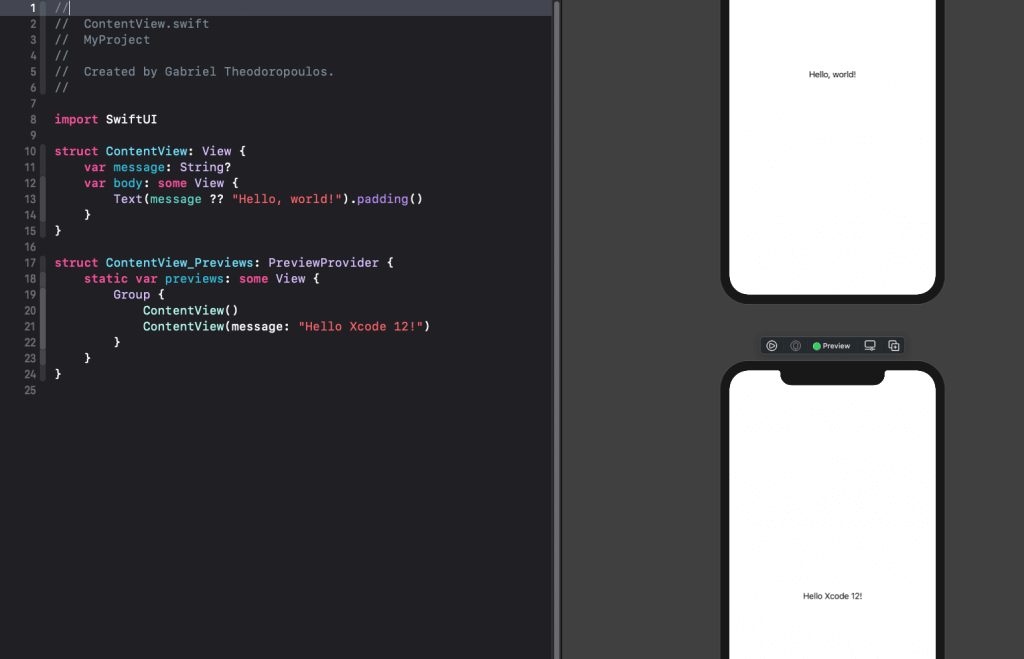
What is great with Previews in Xcode 12 is that they allow to add controls and media straight to them, while the respective code is updated accordingly in real time. But that wouldn’t be enough without being possible to edit modifiers for the added views simply through the Attributes inspector. That way entire views can be constructed without writing even one single line of code. Xcode handles missing code parts or updates them as you configure your UI straight on the canvas. To see all that in action, I strongly recommend to watch the Visually edit SwiftUI views session from WWDC.
On top of the above, Xcode 12 Previews support previewing widgets, as well as App Clips. Also, and always according to Xcode release notes from Apple, the Previews app in iOS 14 and iPadOS 14 can be used to try out SwiftUI previews straight on the device for a greater, more realistic experience.
Adding Custom SwiftUI Views And Modifiers To Xcode Library
Up until Xcode 11.5 it was possible to add custom code snippets to Xcode’s library and have them available for reuse in every new project. Now, Xcode 12 takes this feature one step further and makes it possible to add entire SwiftUI views and modifiers to the library so they can be reused or shared.
Some small amount of work is required in order to add custom views to Xcode’s library, but it consists of a standard series of steps and actions.
First, imagine that we have the following really simple view implementation that presents a text with padding, specific text color and font size:
struct CustomizedText: View {
    var message: String?
    var body: some View {
        Text(message ?? "Your text here").padding()
            .accentColor(.red)
            .font(.title)
    }
}
The following steps can be done in the existing SwiftUI source code files. But for clarity, we’re going to create a new file and keep what you’ll see next separated.
So, using the File > New > File… menu option add a new Swift file to the project (not a SwiftUI file), and name it LibraryContent.swift (you can actually type in any name you want).
Inside that new file, the first step is to import either the SwiftUI or the DeveloperToolsSupport framework:
import DeveloperToolsSupportNext, it’s necessary to implement a new structure that adopts the LibraryContentProvider protocol. In order to add SwiftUI views to Xcode’s library it’s necessary to implement a computed property from LibraryContentProvider called views.
From that property we must return a collection of LibraryItem objects. Each such object must be initialized using an instance of a SwiftUI view we want to add to Xcode’s library.
In its simplest form, here’s how this is done:
struct LibraryContent: LibraryContentProvider {
    @LibraryContentBuilder var views: [LibraryItem] {
        LibraryItem(CustomizedText())
    }
}
Xcode will parse the above and will add the CustomizedText view to its library without being necessary to build the project. To see it in action, go to any SwiftUI view implementation file, and then click on the Plus (+) button on Xcode’s toolbar at the right side to show the library. Scroll down until you find the entry with the Customized Text object:
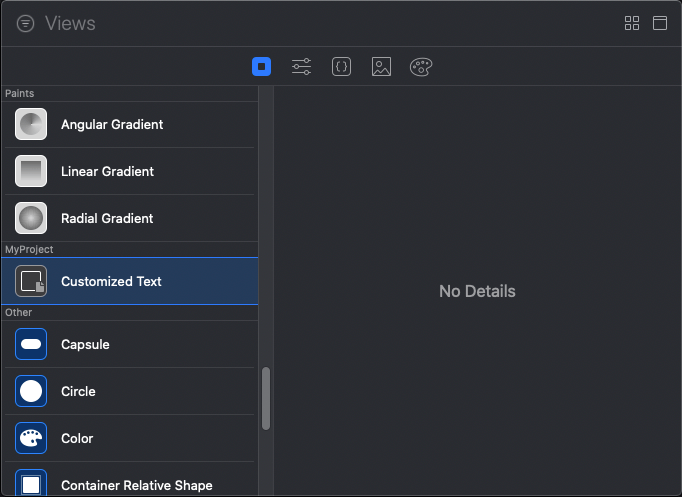
You can simply drag and drop it in the source code like you would do with any other code snippet, and then use it as needed from there on.

Really cool feature, isn’t it? It’s also possible to add parameters to the initialization of the LibraryItem object back in the LibraryContent.swift file. Replace the following:
LibraryItem(CustomizedText())with this:
LibraryItem(CustomizedText(),
    title: "My Customized SwiftUI Text",
    category: .control
)- The first argument above is once again an instance of the
CustomizedTextview initialized inline. titleis the title that will appear in library for this view.categoryis the category that this view belongs to. There are four categories available:control,layout,effectandother. If you’re unsure use.other. This is also the category used by default when none is provided explicitly.
If you open Xcode library now again, you’ll see that the entry for our custom view has been updated accordingly:
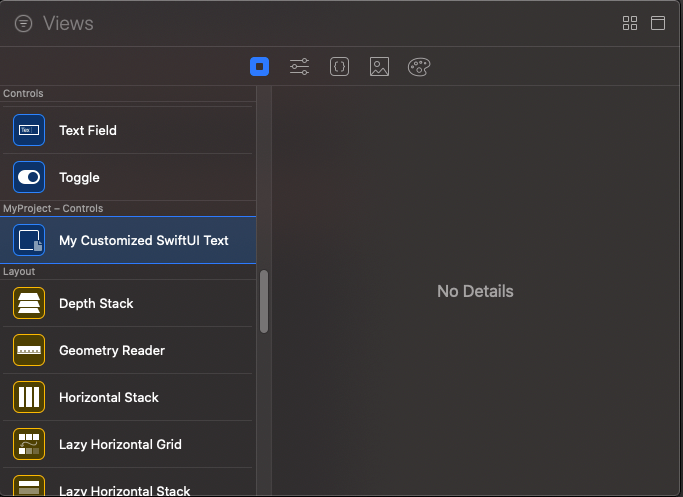
Provided title is used to describe the view, and now it’s categorized as a control.
All the above look great, as it shows the path to create reusable SwiftUI views among projects. However, if you create a new project right now and you open Xcode’s library, you won’t find that custom view in the list of available views! Why?
Just a few lines above you read about the implementation of the LibraryContent struct which conforms to LibraryContentProvider protocol. What Xcode does is to look up for structures like that which adopt LibraryContentProvider in your source code files, and when they’re found, to add custom SwiftUI views (and modifiers) to the library in real time. That’s why custom additions to Xcode’s library are perfectly available within the same project but they don’t exist for new projects.
Then, what’s the point of all these if custom work cannot be reused?
Well, it can be reused, as long as custom SwiftUI views and modifiers are wrapped up in a Swift package, and that package is added as a dependency to any new project. Xcode will find LibraryContentProvider implementations in it (along with the actual source files that implement views and modifiers), and it will add any new items to the library. Also, that’s the approach in order to share SwiftUI views with others!
A quite similar approach must be followed to add modifiers in Xcode’s library. I leave that to you to explore, but make sure to check this out, as well as the few information about the DeveloperToolsSupport framework.
Interface Builder Minimap
For those who work with Interface Builder and storyboards or XIB files (including myself), Xcode 12 has a good surprise to give: A minimap that provides an overview of the canvas. It might doesn’t sound such a big deal, but when there are many views or view controllers laid out on the canvas then navigation starts getting quite annoying. Minimap makes it really easy to navigate by simply dragging around on it, and to have an overview of all UI items existing on interface.
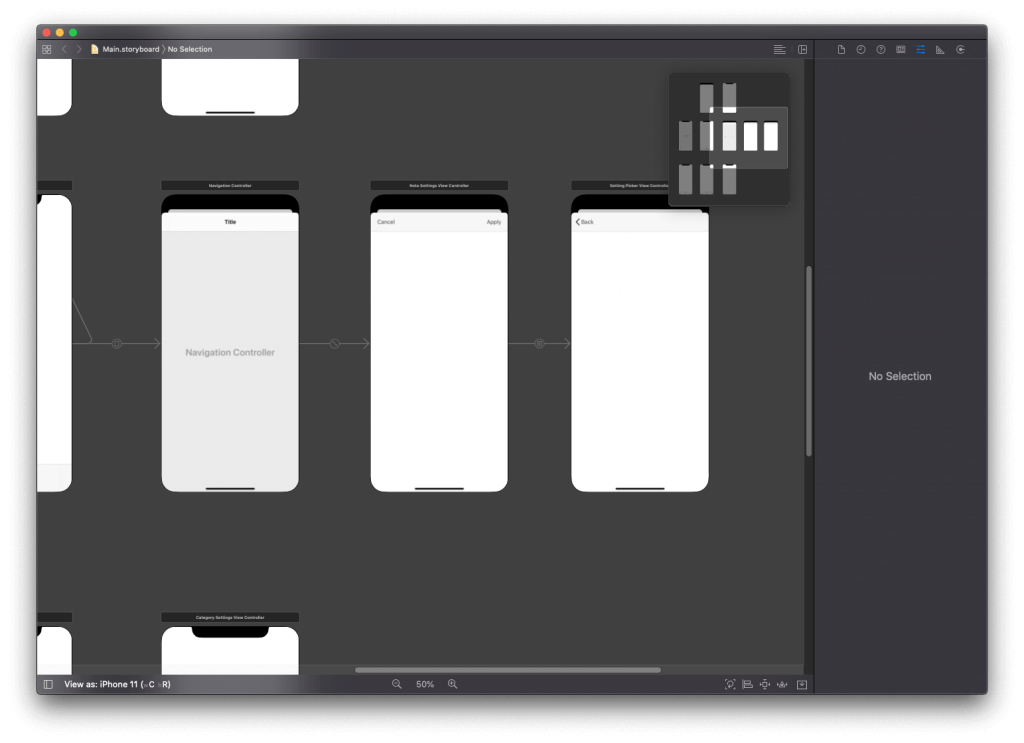
To turn minimap on and off, either go to Editor > Canvas > Minimap menu, or click on the Adjust Editor Options button to show the context menu, where you’ll also find the Minimap option.
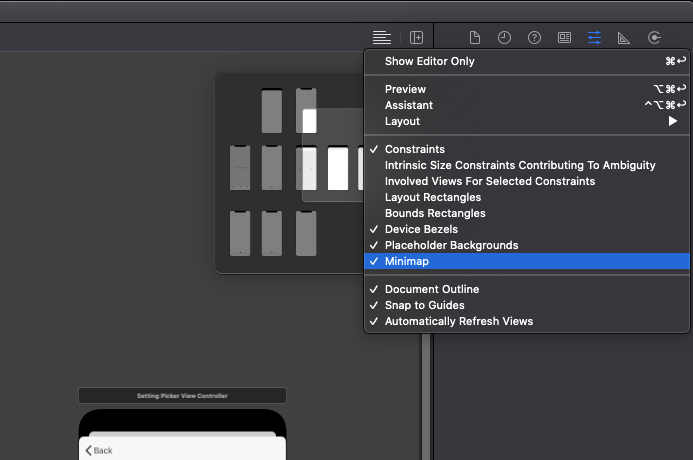
Besides the minimap, Interface Builder brings other new stuff as well, many of which regard macOS. For example, there are several controls updated so they look and feel similarly to controls on iOS and iPadOS (ex., slider and progress bar), safe area layout guides as we know them from iOS are now visible to NSViews as well, but most importantly, it introduces a brand new control, a new window controller with a sidebar object in order to make apps that take the full advantage of the new macOS Big Sur as easy as possible. We might have the chance to talk about all these macOS advancements on a separate post.
Asset Catalogs
A Xcode 12 feature that I’m pretty excited about is that it now supports SVG (Scalable Vector Graphics) image assets! In simple words, one SVG image will work for any possible display size needed!
Up until now if someone wanted to add vector images to Xcode it was mandatory to convert the original SVG images to PDF, and then use the PDF representations in asset catalogs. Or, without vector graphics, image assets should be rasterized and provided at three scales (@1x, @2x, @3x) as PNG files.
Using SVG in Xcode 12 is pretty trivial. Start by adding the SVG file to assets catalog:

Then, use it like you’d use any other image:
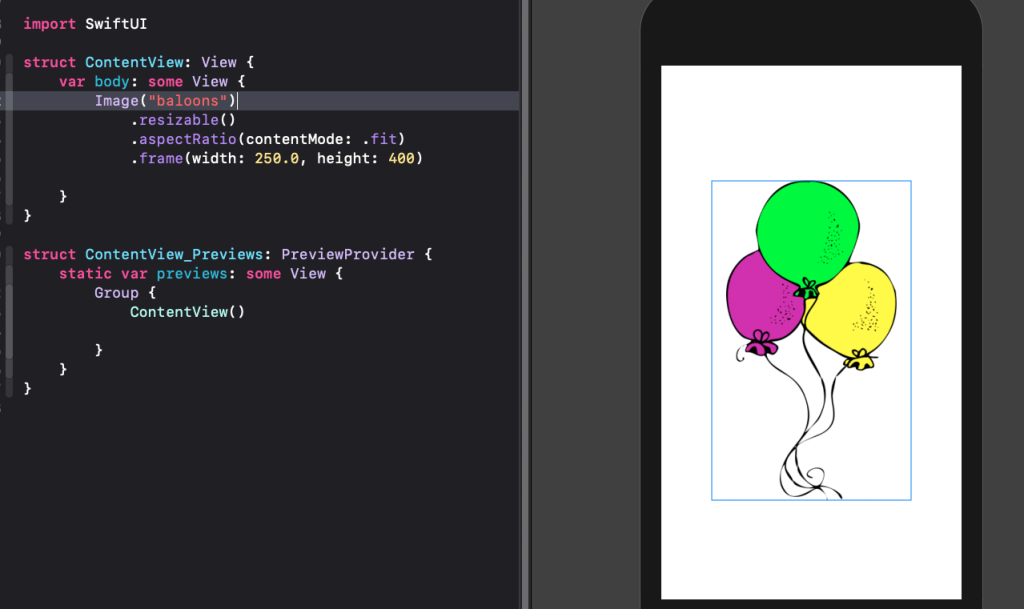
Another improvement regards color sets added to an asset catalog. Now, the dark appearance variation is present by default, as chances are that you’ll need to specify colors for both light and dark modes. You can change that in the Attributes inspector through the Appearances popup menu if you want.
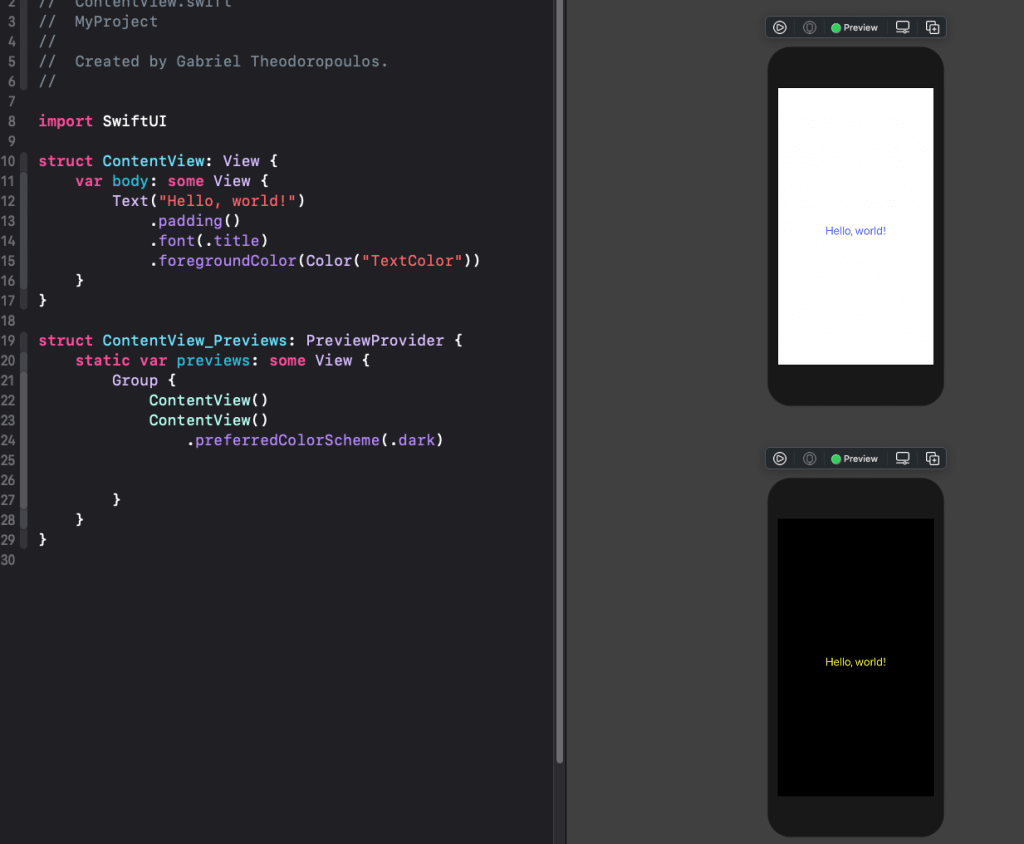
Suppose that the following represents a text color that we’ll use in text controls. For the sake of the example, I specified a blueish color for the light appearance, and a yellowish for the dark mode.

Using them in a text control will pick the right color depending on the specified appearance:
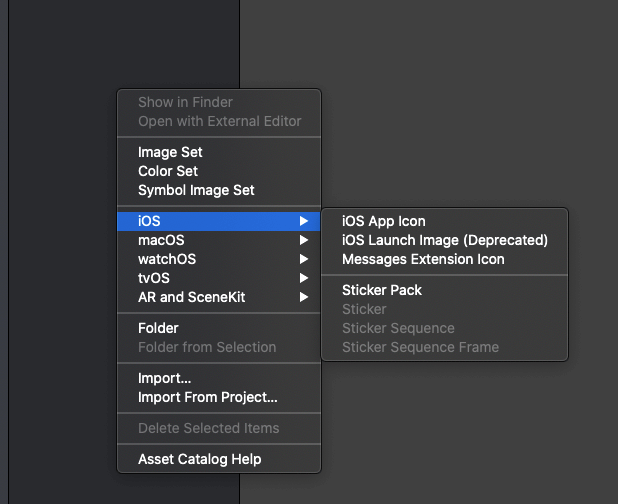
Furthermore, you’ll notice that the context menu allowing to add a new asset in Assets catalog has changed; It’s now more compact, containing submenus with options for each platform in a well organized and easy to find manner.
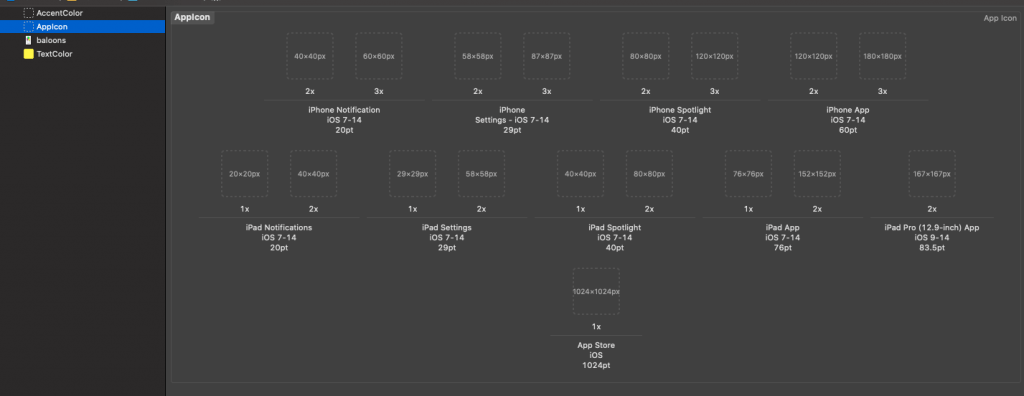
Finally, regarding Asset catalogs, the required pixel size is now shown for all available variations when adding app icons:
Advances In Simulator
iOS Simulator has its own part in the new features and improvements coming with Xcode 12. The first and most obvious addition is that now Simulator can switch to full-screen mode. That’s a whole new experience, especially if you have a large screen to see that in action.
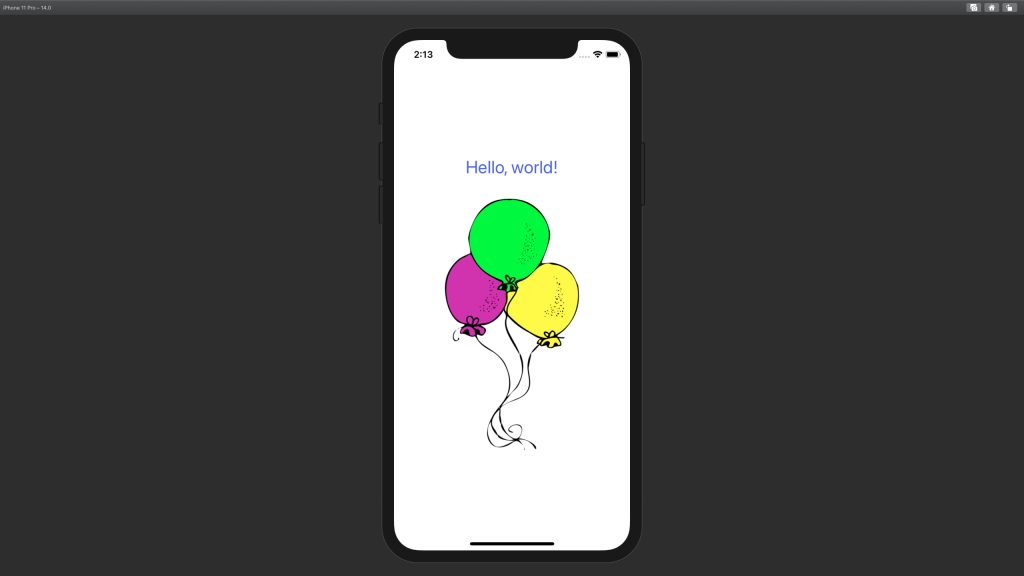
Additionally, Simulator can now remain on top of all other windows even when it doesn’t have the focus anymore, and that’s pretty useful when recording the Simulator screen and you want it to be always on top, or you switch between Simulator and another app but you need it to be visible. To enable or disable that feature go to Window > Stay On Top menu of the Simulator.
Finally, one last thing I consider to be extremely handy is the fact that Simulator supports Nearby Interactions. All it takes is two or more Simulators running simultaneously (and support Nearby Interactions) that you just move around the screen. The closer they are the smaller the reported distance is, and the opposite.

Swift Packages & Resources
As of Xcode 12 any Swift Package created with the Swift tools version 5.3 can contain resources along with the source code. These can be asset catalogs, storyboard files, images, text files, .plist files, and so on.
In the official documentation Apple recommends to create subfolders so resources can distinguish from the source code. Resource files can be dragged from Finder to Project navigator in the Swift Package, to be added using the File > Add files to [package_name] menu, or to be created using the File > New… menu option.
Note that common resource types will be handled automatically by Xcode. For example, Interface Builder files, Core Data files, Asset catalogs and .lproj folders are kind of resources that Xcode will handle without any further configuration. For any other type of resource however it’s necessary to explicitly declare it in the package manifest.
See the above screenshot as an example. Media.xcassets catalog and the MyView.xib file will be handled automatically by Xcode. However there’s a file called notes.txt that must explicitly declared in the manifest file. The declaration must be done in the initializer of the target that the resource belongs to.
.target(
    name: "MyPackage",
    dependencies: [],

    // Declare the resource.
    resources: [
        .process("Resources/notes.txt")
    ]
),
Note that if the file you’re declaring resides in a subfolder, then the subfolder name must prefix the file name as shown above.
In the above sample there’s also another file called temp.txt. Let’s suppose that we want this file to be included in the package, but not to be treated as a resource. In that case we must explicitly exclude it. Once again, that’s an addition we must make in the initializer of the target. Note that excluded items must be declared prior to resources:
.target(
    name: "MyPackage",
    dependencies: [],

    // Exclude resources.
    exclude: ["Resources/temp.txt"],

    resources: [
        .process("Resources/notes.txt")
    ]
),
Besides all the above there are two additional features that I’d like to highlight:
- First, keep in mind that localized content can be contained in Swift packages for any resource added to them.
- Swift packages in Xcode 12 can also contain binary frameworks (XCFrameworks)! That’s a big deal, because it allows to distribute closed-source code with Swift packages, as well as to include frameworks as dependencies! I’ll go no further about that topic here, as most probably we’re going to have a dedicated tutorial just for that here at AppCoda!
Find out more about including resources in Swift Packages in the official documentation from Apple.
Note: Learn how to create Swift Packages in this previous post.
Swift Packages & Playgrounds
Speaking of Swift packages, they can get along pretty well with playgrounds in Xcode 12. Why is that important?
Playgrounds can consist of a great way to append two distinct features to packages:
- They can be used to provide documentation and instructions about package’s APIs and source code as an alternative way to the default description.
- Most importantly, they can contain runnable code that demonstrate the package’s features!
Suppose that we have the MyPackage Swift package which contains implementation of various mathematical calculations; for our example it’s going to be one method only that calculates the average of an array with integer numbers:
public struct MyPackage {

    /// Calculate the average of the given integer numbers.
    public static func calculateAverage(of numbers: [Int]) -> Double? {
        guard numbers.count > 0 else { return nil }
        let sum = numbers.reduce(0, +)
        return Double(sum / numbers.count)
    }

}
Now let’s add a playground to the package that will make use of the above method and it will show some documentation at the same time. In order to add a new playground to the package we have to create it first using the File > New > Playground… menu option in Xcode. If you want to try out what you’re reading here, then follow all steps required to create a new playground and save it somewhere on your disk. Name it Demo.playground. Once Xcode prepares it close it!
Back to the Swift package, you can see in the above screenshot that I’ve created a folder called Playgrounds. Right click on it and select Add files to “Playgrounds”…, or just drag Demo.playground file from Finder to the Project navigator, nested under the Playgrounds folder.
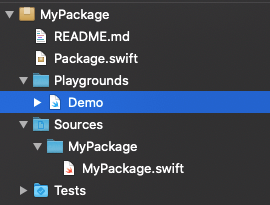
The playground file is now contained in the package.
Any new playground contains some initial code that we don’t need, so by opening the Demo.playground file the first step is to delete it. Then, we can add both documentation and sample code as shown below:
/*:
 ## MyPackage documentation
 */

/*:
 **Step 1:** Import `MyPackage`.
 */

import MyPackage

/*:
 **Step 2:** Create an array with integer numbers.
 */
let numbers = [5, 8, 12, 19, 24, 33, 51, 65, 80, 94]

/*:
 **Step 3:**
 Use the `calculateAverage(of:)` static method from `MyPackage` to calculate the average of any given array of integer numbers.
 */

let average = MyPackage.calculateAverage(of: numbers)
Demo code above is really simple: Initially we import the MyPackage module, then we declare an array of integer numbers, and finally we make use of the calculateAverage(of:) static method implemented in MyPackage to calculate the average of those numbers.
In addition, we have some code blocks that use markup formatting as a guide on how to use our API. However it doesn’t look so beautiful, does it?
To change that, show the Inspectors and make sure to show the File inspector. In the Playground Settings section click to enable the Render Documentation checkbox. A much eye-friendly and readable documentation will be rendered in place of the above!
The cherry on the cake is that we can run the playground code and see the calculated result:
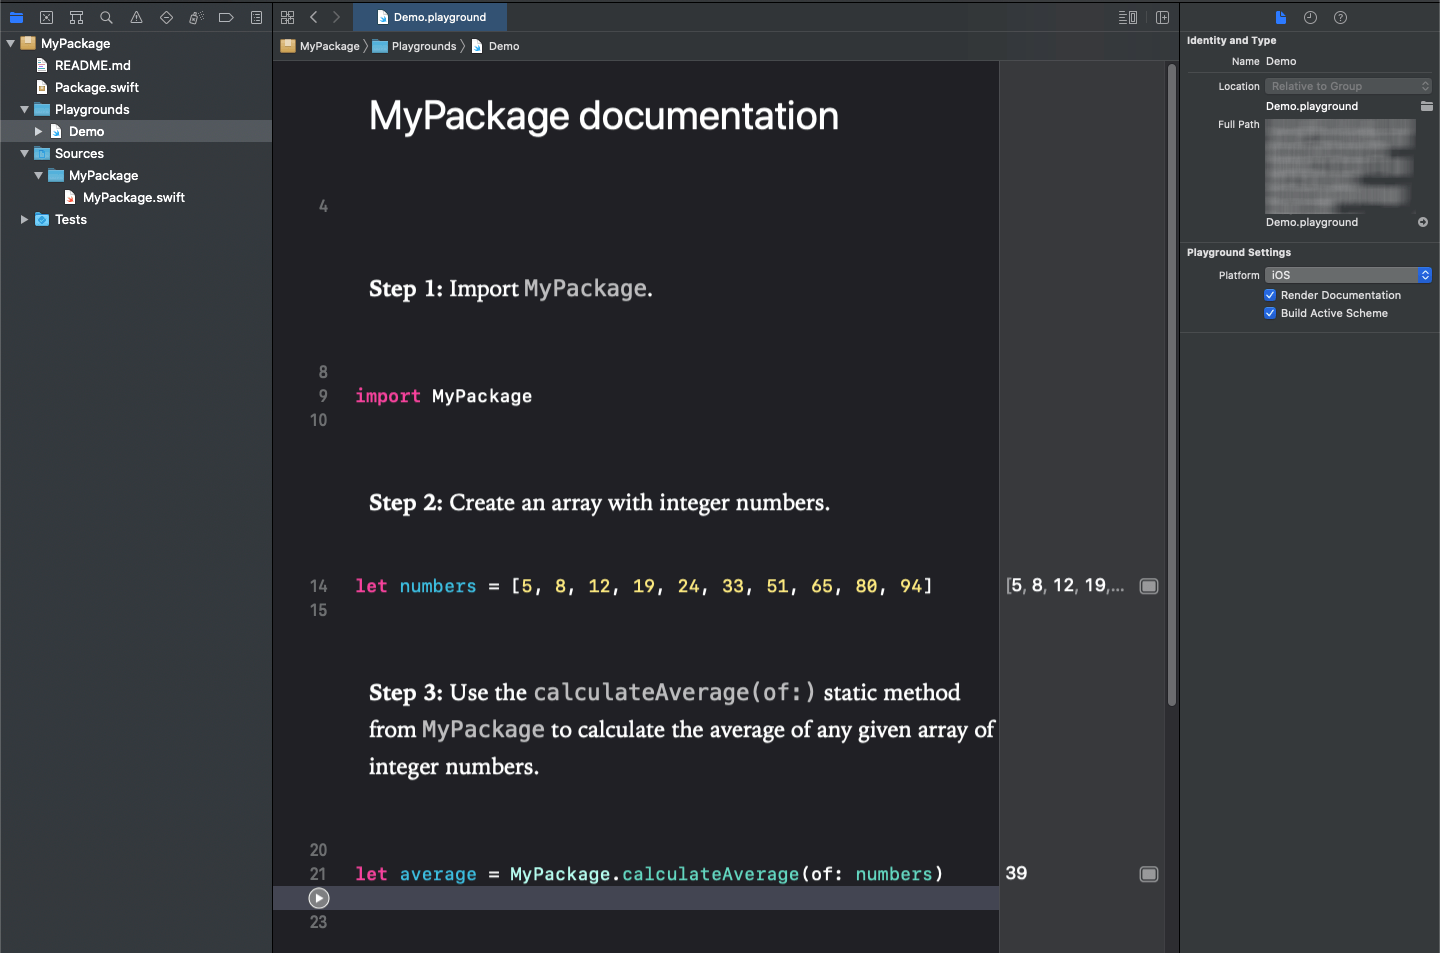
The example presented above is simplified, but it aims on showing how easy it is to add playgrounds to Swift packages in Xcode 12, and how to provide documentation along with executable demonstrating code.
Watch this WWDC 2020 video to find out more about all that and even more!
More Features
Xcode 12 features presented in the previous parts of this post consist of just a part of all new available features and advancements. The list is long, but here I chose to focus on features that would interest the majority of the developers. Improvements exist in other areas too, such as in testing, debugging, Create ML, Instruments and more, for which I prompt you to read the Xcode 12 release notes. Changes also exist in the Organizer and Devices & Simulators windows. Organizer now provides various reports and metrics for apps grouped properly in the sidebar of the window. And of course, there are other great features like the local in-app purchase testing that I intentionally haven’t mentioned anything about as we’re going to talk about it in another post.
With that said, time to move on and change our focus point; let’s see some Swift 5.3 highlights as it comes bundled in Xcode 12.
New Features in Swift 5.3
It feels like yesterday when Swift 1.0 was released back in 2014. And here we are now, six years later, talking about Swift 5.3 that brings new great improvements aiming to make development in Swift even more easy, safe and clean. In the following parts we’re going to focus on some major features presented in version 5.3, so let’s get started.
Multi-Pattern Catch Clauses
Up until Swift 5.2, multiple error handling in do-catch statements required to use a switch statement or if-else conditions in a single catch clause in order to handle various error cases separately, or multiple catch clauses where each one would handle a single error case. Starting from Swift 5.3 it’s made possible to handle multiple error cases in one catch block as a comma-separated list.
Let’s see an example. Consider the following do-catch statement, where inside the do block we’re performing an insert operation to an SQLite database using a custom-made API:
do {
    try insert(into: "table", values: [...])
} catch { ... }
Let’s suppose that there’s a custom error type called DBError, and that there are various error cases that can be returned in the scenario where the above operation fails for some reason. Let’s use multiple catch blocks to deal with certain error cases separately:
do {
    try insert(into: "table", values: [...])
}
catch DBError.tableNotExist(let tableName) {
    print("\(tableName) table does not exist")
}
catch DBError.missingAllValues, DBError.missingSomeValues {
    print("There are missing values")
}
catch DBError.databaseNotOpen {
    print("Database is not open")
}
catch {
    print("Something went wrong and record could not be inserted to database")
}
The new thing here is the second catch clause. We handle two different error cases in one catch block, the DBError.missingAllValues and DBError.missingSomeValues errors which are separated with a comma. There’s no more need to break them in two different catch blocks, and that makes it great for grouping together error cases that have similar treatment.
self Not Required In @escaping Closures
Up until now it was mandatory to include self keyword in closures when referred the current instance in them in order to avoid reference cycles. However in closures marked with the @escaping attribute and when something like that is unlikely to happen, Swift 5.3 allows to avoid writing self repeatedly, as long as we explicitly include it in the closure’s capture list.
To make that clear, think of the following example; it’s a method that is supposed to fetch an image from a remote URL. Upon finishing it passes to completion either the fetched image data, or nil if no image was fetched for some reason:
func fetchImage(from url: URL, completion: @escaping (_ image: Data?) -> Void) {
    // Logic implementation that fetches the image from the given URL.

    // At the end call the completion handler passing
    // a hypothetical imageData object that either contains
    // the fetched image data or it's nil.
    completion(imageData)
}
With what we know so far, here’s what we’d do in order to refer to self properties and methods after using the above:
fetchImage(from: Some_URL { (data) in
    guard let imageData = data else { return }

    self.didFetchImage = true

    self.updateUI(with: imageData)
}
This isn’t mandatory any longer; we’re explicitly including self in the closure’s capture list and we’re not using it in the closure’s body:
fetchImage(from: Some_URL { [self] (data) in
    guard let imageData = data else { return }

    didFetchImage = true

    updateUI(with: imageData)
}
Synthesized Conformance To Comparable Protocol For Enums
Consider the following enum that contains performance cases, and the order of cases has a semantic meaning:
enum Performance {
    case bad
    case average
    case good
    case excellent
}
Suppose that we wanted to compare cases from the above enum somehow like this:
let expectedPerformance = Performance.good
let userPerformance = Performance.average

if userPerformance < expectedPerformance {
    print("Not so good. Please try again.")
}
In order for that to be possible, we’d need to do the following before Swift 5.3:
- To conform to
Comparableprotocol. - To implement a
<or>required function that would perform the actual comparison. - To give
Performancea raw type ofIntso we can compare integer raw values.
Here it is:
enum Performance: Int, Comparable {
    case bad
    case average
    case good
    case excellent

    static func < (lhs: Performance, rhs: Performance) -> Bool {
        return lhs.rawValue < rhs.rawValue
    }
}
With Swift 5.3 all that is not necessary. Swift will synthesize conformance to Comparable automatically:
enum Performance: Comparable {
    case bad
    case average
    case good
    case excellent
}


let expectedPerformance = Performance.good
let userPerformance = Performance.average

if userPerformance < expectedPerformance {
    print("Not so good. Please try again.")
}
Synthesized conformance to Comparable protocol also works with enums with associated values, as long as the value type conforms to Comparable too. Here’s an example:
enum Age: Comparable {
    case kid(age: Int)
    case young
    case middleAged
    case oldAged
}


let ages = [Age.young, Age.kid(age: 12), Age.oldAged, Age.kid(age: 5)]
let sortedAges = ages.sorted()
print(sortedAges)

// Prints:
// Age.kid(age: 5), Age.kid(age: 12), Age.young, Age.oldAged]
Enum Cases As Protocol Witnesses
Consider the following protocol (from Swift ChangeLog):
protocol P {
  static var foo: Self { get }
  static func bar(value: Int) -> Self
}
It has a get-only, static property (foo) of type Self, and a static function with an argument returning Self. Before Swift 5.3, if an enum conformed to such a protocol, it was necessary to implement required properties and functions like so:
enum E: P {
    case _foo
    case _bar(value: Int)

    static var foo: Self {
        return ._foo
    }

    static func bar(value: Int) -> Self {
        return ._bar(value)
    }
}
See that enum‘s cases which are identical to protocol’s property and function respectively had to be renamed (ex., _foo instead of foo), and implementing protocol’s requirements was mandatory. That additional code that feels like it could have been avoided in the first place adds unnecessary noise to the enum.
This restriction has been eliminated in Swift 5.3, so:
- A static get-only property of type
Selfcan be witnessed by an enum case with no associated values. - A static function with arguments and returning
Selfcan be witnessed by an enum case with associated values.
In other words, the following will simply work in Swift 5.3:
enum E: P {
  case foo // matches 'static var foo'
  case bar(value: Int) // matches 'static func bar(value:)'
}
Multiple Trailing Closures
Multiple trailing closures is a sort of syntactic sugar that results to cleaner and more readable code. What is it all about?
Let’s bring in our memory the UIKit framework for a moment, and the UIView animations in particular. We know that a simple animation can be written like this:
UIView.animate(withDuration: 0.4, animations: {
    // perform animation...
}, completion: { (_) in
    // do something upon completion...
})
Or, even simpler, like this:
UIView.animate(withDuration: 0.4, animations: {
    // perform animation...
}) { (_) in
    // do something upon completion...
}
In the second snippet closing parenthesis is written right after the animations closure, and the completion label is omitted. However, with Swift 5.3 the above can be written even simpler like that:
UIView.animate(withDuration: 0.4) {
    // perform animation...
} completion: { (_) in
    // do something upon completion...
}
Notice that parenthesis is now closing right before the first closure, and that animations label does not exist. However, in that case completion label is needed. Definitely more readable!
The same can be applied to SwiftUI controls, with the best example being the Button. Here’s how a button with an action closure and a label closure had to be written:
Button(action: {
    // do something...
}, label: {
    Text("Click Me!")
})
Now, action label can be omitted and we can go one even one step further; since there’s not any parameter value we can skip adding parentheses at all!
Button {
    // do something...
} label: {
    Text("Click Me!")
}
Float16 Type
The Float16 type, a half-precision floating point value type, is introduced in Swift 5.3. According to Apple, this type is especially useful in graphics and ML applications.
let floatNumber: Float16 = 5.4Refined didSet Semantics
Before Swift 5.3, didSet observer was calling the getter of the property that it was implemented to in order to get the old value (oldValue) behind the scenes, regardless of whether it was needed or not. Depending on how many times didSet was executed, this could have had an impact on performance.
In Swift 5.3, a property’s getter is no longer called when didSet observer is implemented, unless oldValue is explicitly referred. See the following as an example taken straight from SE-0268:
class Foo {
  var bar = 0 {
    didSet { print("didSet called") }
  }

  var baz = 0 {
    didSet { print(oldValue) }
  }
}

let foo = Foo()
// This will not call the getter to fetch the oldValue
foo.bar = 1
// This will call the getter to fetch the oldValue
foo.baz = 2
In the baz property the oldValue is referred in the print statement, therefore its getter will be called from didSet. This won’t happen though in the bar property; didSet does not make any call to oldValue, so getter won’t be called.
willSet and didSet Observers In lazy Properties
Property observers willSet and didSet are now supported in lazy properties too. For example:
class C {
  lazy var property: Int = 0 {
    willSet { print("willSet called!") } // Okay
    didSet { print("didSet called!") } // Okay
  }
}
(from Swift ChangeLog)
That new addition will be appreciated by developers who use those observers often.
Conclusion
The most important aspects of Xcode 12 and Swift 5.3 have now been showcased, so just go ahead to try them out. Even though various topics were presented, there are still more to explore. Introduced additions and changes, especially in Xcode, are too many to fit in one post, therefore I recommend once again to read what’s new in both Xcode and Swift in the official websites. Dedicated tutorials for some specific subjects roughly mentioned here will come soon here at AppCoda, so stay tuned and don’t miss out some really cool and interesting topics! Cheers!


