

Every iOS programmer has to debug their apps once in a while. Unless you’re some kind of crazy coding ninja, you know that desperate feeling when you have is to look for a bug in your code for hours and hours until you realize you made a simple syntax error. Or even worse, never finding the bugs. No matter if you are new to programming or have developed multiple apps, routinely writing unit tests will make your code more reliable, safer, and easier to debug!
Luckily for you, Xcode 7 and Swift support Unit Testing. Although Unit Testing doesn’t mean bug free apps, it’s still a very powerful way to verify that every piece or unit of code does its job and facilitate the process of debugging.
As the name implies, in Unit Testing you create small and specific functionality tests for a certain unit of code and make sure that every unit passes the tests. If it passes the test, a green logo will appear next to it. If, for any reason, it was not successful, Xcode will mark a test as ‘failed’. This is a sign for you to look into your code and search for the reason for failure.
A Brief Look at the Demo Project
First, download this starting project I created for you. It’s a simple app that will do a percentage calculation of a given number and a percentage. (For example: 10% of 80 is 8).
This PercentageCalculator project is rather simple. The only essential file for you to look at is ViewController.swift. The code is documented in comments and very straightforward.
It has 5 IBOutlets: one for every UIElement on screen, except for the title, and 2 IBActions for each of the two sliders. The name for each IBAction accurately explains what the method and action performs. When one of the two slider value changes, the value of either the percentage or number is changed.
Furthermore, it has two simple functions “updateLabels()” and “percentage()” that do exactly what you would expect them to do: the first one updates the labels when a slider is changed, the second one takes two floats and returns the percentage calculation.
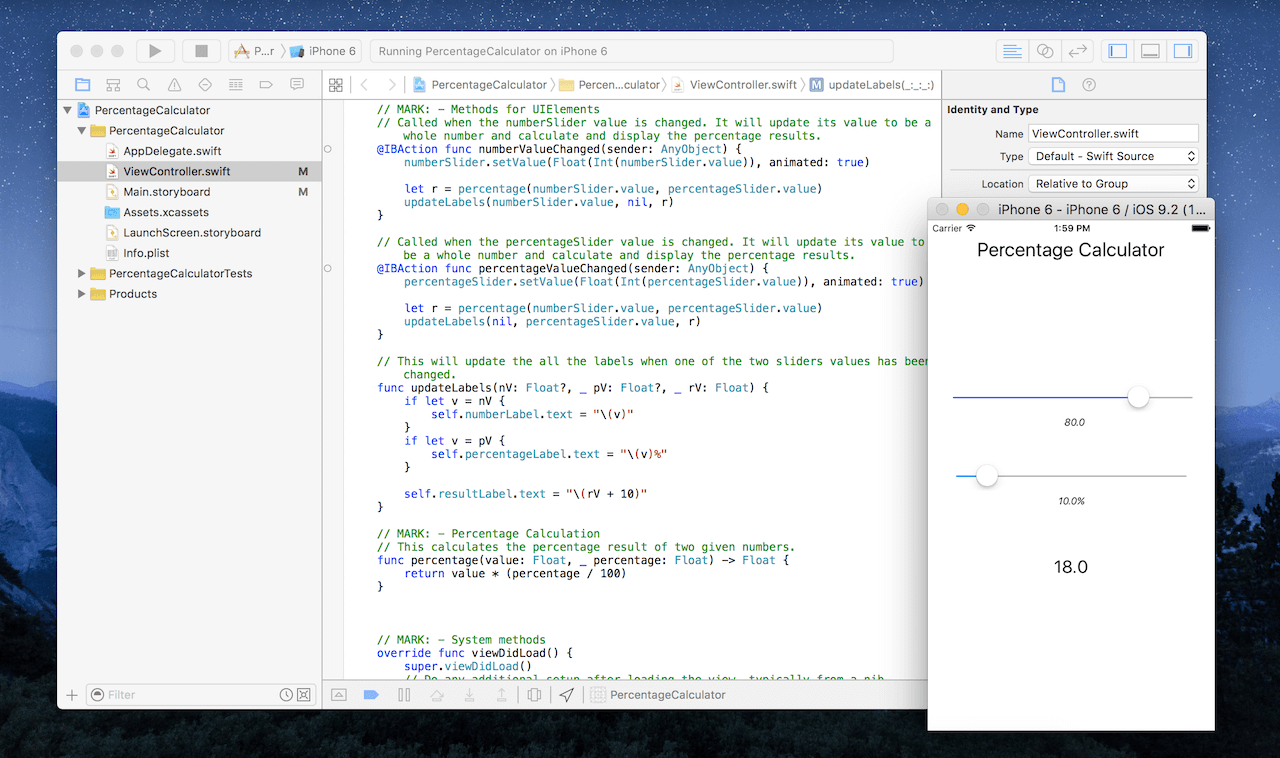
Run the app in your simulator. At first, everything looks normal. But as soon as you start changing the numbers, you will notice that the result value is wrong. To find the bug, we can divide our code in units and test them separately to see if they do what is expected. This will not solve the bug, but narrow down where you have to search it.
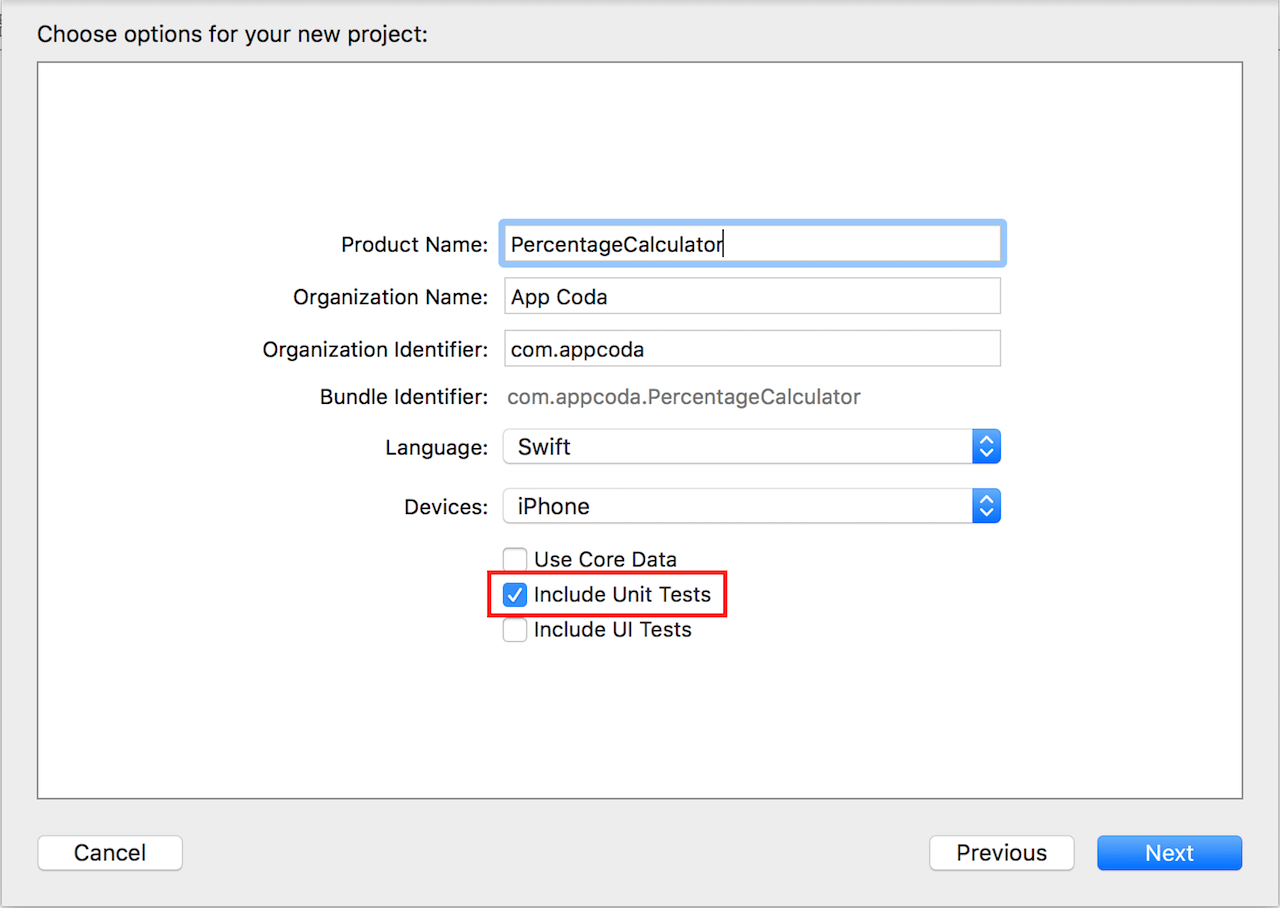
When I created the project, I selected the option to include a test file by default. (If you want to add one manually, select File > New > File > Unit Test Case Class under iOS Source). In this case, the file was already created by Xcode and can be found in the “PercentageCalculatorTests” folder in the project navigator.
In PercentageCalculatorTests.swift there are 4 methods created for us in the PercentageCalculatorTests class. Two of them are example test methods that you can delete (you can recognise test methods because they start with the test keyword and have a diamond icon next to them in the gutter, & end with “…Example”). The other two, setUp() and tearDown() are special boilerplate methods in that they are called respectively before and after every test method is executed.
Let’s Begin to Write Unit Test
Now, it’s time to write your first unit test method! For this tutorial, we are only testing the ViewController class, we will need to add an instance of it to the PercentageCalculatorTests class.
class PercentageCalculatorTests: XCTestCase {
    var vc: ViewController!

    override func setUp() {
        super.setUp()
        // Put setup code here. This method is called before the invocation of each test method in the class.
    }

    override func tearDown() {
        // Put teardown code here. This method is called after the invocation of each test method in the class.
        super.tearDown()
    }

}
The PercentageCalculatorTests class is a subclass of XCTestCase. It comes packed with the XCTest framework. Each instance of a XCTestCase subclass is in charge of testing a specific part of your project, such as a particular feature.
Instantiate vc in the setup method. This way you will get a “fresh” instance of ViewController for every test method, since setUp() is called before every test method. Update the setUp() method like this:
override func setUp() {
    super.setUp()

    let storyboard = UIStoryboard(name: "Main", bundle: NSBundle.mainBundle())
    vc = storyboard.instantiateInitialViewController() as! ViewController
}
Now, remember that all test method names must start with the keyword test. Otherwise, Xcode won’t recognise it. Add a new test method testPercentageCalculator() that will verify whether the percentage() method from ViewController works or not.
func testPercentageCalculator() {
}
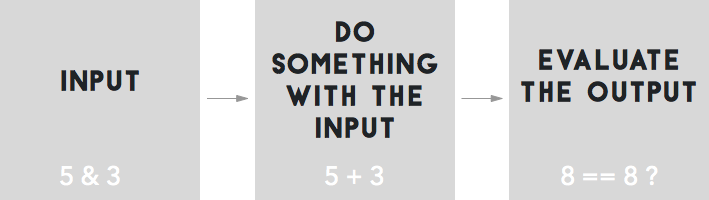
In Unit Testing you check if a certain chunk of code does its job. The chunks of code being tested are usually just a few lines and typically, you are only testing a single method or function. Unit testing is done by providing the unit of code an input value, allowing that value to run through the code, and then checking to see if the output value is what we expect it to be.
The comparison ‘to what we expect it to be’ part is handled by XCTAssert functions. The simplest XCTAssert function is the XCTAssert(expression: BooleanType). This one takes in a boolean expression (This can be something like 5 > 3, 8.90 == 8.90 or true) and makes the test pass if the expression is evaluated to be true or fail if evaluated to be false.
Try it out! First, add the following line to the testPercentageCalculator() method. Then, move the pointer of your mouse over the diamond icon to the left of the method name in the gutter. As you hover, it transforms into an execute icon that you should click to start the test.
func testPercentageCalculator() {
        XCTAssert(true)
}
If everything goes well, the test passes and a green checkmark appears next to the method.

Verifying the Percentage Calculation
Now proceed to the real stuff: testing the percentage() method! Call the method with the vc property, which is an instance of ViewController. Give it two floats, 50 and 50 for example, and store the result in a constant p. In this case, p should be equal to 25 (50% of 50 is 25). Check if this is the case with XCTAssert(p == 25) and execute the test method. Replace the testPercentageCalculator() method with the code below:
func testPercentageCalculator() {
        // Should be 25
        let p = vc.percentage(50, 50)
        XCTAssert(p == 25)
}
The test succeeds, which means that the percentage() function of ViewController does its job and we have to look somewhere else for the bug. Perhaps in the updateLabels() method?
Verifying the Labels
Now, add a new test method called testLabelValuesShowedProperly() to verify if the labels display the right text. Again, call a method from ViewController — updateLabels() this time — and check if the the property text of every label corresponds to the text we expect it to display.
Notice that you give the XCTAssert functions a new parameter: a message of type string. This is handy because we have multiple values to check (three XCTAssert calls) for the test to complete. If a test is unsuccessful, this message will tell us what exactly went wrong.
func testLabelValuesShowedProperly() {
        vc.updateLabels(Float(80.0), Float(50.0), Float(40.0))

        // The labels should now display 80, 50 and 40
        XCTAssert(vc.numberLabel.text == "80.0", "numberLabel doesn't show the right text")
        XCTAssert(vc.percentageLabel.text == "50.0%", "percentageLabel doesn't show the right text")
        XCTAssert(vc.resultLabel.text == "40.0", "resultLabel doesn't show the right text")
}
When you try to execute this method, you will get an error complaining that numberLabel, percentageLabel and resultsLabel are nil. How is this possible?
The thing is that I created these labels in my storyboard file and thus they are instantiated once the view is loaded, but since for Unit Tests the loadView() method is never triggered, the labels are not created and thus they are nil. A possible solution for this problem is to call vc.loadView(), but Apple doesn’t recommend doing this in its documentation as it may cause memory leaks when objects that have already been loaded are loaded again.
Instead, you should access the view property of vc, which will in its turn trigger all the required methods, and not simply the loadView() method. Update the code in testLabelValuesShowedProperly().
func testLabelValuesShowedProperly() {
        let _ = vc.view
        vc.updateLabels(Float(80.0), Float(50.0), Float(40.0))

        // The labels should now display 80, 50 and 40
        XCTAssert(vc.numberLabel.text == "80.0", "numberLabel doesn't show the right text")
        XCTAssert(vc.percentageLabel.text == "50.0%", "percentageLabel doesn't show the right text")
        XCTAssert(vc.resultLabel.text == "40.0", "resultLabel doesn't show the right text")
}
Notice the use of the underscore ( _ ) to silence the constant name. This is because we don’t actually need the view and will never use it. It basically tells the compiler “Just pretend to access the view and trigger the methods.”
Execute the test. (If you want to execute all the test in our test class, you can also click the square next to “class PercentageCalculatorTests”)

Let’s Fix the Bugs
As you see the test fails! The detailed error messages we entered in this method help us quickly identify the potential cause of the bug. The test is telling us that the resultsLabel are not displaying the right text. So, lets go into the ViewController and see where these label’s text values are being set. After a deeper look into the code of updateLabels() in ViewController.swift we can see what causes the bug:
self.resultLabel.text = "\(rV + 10)"
should be:
self.resultLabel.text = "\(rV)"
Update your code and try to test again. Everything should work now!
Summary
In this tutorial, you learned about Unit Testing in Xcode and how it can help you to find bugs in your code. Besides bug prevention, Unit Testing can also be used for Performance Testing and Asynchronous Testing. Another thing that might interest you is UI Testing, where you test how your app performs in real life situations by recording actions on your app. If this sounds interesting, you should definitely check out this WWDC video on UI Testing.
For the final project, you can download it from GitHub.
If you have any questions about Unit Testing or have troubles with the tutorial, be sure to ping me in the comments!


