

Editor’s note: Last year, Apple opened up Siri for developers by introducing a new framework called SiriKit. Developers can adopt SiriKit to enable their apps to interact with Siri. In this tutorial, Jayven will walk you through the SiriKit and how you can build an app that communicates with Siri. At the time of this writing, SiriKit is limited to certain kinds of apps. In less than 7 hours, Apple will kick off this year’s WWDC. We really hope that Apple will make some significant changes to Siri and let all applications integrate with SiriKit.
Now enter the SiriKit tutorial.
What if your users can access your app through Siri?
“Hey Siri, pay the pizza with the Pizza App.”
“Hey Siri, send a message to the pizza guy saying order ten more with the Pizza App.”
“Hey Siri, let’s start a workout with the unPizza app. Thank you.”
Thank you, Siri.
Now in this tutorial, we are going to create a workout app. When creating a Siri app, the very first thing you would like to find out is if your app category is supported by SiriKit. The current version of SiriKit is not open for all types of apps, but only a subset of the app domain. At the time of this writing, SiriKit supports the following app domains:
- VoIP calling
- Messaging
- Payments
- Photos
- Workouts
- Ride booking
- Car commands
- CarPlay (automotive vendors only)
- Restaurant reservations (requires additional support from Apple)
Pizza Reverse: The Official Workout App for Pizza Lovers
Okay, like I mentioned, we are going to create this pizza fat destruction app. The app is going to be simple with no function. I just want to focus on the Siri part that how you can use SiriKit to interpret the intent and launch the workout app. To give you some ideas about how this tutorial is laid out, here is what we are going to do:
- Creating a new application in Xcode
- Building a SiriKit Extension
- Configuring the app’s intents
- Implementing the demo app
Alright let’s do this!
I was originally going to name my app unPizza, but it’s kind of hard to say it. Just try and say it 10 times in a row as fast as you can. Yeah I know.
So instead, I am going to name the app Pizza Reverse.
Creating a new application in Xcode
Go ahead and open up Xcode. In the Xcode menu, select File > New > Project… Choose Single View Application, and press next. You can name your project whatever you want. I named my project Pizza Reverse.
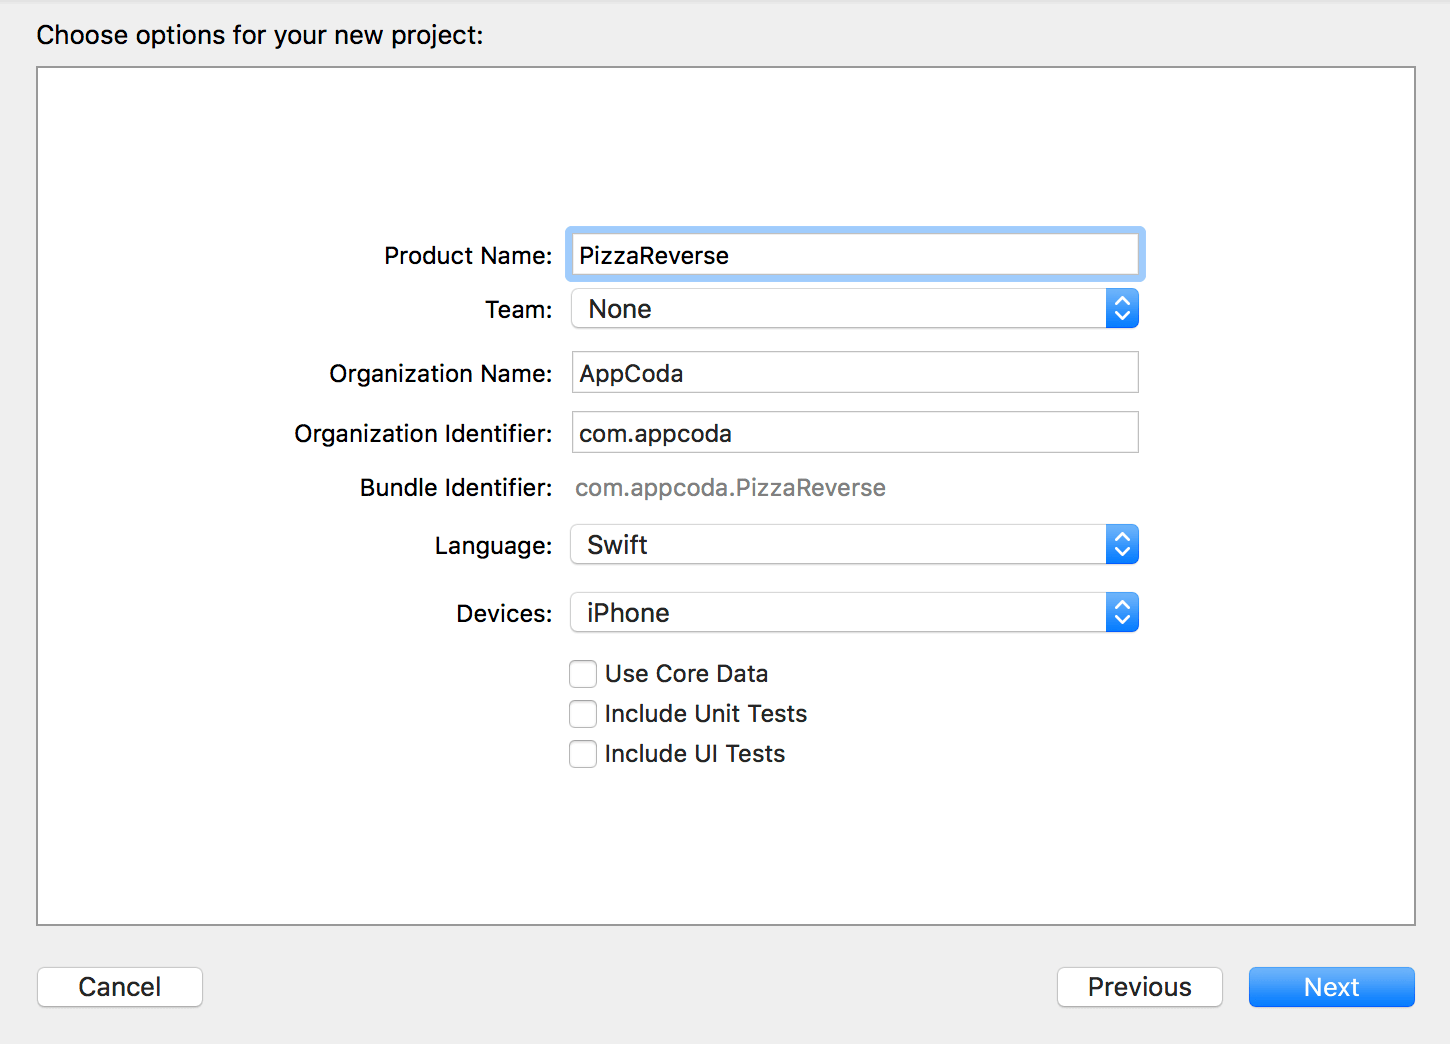
After you named your project, press next. Choose a place to save your project and press on create.
Enable SiriKit Capability
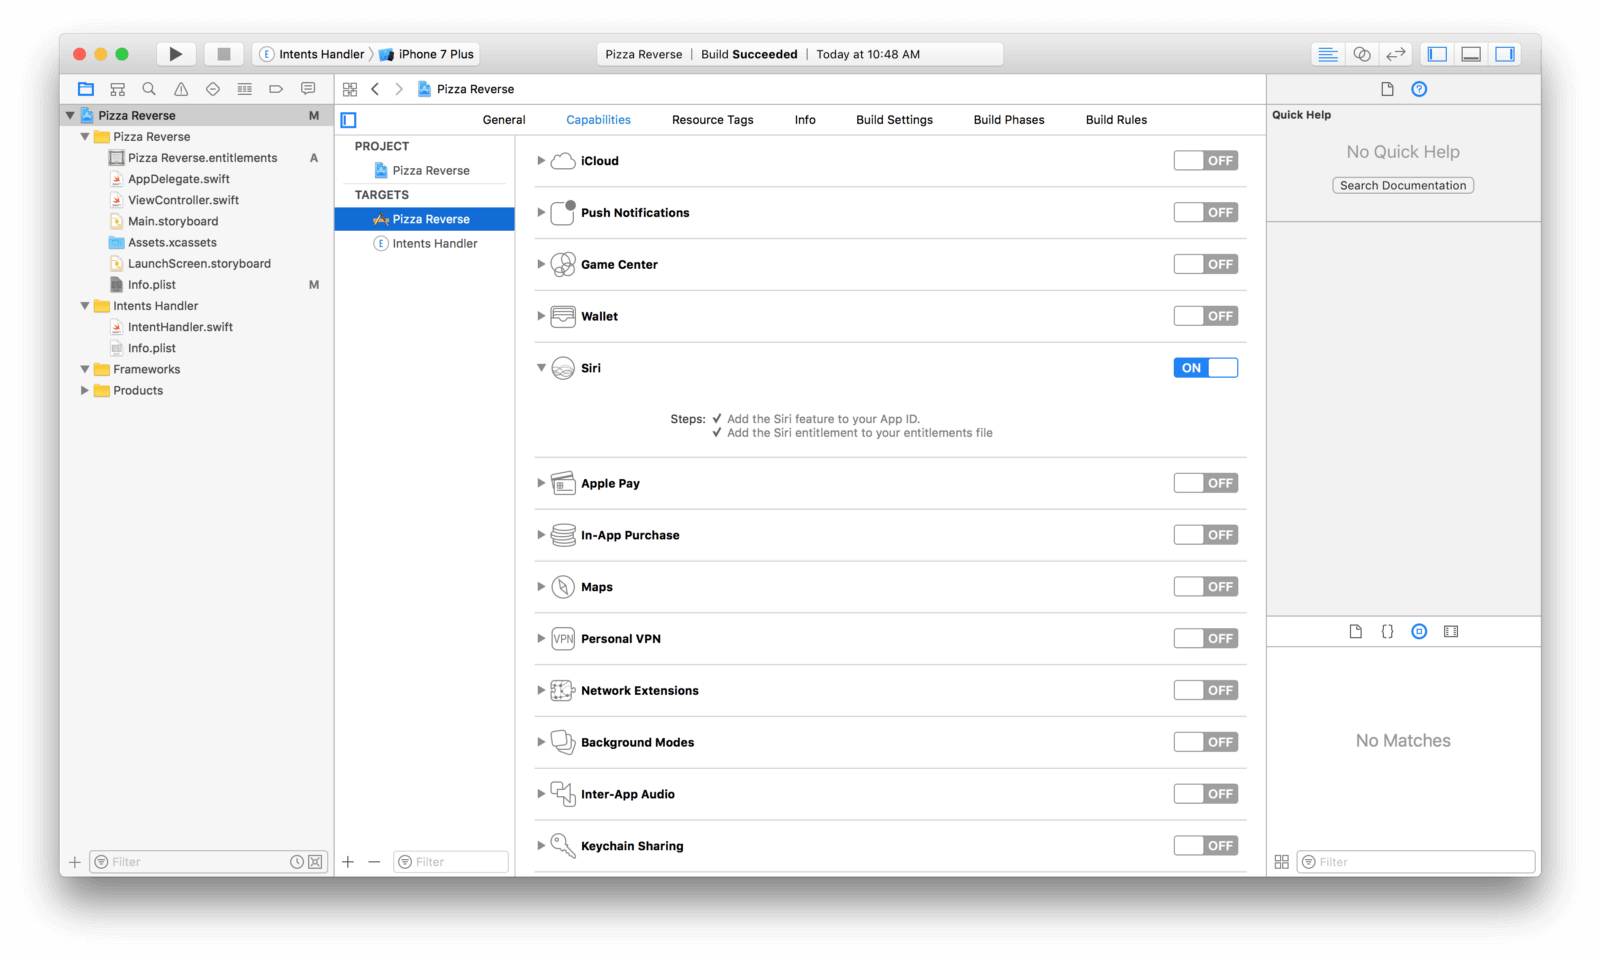
Now go to the project settings. Under the Targets section, click on your app name. In this case, Pizza Reverse.
Click on Capabilities, and turn Siri on.
I will test the demo app on a real device. And, as always, it is required to have an Apple Developer account to run on an actual device.
But in case if you want to use the simulator for testing, please do the followings:
- Open up your simulator
- Open up Settings
- Click on Siri
- Then turn on Siri
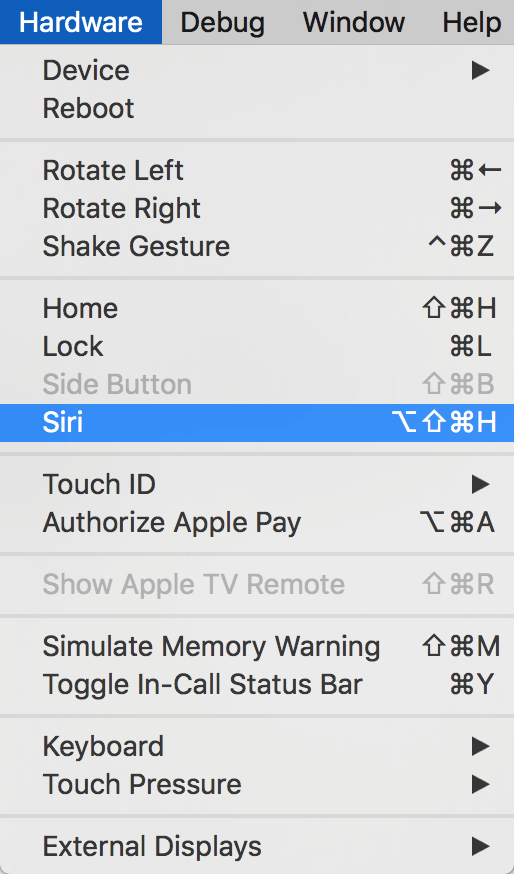
To activate Siri in the simulator, you can click on Hardware on your navigation bar. A drop down will appear, then press on Siri. Or you can also use the short cut (command + alt + shift + H). You can then speak to the simulator for Siri testing.
Privacy — Siri Usage Description
Similar to camera or photo library access, you have to ask for users’ authorization. This also applies to Siri. Therefore, in our info.plist file, we need to add a new property “Privacy — Siri Usage Description.” For the value, please specify the reason why we need to use Siri in our app. For me, I put “Control workout with voice.”

Request Siri Authorization
Okay, now let’s begin to write some code. First, select the ViewController.swift file, and add the import statement to import the Intents framework.
import Intents
In the viewDidLoad() method, we can request for Siri authorization by inserting the following code snippet:
INPreferences.requestSiriAuthorization { (status) in

}
Great!
Expand the Siri Vocabularies
Siri on its own understands what “run” is, and a certain vocabularies. However, in case of this demo app, Siri doesn’t not understand what “push up”, “sit up” or “pull up” is. These are essential workouts to burn off the fatty pizza fats. So what we need to do is to teach Siri the vocabularies it doesn’t know by using the INVocabulary class.
The following code is the code you need and should be placed right after Siri authorization:
INVocabulary.shared().setVocabularyStrings(["push up", "sit up", "pull up"], of: .workoutActivityName)
The ViewController.swift file now looks like this:
import UIKit
import Intents

class ViewController: UIViewController {

    override func viewDidLoad() {
        super.viewDidLoad()

        INPreferences.requestSiriAuthorization { (status) in

        }

        INVocabulary.shared().setVocabularyStrings(["push up", "sit up", "pull up"], of: .workoutActivityName)
    }

    override func didReceiveMemoryWarning() {
        super.didReceiveMemoryWarning()
        // Dispose of any resources that can be recreated.
    }
}
SiriKit Extension
You enable your app to support Siri by building a SiriKit extension. Now go up to the Xcode menu and select File > New > Target…
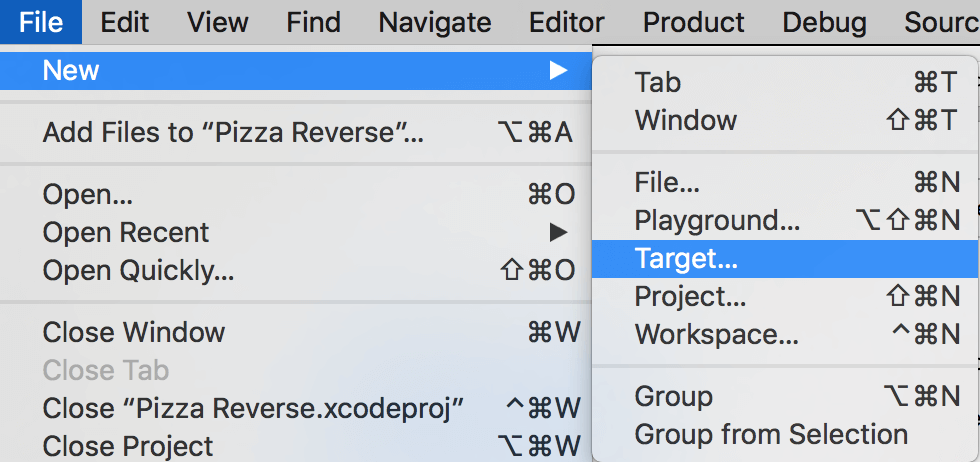
Choose Intents Extension. Then press next.

Cool. Now give your New Target a Product Name, I named mine Intents Handler. Make sure to uncheck Include UI Extension.
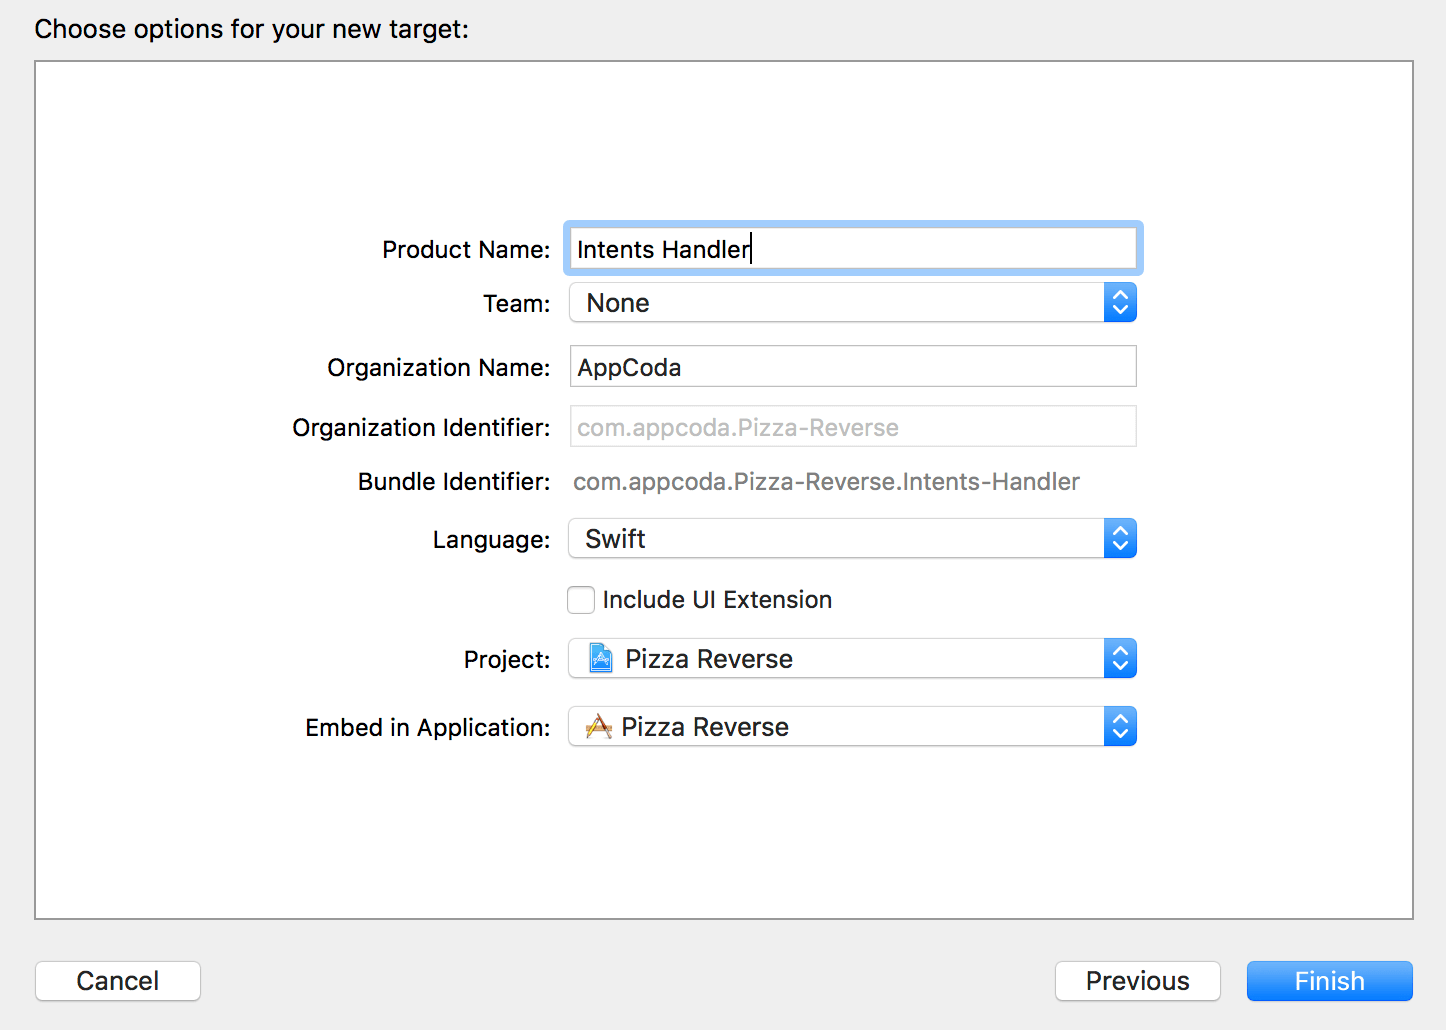
The Intents UI Extension displays details such as a map or a custom UIView which we design to show our users as response. But that’s another topic for another day. We are going to focus solely on Intents Extension today. That’s why I want to leave it untick.
Once you have given your Intents Extension target a product name, press finish.
Great.
Now let’s continue to get things rolling, press on the Info.plist file under the Intents Handler group. Then expand NSExtension, followed by NSExtensionAttributes. Next, further expand IntentsRestrictedWhileLocked and IntentsSupported. You will have something like this:
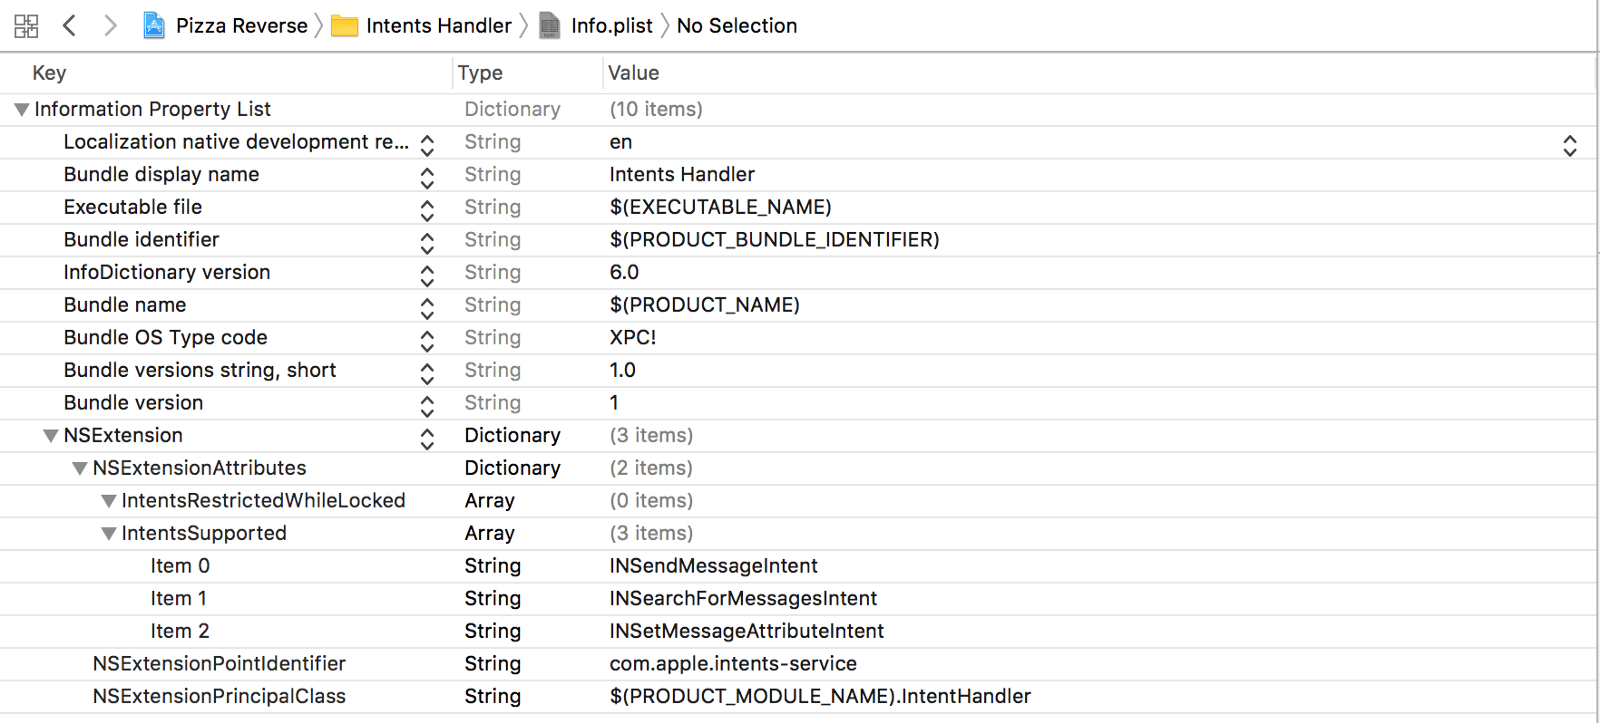
Let me explain what these two options stand for.
- IntentsRestrictedWhileLocked – IntentsRestrictedWhileLocked is just what it describes. What do we want to restrict our users from doing when the phone is locked. For example, we can disallow our users from pausing the workout when the screen is locked. But we won’t do that. That’s why we leave the value blank.
“Hey Siri, can you pause the workout.” — User
“Nahh. Finish the workout you lazy bum.” — Siri
“Ok Siri. You are the best.” — User
- IntentsSupported – IntentsSupported is what voice command our app is capable to handle through Siri. You can check out the full list of possible Intents for each Domains here. By default, this option is set to support the intents designed for messaging app including
INSendMessageIntent,INSearchForMessagesIntent, andINSetMessageAttributeIntent.
Our demo app is unrelated to messaging. So, go ahead and delete all three. You can choose a particular row and press delete or you can press on the minus button to the right of the particular key.
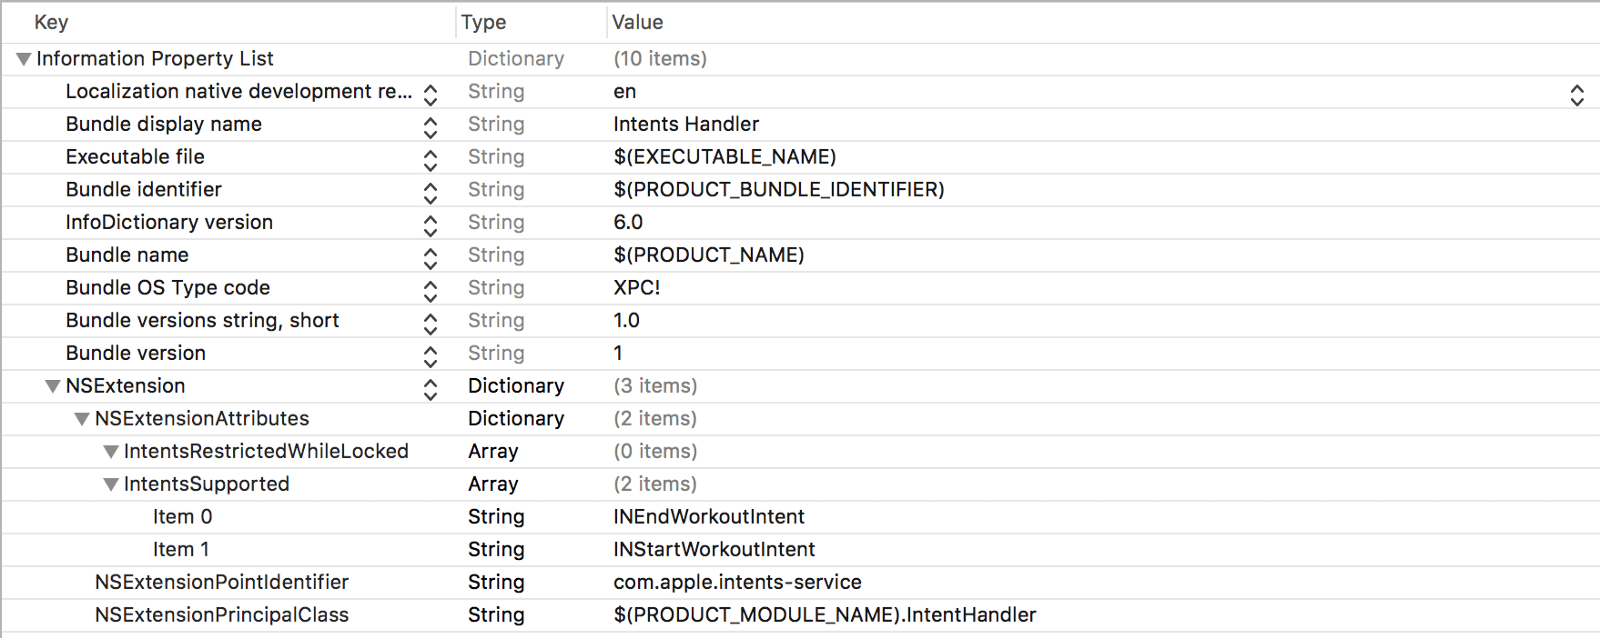
Now your Info.plist should look something like this:
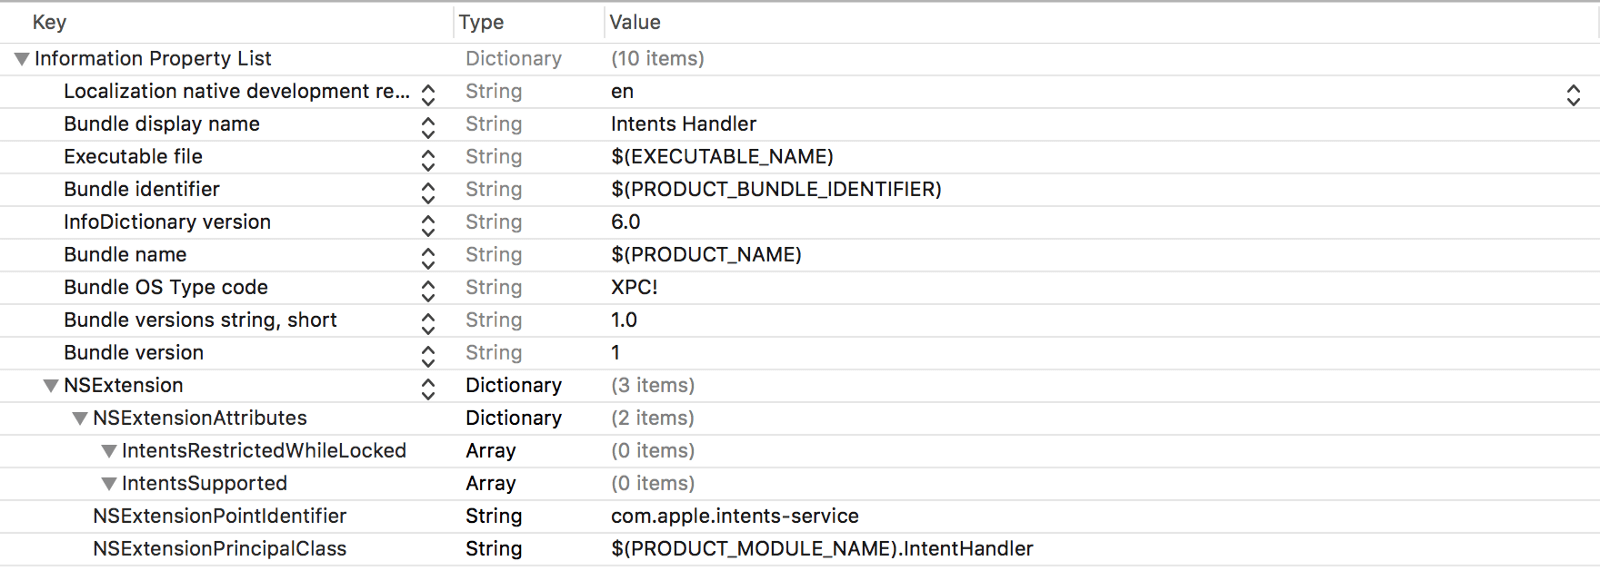
Our app is designed for workout, intensive pizza fat burning ultimate 9000 calories burned/minute app. Okay, let’s add two intents related to workout:
- INStartWorkoutIntent – to start a workout
- INEndWorkoutIntent – to end the workout
Press the add button next to the IntentsSupported key, and add the above intents. Once done, your Info.plist should look something like this:
Now if we look at the Project Navigator, under the Intents Handler folder we have a Swift file called IntentHandler.swift. Choose that file, which is the file that we need to put our code.
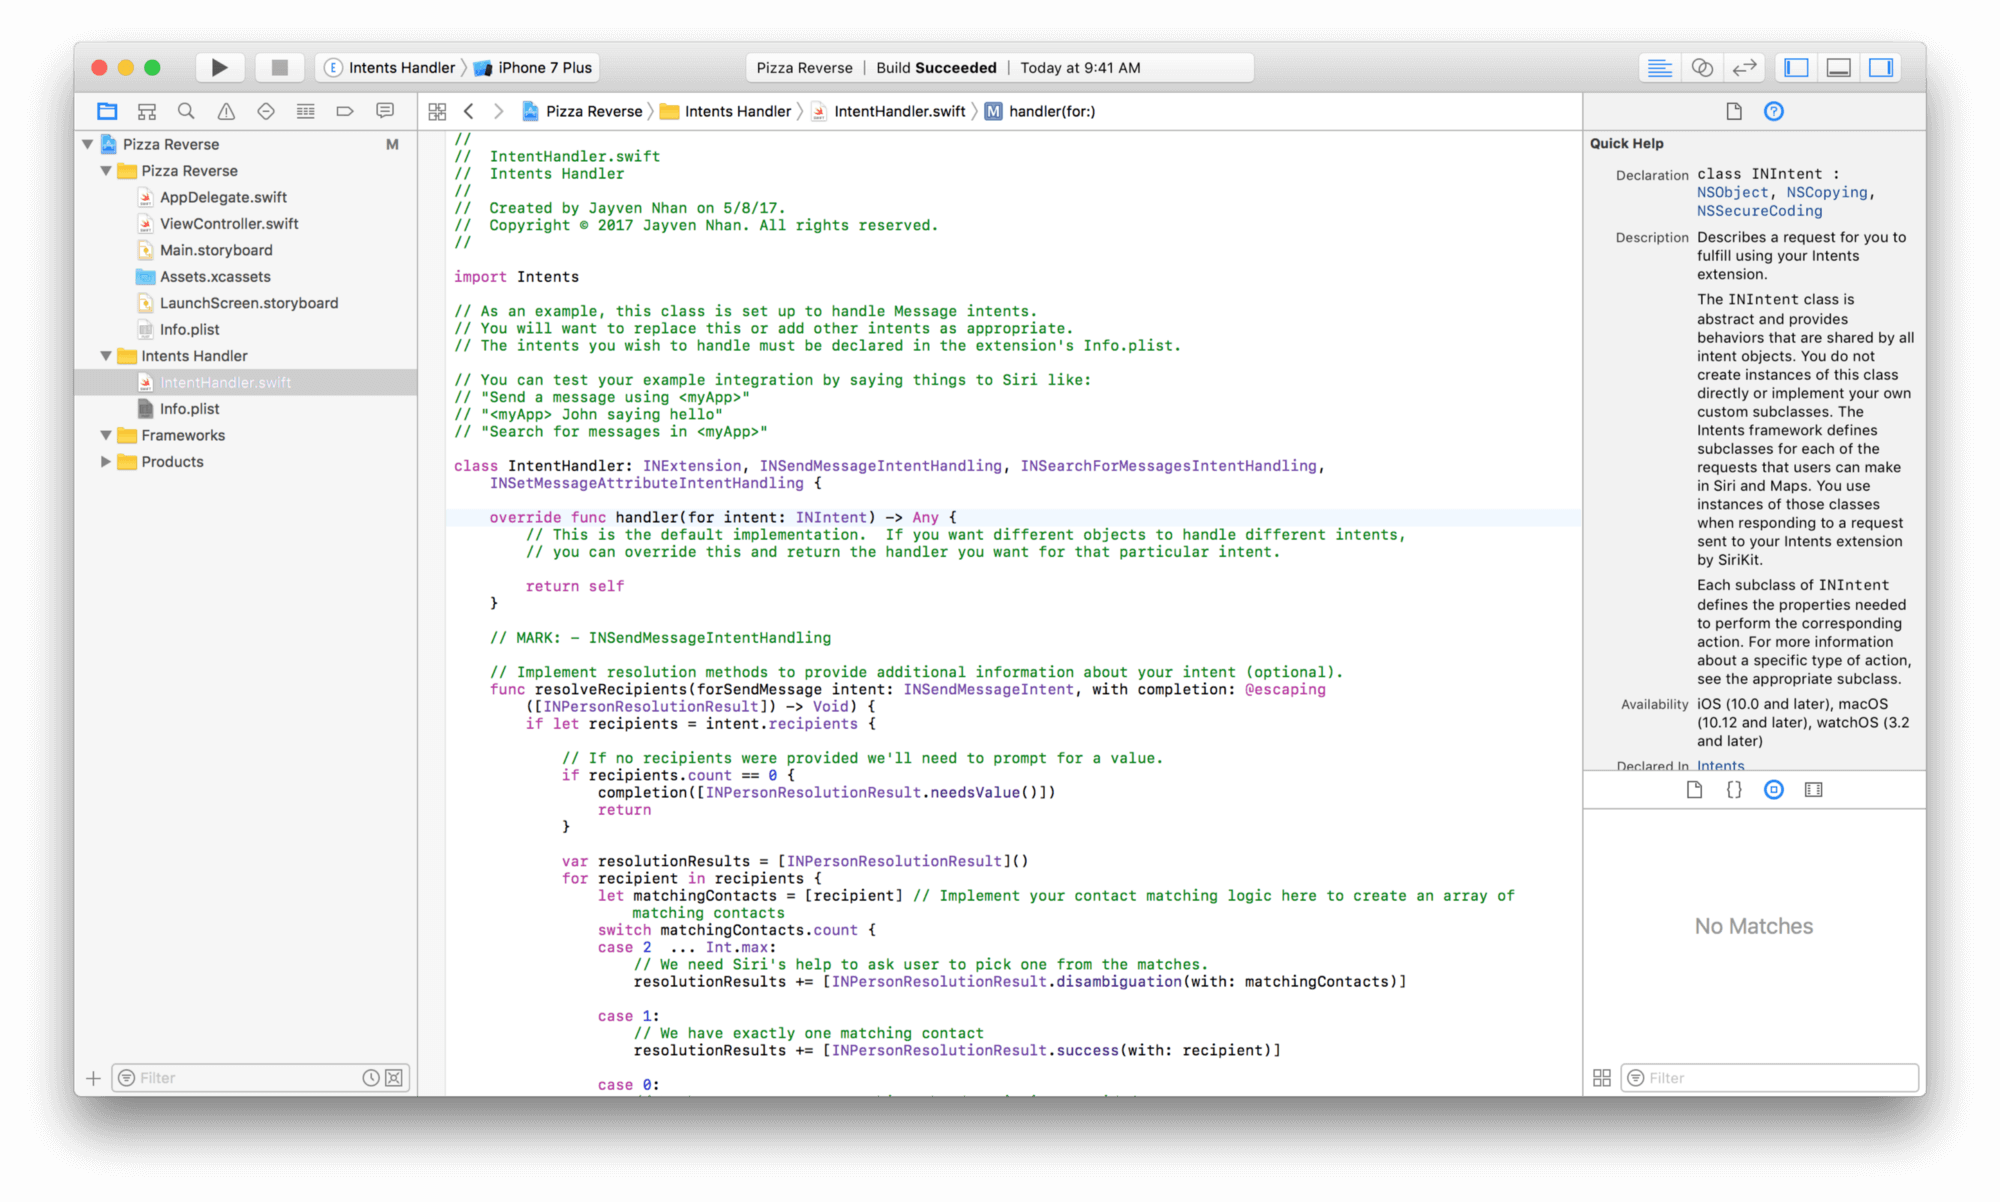
First, we are going to delete all the protocols adopted by the hander except for INExtension. Change the code from:
class IntentHandler: INExtension, INSendMessageIntentHandling, INSearchForMessagesIntentHandling, INSetMessageAttributeIntentHandling {
to:
class IntentHandler: INExtension {
Then delete everything inside the class. We will start from scratch.
The IntentHandler.swift file generated by Xcode is an example of handling intents for a messaging app. There is quite a lot of work that can go into creating a SiriKit extension. It depends on how far you want to extend your app with Siri and how you handle the intents for your app. I prefer to remove those unrelated code, and start from scratch.
Okay. Once you deleted everything inside the IntentHandler class, your IntentHandler.swift file should look something like this:
import Intents

class IntentHandler: INExtension {

}
Just a quick note that I also deleted the file generated comment between import Intents and the IntentHandler class.
Now we are going to adopt the following protocols in the IntentHandler class:
- INStartWorkoutIntentHandling
- INEndWorkoutIntentHandling
class IntentHandler: INExtension, INStartWorkoutIntentHandling, INEndWorkoutIntentHandling {

    func handle(startWorkout intent: INStartWorkoutIntent, completion: @escaping (INStartWorkoutIntentResponse) -> Void) {

    }

    func handle(endWorkout intent: INEndWorkoutIntent, completion: @escaping (INEndWorkoutIntentResponse) -> Void) {

    }

}
To conform to the protocols, you will need to implement the required methods. The two functions we added above are to handle a startWorkout intent and an endWorkout intent. This means when Siri recognizes that the user is trying to begin or end an workout, these functions will handle the user’s intention whichever one it may be.
We will only handle begin workout in this tutorial to keep things concise. The end workout handler is there to make sure that we are aware of how to handle intents and that there are more than one intent. Also the way we handle them is first by adding a protocol to our intent handler class. Then we conform to our protocol(s).
Great!
Implementing the Start Workout Intent
Now this is what we are going to have inside of our start workout handle function. I will explain line by line what’s going on.
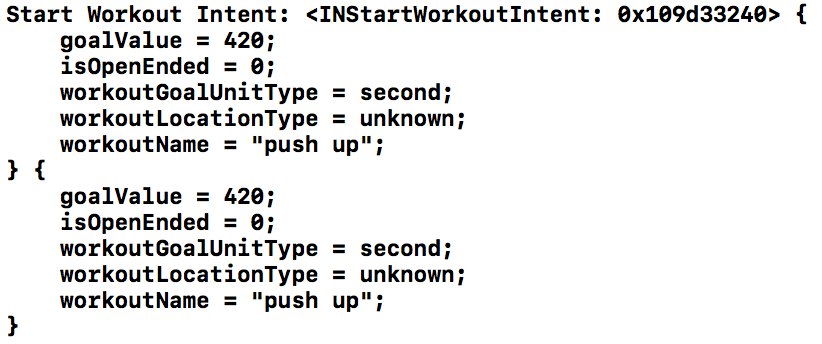
func handle(startWorkout intent: INStartWorkoutIntent, completion: @escaping (INStartWorkoutIntentResponse) -> Void) {

    print("Start Workout Intent:", intent)

    let userActivity: NSUserActivity? = nil
    guard let spokenPhrase = intent.workoutName?.spokenPhrase else {
        completion(INStartWorkoutIntentResponse(code: .failureNoMatchingWorkout, userActivity: userActivity))
        return
    }

    print(spokenPhrase)

    completion(INStartWorkoutIntentResponse(code: .continueInApp, userActivity: userActivity))
}
We start out by printing out the intent argument. Once printed, you will be able to see that the argument contains the following keys:
- goalValue
- isOpenEnded
- workoutGoalUnitType
- workoutLocationType
- workoutName
Each intent handler function has its own keys and values. Some may share similarities, but not all the keys and values are the same. For example, the intent for the endWorkout handler function only has a workoutName key and value.
Cool. Now let’s talk about userActivity: NSUserActivity. It simply captures what the user was doing. Perhaps the user was viewing app content, editing a document, viewing a web page, or watching a video. If it is important to you, then feel free to explore on on this topic here. We can just put nil for this variable for now.
In the last part, we simply check if the workout exists within our inventory of known workouts. We will see how we can expand the vocabulary list for the app later on.
So our logic is if we don’t have a workout name that’s recognized by our app, we will simply respond saying that there is no matching workout and return. However, if our app do recognize the workout, we will launch the app. We will see how this works in a while.
Handling App Launch from Siri
Now back to the AppDelegate.swift file to implement a method. First, add the import statement at the very top of the file:
import Intents
Then add the following function and we will discuss what’s going on.
func application(_ application: UIApplication, continue userActivity: NSUserActivity, restorationHandler: @escaping ([Any]?) -> Void) -> Bool {
        guard let intent = userActivity.interaction?.intent as? INStartWorkoutIntent else {
            print("AppDelegate: Start Workout Intent - FALSE")
            return false
        }
        print("AppDelegate: Start Workout Intent - TRUE")
        print(intent)
        return true
    }
This method is called whenever your app is launched to handle a SiriKit intent. Now we see the type NSUserActivity once again. As explained earlier, it contains information about what the user was doing. Inside of the function, we check if the user’s intention is to start a workout. If it is, then we are going to print out the follow property values:
- Workout name
- Goal value
- Workout goal unit type
- Workout location type
- Is open ended
I believe it will be more clear what the values of these properties hold when we demo the app. In real world apps, you can also update your app’s UI based on the userActivity parameter.
Demo Time
Siri Authorization
Now run the demo app for the first time in the simulator or a real device. The app should ask you for Siri authorization.

Talking To Siri
Now go back to home screen and activate Siri. If you use the simulator to test, go to Hardward > Siri to active it. In my test, I spoke to Siri to start a push up workout for 7 minutes. Once Siri recognizes our intent (i.e. push up workout), it will bring up the Pizza Reverse app. And, if you look into the console, you will find something like this:
Here we just print out the intent into the debug console. In a real world app, you can display the appropriate screen (say, push up workout) based on the given intent.
Wrap Up
Congratulations! You’ve completed the tutorial. Hopefully by now you understand how to develop a SiriKit extension for your app, and how to handle the intent. I hope you like this article and if you find this article helpful, please let me know by sharing this article. Stay awesome. And, I invite you to connect with me on all my social media channels. If any of you are going to WWDC, feel free to connect with me too! Maybe there will be a new Siri this time around!
For reference, you can download the sample project on GitHub.


