

There are several underused and not-so-popular frameworks hidden in the iOS SDK. Some of them can be useful and time-saving tools. The Natural Language Processing Class is one of them. Available in both Swift and Obj-C, the NSLinguisticTagger Class is used analyze natural language text to tag part of speech and lexical class, identify names, perform lemmatization, and determine the language and script. As a result, it is used extensively in machine learning programs. What does this really mean? Well, that’s what you’ll find out!
To begin, let’s go to Xcode and create a new playground. Name the playground whatever you want and set the platform to macOS. Once the playground is created, select everything and delete it. This way you’ll have a clean slate to work on. At the top of the playground, type the code below to import the following library.
import Foundation
To experiment with the new NLP API, let’s choose a big paragraph to mess around with. Here the block of text we’ll have our code analyze.
let quote = "Here's to the crazy ones. The misfits. The rebels. The troublemakers. The round pegs in the square holes. The ones who see things differently. They're not fond of rules. And they have no respect for the status quo. You can quote them, disagree with them, glorify or vilify them. About the only thing you can't do is ignore them. Because they change things. They push the human race forward. And while some may see them as the crazy ones, we see genius. Because the people who are crazy enough to think they can change the world, are the ones who do. - Steve Jobs (Founder of Apple Inc.)"
The very first thing we need to do is create a tagger. In Natural Language Processing, a tagger is basically a piece of software which can read text and “tag” various information to it such as part of speech, recognize names and languages, perform lemmatization, etc. We do this by calling the NSLinguisticTagger class. In the Playground file, insert the following lines of code:
let tagger = NSLinguisticTagger(tagSchemes:[.tokenType, .language, .lexicalClass, .nameType, .lemma], options: 0)
let options: NSLinguisticTagger.Options = [.omitPunctuation, .omitWhitespace, .joinNames]
What are these tag schemes? Well, basically tag schemes are the constants used to identify the pieces of information we want from the text. The tag schemes we ask the tagger to look for are the token type, language, lexical class, name type, and lemma. We’ll be using these tag schemes in the rest of the tutorial. Here’s what each one is:
- Token Type: A property which classifies each character as either a word, punctuation, or whitespace.
- Language: Determines the language of the token
- Lexical Class: A property which classifies each token according to its class. For example, it’ll determine the part of speech for a word, the type of punctuation for a punctuation, or the type of whitespace for a whitespace.
- Name Type: This property looks for tokens which are part of a named entity. It’ll look for a personal name, an organizational name, and a place name.
- Lemma: This basically returns the stem of a word token. I’ll be going into more detail about this later on.
The options portion basically tells the API how to split up the text. We’re asking the analyzer to ignore any punctuation and any whitespace. If there is a named entity, join it together.
With the initial setup, now we are ready to begin writing code using NLP in Swift! Before we continue to add any code, please make sure your code looks something like this.

Language Identification
So now, let’s begin by identifying what language this text is in. Obviously, we know that it’s in English but our computer doesn’t know that. Let’s create a function to determine the language:
func determineLanguage(for text: String) {
    tagger.string = text
    let language = tagger.dominantLanguage
    print("The language is \(language!)")
}
This code should be fairly simple to understand but in case you didn’t, don’t worry. I’ll break it down for you. We assign the string a user inputs to the tagger. We define a constant language to be the dominant language of the string the tagger is assigned to and print it.
Now let’s call the function with determineLanguage(for: quote). You should get an output which reads;
The language is en
Tokenization
The next step in parsing text is tokenization. Tokenization is the process of splitting sentences, paragraphs, or documents into your choice of length. In this scenario, we’ll be splitting the quote above into words. As before, let’s create a function:
func tokenizeText(for text: String) {
    tagger.string = text
    let range = NSRange(location: 0, length: text.utf16.count)
    tagger.enumerateTags(in: range, unit: .word, scheme: .tokenType, options: options) { tag, tokenRange, stop in
        let word = (text as NSString).substring(with: tokenRange)
        print(word)
    }
}
Let’s break down the code. Similar to what we’ve done earlier, we set the text a user inputs to be the tagger’s string. Next, we define a constant range to be the range of characters the API should tokenize. After that, we call the tagger.enumerateTags function to tokenize. We set the range, the length to .word, what Linguistic Tag Scheme to choose, and refer to the options constant we made earlier (i.e. what to ignore and what to join).
Upon every word the function tokenizes, we ask the function to print the word to the console. Now insert the following line of code to call the function:
tokenizeText(for: quote)
You should get a long list of all the words looking something like “Here, ‘s, to, the, … , Founder, of, Apple Inc.”
Here
's
to
the
crazy
ones
The
misfits
The
rebels
The
troublemakers
The
round
pegs
in
the
square
holes
The
ones
who
see
things
differently
They
're
not
fond
of
rules
And
they
have
no
respect
for
the
status
quo
You
can
quote
them
disagree
with
them
glorify
or
vilify
them
About
the
only
thing
you
ca
n't
do
is
ignore
them
Because
they
change
things
They
push
the
human
race
forward
And
while
some
may
see
them
as
the
crazy
ones
we
see
genius
Because
the
people
who
are
crazy
enough
to
think
they
can
change
the
world
are
the
ones
who
do
Steve Jobs
Founder
of
Apple Inc.
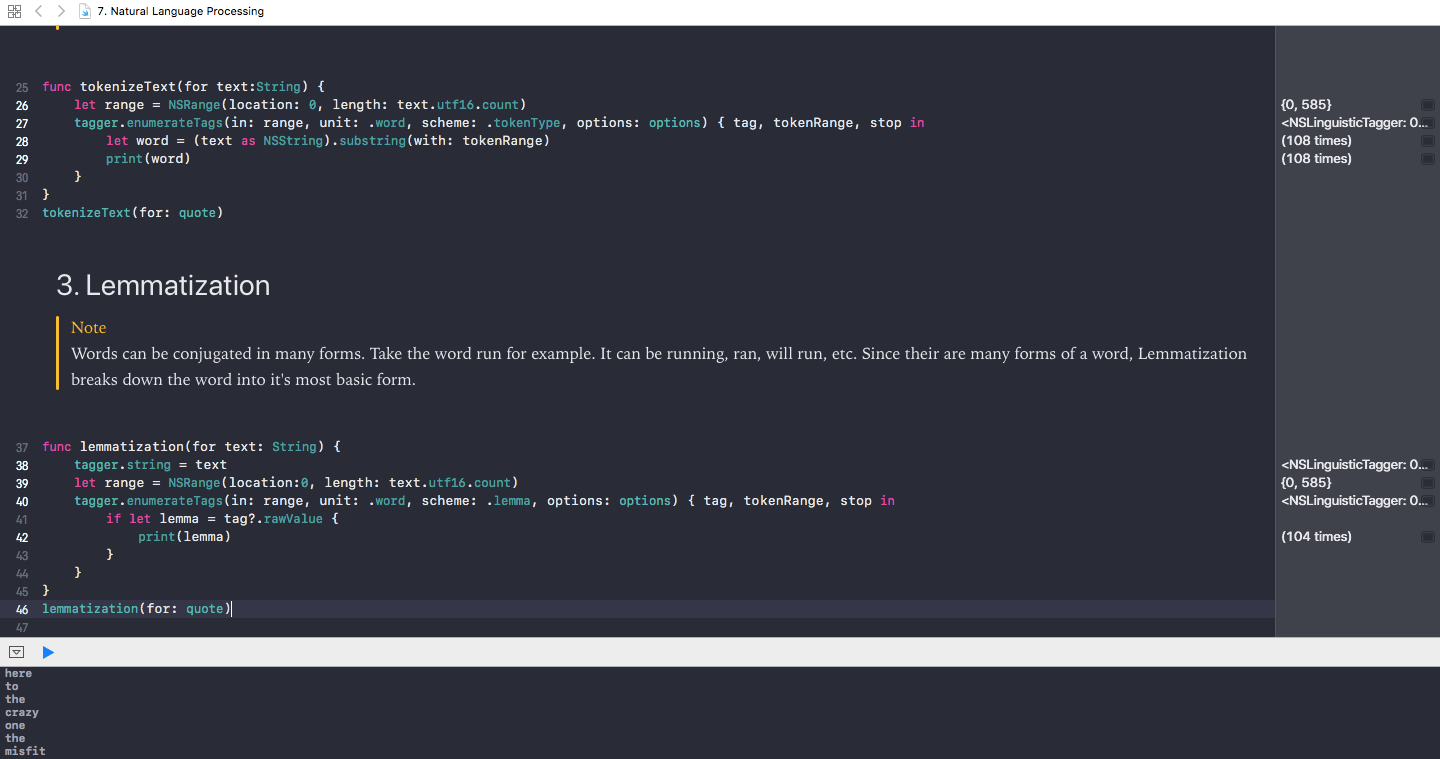
Lemmatization
Now that we have identified the language and dove in a little deeper by splitting up the quote into words, let’s go even more deeper by transforming the words into their base root. This is called Lemmatization. Take the word run for example. It can be transformed into running, ran, will run, etc. Since there are many forms of a word, Lemmatization breaks down the word into its most basic form.
Let’s implement the following function to lemmatize the words.
func lemmatization(for text: String) {
    tagger.string = text
    let range = NSRange(location:0, length: text.utf16.count)
    tagger.enumerateTags(in: range, unit: .word, scheme: .lemma, options: options) { tag, tokenRange, stop in
        if let lemma = tag?.rawValue {
            print(lemma)
        }
    }
}
This block of code is about 95% similar to our tokenizeText function. Instead of the .tokenType scheme, we use the .lemma scheme. Then, since the raw value of the tag is the lemma of the word, we have the function print to display the lemma for every word. Now invoke the function and take a look:
lemmatization(for: quote)
The list will look pretty similar to the same list you got after tokenizing the quote. But, there are a couple of differences. For example, notice how misfits, rebels, and troublemakers all have been return in their singular form. In the phrase “They are not fond of…”, see how are is returned to the console as be.
Parts of Speech
Diving in a little more deeper, let’s take every word in the quote and identify its part of speech.
func partsOfSpeech(for text: String) {
    tagger.string = text
    let range = NSRange(location: 0, length: text.utf16.count)
    tagger.enumerateTags(in: range, unit: .word, scheme: .lexicalClass, options: options) { tag, tokenRange, _ in
        if let tag = tag {
            let word = (text as NSString).substring(with: tokenRange)
            print("\(word): \(tag.rawValue)")
        }
    }
}
By now, the code should look really familiar. Same as our tokenizeText function, the only key difference is changing the scheme to .lexicalClass.
partsOfSpeech(for: quote)
The console returns each word and its corresponding part of speech. You can see the verbs, nouns, prepositions, adjectives, etc. Here are some of the results:
The: Determiner
troublemakers: Noun
The: Determiner
round: Noun
pegs: Noun
in: Preposition
the: Determiner
square: Adjective
holes: Noun
The: Determiner
ones: Noun
who: Pronoun
see: Verb
Named Entity Recognition
Finally, let’s see if the quote can recognize any names, organizations, or places in the quote above. Here’s the function below:
func namedEntityRecognition(for text: String) {
    tagger.string = text
    let range = NSRange(location: 0, length: text.utf16.count)
    let tags: [NSLinguisticTag] = [.personalName, .placeName, .organizationName]
    tagger.enumerateTags(in: range, unit: .word, scheme: .nameType, options: options) { tag, tokenRange, stop in
        if let tag = tag, tags.contains(tag) {
            let name = (text as NSString).substring(with: tokenRange)
            print("\(name): \(tag.rawValue)")
        }
    }
}

namedEntityRecognition(for: quote)
Notice how there’s one extra line of code? These are the tags we want our tagger to be on the lookout for. We want our tagger to list any personal names, place names, or organization names. Of course, change the scheme to .nameType and the rest should be straightforward.
Note: You’re probably wondering why it’s important to search for any named entities in the text. This is because it can lend a lot of insight into the context of the text.
As you probably expected, the function returns Steve Jobs as a Personal Name and Apple Inc. as an Organization Name.
Apple Inc.: Noun
Steve Jobs: PersonalName
Apple Inc.: OrganizationName
What’s Next
Hopefully by now you know how to use NLP in Swift. However, you’re probably wondering how exactly you can implement these in your apps. One way to implement the NLP API into your app is through the search result. Suppose you had a photos app with captions for each photo. One caption reads “Hike on Mt. Shasta”. Your user probably expect the same photo to show up when he/she search for hike, or hiking, or hikes. This can be implemented through lemmatization and that would definitely improve the user experience of your app.
For reference, you can refer to the complete Xcode playground on GitHub.
To learn more about NLP in Swift, you can check out Apple’s WWDC 2017 video here.
For more details about the NSLinguisticTagger class, you can refer to the official documentation here.


