Design patterns are very important tools for iOS developers to keep in their software engineering arsenals. These patterns, along with several other best practices I’ll mention below, help developers to create reliable and maintainable apps. In other words, design patterns help in managing software complexity.
In this tutorial, I’ll introduce you to the “Model-View-ViewModel” or “MVVM” design pattern. For a historical and pragmatic perspective, I’ll compare the very well-known “Model-View-Controller” or “MVC” design pattern, long favored by many iOS developers, to MVVM, which has steadily been gaining traction among the same group of developers.
In order to help you understand these design patterns, I’ll walk you through the design and coding of my app shown here:
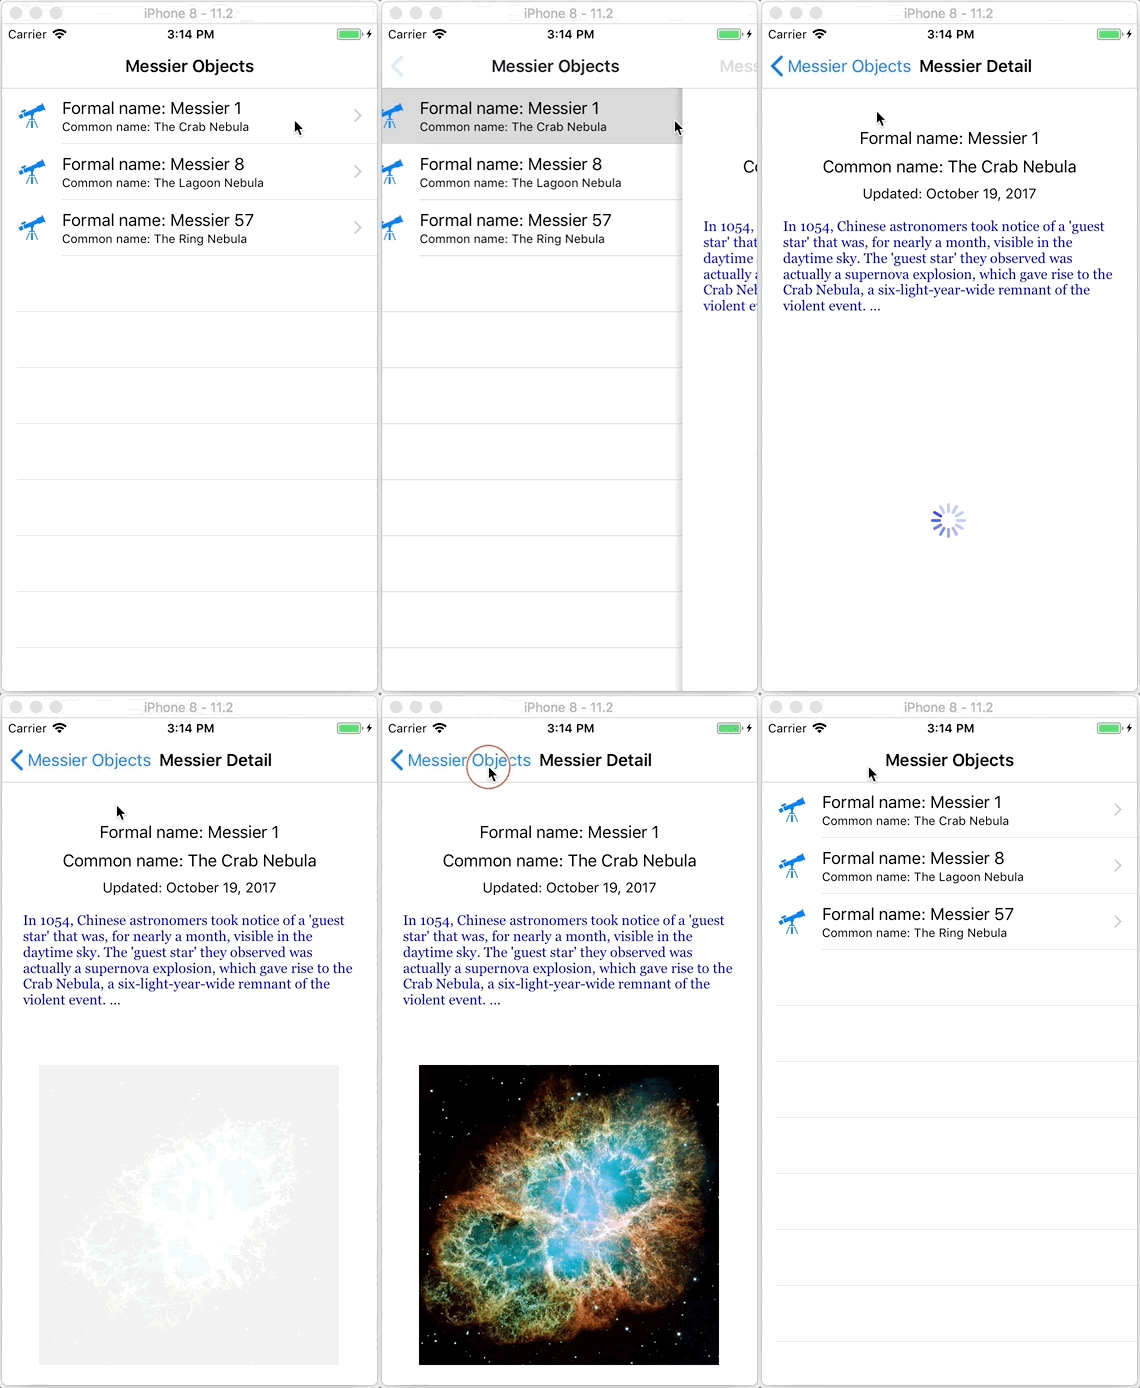
I wrote this app using MVVM, but I’ll start a prototype for the app using MVC and then refactor it into the MVVM design pattern.
What’s a Design Pattern?
Apple defines a “design pattern” as a:
… “a solution to a problem in a context.” Let’s parse this by working backward through the phrase. The context is a recurring situation in which the pattern applies. The problem is the goal you are trying to achieve in this context as well as any constraints that come with the context. And the solution is what you’re after: a general design for the context that achieves the goal and resolves the constraints.
A design pattern abstracts the key aspects of the structure of a concrete design that has proven to be effective over time. The pattern has a name and identifies the classes and objects that participate in the pattern along with their responsibilities and collaborations. It also spells out consequences (costs and benefits) and the situations in which the pattern can be applied. A design pattern is a kind of template or guide for a particular design; in a sense, a concrete design is an “instantiation” of a pattern. Design patterns are not absolute. There is some flexibility in how you can apply them, and often things such as programming language and existing architectures can determine how the pattern is applied. …
Apple, MVC and MVVM
Let me define some preliminary terminology and then we’ll dive into the mechanics of MVC and MVVM. Note that a search of Apple’s “Developer” portal site for “MVVM” returns “No results were found. Please try a different keyword.” But you can find a plethora of information on MVVM as applied to iOS development with a simple web search. I’ll be explaining MVVM in this tutorial, but I wanted to let you know that Apple still seems to be set on MVC — at least they’re not talking about any other overall app design patterns at this point in time.
Preliminary definitions
You’ll notice me referring to “views/controls and view controllers.” When I say “views/controls,” I’m referring to all the objects we use in iOS to build a user interface (UI). We can all agree that a view represents something that can be presented to the user, like a UITextView containing a paragraph of text, or controls like UIButton instances that enable someone to interact with an app. A UIView can just serve as the basic design surface on which we organize all our other controls. So “views/controls” refers to the UIView class and any other UI control meant to provide user interaction, like a UISlider. Remember that all controls, at least all the ones I know of, in UIKit, like UIButton and UISlider, inherit from UIView.
Take the UIButton class found in UIKit. Follow the inheritance tree using the “Inherits From” links found in Apple’s documentation pages from the leaf UIButton to its parent, UIView. Visually, it looks like this:
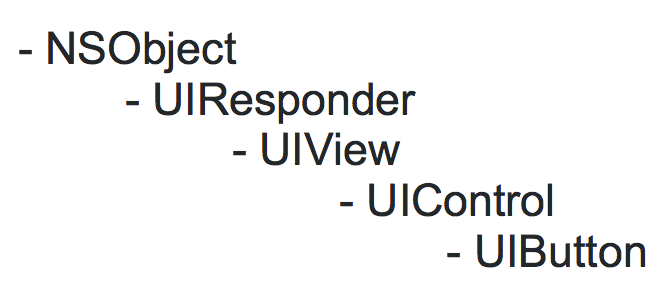
In this discussion, “views/controls” is synonymous with the UIView.
When I say “view controllers,” I’m referring especially to classes like UIViewController, but also classes like UITableViewController, UIPageViewController, etc. These classes make views/controls accessible and useful. For the purposes of discussing MVC and MVVM in the context of iOS development, “views/controls and view controllers” are synonymous with the “VC” in “MVC” and the second “V” in “MVVM.”
Remember that every UIViewController has the instance property of view which is the “view that the controller manages.”
The view property is declared as:
var view: UIView! { get set }
You can see the relationship of the view property to its owner UIViewController in your storyboard here:
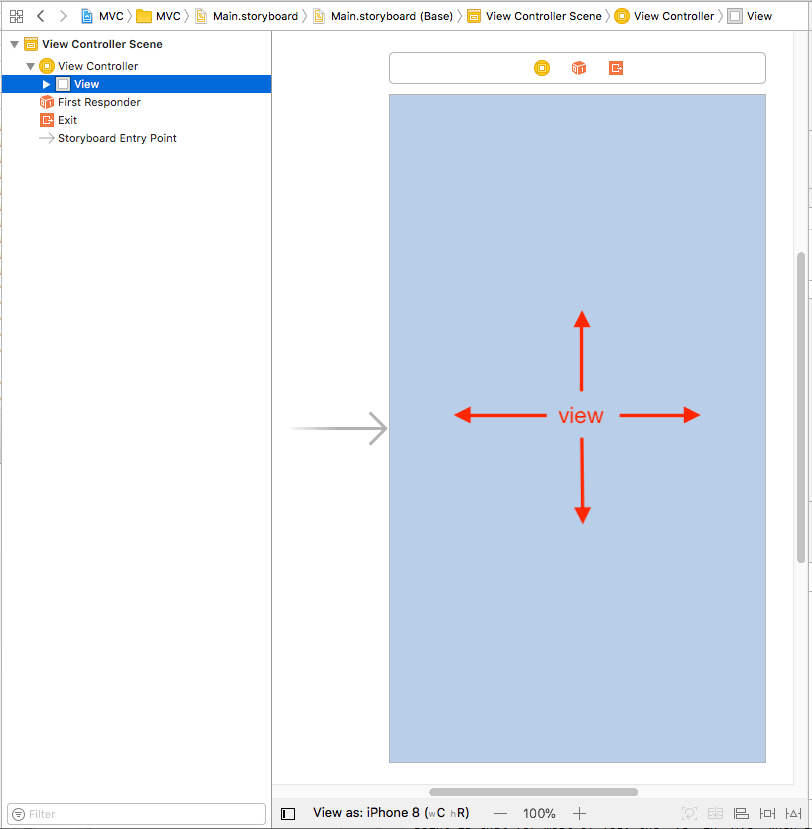
The view is the pale blue colored rectangle.
Model-View-Controller (MVC)
Apple still maintains detailed and voluminous documentation on MVC in its developer library. Even though the company labels this development guidance as “retired,” the MVC bias is evident when you make use of the iOS SDKs like Foundation, UIKit, and CoreGraphics.
Consider all the classes you make use of almost every day, like UIView and UIViewController, UITableView and UITableViewController, UIPageControl and UIPageViewController, to name a few. In iOS, there is a tight relationship between views/controls and view controllers. Yes, you could write your entire UI programmatically, but I would consider that silly, especially in any sizable app, especially when considering screen layout (Adaptive Auto Layout). Programmatic UIs are impossible to manage and scale.
Yes, once in awhile, the need arises for a few lines of code which effect the UI, but the whole UI? I rather work with views/controls and view controllers as inseparable entities that are encapsulated in a storyboard and corresponding Swift (.swift) file(s). My main point is that for most of you, the “VC” in “MVC” when programming iOS means that, when working with views/controls and view controllers, the two domains have huge crossover.
When browsing through or searching Apple’s documentation, you won’t find the word “Model” as in the “M” in MVC in terms of generic data structures to serve as models for MVC apps. This is partially a result of already-existing support for data structure-like entities such as the class, struct, and enum being intrinsic parts of the Swift and Objective-C languages. I hope that many developers would recognize these as go-to platforms for creating data models.
When you do encounter the word “model” in the Apple docs, it is generally associated with very specific applications of data structures — data organization tools — like VNCoreMLModel. Of course, Apple provides Core Data, “a framework that you use to manage the model layer objects in your application,” but it often requires too much effort to get up and running and can be somewhat awkward to use.
Since Apple has been biased towards MVC for many moons, let’s look at their definition of this design pattern:
… The MVC design pattern considers there to be three types of objects: model objects, view objects, and controller objects. The MVC pattern defines the roles that these types of objects play in the application and their lines of communication. When designing an application, a major step is choosing–or creating custom classes for–objects that fall into one of these three groups. Each of the three types of objects is separated from the others by abstract boundaries and communicates with objects of the other types across those boundaries. …
Model Objects Encapsulate Data and Basic Behaviors
Model objects represent special knowledge and expertise. They hold an application’s data and define the logic that manipulates that data. A well-designed MVC application has all its important data encapsulated in model objects. …View Objects Present Information to the User
A view object knows how to display, and might allow users to edit, the data from the application’s model. The view should not be responsible for storing the data it is displaying. …Controller Objects Tie the Model to the View
A controller object acts as the intermediary between the application’s view objects and its model objects. Controllers are often in charge of making sure the views have access to the model objects they need to display and act as the conduit through which views learn about changes to the model. Controller objects can also perform set-up and coordinating tasks for an application and manage the life cycles of other objects. …
Massive-View-Controller (MVC?)
While MVC sounds good in theory, it often doesn’t deliver on its promises in the context of iOS and Xcode. Time after time, I’ve seen developers put most of their apps’ model (data) and business logic code inside of view controllers. It’s become a standing joke to refer to MVC as the “Massive-View-Controller” design pattern. It’s a natural tendency as the view controller plays such an intrinsic role in one of the most important aspects of an app’s lifecycle: interactions with the user.
One of the greatest tools you can use in battling complexity is to divide and conquer. Small and logically organized pieces of code, written using a separation of concerns mindset, is probably about half the battle in controlling complexity, as we’ll see below when using the Swift extension language construct.
Remember that there are other very powerful tools for controlling complexity like protocol-oriented programming (see here also), object-oriented programming, error checking, delegation, and property observers, to name a few.
Excessively large view controllers can be very difficult to test. Because of their many properties, they can take on an incalculable number of states. If they contain many functions that commingle business logic with UI components, developing effective testing protocols can be a huge task.
For a long time up until today, Apple’s Xcode has encouraged the use of what I like to call the “VC minus M” flavor of the MVC pattern. Here’s the default file and directory structure generated when creating a new project based on the very-commonly-used iOS Single View App template:
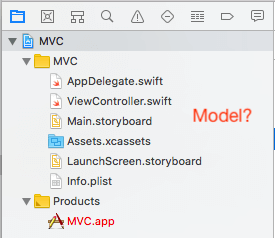
Notice there’s no Xcode template file containing either a class or struct representing a data model stub in the picture. The model portion of MVC seems to be assumed, and most likely is taken for granted by more experienced developers, but may be lost on novices. If I were king for a day, I’d rewrite Xcode to include a “Model.swift” file when creating a new project based on the Single View App or other project templates. My Model.swift file would look like this…
//
//  Model.swift
//  MVC
//
//  Created by Andrew L. Jaffee on 5/17/18.
//  Copyright © 2018 Andrew L. Jaffee. All rights reserved.
//

import Foundation

class Model {

    // Define properties representing
    // your app's data here.

}
… or this:
//
//  Model.swift
//  MVC
//
//  Created by Andrew L. Jaffee on 5/17/18.
//  Copyright © 2018 Andrew L. Jaffee. All rights reserved.
//

import Foundation

struct Model {

    // Define properties representing
    // your app's data here.

}
Both versions of my Model.swift file compile with the newly-created project. So my king-for-a-day iOS app template generated by Xcode would look like this:
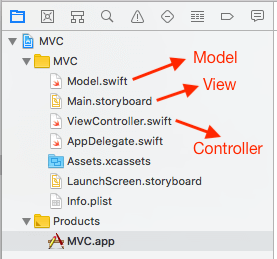
Model-View-ViewModel (MVVM)
I would venture that the Model-View-ViewModel (MVVM) design pattern is really not that far from what MVC was intended to be. MVVM adds one component to the MVC model, namely something called the “ViewModel” or “view model.” It can be a class or struct but is generally a class so that references of the same instance can be passed around in your code. The ViewModel sits between the view controller and Model.
Remember I had mentioned earlier that, for the purposes of discussing MVC and MVVM in the context of iOS development, “views/controls and view controllers” are synonymous with the “VC” in “MVC” and the second “V” in “MVVM?” Consider views/controls and view controllers as inseparable entities that are encapsulated in a storyboard and corresponding Swift (.swift) file(s).
Let’s understand this pattern by defining each of its constituent letters, M, V, and VM.
M for “Model” – This is a structure that stores domain-specific information (data) in the simplest of formats. By keeping it raw, we keep it portable and reusable. For example, we could store a phone number as 10 digits or characters. We leave it to a ViewModel to transform the raw “2125514701” into something like “(212) 551-4701” or “212-551-4701” or “212.551.4701”. The View/view controller can then display the phone number representation it gets from the ViewModel. If dealing with say, dialing a number internationally, we would leave those details to the ViewModel.
V for “View” – No need to go through my discussion on “views/controls and view controllers” again. Please refer above to my discussion of Preliminary definitions.
VM for “ViewModel” – This is the new piece that I would add to MVC if I were king for a day. The ViewModel sits between the Model and View/view controller. The ViewModel converts data in the model into human readable format that can be presented in the View by the view controller. The ViewModel could also handle updates that users make to data presented by the View/view controller, perhaps using a property observer or something like key-value observing (KVO). Updates to View data would not go directly to the Model, rather they would be triggered by the view controller talking to the ViewModel which would then talk to the Model.
As a concrete example, the ViewModel could use a DateFormatter to convert a primitive representation of a date in the Model into a format readable by a user looking at the View.
In summary:
- The View/view controller presents Model data to the user and may allow updates to that Model data. The View/view controller does not talk directly to the Model. The View/view controller can only talk to the Model indirectly through the ViewModel.
- The View can only communicate with the view controller. In the UI, app data is provided to the view controller for display by the View solely by the ViewModel, and any changes made to data in the View must be passed to the view controller which solely communicates with the ViewModel.
- The ViewModel is the intermediary between the View/view controller and Model. It is a single conduit, a gatekeeper, through which data flows from the Model to the View/view controller and vice versa.
- The Model is soley a data structure meant for storing domain/app-specific information. Only the ViewModel talks to the Model. Only the ViewModel talks to the View/view controller.
What you won’t see today
Just getting people to understand the difference between MVC and MVVM can be a challenge, so I didn’t want to muddy the waters in this tutorial with too many advanced topics. For example, I could’ve shown you how a user edit to a UITextField could be caught by a view controller, the view controller could set a property in the ViewModel, and a property observer could’ve updated the Model… but I didn’t. Conversely, I could’ve shown you how the ViewModel could monitor the Model for changes, and then update the view controller which updates the view… but I didn’t. Finally, I could’ve shown you what I consider to be very cumbersome Swift code for KVO that I could’ve placed in the view controller… but I didn’t. Swift 4’s current implementation of KVO looks heavy-handed, obtuse, intimately tied to Objective-C, subject to change, and probably a good candidate for deprecation.
Arguing about MVVM
As always, there are a variety of opinions about the MVVM design pattern. I’m a pragmatist, not a dogmatic, not an absolutist. When I hear statements like “never import UIKit into the ViewModel Swift file(s)” or “never pass a closure from a view controller to the ViewModel,” I say, “I’ll evaluate the situation when I encounter it and then choose the simplest and safest approach.” You’ll see examples of both of the previous two admonitions below.
One topic of argument over MVVM that I see constantly popping up is the question of where in the design pattern to put networking code for downloading files. For me, the answer is simple: put networking code for downloading files in the ViewModel. A model stores raw data and doesn’t know that, for example, a file needs to be downloaded over a certain transport like HTTPS and displayed in some specific control like a UIImageView. Conversely, the ViewModel layer is closer to the presentation layer, handles data, and should probably know about details like where a file is stored and how to get it.
Just where precisely is the “best” place to download files in an MVVM app? Is there always a “correct” answer?
Sample Code
In order to demonstrate both MVC and MVVM, I’ve created a sample app for helping people interested in astronomy to view a class of stellar phenomena called the “Messier” objects, like globular clusters and nebulae. My app could serve as a prototype for providing a gateway to NASA’s collection of Messier-type objects in its “Hubble’s Messier Catalog”:
“Charles Messier (1730–1817) was a French astronomer best known for his ‘Catalog of Nebulae and Star Clusters.’ An avid comet-hunter, Messier compiled a catalog of deep-sky objects in order to help prevent other comet enthusiasts from wasting their time studying objects that were not comets.”
An MVC App
I built a prototype app as a proof of concept for my final app. I wanted to see what the UI woud look like, what frameworks I’d need, how much code I’d have to write, and what kind of code I’d have to write. Most importantly, I used the MVC design pattern to see how easily people can fall into the trap of writing “Massive-View-Controller” code as opposed to actually using the MVC design pattern. As I’ve noted previously, this kind of app — Massive-VC — is still what I see most often when meeting new customers and helping them develop quality iOS code.
Here’s the prototype app in action:
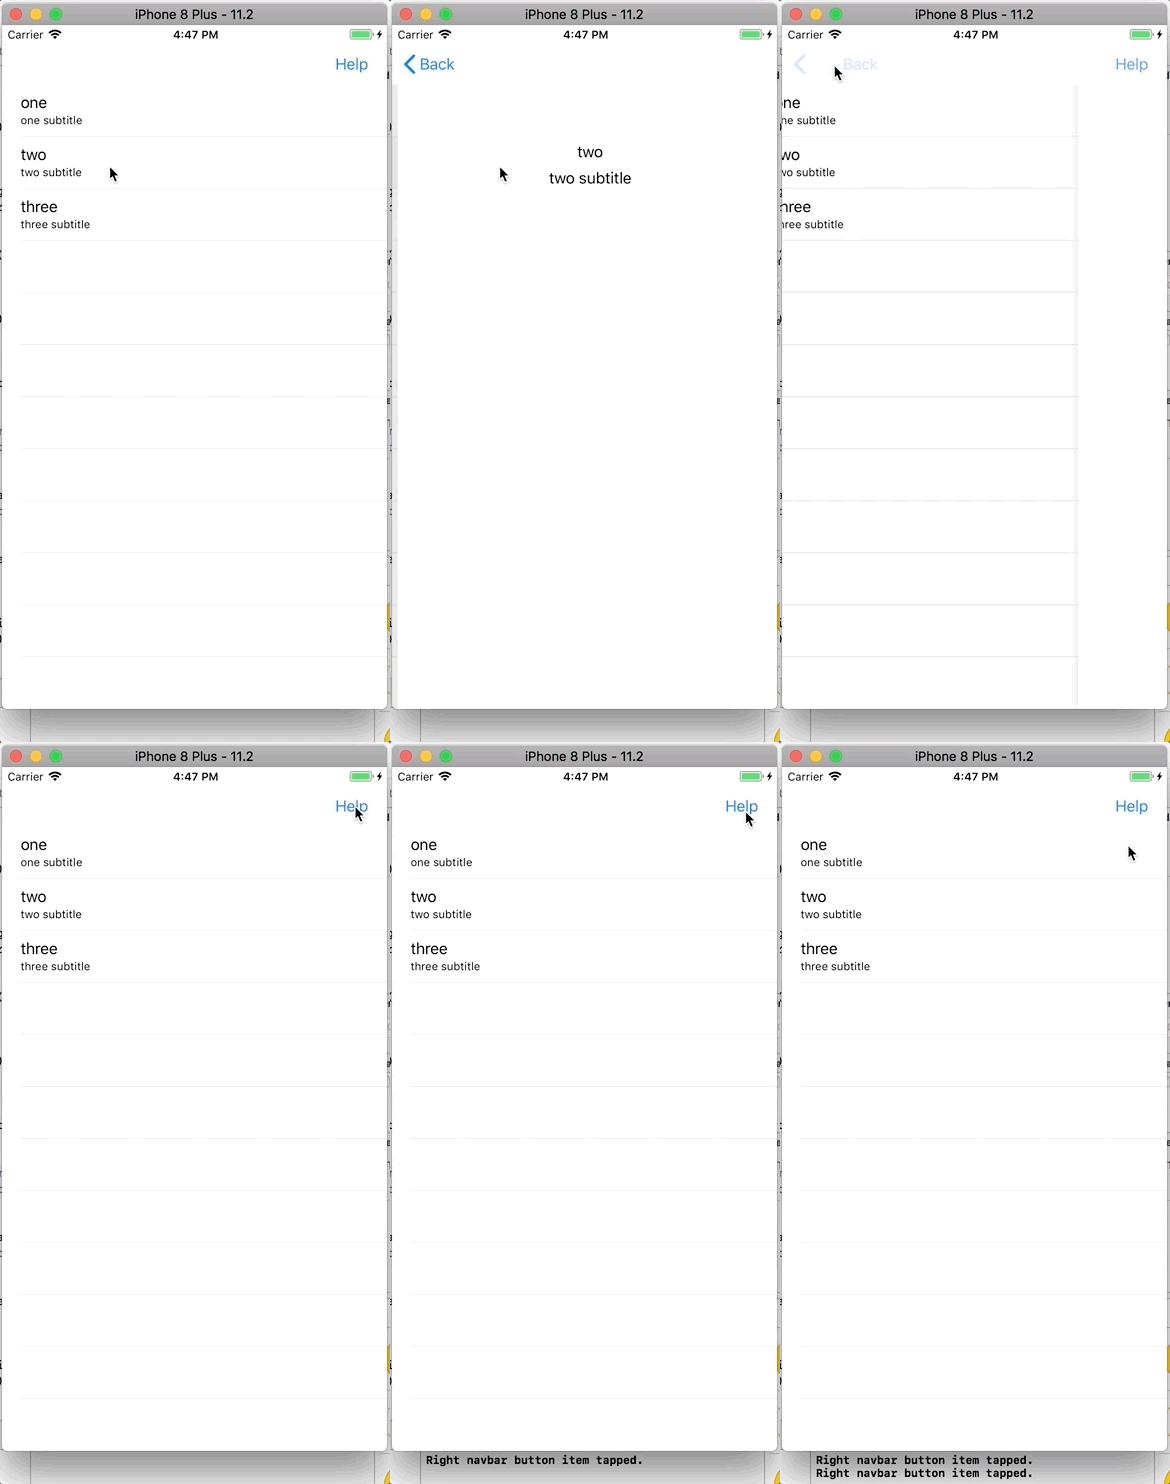
Most of you should understand what I’m doing here. I’ve wired up a UITableView to display a few rows of data. Clicking on each row performs a segue that displays a detail screen which can show much more information than just a row. I’ve embedded my main UIViewController subclass in a UINavigationViewController so that my segue pushes my detail view controller onto the screen with a nice hierarchical burrowing slideover. The user can then return to the UITableView using that oh-so-convenient “< Back” button.
Let’s look at the project structure for this prototype app. Some deficiencies should start becoming apparent to you immediately:
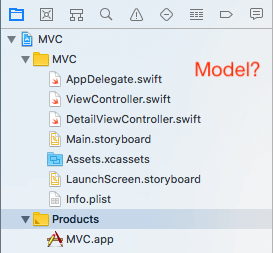
Remember what I call the “VC minus M” flavor of the Xcode MVC pattern? Let’s look at the main UIViewController code and discuss it.
I’m going to describe the code in a series of steps — steps that are also comments in my code shown below. So as you read the steps in this section, please refer to those same steps in the code below.
The MVC code
import UIKit

// #1 - WHY ARE ALL THESE PROTOCOLS ADOPTED HERE?
class ViewController: UIViewController, UITableViewDelegate, UITableViewDataSource {

    // #2 - WHY IS THE MODEL IN THE VIEW CONTROLLER?
    let dataSource = ["one", "two", "three"]

    // #3 - OK, ALL THIS SHOULD GO IN A
    // UIViewController SUBCLASS
    @IBOutlet weak var tableView: UITableView!

    // #3 - OK, ALL THIS SHOULD GO IN A
    // UIViewController SUBCLASS
    override func viewDidLoad() {
        super.viewDidLoad()
        // Do any additional setup after loading the view, typically from a nib.

        tableView.delegate = self
        tableView.dataSource = self
    }

    // #3 - OK, ALL THIS SHOULD GO IN A
    // UIViewController SUBCLASS
    override func viewDidLayoutSubviews() {
        super.viewDidLayoutSubviews()
    }

    // #3 - OK, ALL THIS SHOULD GO IN A
    // UIViewController SUBCLASS
    override func traitCollectionDidChange(_ previousTraitCollection: UITraitCollection?) {
        super.traitCollectionDidChange(previousTraitCollection)
    }

    // #3 - OK, ALL THIS SHOULD GO IN A
    // UIViewController SUBCLASS
    override func viewWillLayoutSubviews() {
        super.viewWillLayoutSubviews()
    }

    // #3 - OK, ALL THIS SHOULD GO IN A
    // UIViewController SUBCLASS
    override func updateViewConstraints() {
        super.updateViewConstraints()
    }

    // #3 - OK, ALL THIS SHOULD GO IN A
    // UIViewController SUBCLASS
    override func viewWillAppear(_ animated: Bool) {
        super.viewWillAppear(animated)

        navigationItem.rightBarButtonItem = UIBarButtonItem(title: "Help", style: .plain, target: self, action: #selector(myRightSideBarButtonItemTapped(_:)))
    }

    // #3 - OK, ALL THIS SHOULD GO IN A
    // UIViewController SUBCLASS
    override func viewDidAppear(_ animated: Bool) {
        super.viewDidAppear(animated)
    }

    // #3 - OK, ALL THIS SHOULD GO IN A
    // UIViewController SUBCLASS
    override func viewWillDisappear(_ animated: Bool) {
        super.viewWillDisappear(animated)
    }

    // #3 - OK, ALL THIS SHOULD GO IN A
    // UIViewController SUBCLASS
    override func viewDidDisappear(_ animated: Bool) {
        super.viewDidDisappear(animated)
    }

    // #3 - OK, ALL THIS SHOULD GO IN A
    // UIViewController SUBCLASS
    override func didReceiveMemoryWarning() {
        super.didReceiveMemoryWarning()
        // Dispose of any resources that can be recreated.
    }

    // #4 - IF YOU WANT MAINTAINABLE HELP, PUT
    // THIS IN A SEPARATE FILE
    @objc func myRightSideBarButtonItemTapped(_ sender:UIBarButtonItem!) {
        print("Right navbar button item tapped.")
    }

    // #5 - OK, THIS SHOULD GO IN A
    // UIViewController SUBCLASS
    override func prepare(for segue: UIStoryboardSegue, sender: Any?) {

        if segue.identifier == "ShowDetail" {

            if let destinationViewController = segue.destination as? DetailViewController
            {
                let indexPath = self.tableView.indexPathForSelectedRow!
                let index = indexPath.row
                destinationViewController.data = dataSource[index]
            }
        }

    }

    // #6 - WHY IS THIS IN A UIViewController SUBCLASS?
    func tableView(_ tableView: UITableView, didSelectRowAt indexPath: IndexPath) {
        tableView.deselectRow(at: indexPath, animated: true)
    }

    // #6 - WHY IS THIS IN A UIViewController SUBCLASS?
    func numberOfSections(in tableView: UITableView) -> Int {
        return 1
    }

    // #6 - WHY IS THIS IN A UIViewController SUBCLASS?
    func tableView(_ tableView: UITableView, numberOfRowsInSection section: Int) -> Int {
        return dataSource.count
    }

    // #6 - WHY IS THIS IN A UIViewController SUBCLASS?
    func tableView(_ tableView: UITableView, cellForRowAt indexPath: IndexPath) -> UITableViewCell {

        let tableViewCell = tableView.dequeueReusableCell(withIdentifier: "Cell")

        tableViewCell?.textLabel?.text = dataSource[indexPath.row]
        tableViewCell?.detailTextLabel?.text = dataSource[indexPath.row] + " subtitle"

        return tableViewCell!

    }

} // end class ViewController
Discussing my MVC code’s comments
As we’ll see in the following discussion, most of the problems I’ve commented on in the code above are violations of the divide and conquer, separation of concerns, or single responsibility principle axioms. These are all terms you should look up and study.
#1 – Why are the UITableViewDelegate and UITableViewDataSource protocols specified in this ViewController.swift file? Not only is this UIViewController subclass signature harder to read, all the property and/or method conformance requirements for these protocols must be implemented in this file, leading to code bloat. What if the UIViewController class required more protocols? I’ve seen examples of view controllers adopting as many as 6 to 8 different protocols. There’s an elegant solution as we’ll see in the MVVM example below.
#2 – Even though the MVC pattern specifies that the “M” or Model be separate, many developers just shove the entire data model into the main view controller subclass. This violates separation of concerns and leads to code bloat, especially if the model is complex.
#3 – All these callbacks, viewDidLoad, viewDidLayoutSubviews, viewDidAppear, etc., should be in this view controller subclass. The point is that a view controller already has enough responsibilities without being saddled with code that shouldn’t be in a view controller, like business logic, helper functions, data structures, data model logic… When a view controller has all this extra code in it, it becomes impossible to read, maintain, enhance, support — you name it. Time for separation of concerns.
#4 – Since I’ve built so many apps that provide interactive help, I created my own help class hierarchy using OOP. It’s reusable and maintainable. It provides an index, search feature, and table of contents. I can use it in many different apps by populating its Model with app/domain-specific data. At least you could move your help-handling entry method into a different Swift file like help.swift.
#5 – An instance of prepare(for:sender:) is completely appropriate here. Get rid of all the other code that violates the separation of concerns principle and there’ll be plenty of room for it.
#6 – Why are all these methods required by conformance to the UITableViewDelegate and UITableViewDataSource protocols here? This violates separation of concerns. There’s an elegant solution as we’ll see in the MVVM example below.
An MVVM App

I built an astronomical Messier object explorer app following the MVVM pattern. I really followed MVVM’s separation of concerns principles. There’s a Model, there are View/view controllers, and there’s a ViewModel. We’ll go through each of these MVVM components by reading through the code and discussing the code below.
Here’s the prototype app in action:

Most of you should understand what I’m doing here. The same explanation I gave in the third paragraph in the the section above entitled “AN MVC APP” applies here — except my code is rationally structured using MVVM.
Let’s look at the project structure for this prototype app. Many improvements over the Massive-VC app code should start becoming apparent to you immediately:
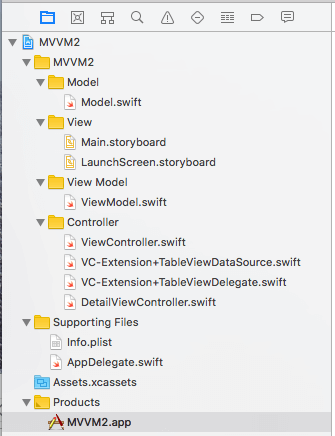
I’m going to describe the code in a series of steps — steps that are also comments in my code shown below. So as you read the steps in this section, please refer to those same steps in the code below.
The MVVM code: The Model
The Model is solely a data structure meant for storing domain/app-specific information. Only the ViewModel talks to the View/view controller. Only the ViewModel talks to the Model.
The Model is made up strictly of primitive data types for portability. The app interface may change. The Model may be used in a different app. I want this Model to have longevity. The only comment I would make about the code is that, instead of reading data from a NASA JSON or RSS feed, I’ve hard coded the Model data. MVVM is hard enough to understand without you having to dig through a bunch of ancillary code on parsing some structured file format. For info on use of NASA data, see this link.
import Foundation

// MARK: - Model Support

struct updatedDate {

    let month:  Int
    let day:    Int
    let year:   Int

}

// MARK: - Model

struct MessierDataModel {

    let formalName: String  // "Messier" #
    let commonName: String  // common name
    let pageLink:   String  // NASA overview page
    let imageLink:  String  // NASA detail image link
    let updateDate: updatedDate // NASA page updated date
    let description: String // Messier object description
    let thumbnail:  String  // placeholder for detail image

}

// MARK: - Model Data

// For info on use of NASA data, see https://www.nasa.gov/multimedia/guidelines/index.html

let updateDateMessier1 = updatedDate(month: 10, day: 19, year: 2017)

let Messier1 = MessierDataModel(formalName: "Messier 1", commonName: "The Crab Nebula", pageLink: "https://www.nasa.gov/feature/goddard/2017/messier-1-the-crab-nebula", imageLink: "https://www.nasa.gov/sites/default/files/thumbnails/image/crab-nebula-mosaic.jpg", updateDate: updateDateMessier1, description: "In 1054, Chinese astronomers took notice of a \'guest star\' that was, for nearly a month, visible in the daytime sky. The \'guest star\' they observed was actually a supernova explosion, which gave rise to the Crab Nebula, a six-light-year-wide remnant of the violent event. ...", thumbnail: "telescope")

let updateDateMessier8 = updatedDate(month: 10, day: 19, year: 2017)

let Messier8 = MessierDataModel(formalName: "Messier 8", commonName: "The Lagoon Nebula", pageLink: "https://www.nasa.gov/feature/goddard/2017/messier-8-the-lagoon-nebula", imageLink: "https://www.nasa.gov/sites/default/files/thumbnails/image/heic1015a.jpg", updateDate: updateDateMessier8, description: "Commonly known as the Lagoon Nebula, M8 was discovered in 1654 by the Italian astronomer Giovanni Battista Hodierna, who, like Charles Messier, sought to catalog nebulous objects in the night sky so they would not be mistaken for comets. This star-forming cloud of interstellar gas is located in the constellation Sagittarius and its apparent magnitude of 6 makes it faintly visible to the naked eye in dark skies. The best time to observe M8 is during August. ...", thumbnail: "telescope")

let updateDateMessier57 = updatedDate(month: 10, day: 19, year: 2017)

let Messier57 = MessierDataModel(formalName: "Messier 57", commonName: "The Ring Nebula", pageLink: "https://www.nasa.gov/feature/goddard/2017/messier-57-the-ring-nebula", imageLink: "https://www.nasa.gov/sites/default/files/thumbnails/image/ring-nebula-full_jpg.jpg", updateDate: updateDateMessier57, description: "M57, or the Ring Nebula, is a planetary nebula, the glowing remains of a sun-like star. The tiny white dot in the center of the nebula is the star\'s hot core, called a white dwarf. M57 is about 2,000 light-years away in the constellation Lyra, and is best observed during August. Discovered by the French astronomer Antoine Darquier de Pellepoix in 1779, the Ring Nebula has an apparent magnitude of 8.8 and can be spotted with moderately sized telescopes. ...", thumbnail: "telescope")
The MVVM code: The ViewModel
The ViewModel is the intermediary between the View/view controller and Model. It is a single conduit, a gatekeeper, through which data flows from the Model to the View/view controller and vice versa.
import Foundation

// #1 - "Should I Stay or Should I Go"
// - The Clash
import UIKit

/**
 #2 - Define a closure TYPE for updating a UIImageView once an image downloads.

 - parameter imageData: raw NSData making up the image
 */
public typealias ImageDownloadCompletionClosure = (_ imageData: NSData ) -> Void

// MARK: - #3 - App data through ViewModel

var messierViewModel: [MessierViewModel] =
    [MessierViewModel(messierDataModel: Messier1),
     MessierViewModel(messierDataModel: Messier8),
     MessierViewModel(messierDataModel: Messier57)]

// MARK: - #4 - View Model

class MessierViewModel
{

    // #5 - I use some private properties solely for
    // preparing data for presentation in the UI.

    private let messierDataModel: MessierDataModel

    private var imageURL: URL

    private var updatedDate: Date?

    init(messierDataModel: MessierDataModel)
    {
        self.messierDataModel = messierDataModel
        self.imageURL = URL(string: messierDataModel.imageLink)!
    }

    public var formalName: String {
        return "Formal name: " + messierDataModel.formalName
    }

    public var commonName: String {
        return "Common name: " + messierDataModel.commonName
    }

    // #6 - Data is made available for presentation only
    // through public getters. No direct access to Model.
    // Some getters prepare data for presentation.

    public var dateUpdated: String {

        let dateString = String(messierDataModel.updateDate.year) + "-" +
                         String(messierDataModel.updateDate.month) + "-" +
                         String(messierDataModel.updateDate.day)

        let dateFormatterGet = DateFormatter()
        dateFormatterGet.dateFormat = "yyyy-MM-dd"

        let dateFormatterPrint = DateFormatter()
        dateFormatterPrint.dateFormat = "MMMM dd, yyyy"

        if let date = dateFormatterGet.date(from: dateString) {
            updatedDate = date
            return "Updated: " + dateFormatterPrint.string(from: date)
        }
        else {
            return "There was an error decoding the string"
        }
    }

    // #7 - Controversial? Should this SOLELY live in the UI?
    public var textDescription: NSAttributedString {

        let fontAttributes = [NSAttributedStringKey.font:  UIFont(name: "Georgia", size: 14.0)!, NSAttributedStringKey.foregroundColor: UIColor.blue]
        let markedUpDescription = NSAttributedString(string: messierDataModel.description, attributes:fontAttributes)
        return markedUpDescription

    }

    public var thumbnail: String {
        return messierDataModel.thumbnail
    }

    // #8 - Controversial? Is passing a completion handler into the view
    // model problematic? Should I use KVO or delegation? All's I'm
    // doing is getting some NSData/Data.
    func download(completionHanlder: @escaping ImageDownloadCompletionClosure)
    {

        let sessionConfig = URLSessionConfiguration.default
        let session = URLSession(configuration: sessionConfig)
        let request = URLRequest(url:imageURL)

        let task = session.downloadTask(with: request) { (tempLocalUrl, response, error) in

            if let tempLocalUrl = tempLocalUrl, error == nil {
                if let statusCode = (response as? HTTPURLResponse)?.statusCode {
                    let rawImageData = NSData(contentsOf: tempLocalUrl)
                    completionHanlder(rawImageData!)
                    print("Successfully downloaded. Status code: \(statusCode)")
                }
            } else {
                print("Error took place while downloading a file. Error description: \(String(describing: error?.localizedDescription))")
            }
        } // end let task

        task.resume()

    } // end func download

} // end class MessierViewModel
#1 – Is including UIKit in the ViewModel a problem? I’m playing devil’s advocate. I’m curious how readers feel about my use of UIFont in the ViewModel. Am I too close to the UI? Many people say that one of the ViewModel’s primary functions is to provide presentation logic… So “should I stay or should I go?”
#2 – Notice I’m defining a closure type so I can pass code between MVVM layers. Am I violating separation of concerns? I doubt it. Closures are very convenient and maleable.
#3 – For all intents and purposes, the app’s data source is the ViewModel.
#4 – I’ve chosen a class as the ViewModel type so I can use reference semantics and pass the model around the app.
#5 – I use some private properties solely for preparing data for presentation in the UI. For example, I store a hyperlink in the Model as a String but convert it into a URL to download a file.
#6 – Data is made available for presentation only through public getters. No direct access to the Model is allowed. Some getters preprocess data for presentation.
#7 – See point #1 on my “controversial” use of UIKit and UIFont in the ViewModel.
#8 – Is passing an @escaping completion handler into the ViewModel problematic? Should I use KVO or delegation? All’s I’m doing is getting some NSData/Data. If changes are made to the app, I’m just as likely to have to change my delegation code as I am my closure code. Closures allow you to create chunks of almost any type of code that can be called almost anywhere, anytime (like in the future). They are self-contained but can access variables and constants from the surrounding environment in which they were defined. They can be assigned to properties, variables, and/or constants — and passed as parameters to functions/methods.
The MVVM code: The view controller code
My app’s main view controller has become very simple. It now fits on one page. How did I accomplish that? Here’s file ViewController.swift:
import UIKit

// MARK: - View Controller

class ViewController: UIViewController {

    @IBOutlet weak var tableView: UITableView!

    override func viewDidLoad() {
        super.viewDidLoad()

        // #1 - The UITableViewDataSource and
        // UITableViewDelegate protocols are
        // adopted in extensions.
        tableView.delegate = self
        tableView.dataSource = self
    }

    override func didReceiveMemoryWarning() {
        super.didReceiveMemoryWarning()
    }

    override func prepare(for segue: UIStoryboardSegue, sender: Any?) {

        if segue.identifier == "DetailSegue" {

            if let destinationViewController = segue.destination as? DetailViewController
            {
                let indexPath = self.tableView.indexPathForSelectedRow!
                let index = indexPath.row
                // #2 - The ViewModel is the app's de facto data source.
                // The ViewModel data for the currently-selected table
                // view cell representing a Messier object is passed to
                // a detail view controller via a segue.
                destinationViewController.messierViewModel = messierViewModel[index]
            }
        }

    } // end func prepare

} // end class ViewController
#1 – I was able to move my main view controller’s code for conformance to the UITableViewDelegate and UITableViewDataSource protocols by using the Swift extension language construct. The technique is straightforward. You may say that using the Swift extension has nothing to do with MVVM, but I would argue otherwise. One of the purposes of design patterns is to help you achieve separation of concerns and to break code into smaller, more manageable, and more logically organized pieces. See the next two files in my app project below.
#2 – The ViewModel is the app’s de facto data source, not the Model. The ViewModel data for the currently-selected table view cell representing a Messier object is passed to a detail view controller via a segue. Then the user can see the Messier object on the big screen.
Here’s my main view controller’s code for conformance to the UITableViewDelegate protocol in file VC-Extension+TableViewDelegate.swift:
import Foundation

import UIKit

// MARK: - UITableView Delegate

extension ViewController : UITableViewDelegate {

    func tableView(_ tableView: UITableView, didSelectRowAt indexPath: IndexPath) {
        tableView.deselectRow(at: indexPath, animated: true)
    }

}
All’s I’m doing in didSelectRowAt is de-selecting a table view row so it doesn’t get stuck as highlighted when it is selected. Users can be confident as to which rows they selected. Otherwise, once a row is tapped, it stays highlighted.
Here’s my main view controller’s code for conformance to the UITableViewDataSource protocol in file VC-Extension+TableViewDataSource.swift:
import Foundation

import UIKit

// MARK: - UITableView Data Source

extension ViewController : UITableViewDataSource {

    func numberOfSections(in tableView: UITableView) -> Int {
        return 1
    }

    func tableView(_ tableView: UITableView, numberOfRowsInSection section: Int) -> Int {
        return messierViewModel.count
    }

    func tableView(_ tableView: UITableView, cellForRowAt indexPath: IndexPath) -> UITableViewCell {

        let tableViewCell = tableView.dequeueReusableCell(withIdentifier: "Cell")

        // #1 - The ViewModel is the app's de facto data source.
        tableViewCell?.imageView?.image = UIImage(named: messierViewModel[indexPath.row].thumbnail)
        tableViewCell?.textLabel?.text = messierViewModel[indexPath.row].formalName
        tableViewCell?.detailTextLabel?.text = messierViewModel[indexPath.row].commonName

        return tableViewCell!
    }

} // end extension ViewController : UITableViewDataSource
#1 – The ViewModel is the app’s de facto data source, not the Model.
This code should be familiar to most of you. I’m wiring up the default prototype cell UI elements in each UITableViewCell corresponding to each Messier object stored in my ViewModel.
Finally for the view controller code, we’ll look at my DetailViewController class in file DetailViewController.swift:
import UIKit

// MARK: - Detail View Controller

class DetailViewController: UIViewController {

    var messierViewModel: MessierViewModel?

    @IBOutlet weak var titleLabel: UILabel!
    @IBOutlet weak var subtitleLabel: UILabel!
    @IBOutlet weak var updatedLabel: UILabel!
    @IBOutlet weak var descriptionTextView: UITextView!
    @IBOutlet weak var imageView: UIImageView!
    @IBOutlet weak var activitySpinner: UIActivityIndicatorView!

    override func viewDidLoad() {

        super.viewDidLoad()

        imageView.alpha = 0.0

        // #1 - Define a closure (completion block) INSTANCE for updating a UIImageView
        // once an image downloads.
        let imageCompletionClosure = { ( imageData: NSData ) -> Void in

            // #2 - Download occurs on background thread, but UI update
            // MUST occur on the main thread.
            DispatchQueue.main.async {

                // #3 - Animate the appearance of the Messier image.
                UIView.animate(withDuration: 1.0, animations: {
                    self.imageView.alpha = 1.0
                    self.imageView?.image = UIImage(data: imageData as Data)
                    self.view.setNeedsDisplay()
                })

                // #4 - Stop and hide the activity spinner as the
                // image has finished downloading
                self.activitySpinner.stopAnimating()

            } // end DispatchQueue.main.async

        } // end let imageCompletionClosure...

        // #5 - Start and show the activity spinner as the
        // image is about to start downloading in background.
        activitySpinner.startAnimating()

        // #6 - Update the UI with info from the Messier object
        // the user chose to inspect.
        titleLabel.text = messierViewModel?.formalName
        subtitleLabel.text = messierViewModel?.commonName
        updatedLabel.text = messierViewModel?.dateUpdated
        descriptionTextView.attributedText = messierViewModel?.textDescription

        // #7 - Start image downloading in background.
        messierViewModel?.download(completionHanlder: imageCompletionClosure)

    } // end func viewDidLoad

    override func viewDidLayoutSubviews() {

        super.viewDidLayoutSubviews()
        // #8 - make sure UITextView shows beginning
        // of Messier object description
        self.descriptionTextView.setContentOffset(CGPoint.zero, animated: false)

    }

    override func didReceiveMemoryWarning() {
        super.didReceiveMemoryWarning()
    }

} // end class DetailViewController
#1 – Define a closure (completion block) instance for updating the UIImageView once an image downloads.
#2 – Download occurs on background thread, but UI update must occur on the main thread (in completion block).
#3 – Animate the appearance of the Messier image (in completion block).
#4 – Stop and hide the activity spinner as the image has finished downloading (in completion block).
#5 – Start and show the activity spinner as the image is about to begin downloading in the background.
#6 – Update the UI with info from the Messier object that the user chose to inspect.
#7 – Start image downloading in background.
#8 – Make sure the UITextView shows the beginning text of the Messier object description.
The MVVM code: The View/view controller
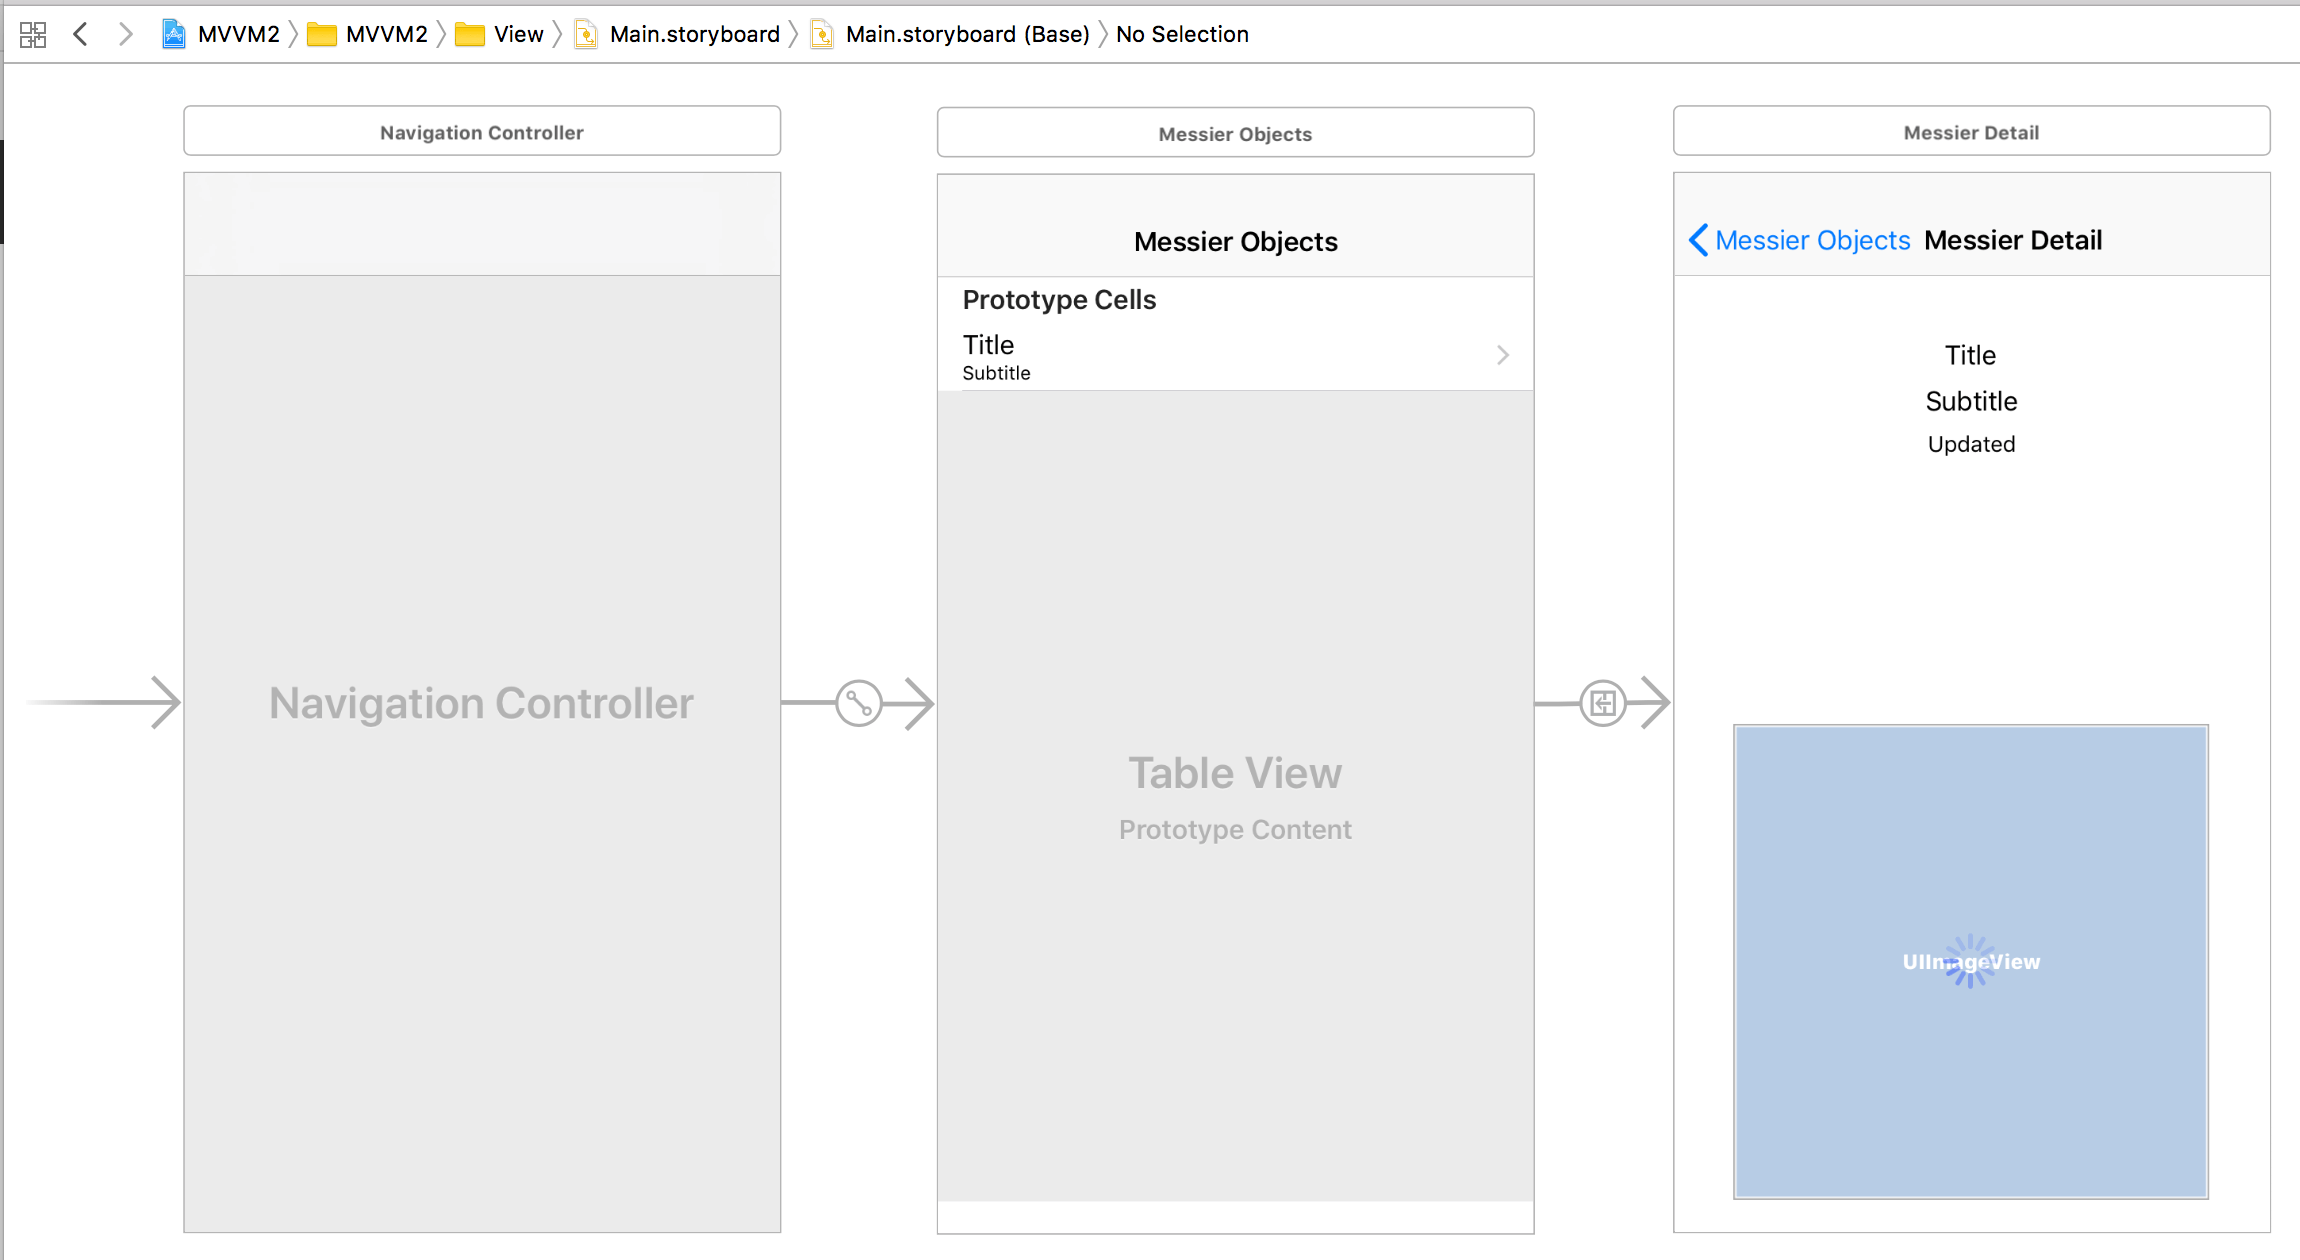
Let’s quickly walk through my storyboard. I’ve wired up a UITableView to display a few rows of Messier object data. Clicking on each row performs a segue that displays a detail screen which can show much more information than just a row, including an image of the Messier object. The images download in the background as they’re very large multi-megabyte files. I’ve embedded my main UIViewController subclass in a UINavigationViewController so that my segue pushes my detail UIViewController subclass onto the screen with a nice hierarchical burrowing slideover. The user can then return to the UITableView using the built-in “< Back” button.
Here’s a screenshot of my Main.storyboard file:
Conclusion
When developing software, we’re literally controlling chaos — at least trying to control chaos. Software complexity generally grows exponentially as developers add more code (variables, constants, structures, enumerations, classes, protocols, conditionals, repetitive constructs, etc.) to their projects. Look at the graph here and you’ll see that when a software app approaches just 6000 lines of code, complexity approaches infinity — the unknowable, the utterly unpredictable, the uncontrollable.
It was estimated that Windows 7 contained approximately 40 million lines of code while macOS 10.4 (Tiger) contained about 85 million lines. Estimating the number of possible behaviors which such systems can exhibit is computationally impossible. Remember I mentioned “exponential,” i.e., where complexity approaches infinity. Any application with 40 or 85 million lines of code is infinitely complex. No one can ever know every possible state or behavior that such applications can exhibit. We can only do our best to try to control the chaos.
Remember that even those “smaller” apps that you and your teams work on can easily reach infinite complexity.
So what is a programmer to do? Continue looking at topics such as was the subject of this article: design patterns. Also look at the other tools I mentioned that were designed to help control software complexity. Look up the term “software complexity” and do your own research.
Remember that there is no perfect solution and don’t get into arguments with people who preach utopian or all-or-nothing solutions. We are humans. We’re always growing. Let’s do our best.


