Hey everyone and welcome back to the second and final part of this tutorial series where we explore the intricacies of Apple’s MusicKit by building our very own music player in SwiftUI that can stream songs from our Apple Music account. If you haven’t read Part 1, you can do that here.
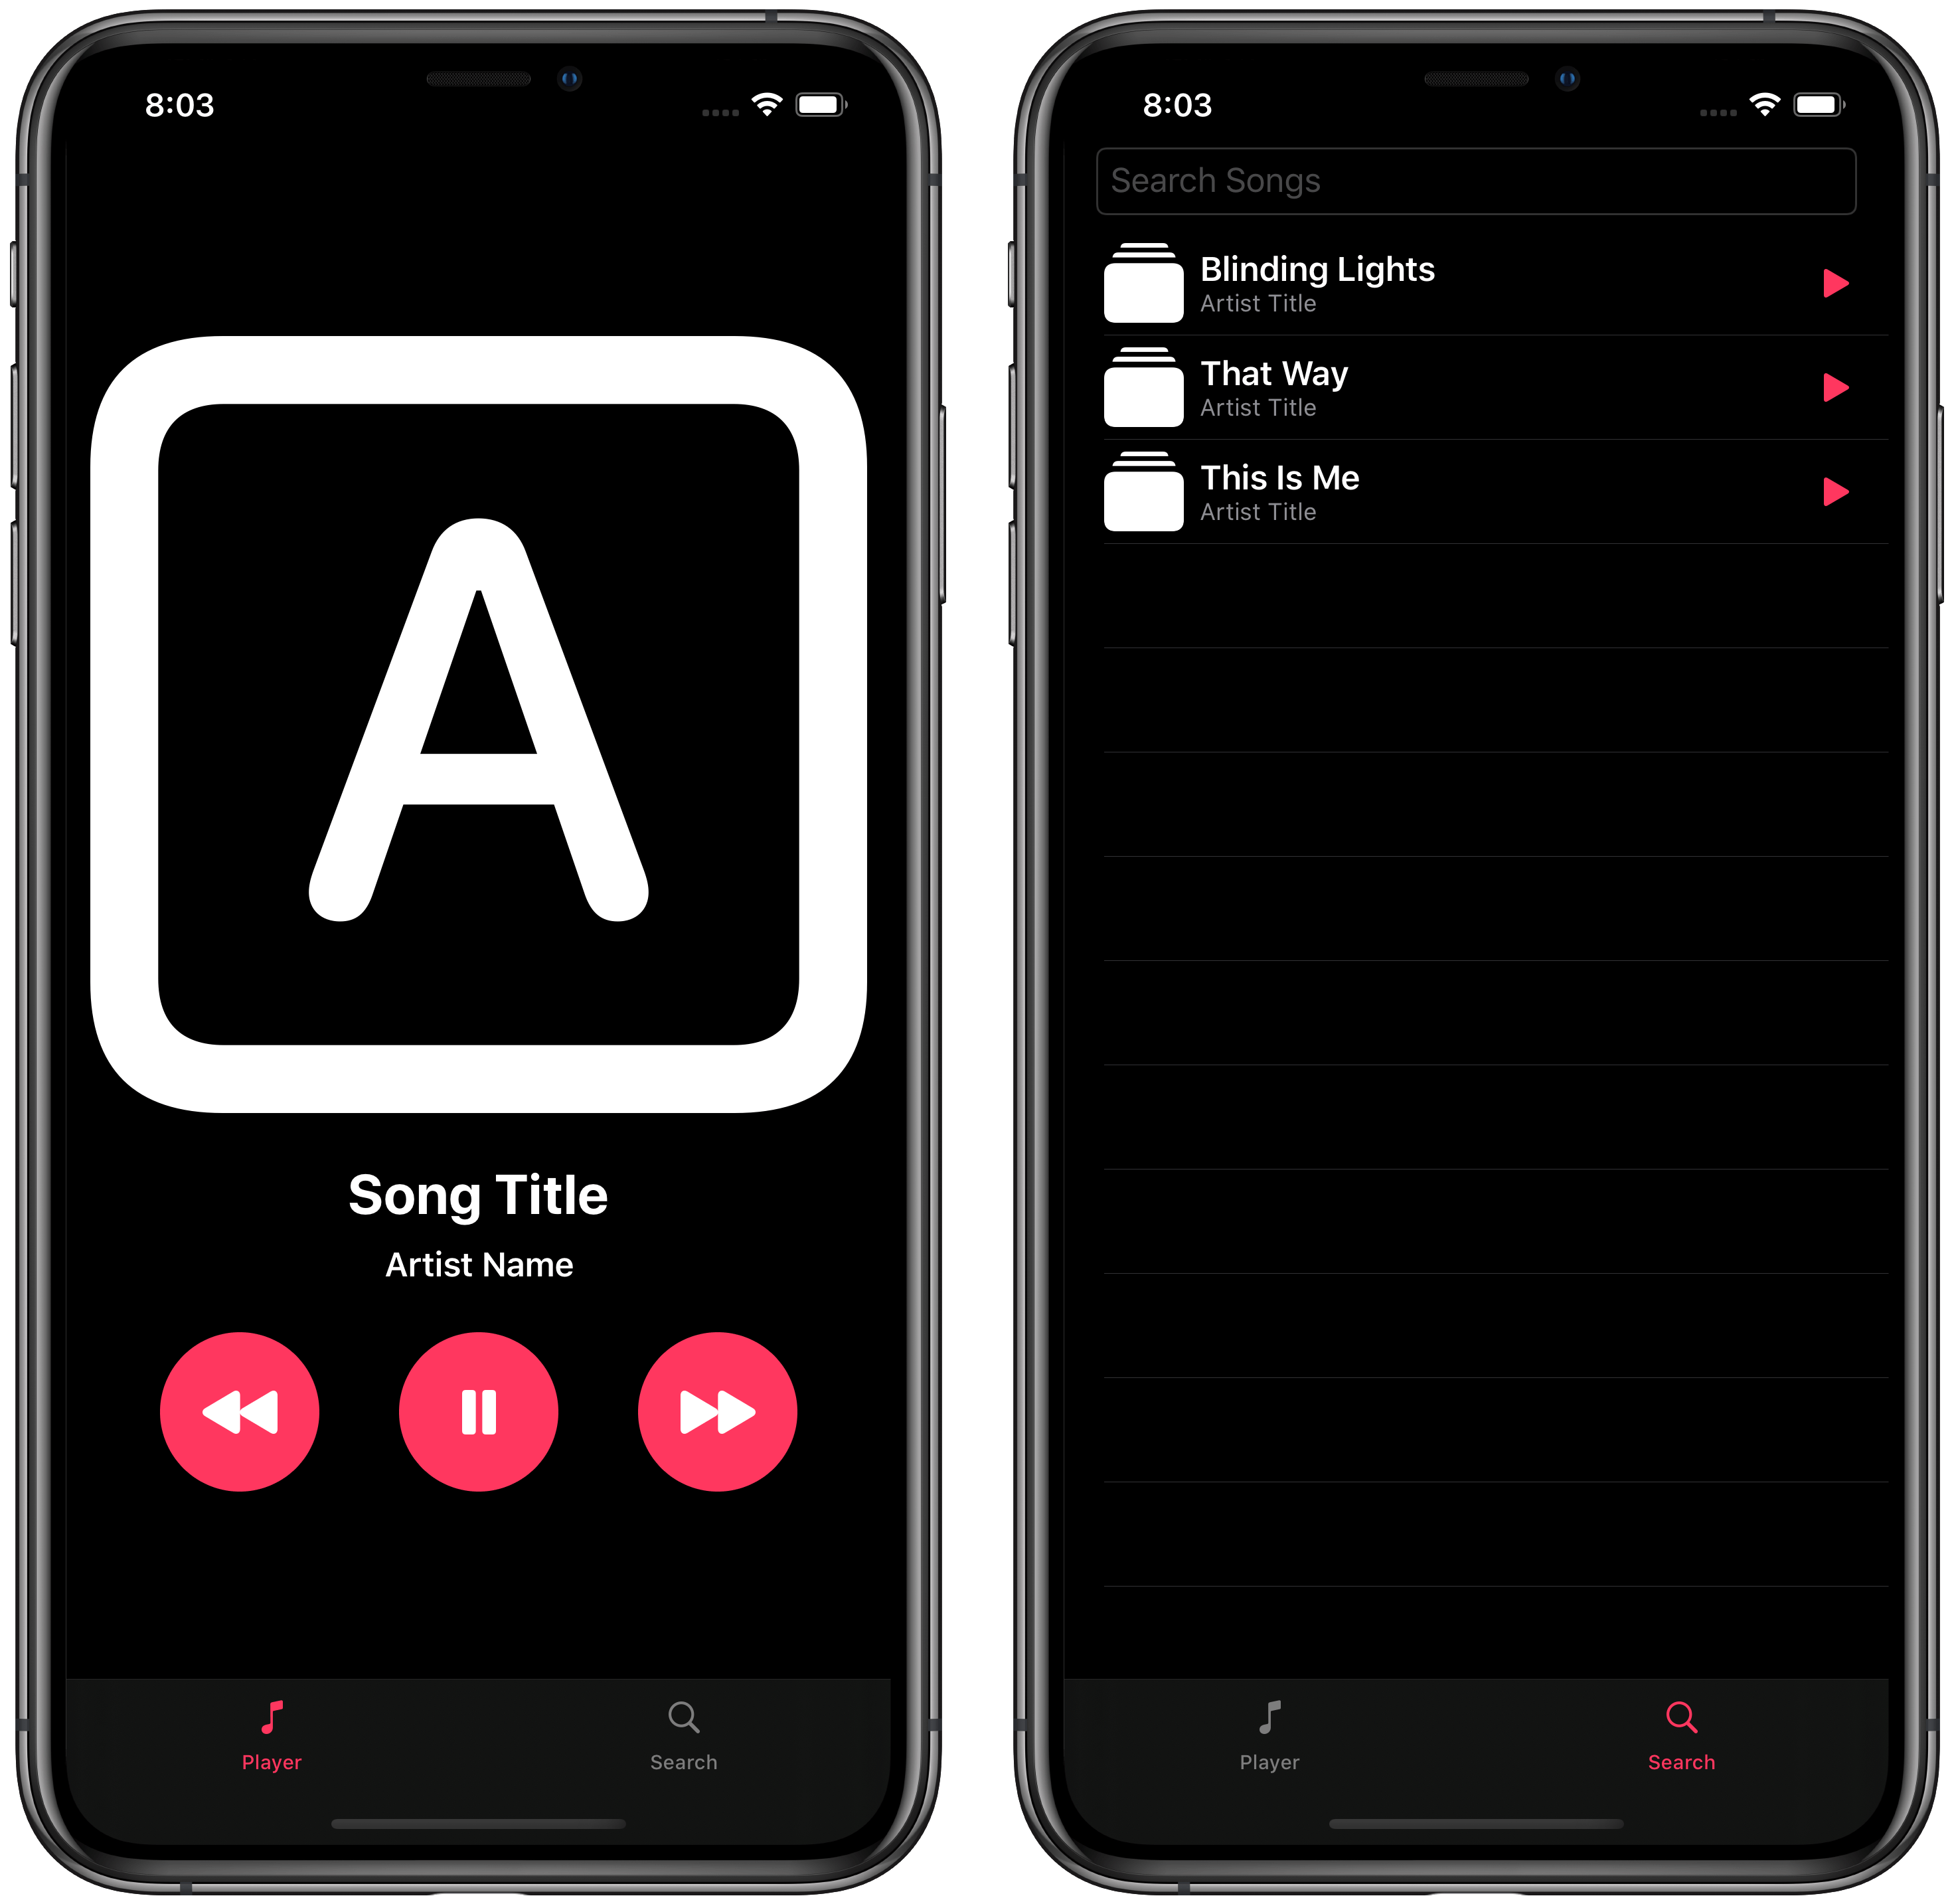
In the last tutorial, we looked at how to create a MusicKit Identifier for our Apple Developer account, created a JSON Web Token private key, and we were able to successfully make web requests to the Apple Music API. At the end of the tutorial, we also built the UI of our music player and were able to make it look like below.
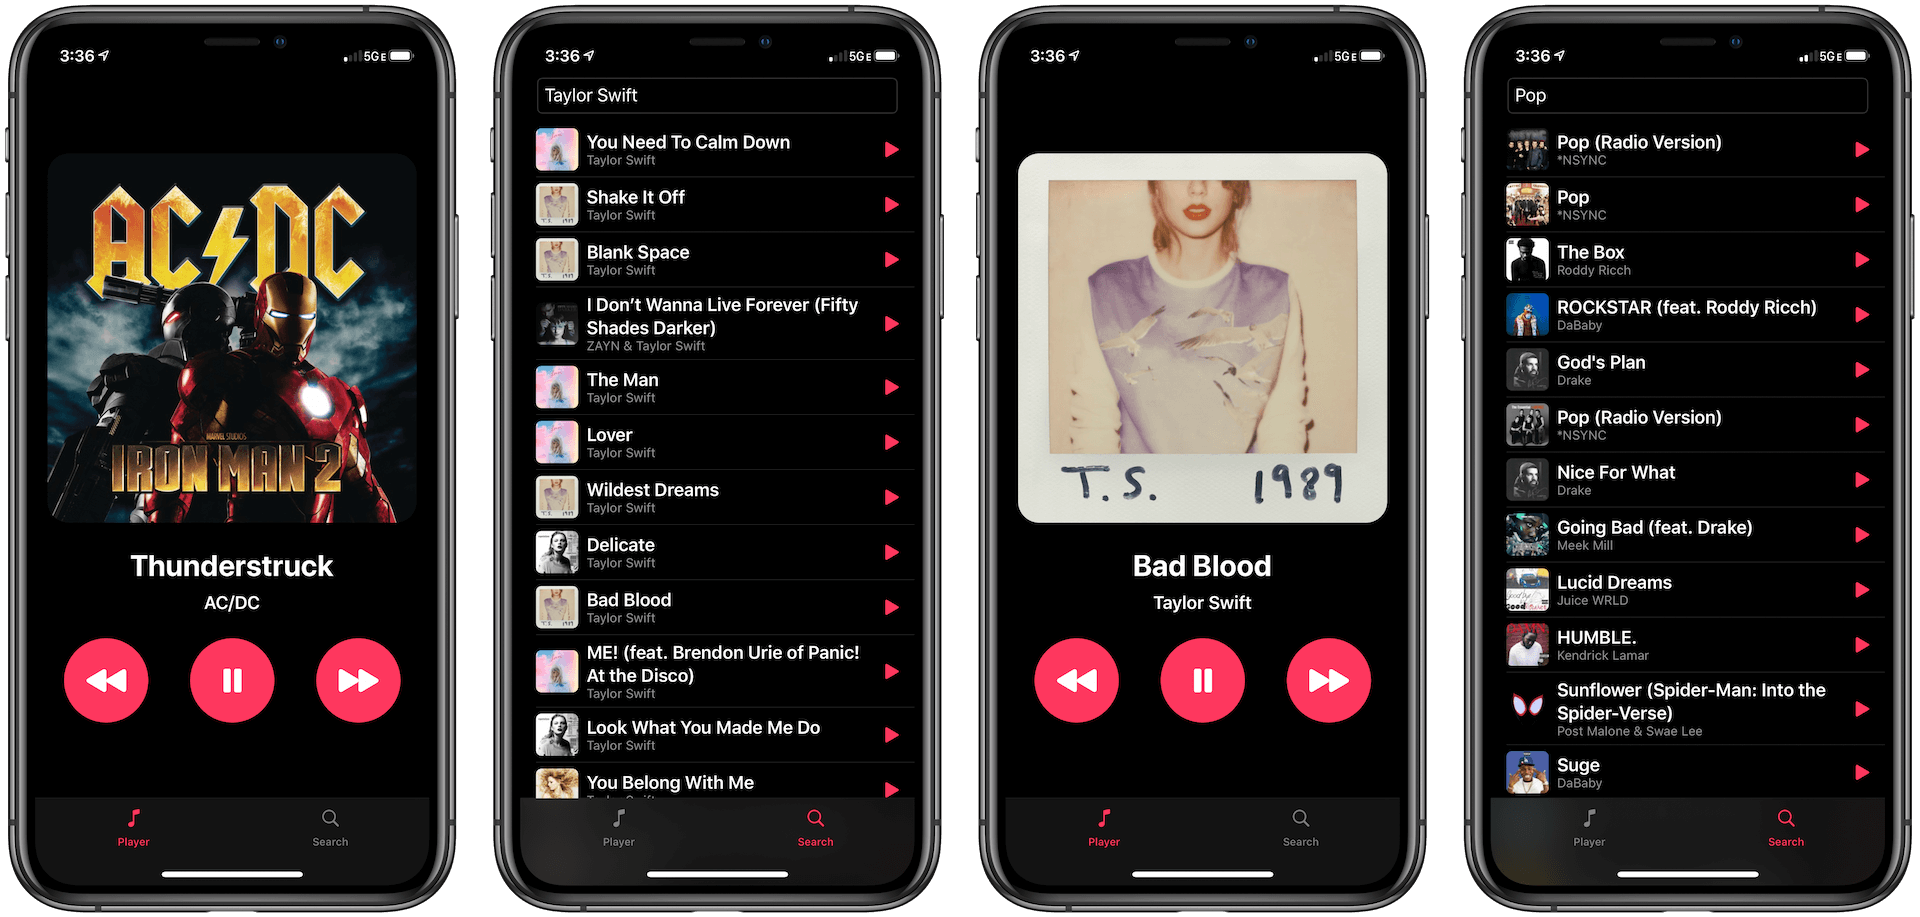
In this tutorial, we’ll start making calls to the Apple Music API to populate our app with real data. We’ll also look at how to control media playback with the MediaPlayer framework and enhance the app to this.
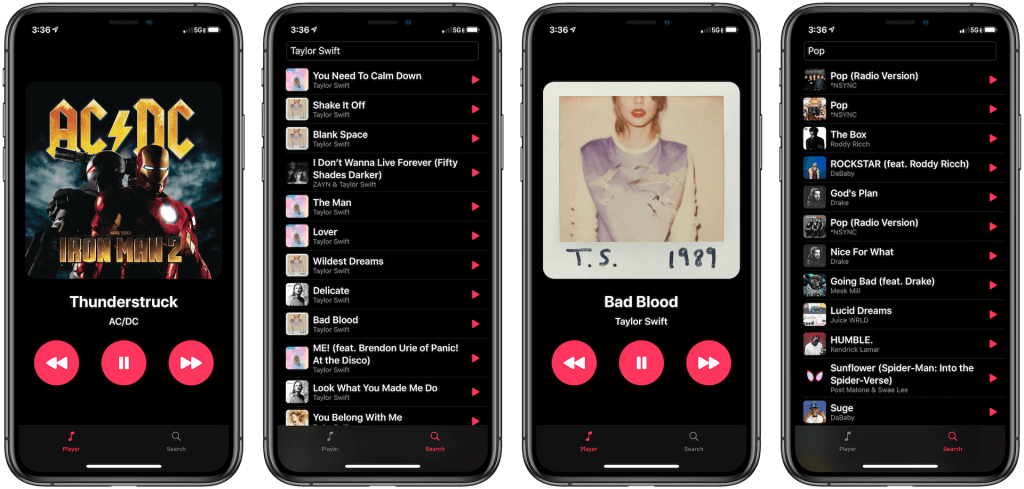
Cool, right? Let’s get started.
Note: This tutorial was made using Xcode 11.4 and Swift 5.1. An active Apple Music subscription will be needed in order to test the app out. You will also need to run your app on a real device because as of this time, the Simulator does not support Apple Music playback.
Apple Music API vs iTunes Search API
If you’ve worked with podcasts, tv shows, or any other Apple generated media content, you must have come across the iTunes Search API. The iTunes Search API lets you search for content in the iTunes Store, App Store, and iBooks Store. This will give you access to information about apps, books, movies, podcasts, music, music videos, audiobooks, and TV shows. The best part about using this API is that it’s completely free so you can get updated information, on the fly, for no additional cost.
But why do we use the Apple Music API instead of the iTunes Search API? This is because of how much information and power the Apple Music API can deliver. While the Apple Music API provides the same functionality as the iTunes Search API (fetching information about music and music videos), the Apple Music API takes it to the next level by accessing a user’s personal library and recommendations.
This means your app can leverage a user’s playlists, songs, or ratings for their content. This is why it’s required for your user to have an Apple Music account if you will be using the API. Another important reason why the Apple Music API is better over the iTunes Search API is because it is built to work harmoniously with the MediaPlayer framework. As you’ll see, streaming audio is a breeze with the Apple Music API. Let’s get started!
Creating our Classes
Due to the nature of SwiftUI, making URL calls within our structs can get really complicated. Furthermore, it can get pretty complicated to populate our UI with different information gathered from different songs. This is why we’ll create an AppleMusicAPI class that will contain the functions we’ll frequently use in our app and a Song structure to make it easier to populate our UI.
Before we begin, download SwiftyJSON.swift and add the file to your project. This file contains the code for the popular library SwiftyJSON. This is a tremendous tool when making HTTP requests and receiving and parsing JSON responses. You can find more information about SwiftyJSON here.
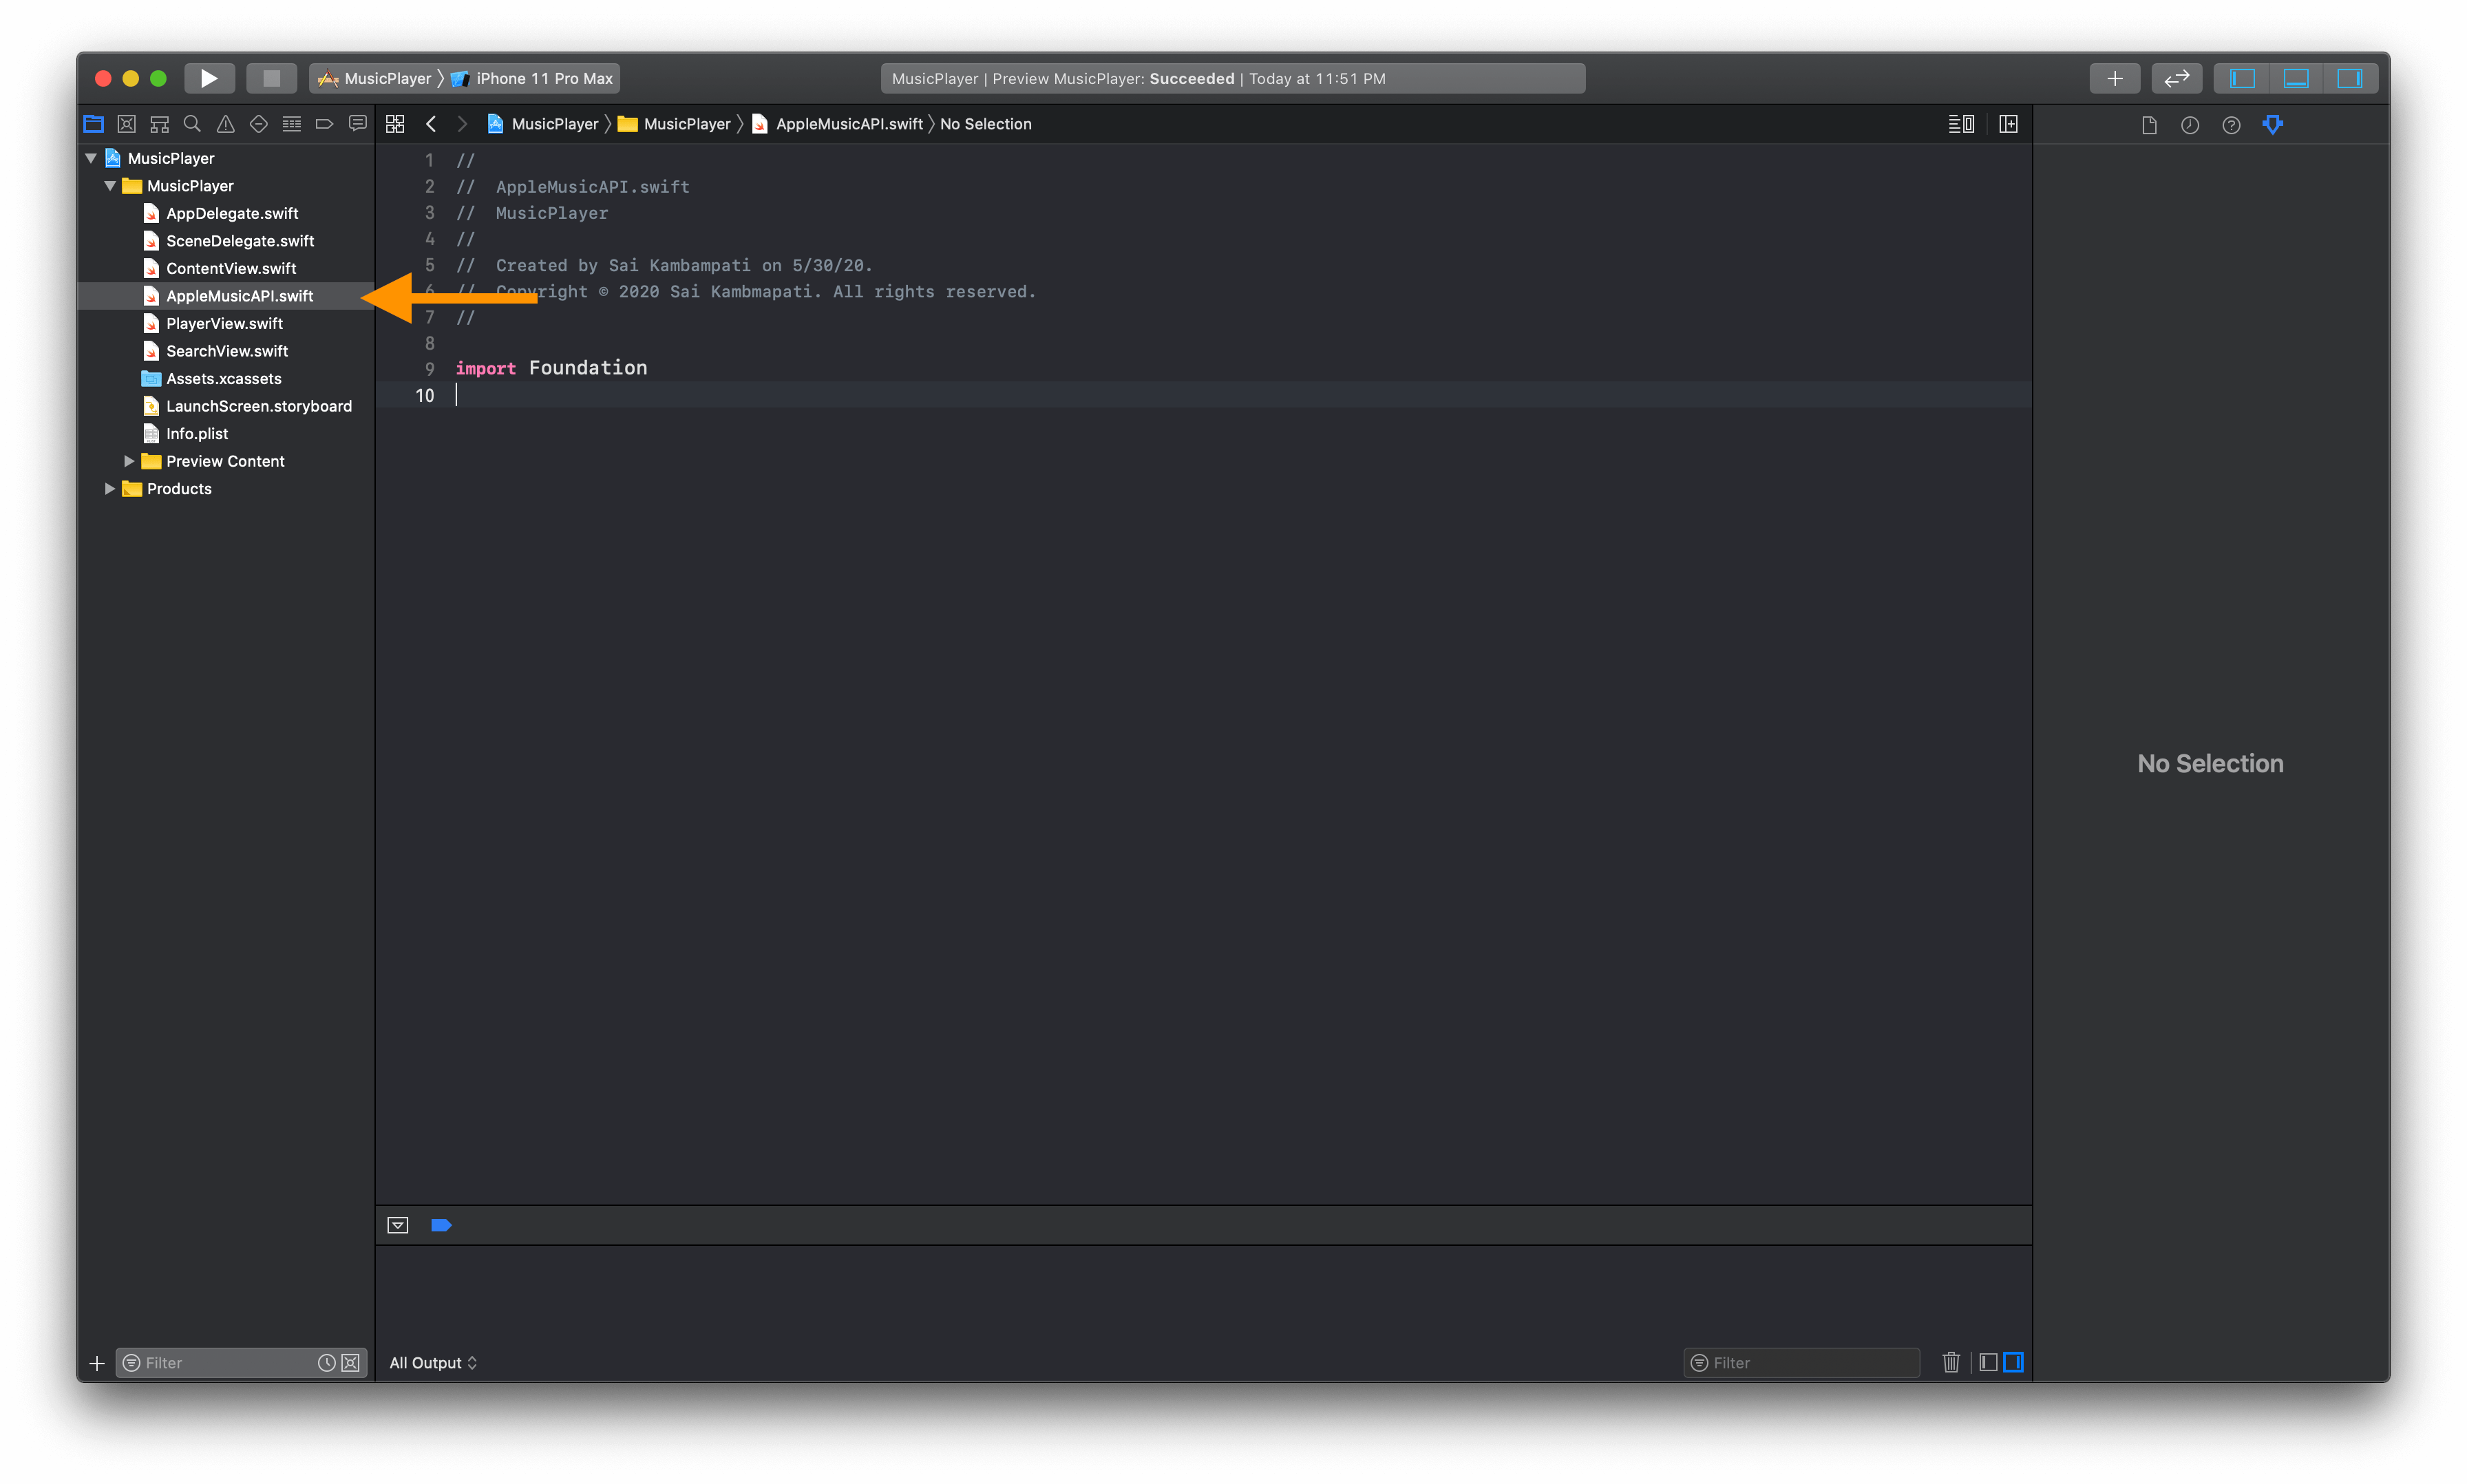
To begin, choose to File > New > File. From the popup that appears, select Swift file. Name this file AppleMusicAPI.swift and save this file in the default location. You should now have a template file as shown below.
Similarly, let’s create a struct for our songs. Go to File > New > File and select Swift file. Name this file as Song.swift and save this file. We’ll begin creating our Song structure first.
Add the following code below import Foundation:
struct Song {
    var id: String
    var name: String
    var artistName: String
    var artworkURL: String

    init(id: String, name: String, artistName: String, artworkURL: String) {
        self.id = id
        self.name = name
        self.artworkURL = artworkURL
        self.artistName = artistName
    }
}
The code above creates a simple structure for Song. In case if you’re not familiar with structures, don’t worry. A structure is a type of class that helps make your code more concise, especially when dealing with structural data. Structures, just like classes, can define properties, methods, and initializers to set up their initial state. This is what we are doing with our init method. We are providing a default initializer method for the Song structure that lets a user input the ID, name, artist’s name, and album artwork’s URL.
Now switch over to the AppleMusicAPI.swift file. Here, we’ll be implementing a class called AppleMusicAPI that stores our developer token and a bunch of methods that will help when playing our song through our app.
Remove import Foundation and Add the following code to AppleMusicAPI.swift:
// 1
import StoreKit

// 2
class AppleMusicAPI {
    // 3
    let developerToken = "YOUR DEVELOPER TOKEN FROM PART 1"

    // 4
    func getUserToken() -> String {
        var userToken = String()

        return userToken
    }
}
The above code is pretty self-explanatory but don’t worry if this is a little unclear. Here’s what the above function does.
- First, we import the
StoreKitframework. This helps us access a lot of built-in methods that can communicate with the Apple Music API. - Here, you’ll notice we’re defining a class called
AppleMusicAPI. This makes it easier to manage multiple instances of this class and reference the methods from other views in our app. - Here we’re defining a constant
developerTokencontaining the developer token we created in Part 1 on this tutorial series. This makes it easier to call the token when communicating with the API. - Finally, we define our first method in this class:
getUserToken(). As mentioned earlier, the Apple Music API can get a user’s library and playlists. This is only possible if we receive a token that is identifiable to a particular user.
Let’s finish implementing the rest of the getUserToken method.
func getUserToken() -> String {
    var userToken = String()

    // 1
    let lock = DispatchSemaphore(value: 0)

    // 2
    SKCloudServiceController().requestUserToken(forDeveloperToken: developerToken) { (receivedToken, error) in
        // 3
        guard error == nil else { return }
        if let token = receivedToken {
            userToken = token
            lock.signal()
        }
    }

    // 4
    lock.wait()
    return userToken
}
You might face some new code in the above snippet. Don’t worry though as most of it will be explained.
- First, we define a
lockthat is of typeDispatchSemaphore. What is aDispatchSemaphore? A dispatch semaphore is an efficient implementation of halting a thread until a particular message has been passed. This “locks” a thread from executing more code until a signal has been given. - We access the
SKCloudServiceController().requestUserToken()method to get a token that authenticates the user in personalized Apple Music API requests. Notice how we use our constantdeveloperTokenin this method. It’s definitely easier than typing the long string again and again. - Here, we write some code to error check what the
requestUserToken()function returns. IfreceivedTokenis not empty, we set it equal to ouruserTokenvariable from above. Notice, afterwards, we calllock.signal(). This lets the dispatch semaphore we create earlier know that it’s ok to start executing remaining code. - Since this method executes asynchronously, it’s possible that when
getUserToken()executes, it can skip to the linereturn userToken, even before a token is received from theSKCloudServiceController. By adding thelock.wait()line of code, this tells the code to halt executing any further code until a signal is given (as we implemented in Step 3).
Note: Dispatch sophomores must be used with caution. This can transform code to execute synchronously which can slow down an app or not update UI in time. In fact, if lock.signal is not called, the app will forever remain stuck until the user restarts the app. Thus, it’s not advised to use this in big production apps. However, for our purposes, it’s completely acceptable.
Now, let’s implement our next method: fetchStorefront().
A storefront is an object that represents the iTunes Store territory that the content is available in. When we perform a search using the Apple Music API, we’d like to show results relevant to our user’s location. Beneath, getUserToken(), add the following method:
func fetchStorefrontID() -> String {
    // 1
    let lock = DispatchSemaphore(value: 0)
    var storefrontID: String!

    // 2
    let musicURL = URL(string: "https://api.music.apple.com/v1/me/storefront")!
    var musicRequest = URLRequest(url: musicURL)
    musicRequest.httpMethod = "GET"
    musicRequest.addValue("Bearer \(developerToken)", forHTTPHeaderField: "Authorization")
    musicRequest.addValue(getUserToken(), forHTTPHeaderField: "Music-User-Token")

    // 3
    URLSession.shared.dataTask(with: musicRequest) { (data, response, error) in
        guard error == nil else { return }

        // 4
        if let json = try? JSON(data: data!) {
            print(json.rawString())
        }
    }.resume()

    // 5
    lock.wait()
    return storefrontID
}- Just like earlier, we create a dispatch semaphore called
lockto make sure that the function returns astorefrontIDonly after the data has been received from our URL request. - We create a
URLRequestusing the Apple Music API url. A lot of the details about handling requests and responses from the Apple Music API can be found here, but here’s the gist. To compose a request to the API, first specify the root path, https://api.music.apple.com/v1/ . Here, we specify the storefront component. Using a GET Request, we create a request, adding our developer token in the header. - Next, we use
URLSessionto sendmusicRequest. This is very similar to performing any networking requests for either obtaining images or data. As the.dataTaskmethod is built, we are returned with three constants:data(the data the network response sends back),response(details about the response), anderror(this may be nil if there is no error). After checking to make sure there is no error, we move to Step 4. - The data we get is a JSON payload. A payload is the part of transmitted data that is the actual intended message. Using the
SwiftyJSONlibrary we added earlier, we’ll print the raw JSON output before parsing it. Notice that we’re not callinglock.signal()here because we’re not setting anything to thestorefrontID. If we did calllock.signal(), our app would crash when testing it. We’ll add the signal when we parse our JSON result. - Finally, we ask the dispatch semaphore to wait before returning the storefront’s ID.
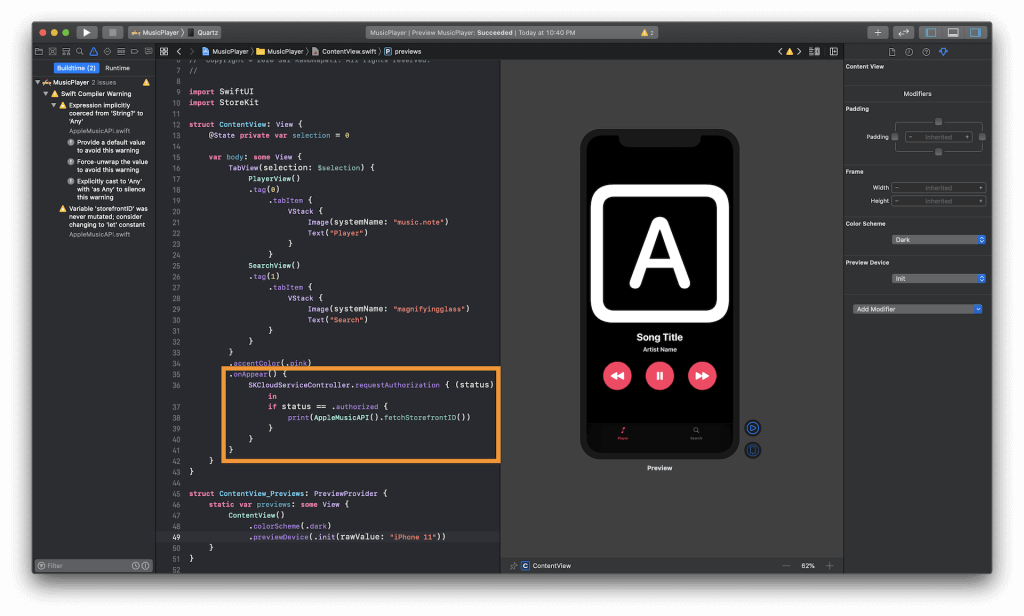
This was a lot of code so now is a good time to make sure everything is working properly. We’ll switch to ContentView.swift and add an onAppear function to our TabView. Whatever code we place inside this method will be executed when TabView is displayed to the user. The code we’ll place inside will ask the user for permission to access their media library and upon authorization, will call the fetchStorefront() method which will print the JSON payload.
Let’s do it! At the top of the file, add import StoreKit and then make your TabView view look as such
TabView(selection: $selection) {
// Previous Code
    ...
}
.accentColor(.pink)
.onAppear() {
    SKCloudServiceController.requestAuthorization { (status) in
        if status == .authorized {
            print(AppleMusicAPI().fetchStorefrontID())
        }
    }
}
These few lines of code are easily comprehendible. We ask the SKCloudServiceController (remember, this is an object provided by StoreKit that determines the current capabilities of the user’s music library) for authorization to access a user’s media library. If the user authorizes this access, we run print(AppleMusicAPI().fetchStorefrontID()) which will print the JSON payload of the request.
Notice how we call out AppleMusicAPI class. Similar to ContentView in SwiftUI or ViewController in storyboard-based Swift, by adding the pair of parentheses after the class’s name, we are initializing it which gives us access to all its constants and methods, such as the fetchStorefrontID() method.
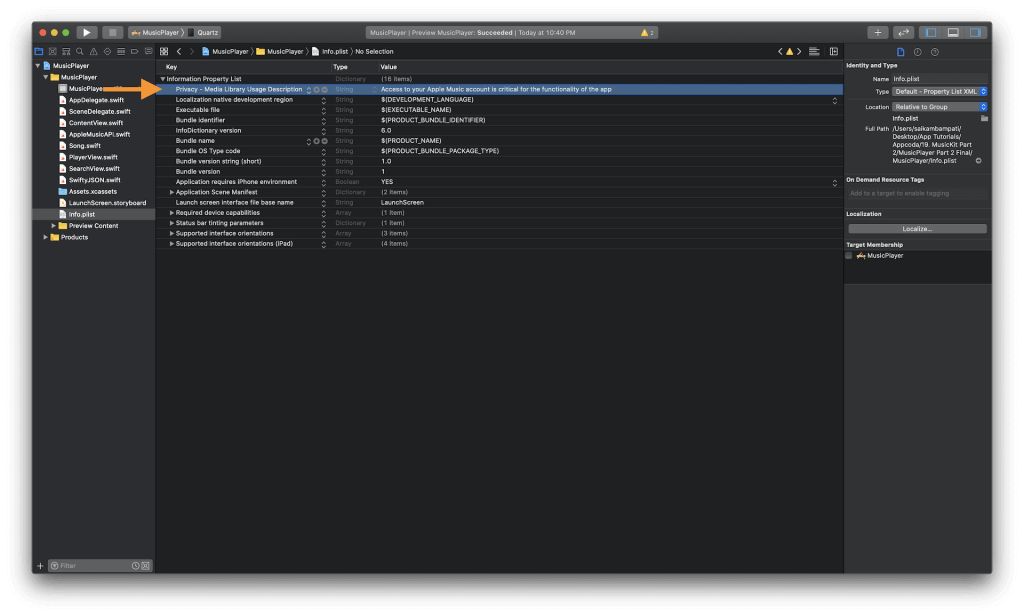
Now before we run the app to make sure everything is functioning as expected, we need to make a slight addition to our Info.plist. We need to add the following property that gives gives a description to the user what we need access to their music library for. The key is Privacy - Media Library Usage Description and the value can be any message you wish it to be that adequately informs users what the data will be used for.
Now we can run out app!
You’ll need to run the app on a physical device with an active Apple Music subscription. Unfortunately, the simulator does not have the Music app so accessing a user’s Apple Music account is near impossible. Having an active Apple Music subscription lets you test the features of your app on your account.
After authorizing the app to access your Apple Music account, you should wait for some time and expect an output that looks like the one below.
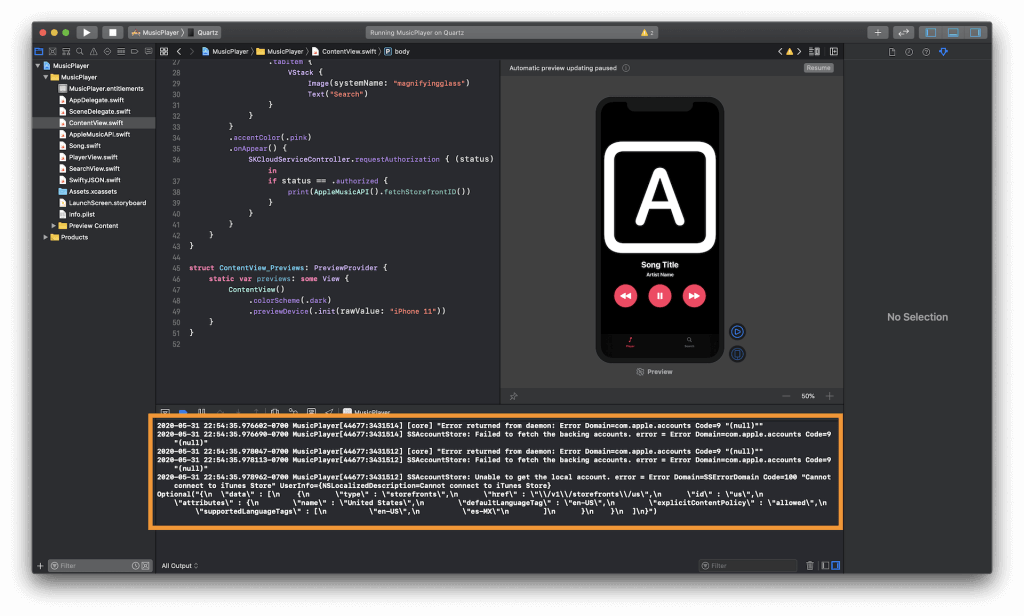
Don’t worry about the error messages stating something along the liens of “Unable to get the local account”. Beneath that, you’ll see a JSON string printed out. This goes to show that our code is working. Let’s go back to AppleMusicAPI.swift and finish the rest of the fetchStorefrontID() method. Delete the line print(json.rawString()) and replace it with the following
// 1
let result = (json["data"]).array!
let id = (result[0].dictionaryValue)["id"]!

// 2
storefrontID = id.stringValue

// 3
lock.signal()- We set
resultto be the array the JSON payload provides underneath thedatakey.idis simply value provided under theidkey in the dictionary provided inresult. This can sound a little confusing. The names of keys and values can be derived from the JSON string we printed earlier. To learn more about reading and parsing JSON, this [article][4] can help you. - We set the
storefrontIDto the string value of theidconstant from Step 1. - Just like earlier, we signal the dispatch semaphore that it’s okay to execute remaining code and free up the thread.
Your entire fetchStorefrontID() method should look like this.
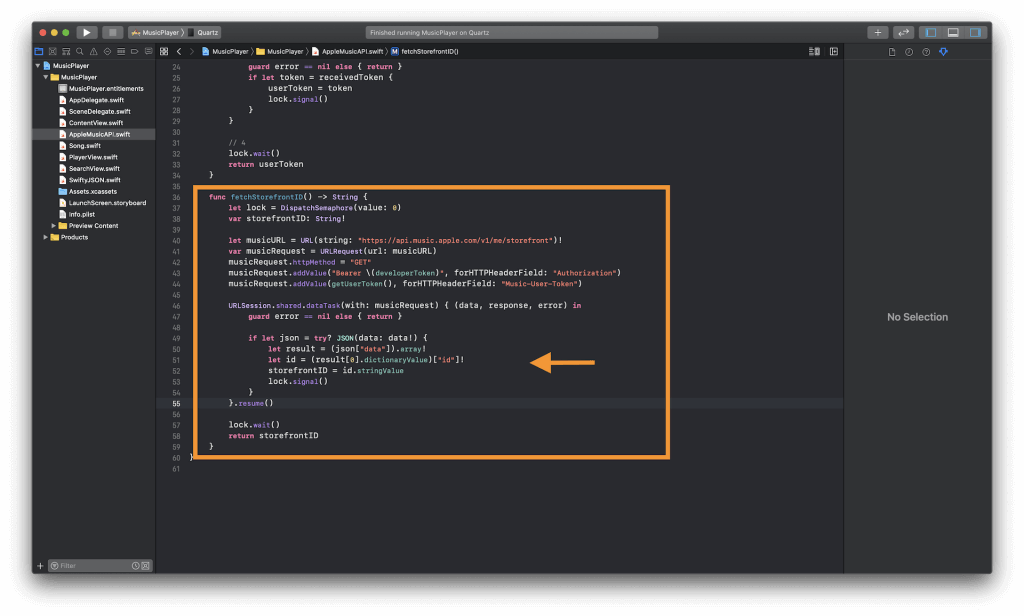
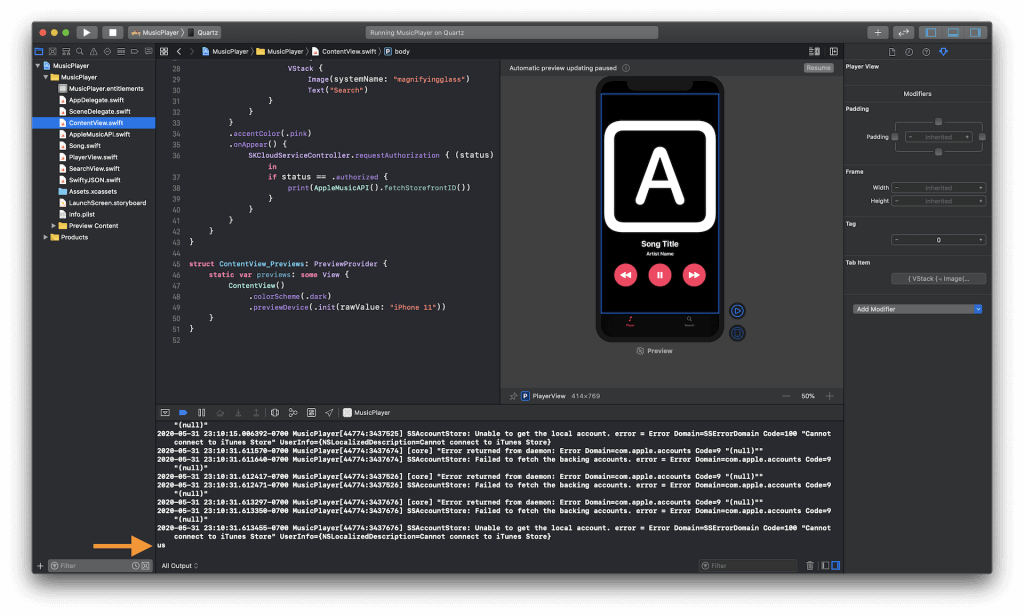
Run the app again and you’ll see how instead of printing a JSON file, only two characters are printed, signifying the storefront ID of your Apple Music account. For me, in the United States, a simple “us” is printed out.
If everything works, give yourself a pat on the back! We have one last method to implement in our AppleMusicAPI class and this one is pretty big. This method will allow us to search Apple Music’s entire library of 40 million+ songs based on the keywords given. Now’s a good time to take a break!
Music Search
Underneath our fetchStorefrontID() method, let’s add a new method called searchAppleMusic(searchTerm:) that will let us search Apple Music’s library based on the term. Here’s a boilerplate to get you started. You’ll notice it’s very similar to our fetchStorefrontID() function.
func searchAppleMusic(_ searchTerm: String!) -> [Song] {
    let lock = DispatchSemaphore(value: 0)
    var songs = [Song]()

    let musicURL = URL(string: "https://api.music.apple.com/v1/catalog/\(fetchStorefrontID())/search?term=\(searchTerm.replacingOccurrences(of: " ", with: "+"))&types=songs&limit=25")!
    var musicRequest = URLRequest(url: musicURL)
    musicRequest.httpMethod = "GET"
    musicRequest.addValue("Bearer \(developerToken)", forHTTPHeaderField: "Authorization")
        musicRequest.addValue(getUserToken(), forHTTPHeaderField: "Music-User-Token")

    URLSession.shared.dataTask(with: musicRequest) { (data, response, error) in
        guard error == nil else { return }

    }.resume()

    lock.wait()
    return songs
}
In terms of variables, we have our routine dispatch semaphore defined and a new songs array of type Song that we defined earlier. We’ll be storing the songs in this array and returning this array to populate our table. You’ll notice that searchTerm is a String provided as an input to this function. We also perform string manipulation on searchTerm to replace any instances of whitespaces with the + symbol as URL’s can’t contain any whitespaces.
We also create the URLRequest using the Apple Music API url. Notice that like before, it uses the root path https://api.music.apple.com/v1/. However, the URL component is catalog and we pass the search term as a parameter of the URL. Apart from these changes, we again use the GET request, create the request, and add our developer token to the header.
Now comes the important part which is parsing the data returned from our URLSession.shared.dataTask. Let’s think about what we need. We need to parse the data for an array of songs. We then need to isolate the different components of the each song in the array such as title, artist, album artwork, etc. After isolating these components, we can create an object of type Song and add this to our songs array. This is how it can be accomplished.
Type the following code and place it underneath guard error == nil else { return } inside the URLSession.shared.dataTask() method:
// 1
if let json = try? JSON(data: data!) {
    // 2
    let result = (json["results"]["songs"]["data"]).array!
    // 3
    for song in result {
        // 4
        let attributes = song["attributes"]
        let currentSong = Song(id: attributes["playParams"]["id"].string!, name: attributes["name"].string!, artistName: attributes["artistName"].string!, artworkURL: attributes["artwork"]["url"].string!)
        songs.append(currentSong)
    }
    // 5
    lock.signal()
} else {
    // 6
    lock.signal()
}
This is very similar to the code we wrote above to fetch a user’s storefront ID. The only difference it there’s a lot more JSON parsing and we are creating a Song object to add to our array.
- First, we type check to see is the data returned is in a valid JSON format. If it is, we create a constant called
jsoncontaining all this data in the JSON file format. - We parse
jsonfor the songs that is nested withinresults->songs->datain an array format. Now, I don’t want to burden you with more JSON formatting but this order was derived by printing the raw string ofjsonand noticing how each component was ordered. If you want, you can printjsonto see howresultis nested within the JSON data.resultwill now contain an array of our songs. - Now, we parse through each song in
resultusing our trusty for loop. - First, we define a constant called
attributesthat is a dictionary of all the attributes of our current song. These attributes contain lots of information about the current song but we’re interested in the id, name, artist’s name, and artwork URL. Then we create acurrentSongconstant of typeSongthat is populated with the values from theattributesdictionary. Finally, we append thecurrentSongto oursongsarray. - Last but not least, we signal our dispatch semaphore through
lockso the rest of the thread can be freed up to run the remaining code. - This is more of a check but if the data returned is not in a valid JSON format, we don’t want our app to stay stuck forever. This is why we add an
elseclause to signal the dispatch semaphore to continue the rest of the code.
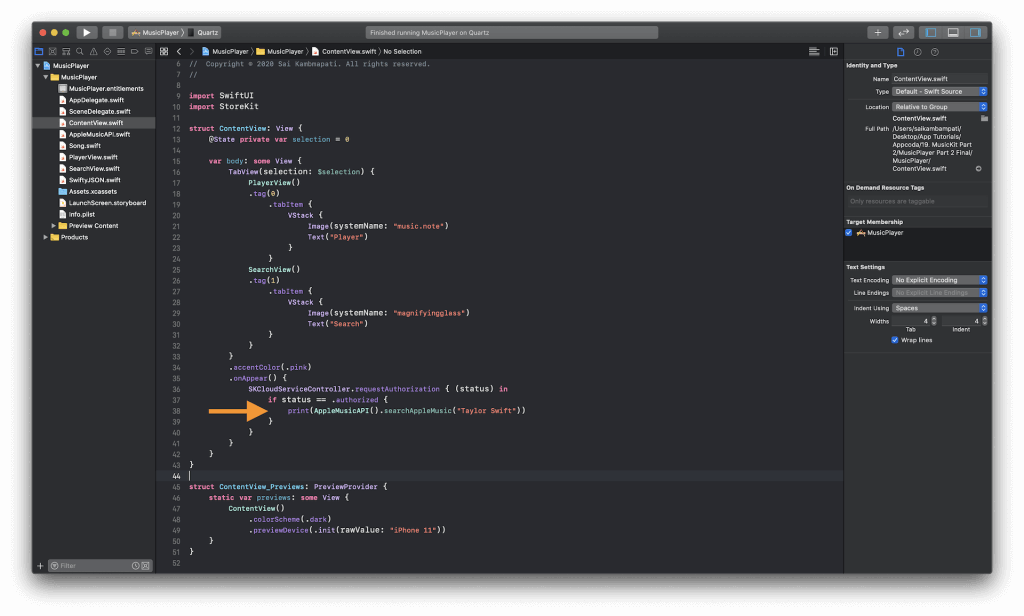
Now we need to make sure our function works. Head over to ContentView.swift. In the .onAppear() declaration, we need to make a very minor change to the statement where we print AppleMusicAPI().fetchStorefrontID(). All we need to do is replace .fetchStorefrontID() with .searchAppleMusic("Taylor Swift"). If all goes well, when we run the app, this will print an array of Song objects containing all the songs Apple Music returns when its catalog is searched for Taylor Swift. (Of course, you can replace this with any artist, album, song, or word of your choice).
Run the app and observe the console. After a few seconds, you should see an output similar to the following:
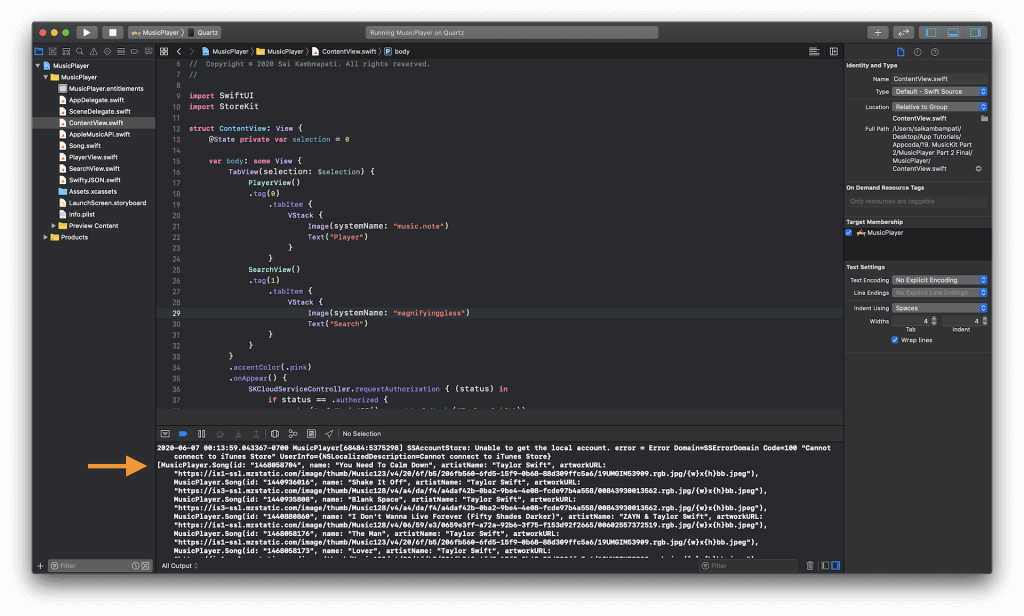
As you can see, a whole array containing the songs based on your search term. We can look at the artist name, id, name of the song, and a URL to the album artwork. Since we know our code works, let’s delete the entirety of the .onAppear() declaration. That way we don’t necessarily make calls to the API when our app loads.
Now comes the second part of this section which is populating our search table view with the results.
Populating the Table
Go to SearchView.swift. We’ll be making all the changes here to populate our search table. There are many changes we have to make so follow carefully.
First, we need to replace the songs array containing some temporary strings. Delete that line and replace it with the following line:
@State private var searchResults = [Song]()This creates a new empty array called searchResults that conforms to our Song object. We also link it to the @State property so anytime any changes are made to this array, any UI using this variable will be updated.
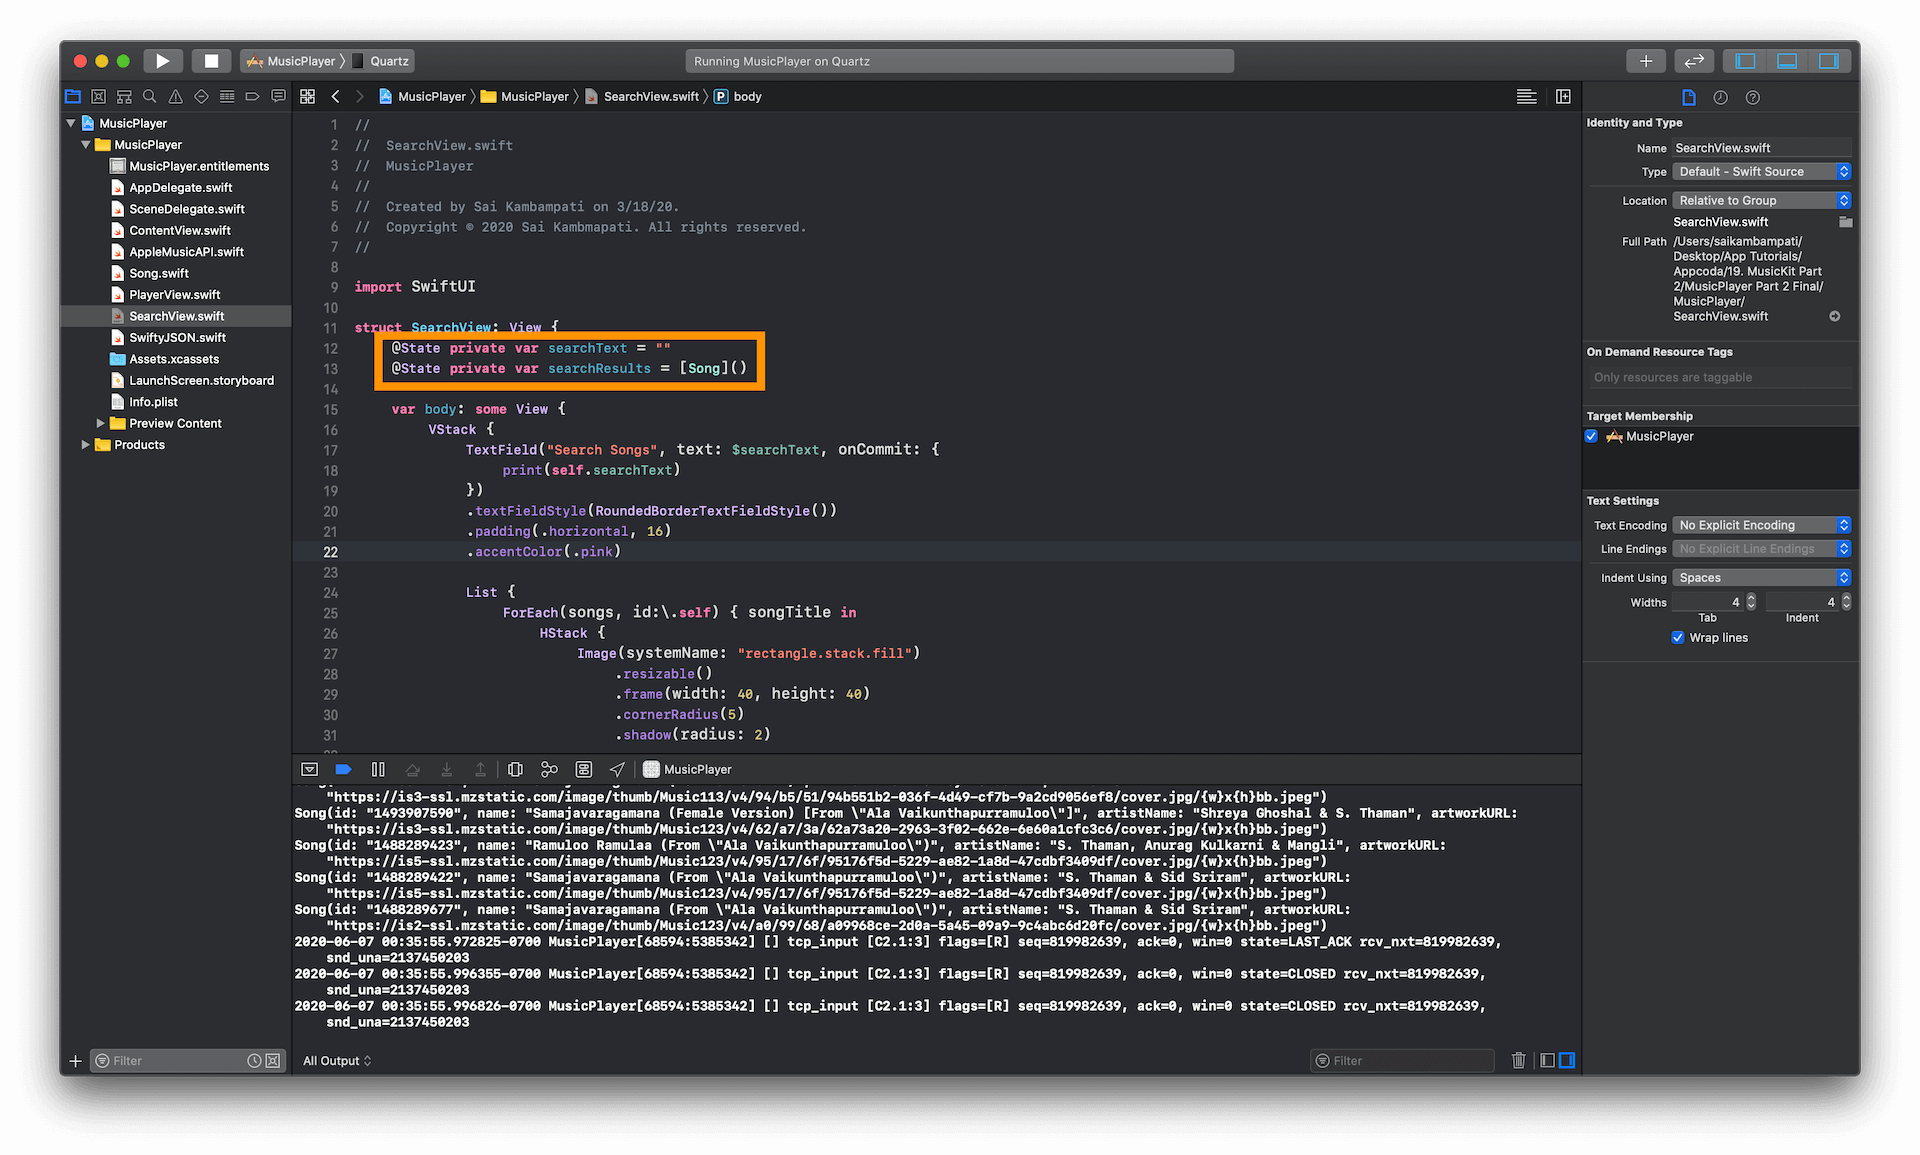
Now, as expected, you’ll get some errors since we removed our old songs array. Let’s start at the ForEach within our List SwiftUI component. The error displayed here is that we’re still trying to iterate over a variable songs that doesn’t exist. Replace the ForEach line with the following:
ForEach(searchResults, id:\.id) { song in
    ...
There are three changes we’ve made here.
- The first change is we’ve replaced
songswhichsearchResults. - Now since our
Songobject doesn’t conform to theHashableproperty, we can’t use.selfto use it as anid. Good news though! OurSongobjects have anidproperty to identify each element. This is why we replace\.selfwith\.id. - Finally, and this is really minor, we replace the
songTitlevariable tosong.songTitlereferred to the string from our old array. This isn’t very representative of the current array for which we are iterating which is why we rename it tosong.
While this error is removed, we now have errors wherever we used the variable songTitle. This is a simple fix as we replace songTitle with song.name. Modify the code after the Image object within your HStack to look like the following:
VStack(alignment: .leading) {
    // 1
    Text(song.name)
        .font(.headline)
    // 2
    Text(song.artistName)
        .font(.caption)
        .foregroundColor(.secondary)
}
Spacer()
Button(action: {
    // 3
    print("Playing \(song.name)")
}) {
    Image(systemName: "play.fill")
        .foregroundColor(.pink)
}- first change we made was to replace
songTitlewithsong.name. This will use the name of the song as the string value for this Text object. - The second change we made is to replace the ”Artist Name” placeholder with the actual artists name. Just like
song.name, we usesong.artistNameto populate thisTextobject with the value insong.artistName. - Finally, the last change we made was a slight modification to our
Buttonobject which is to replacesongTitlewithsong.namejust like Step 1.
Now, you can build and run the app. Everything should compile and work as normal but there’s a catch. You’ll notice that when you search for a song and press enter, nothing happens. This is because we still haven’t called the searchAppleMusic function from our AppleMusicAPI() class. To do this, we need to make some changes to our TextField. Before this, at the top of the file underneath import SwiftUI, add the line import StoreKit.
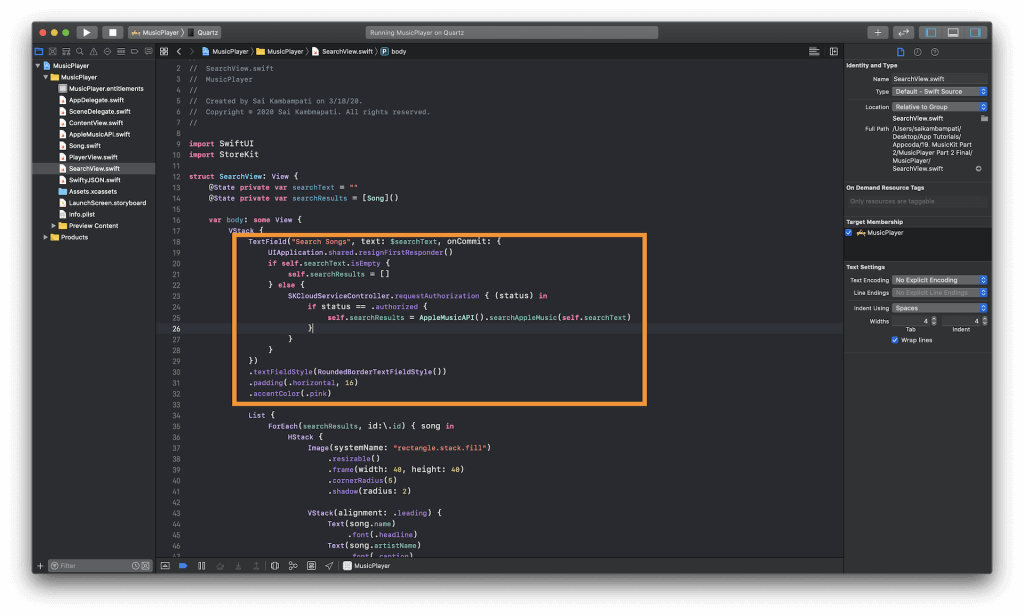
Now, make the following changes to your TextField:
TextField("Search Songs", text: $searchText, onCommit: {
    // 1
    UIApplication.shared.resignFirstResponder()
    if self.searchText.isEmpty {
        // 2
        self.searchResults = []
    } else {
        // 3
        SKCloudServiceController.requestAuthorization { (status) in
            if status == .authorized {
                // 4
                self.searchResults = AppleMusicAPI().searchAppleMusic(self.searchText)
            }
        }
    }
})
.textFieldStyle(RoundedBorderTextFieldStyle())
.padding(.horizontal, 16)
.accentColor(.pink)
We’re at the last stretch here but this code shouldn’t be too complicated for you to read. Here’s a gist of what it compiles:
- First, we’d like to dismiss the keyboard when the user presses Search on the keyboard. This is done by calling the line
UIApplication.shared.resignFirstResponder() . - Next, we’d like to make sure that if the user doesn’t enter anything, our
searchResultsare empty. This is why we set it to an empty array if thesearchTextis empty. - If the
searchTextvariable is not empty, we’d like to call oursearchAppleMusicfunction. Before we do this, we make sure thatSKCloudServiceControllerhas the necessary authorization to access a user’s media library. If the user authorizes this access, we can continue to the next line of code. - Finally, we set out
searchResultsarray equal to the results ofAppleMusicAPI().searchAppleMusic(self.searchText). This will pass the search term to oursearchAppleMusicfunction and update oursearchResultsarray with whatever Apple Music returns!
We’re finally ready to run our app. Build and run the app and head over to the Search page. Enter any term, wait for a couple seconds as your app makes network requests you’ve implemented, and watch with delight as the table view is populated with the results of your search term.
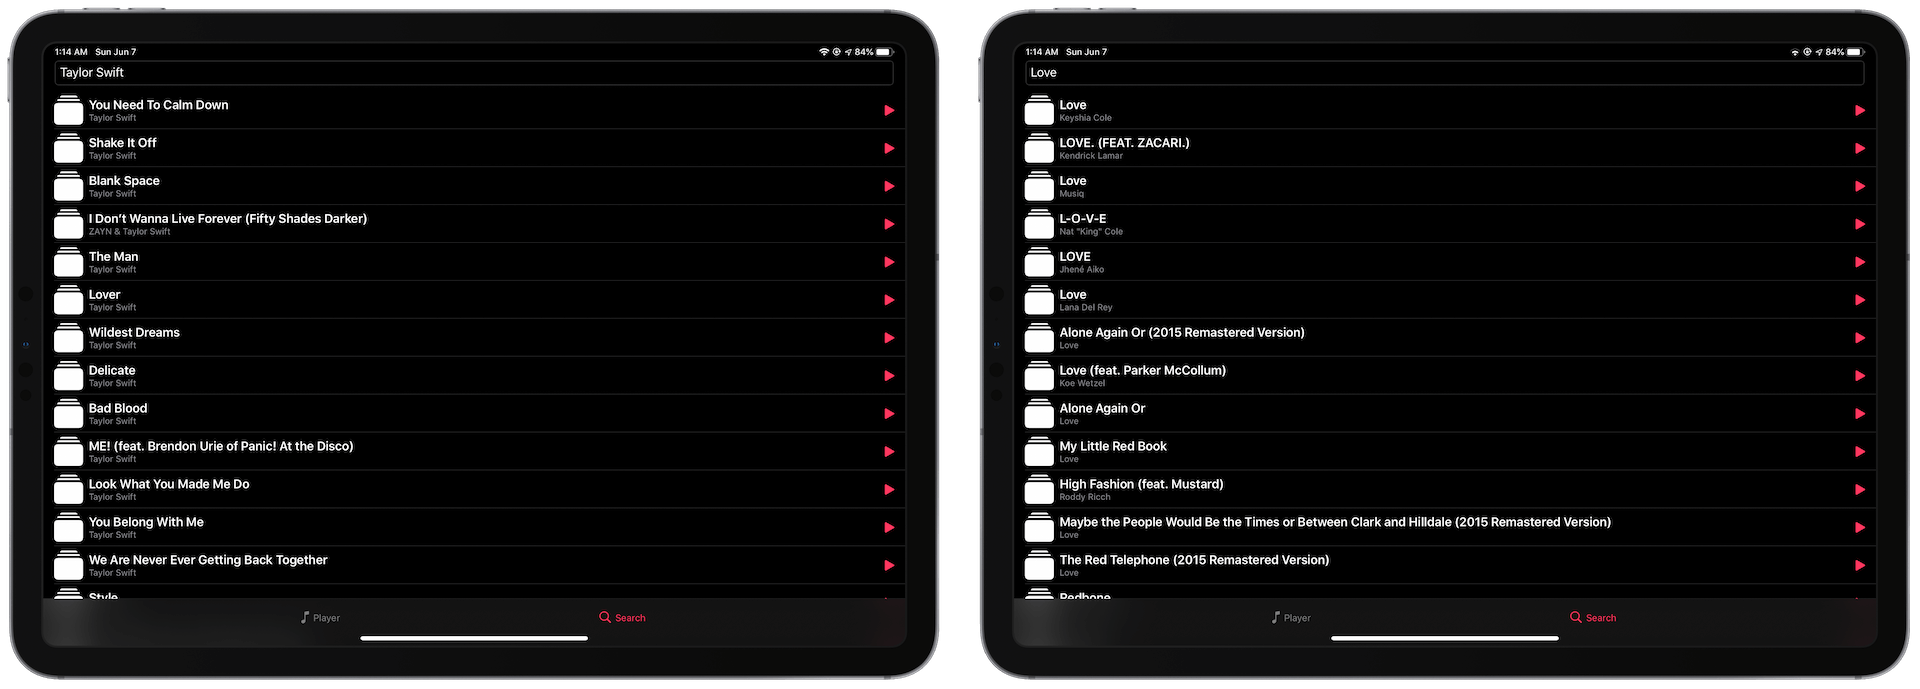
Congratulations! You’ve mastered the basics of the Apple Music API! As you can see, it’s very repetitive in that the steps can be summed down to the following:
- Make a network call to the Apple Music API
- Parse the JSON to see where the data you need can be found
- Create an object and populate it with the data you’ve parsed
For the remainder of the tutorial, we’ll be focusing on the under appreciated MediaPlayer framework and its very important object, MPMusicPlayerController . Also, don’t worry about the album artwork not displaying as of now. I’ll show you how we can use Swift Package Manager to successfully load and display images from a URL.
Implementing Music Play Back
Get excited because now we’ll be looking at the MediaPlayer framework and how to access and control your device’s music player. Essentially, the MediaPlayer framework is a part of MusicKit and lets you control playback of the user’s media from your app.
To play content using this framework, we have to instantiate one of the built-in MPMusicPlayerController objects. There are two types. Here is a brief description of what they are:
- System Player: This media player is directly linked to the Music app on your device. If you choose to use this player, then when a user click on a song, it will open up Music and start playing from that app.
- Application Player: This will be a media player that is built-in directly to your app. That way when a user clicks on a song, they won’t be transported to the Music app, but rather all the playback functionality will occur in your app. Of course, this means that you will have to add play/pause and skip/rewind functionality. We’ll be using this type of player for our app.
Let’s add the application player to our app. Now we want to modify this object within both screens of our app. In our Player View, we want to control the playback of the currently playing item in the song and in our Search View, we want to be able to play songs directly from that page. As such, we’ll be implementing @State and @Binding protocols to help with data flow.
Head over to ContentView.swift. At the top of the file, type import MediaPlayer underneath import StoreKit. Next, add the following line where you declare your selection variable:
@State private var musicPlayer = MPMusicPlayerController.applicationMusicPlayerWe’re creating a variable called musicPlayer that is of the type applicationMusicPlayer as we discussed above. We’re also adding the @State property to it so we can use it to pass it to other views. Let’s do that right now!
Go to PlayerView.swift and at the top of the file, add import the MediaPlayer framework with:
import MediaPlayerNext, at the top of thestruct, add the following line:
@Binding var musicPlayer: MPMusicPlayerControllerThis creates a Binding variable for our Player View. Since we will be binding this variable to the musicPlayer we created in ContentView.swift, anytime we make a change in Player View to this object, it will be reflected in Content View.
Since we can’t pass this binding variable to our PlayerView_Previews and SwiftUI previews have no support for MusicKit, there’s no point in having this in our file anymore. Delete the entire PlayerView_Previews structure from this file.
Let’s do the same thing in SearchView.swift. You should already have the MediaPlayer framework implemented. Just like before, add the following line to the top of your SearchView structure below the initialization of the searchResults array.
@Binding var musicPlayer: MPMusicPlayerControllerSimilar to PlayerView.swift, delete the entire SearchView_Previews structure from this file.
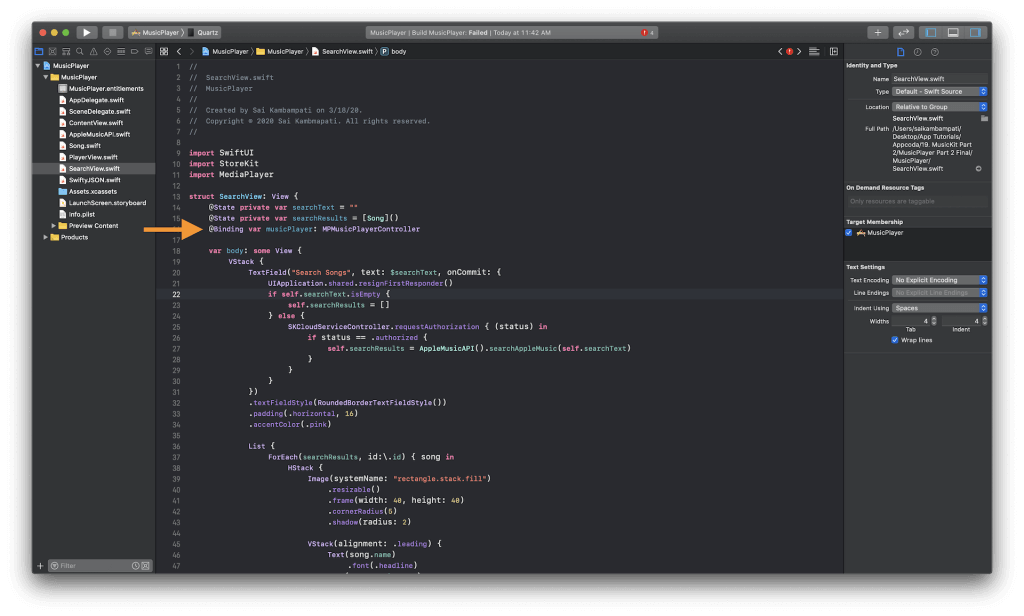
Now, head back to ContentView.swift. You should see some errors for PlayerView() and SearchView(). This is simply because we haven’t added the argument for the parameter musicPlayer when we call it. You can fix this by changing PlayerView() to PlayerView(musicPlayer: self.$musicPlayer) and SearchView() to SearchView(musicPlayer: self.$musicPlayer).
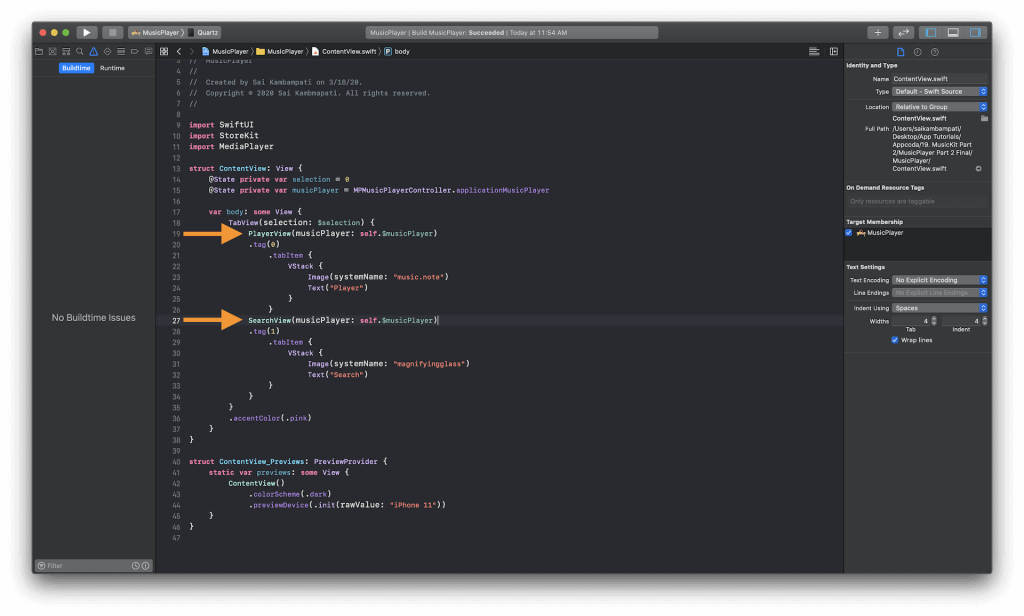
Build the app! It should compile without errors. We now have a built-in media player that is accessible to all the views in our app! Now when we implement the play and pause methods, we can easily update our player and reflect those changes across all the views in our app!
Playing Music
When our user clicks on a song from the search table, we’d like our app to play the song selected. This means that we have to add a song to our musicPlayer’s queue and tell the queue to play. Watch how we implement this in two line!
Go to SearchView.swift. Find the Button structure that should be inside the List structure. As of right now, it only prints the name of the song it is playing to the console. Delete that line and replace it with the following:
self.musicPlayer.setQueue(with: [song.id])
self.musicPlayer.play()
That’s it! In the first line, we set the queue of our musicPlayer. The queue in this case is an array of strings containing the ID’s of the song. This is why the MediaPlayer and Apple Music API work harmoniously together. The framework can automatically detect which song is to be played based on the ID given. The final line simply instructs our musicPlayer to play whatever is in the queue!
Build and run the app! You should be able to search for a song, and when you tap on it, your music player should start playing the song!
If you’ve got everything working, congratulations! This is one of the most under appreciated, unknown functionalities you can build using Swift! We’re not done yet though! While we can play music, we’d also like to control the playback state of the song! We also want to make sure that the Player View can show us the name of the song and tag artist’s name. This can be achieved relatively simply as well!
Go to PlayerView.swift. Let’s start at the top of the file and make the respective changes as we work our way down!
Find the VStack structure where we define our Text objects that will contain the name of the song and the artist’s name. Replace it with the following:
VStack(spacing: 8) {
    Text(self.musicPlayer.nowPlayingItem?.title ?? "Not Playing")
        .font(Font.system(.title).bold())
    Text(self.musicPlayer.nowPlayingItem?.artist ?? "")
        .font(.system(.headline))
}
The changes we’ve made here is to replace “Song Title” and “Artist Name“ with the actual name of the currently playing song and the artist by whom it’s sung. If no song is playing, then we leave the artist’s name empty and set the name of the song to ”Not Playing”.
Before we go further, I’d like to explain a little bit about this .nowPlayingItem object we’re calling. This object is of a type called MPMediaItem. This object is provided by the MediaPlayer framework and is an object which contains a collection of properties that represents what you could call a “song” in a media library. More specifically, an MPMediaItem can be any object that can be played and has a metadata that is similar to any audio-based object such as a song or podcast. The properties we’re using here are title, which is the name of the song, and artist, which is the name of the artist. There are many more properties that you can use if you choose to that can be found here.
Build and run your app. You can see that when you start to play a song, the metadata is displayed where it’s supposed to be!
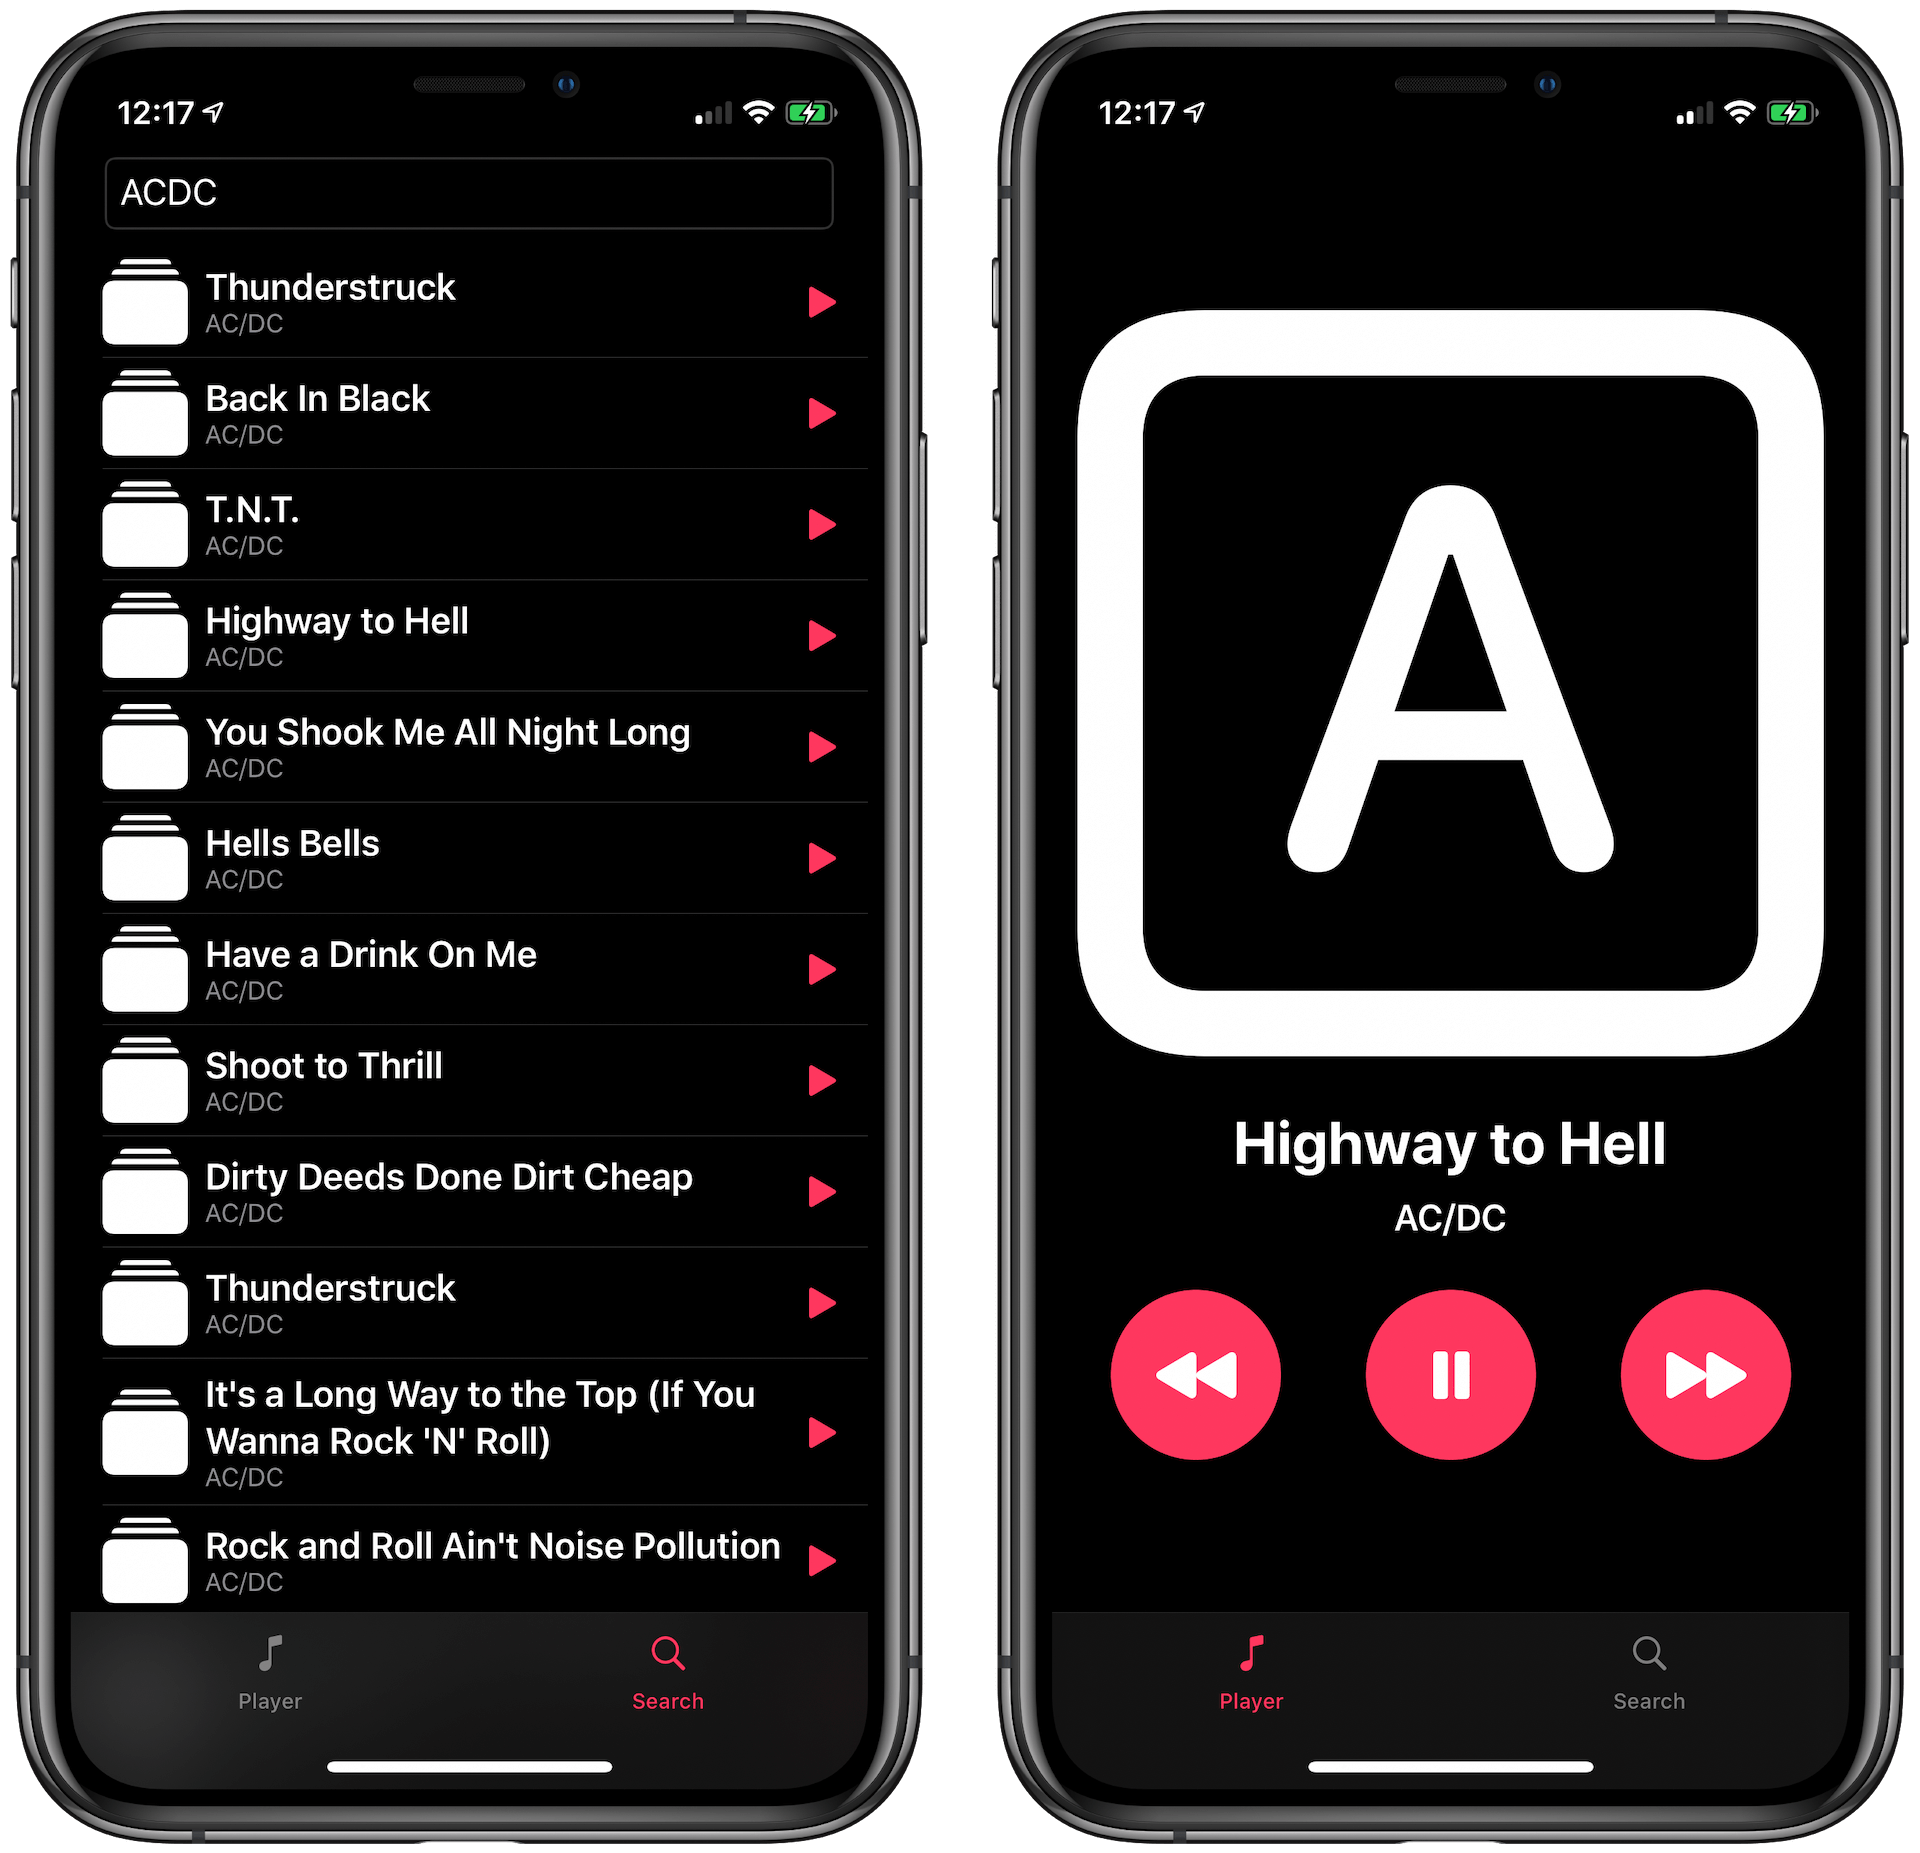
Now, let’s add some play and pause functionality. Scroll down in PlayerView.swift and go to the Button object which currently prints ”Pause” to the console. Delete this line and replace it with the following:
if self.musicPlayer.playbackState == .paused || self.musicPlayer.playbackState == .stopped {
    self.musicPlayer.play()
} else {
    self.musicPlayer.pause()
}
Our musicPlayer has a property called playbackState that is of type MPMusicPlaybackState. This property keeps track of whether the music player is playing a song, paused, or stopped. If the playbackState is equal to.paused or .stopped, then nothing is playing and when the user clicks on this button, we’d like for it to start playing. This is why we call self.musicPlayer.play(). Similarly, in the else clause, we call self.musicPlayer.pause() because we’d like to stop the currently playing song.
You can build and run the app on your device. You should see that when you click on the pause button, the music pauses and when you press again, the music resumes. However, the icon of the button is not updating. This can be done by tracking the playback state of the currently playing item!
At the top of PlayerView.swift, underneath where you declared musicPlayer, type the following line:
@State private var isPlaying = falseThis is a Boolean variable that is attached to the @State property that will be updated based on the playback state of the currently playing song. First, go to the Button object we modified above. Modify the action of the Button to look like the following:
if self.musicPlayer.playbackState == .paused || self.musicPlayer.playbackState == .stopped {
    self.musicPlayer.play()
    // 1
    self.isPlaying = true
} else {
    self.musicPlayer.pause()
    // 2
    self.isPlaying = false
}
We’ve added two lines that are pretty self explanatory. When we signal the musicPlayer to play, we set the isPlaying variable to true. When we pause the musicPlayer, we once again set the isPlaying variable to false.
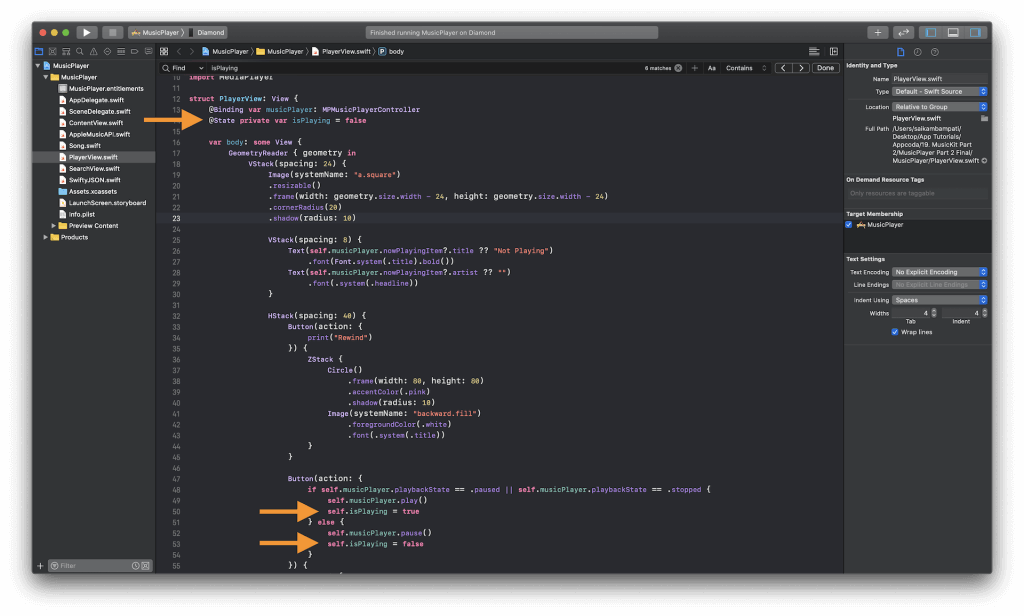
Next, we need to use the isPlaying variable to update the image used as the logo for the button. This is quite simple. Underneath the button’s action where we declare the UI of the button, modify the ZStack object to look as such:
ZStack {
    Circle()
        .frame(width: 80, height: 80)
        .accentColor(.pink)
        .shadow(radius: 10)
    Image(systemName: self.isPlaying ? "pause.fill" : "play.fill")
        .foregroundColor(.white)
        .font(.system(.title))
}
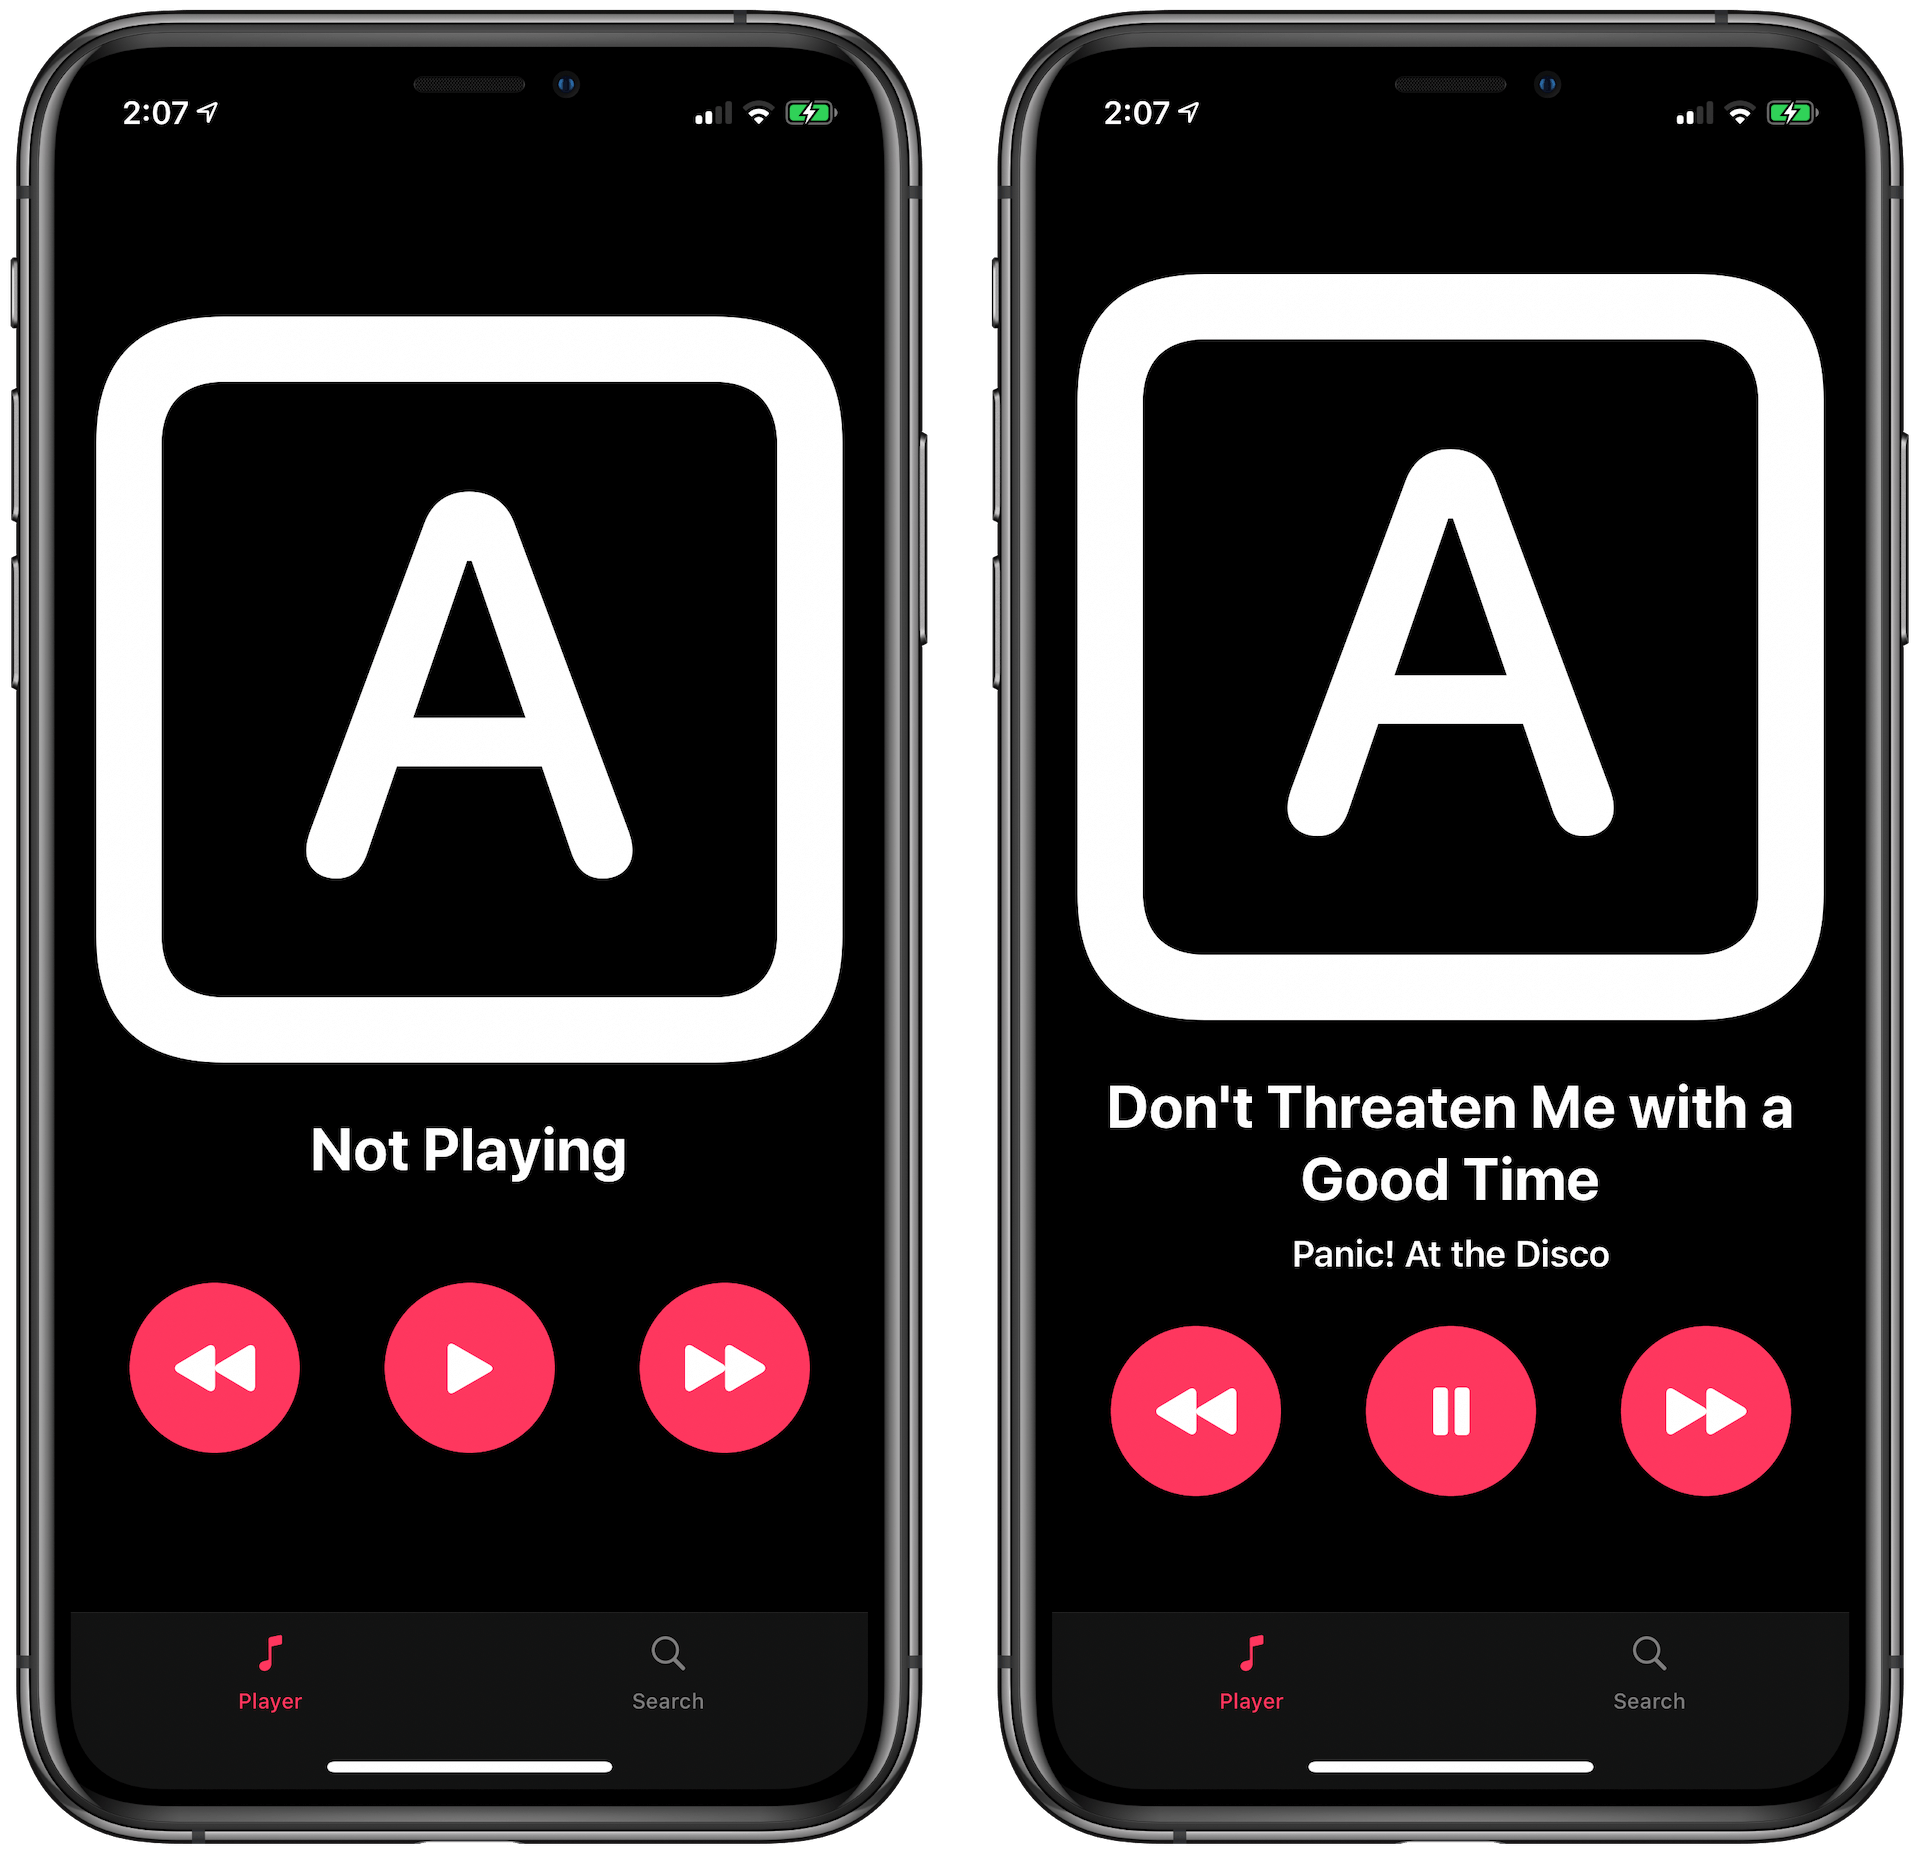
The change we made here is to change the systemNameof the Image object used based on whether self.isPlaying is true or false. If it is true, we’ll use the pause.fill SF Symbol. If not, we’ll use the play.fill symbol.
Last but not least, we need a way to update self.isPlaying if there is a change made in Search View. For example, if our player is paused but we play a song from Search View, we’d like to update self.isPlaying by setting it to true. Now, we can use the @Binding protocol but I’d like to show you an easier alternative: the onAppear() function!
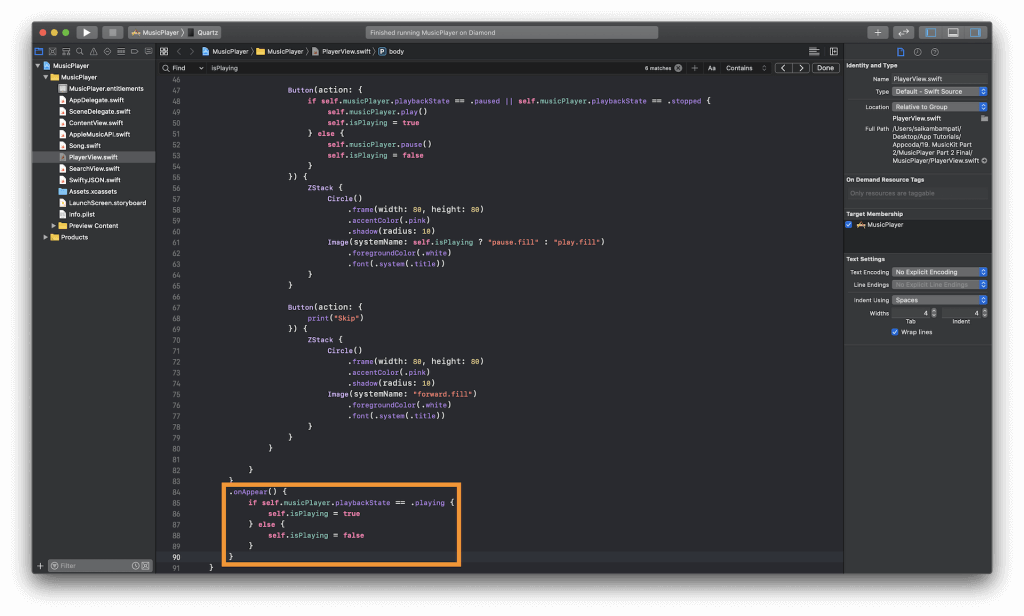
At the very bottom of PlayerView.swift, find the second to last } closing curly bracket. This is the bracket that will close our GeometryReader. Attach the .onAppear() function below it as shown:
.onAppear() {
    if self.musicPlayer.playbackState == .playing {
        self.isPlaying = true
    } else {
        self.isPlaying = false
    }
}
What are we doing in this function? Well, remember that our musicPlayer is already bound to all the views in our app. So any updates to this object is immediately reflected in every view. When we play a song from Search View, the musicPlayer is updated to set its playbackState to .playing. This is why in the .onAppear() function, we check to see that if the playbackState is in fact playing, then we set isPlaying to true. If not, we set isPlaying to false!
That’s all for playing and pausing! Build and run your app! You should see that the play/pause button accurately changes based on whether the song is currently playing or is paused!
Implementing Skip & Rewind
Now let’s implement the logic for skip and rewind buttons. This won’t take too long. Let’s start with the skip button.
Navigate to PlayerView.swift and locate the Button object that we’re using as a temporary skip button. It should be printing ”Skip” to the console when tapped upon.
Replace the line print("Skip") with self.musicPlayer.skipToNextItem() and that’s all! Build and run your app. When you press the skip button, it will jump to the next song in the queue, which is nothing, so the player will stop!
You can see how MediaPlayer comes with a list of functions that make it easy for us to control playback! With one line of code, we were able to implement a “skip song” functionality into our music player app. The “rewind” button is a little more challenging.
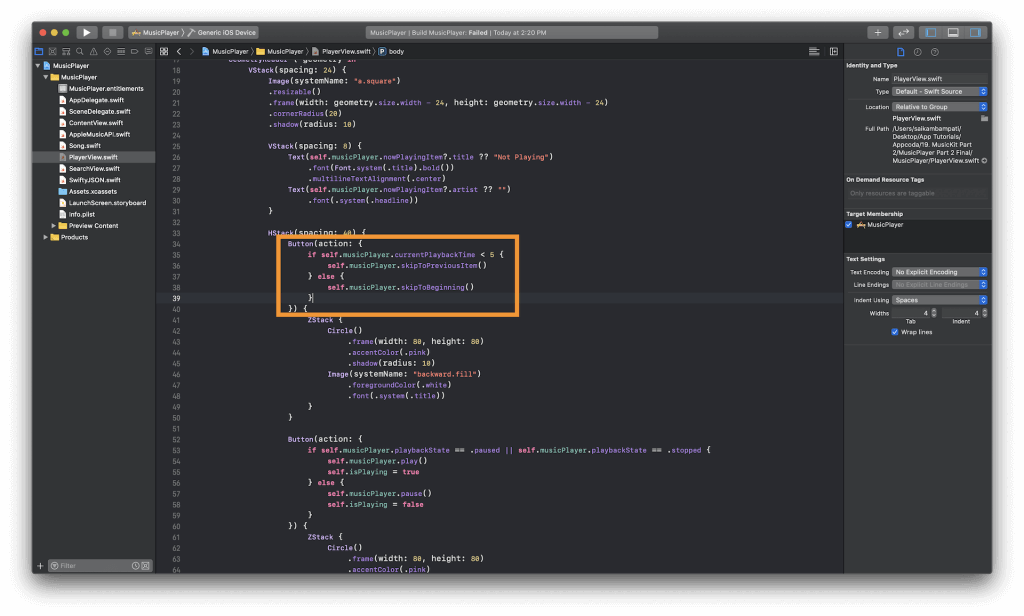
Think about your favorite music player. When you press the rewind button, what happens? If the song is more than 5 seconds through its playback, it skips to the beginning of the song. If the current playback is still within the first 5 seconds, then it goes to the previous song. With a simple if-else statement, watch how we can add the same functionality to our app.
Scroll back up to the Button object that currently prints ”Rewind” to the console. Delete that line and replace it with the following:
if self.musicPlayer.currentPlaybackTime < 5 {
    self.musicPlayer.skipToPreviousItem()
} else {
    self.musicPlayer.skipToBeginning()
}
You can see that we use a new property here: currentPlaybackTime. This is the length of the song, in seconds, that has been played by our player. If the number of seconds played so far is less than 5, we call upon a new method: skipToPreviousItem(). This method, provided by the MediaPlayer framework, we jump back in the queue and start playing the song before this song. Currently, this will continue playing the beginning of this song.
However, what we can test is that if currentPlaybackTime is greater than or equal to 5, we can call skipToBeginning() in our musicPlayer and that will ask our musicPlayer to start playing from the beginning of our current song.
Build and run your app! It should be able to handle the skip and rewind buttons as you implemented! As you can see from this section, a lot of the methods we use to control playback are already implemented in the MediaPlayer framework. With a little research, you can continue to build upon all these features.
Implementing Album Artwork
Finally, let’s replace the ugly “A” SF Symbol with the album artwork of the current song playing. If you remember from earlier, our Song object has a property called artworkURL that contains the string of a URL containing the image of the album.
Normally, we’d have to write a lot of code to process the URL, gather the image data, and cache the image so we wouldn’t make redundant calls. I’d like to show you a nifty Swift package called [SDWebImageSwiftUI][6]. This package contains a framework built for SwiftUI that can help with image loading and contains features like async image loading, memory/disk caching, animated image playback and more. If you ever need to load images from a URL in your apps, I highly recommend this framework since it automatically handles image loading and caching, thereby speeding up your app.
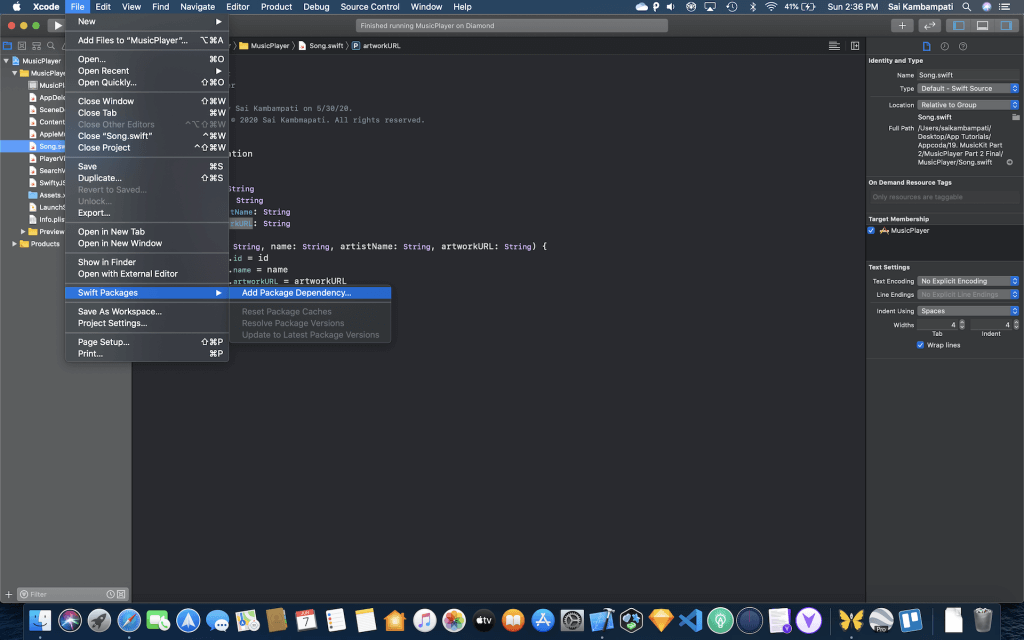
Here’s how we can install it. We’ll be using Swift Package Manager to link this framework with our project. In Xcode, go to the Title Bar, and click on File > Swift Packages > Add Package Dependancy.
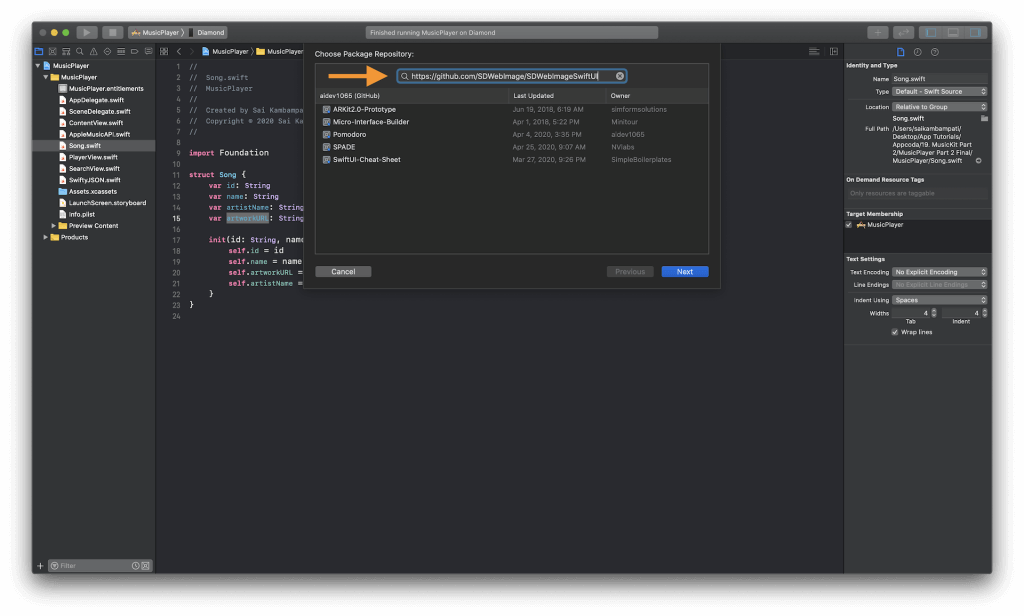
A popup will show up and ask you to enter a package repository URL. The URL we will be using is https://github.com/SDWebImage/SDWebImageSwiftUI. Enter this URL and press Next.
After some loading, Xcode will ask you which version to use. Don’t make any changes and simple press Next. Xcode will take some time to fetch the repository and create a package to add to your project. After a minute, Xcode will show you a popup confirming you to choose the packages and target. Make sure it looks like something below.
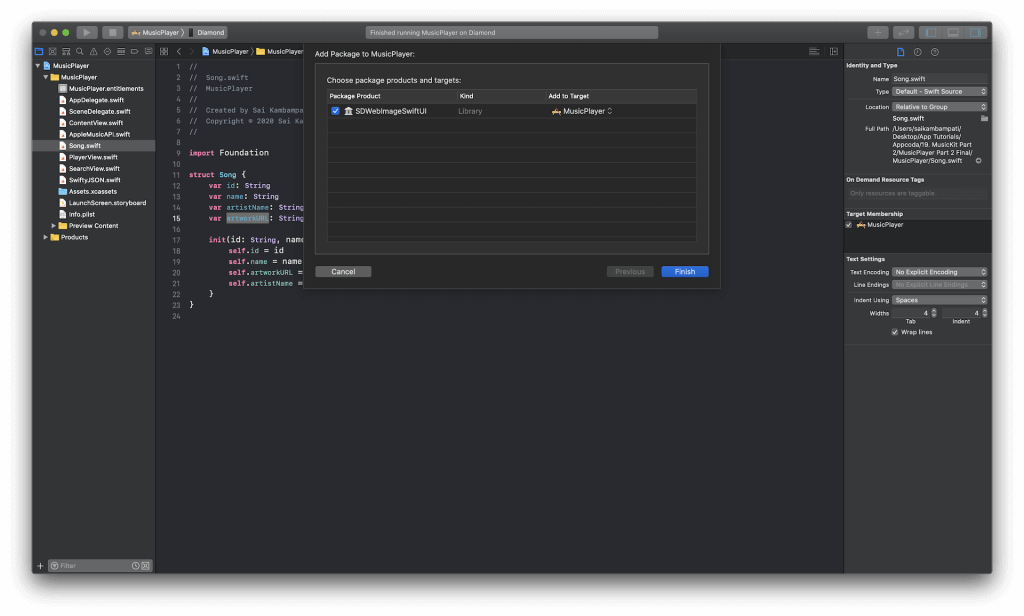
The important point to follow here is that MusicPlayer is selected as the target. Click Finish and Xcode will take you to the main project page that shows all your Swift Packages. This means that the package has successfully been added to your project and you can start using the framework!
Go to SearchView.swift and at the top of the file, type import SDWebImageSwiftUI. This will gives us access to all the objects and methods in this framework.
In our List object, locate the Image object that is currently coded as such:
Image(systemName: "rectangle.stack.fill")
    .resizable()
    .frame(width: 40, height: 40)
    .cornerRadius(5)
    .shadow(radius: 2)
Making sure that all its modifiers are still in place, replace it with the following
WebImage(url: URL(string: song.artworkURL.replacingOccurrences(of: "{w}", with: "80").replacingOccurrences(of: "{h}", with: "80")))
    .resizable()
    .frame(width: 40, height: 40)
    .cornerRadius(5)
    .shadow(radius: 2)
SDWebImageSwiftUI provides an object called WebImage. This is very similar to our Image object but has some really neat additions. For one, it takes an argument called url which when provided, automatically loads the image from this URL.
We create a URL object and pass the string song.artworkURL. Notice that once again, we perform string manipulation here. If you notice the URL, you’ll notice that it has two parameters: {h} and {w}. These parameters stand for height and width, respectively. This is provided by the Apple Music API on purpose because we can specify the height and width that is best suited for us. I chose a height and width of 80, since this is 2x the size of our WebImage so the image loaded will have a high quality. Therefore, we call replaceOccurences on both {w} and {h} and replace it with 80.
Everything else should remain the same! Make sure your code looks like the screenshot below:
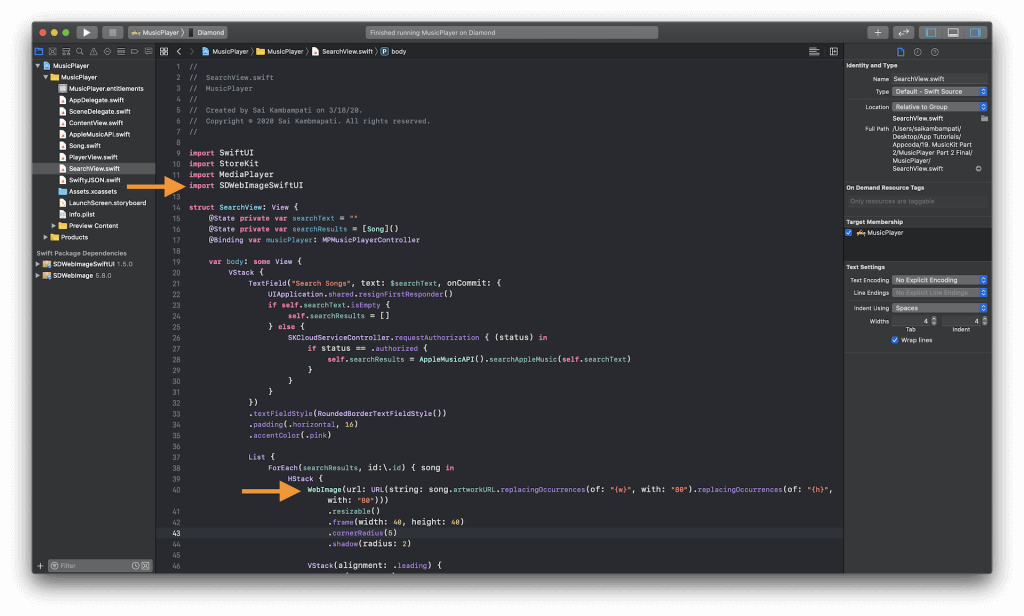
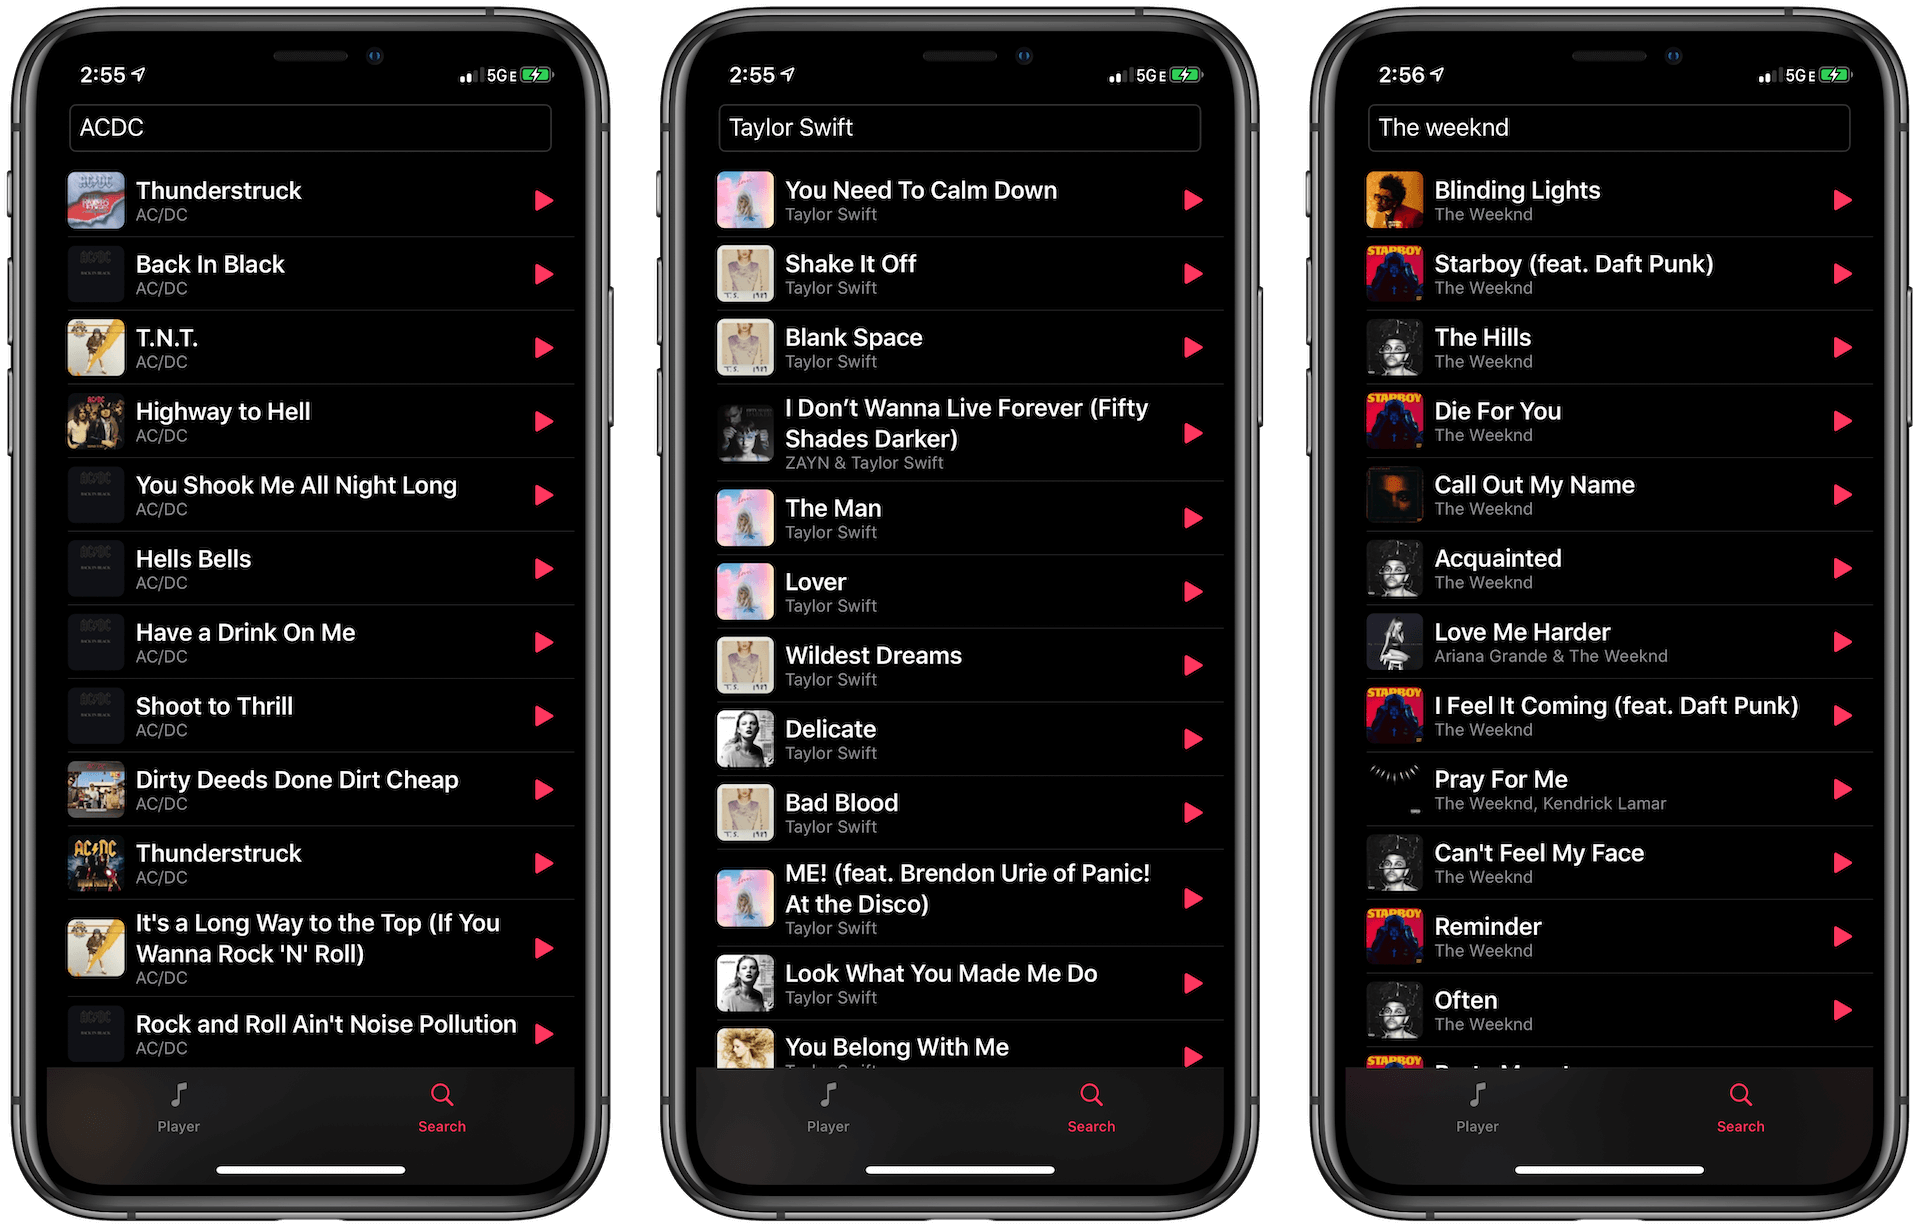
Build and run your app! Now, when you search for a song, you can actually see the album cover in the search results. The best part too is that SDWebImageSwiftUI caches the image so if you quit the app and search for the same term again, you can notice that there is a huge speed increase in loading the image.
Our last step is to change the album artwork in PlayerView.swift. Unfortunately, this is not as simple. See, in SearchView.swift we had a list of Song objects, each containing a URL to the album cover. Since we didn’t pass this list along, our Player View can’t access this album artwork URL. Furthermore, while MediaPlayer is great at providing many built-in objects and methods, it does not contain an object with a link to a particular song’s album artwork.
In order to fix this, we need to rely on State and Binding, once again. Head to ContentView.swift and at the top of the file, underneath where you created your musicPlayer variable, add the following file:
@State private var currentSong = Song(id: "", name: "", artistName: "", artworkURL: "")We are creating a new shared object called currentSong of type Song that will be updated whenever we click on a new song from our Search View.
On that note, go to SearchView.swift and add the following Binding property at the top of the file, below where you declared your musicPlayer variable.
@Binding var currentSong: SongScroll to the bottom of the file and you’ll find the Button object that currently sets the queue of the musicPlayer and tells it to start playing. Over here, we want to set currentSong to the song that was tapped upon.
Modify the action of the Button as shown.
Button(action: {
    self.currentSong = song
    self.musicPlayer.setQueue(with: [song.id])
    self.musicPlayer.play()
})
All we’re adding here is setting the currentSong to the song that was tapped on.
Let’s do the same for PlayerView.swift. Navigate to that file and at the very top, add import SDWebImageSwiftUI. This will let us use the WebImage object as we did above.
Next, add the Binding variable currentSong to the structure, right below where we declared the isPlaying variable.
@Binding var currentSong: SongLast but not least, let’s replace our current Image object which holds the SF Symbol a.square with the following code. Notice that all the modifiers remain the same.
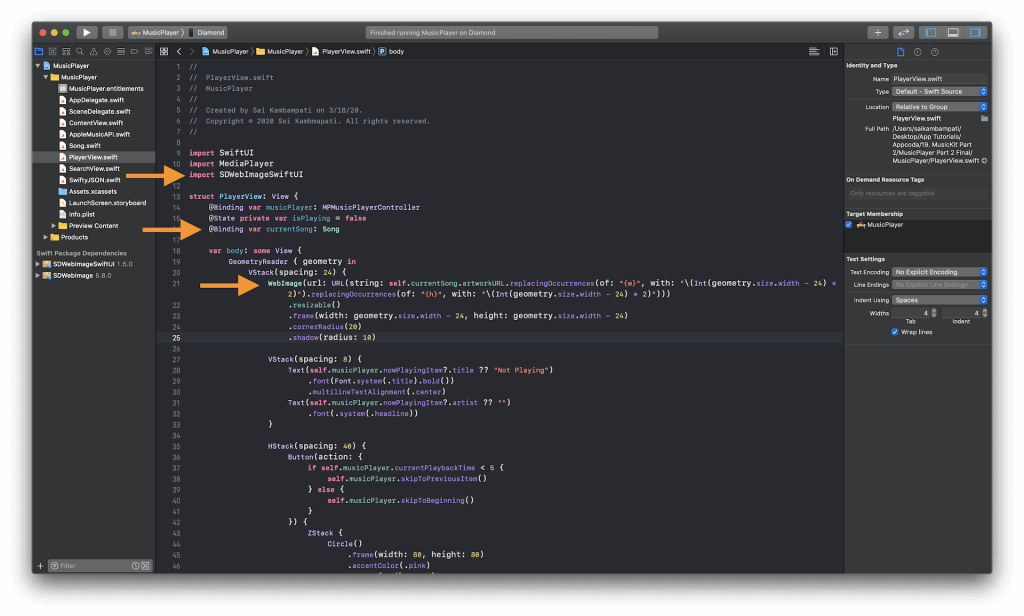
WebImage(url: URL(string: self.currentSong.artworkURL.replacingOccurrences(of: "{w}", with: "\(Int(geometry.size.width - 24) * 2)").replacingOccurrences(of: "{h}", with: "\(Int(geometry.size.width - 24) * 2)")))
    .resizable()
    .frame(width: geometry.size.width - 24, height: geometry.size.width - 24)
    .cornerRadius(20)
    .shadow(radius: 10)
Now just like before, we pass a URL to WebImage, only this URL is very lengthy. Just like before, we are replacing {w} and {h} with the width and height we want. It’s not as simple as before however, since our height and width is reliant on the width of the device. This is why we replace {w} and {h} with geometry.size.width - 24. The number is actually of type Floatso to convert it to an integer, we wrap it around in Int. Finally, we multiply both lengths by 2 to get a sharper image quality.
Last but not least, we still need to pass the currentSong from our Content View to both the Player View and Search View. Head over to ContentView.swift and make the following changes to where you declare both PlayerView() and SearchView().
PlayerView(musicPlayer: self.$musicPlayer, currentSong: self.$currentSong)
...
SearchView(musicPlayer: self.$musicPlayer, currentSong: self.$currentSong)
In these changes, we passing the currentSong that was created in ContentView.swift to the remaining views.
Congratulations! This is the end of this lengthy tutorial! Build and run your app and watch with delight as your app can make calls to the Apple Music API, parse JSON and display a list of songs, utilize a devices media player capabilities to play songs and control playback, and harness external libraries to load images from remote sources- all using SwiftUI, a technology that is only a year old!
Conclusion
If you’ve reached the end successfully, congratulations! This two part tutorial was not your average, intermediate tutorial. Despite its lengthy content, I hope you learned something new from all the technologies we’ve utilized. I’ve compiled a list of resources below that can help you if you choose to continue building upon this app! You can download the completed project on GitHub.
For reference, you can check out the following resource related to this tutorial:
Apple Documentation and Videos
- Apple Music API Documentation
- StoreKit Documentation
- MediaPlayer Documentation
- MusicKit on Android and the Web
- WWDC 2017 Video- Introduction MusicKit
- WWDC 2018 Video- MusicKit on the Web
More on the Technology
As always, if you have any doubts, feel free to leave a comment below or reach me on Twitter @HeySaiK. I can’t wait to see what you’ll make with MusicKit!


