Just as Apple does a lot for its developer community, another company which goes to great lengths to create amazing tools and services for its developers is Google. In recent years, Google has released and improved its services such as Google Cloud, Firebase, TensorFlow, etc. to give more power to both iOS and Android developers.
This year at Google I/O 2018, Google released a brand new toolkit called ML Kit for its developers. Google has been at the front of the race towards Artificial Intelligence and by giving developers access to its ML Kit models, Google has put a lot of power into its developers.

With ML Kit, you can perform a variety of machine learning tasks with very little code. One core difference between CoreML and ML Kit is that in CoreML, you are required to add your own models but in ML Kit, you can either rely on the models Google provides for you or you can run your own. For this tutorial, we will be relying on the models Google uses since adding your own ML models requires TensorFlow and an adequate understanding of Python.
Another difference is that if your models are large, you have the ability to put your ML model in Firebase and have your app make calls to the server. In CoreML, you can only run machine learning on-device. Here’s a list of everything you can do with ML Kit:
- Barcode Scanning
- Face Detection
- Image Labelling
- Text Recognition
- Landmark Recognition
- Smart Reply (not yet released, but coming soon)
In this tutorial, I’ll show you how to create a new project in Firebase, use Cocoapods to download the required packages, and integrate ML Kit into our app! Let’s get started!
Creating a Firebase Project
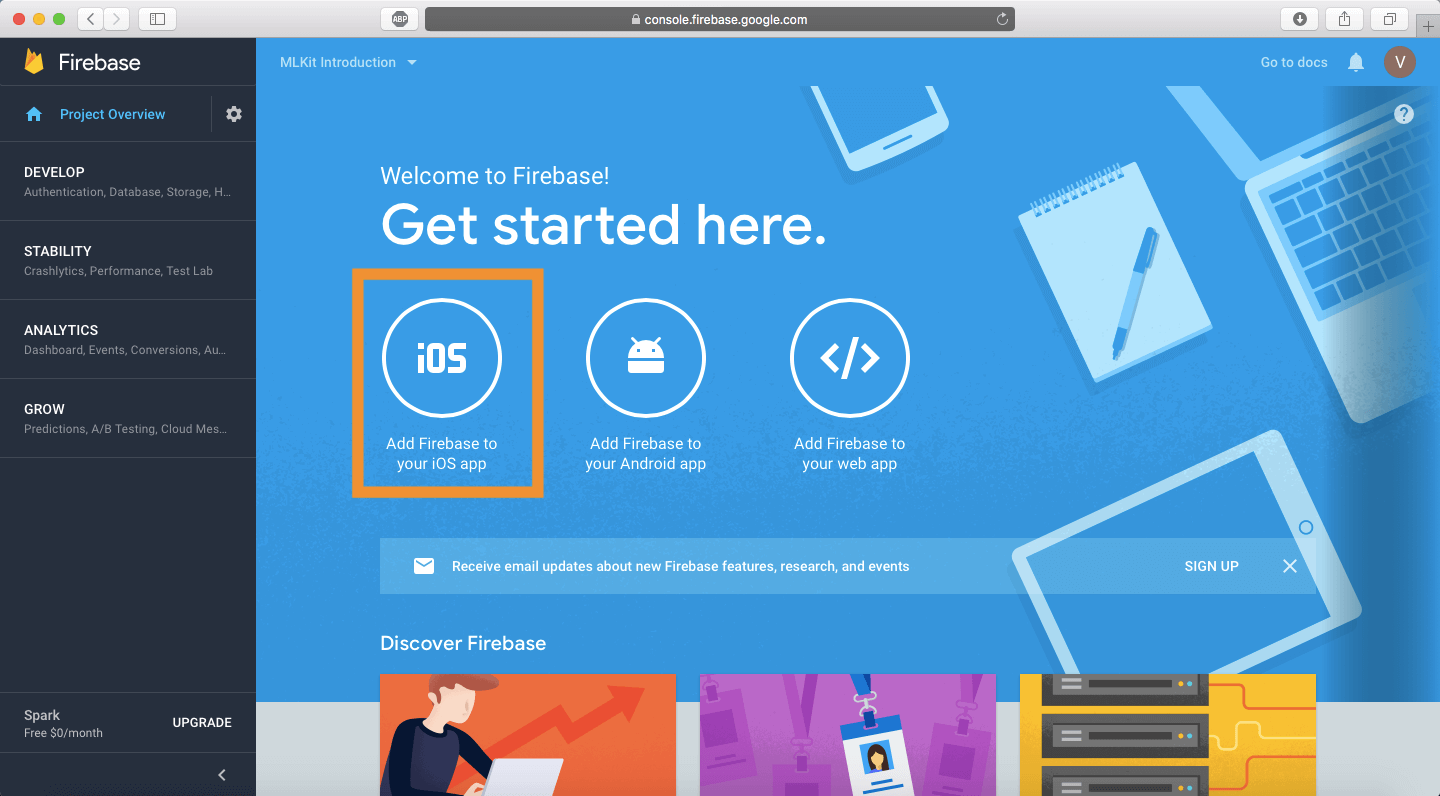
The first step is to go to the Firebase Console. Here you will be prompted to login to your Google Account. After doing so, you should be greeted with a page that looks like this.
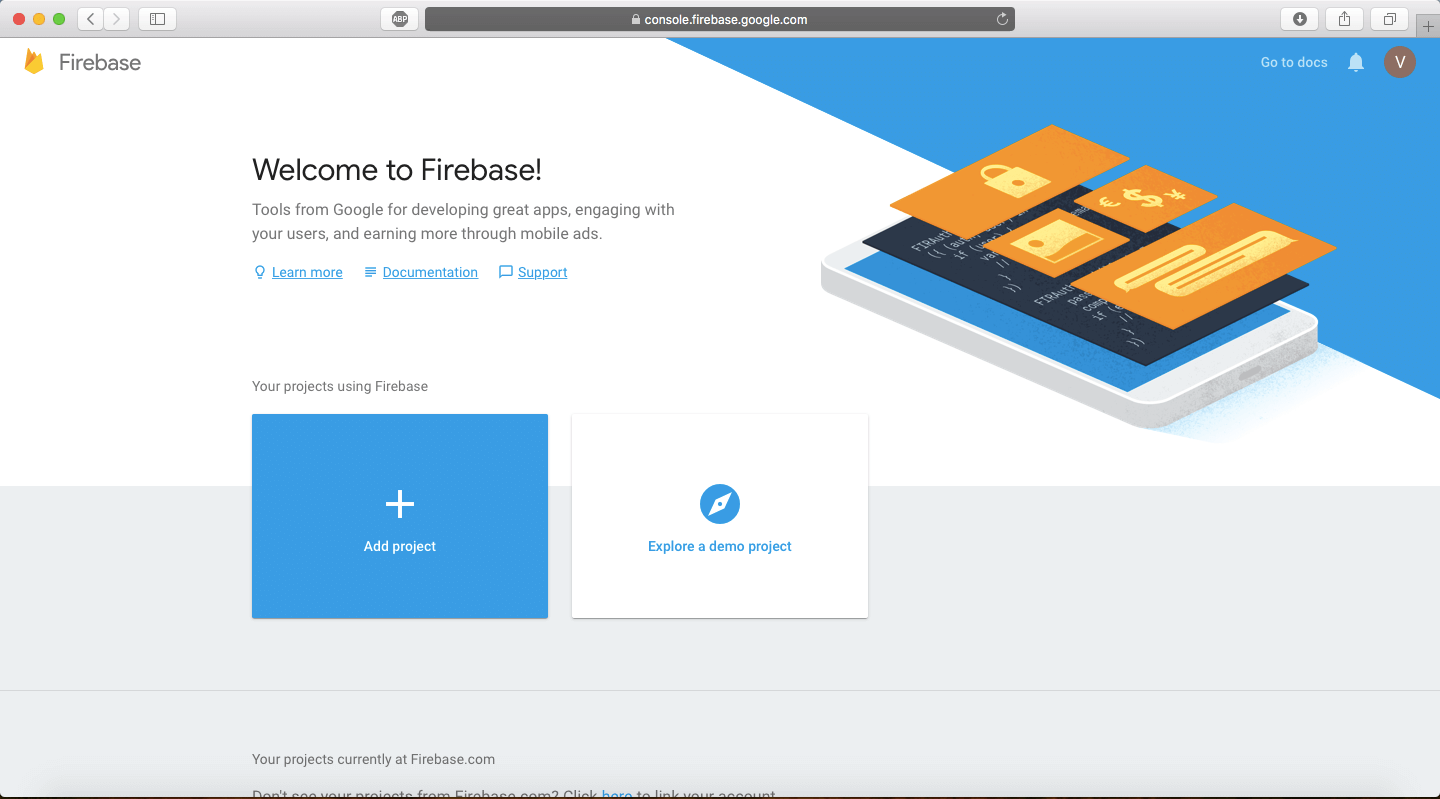
Click on Add Project and name your project. For this scenario, let’s name this project ML Kit Introduction. Leave the Project ID as is and change the Country/Region as you see fit. Then, click on the Create Project button. This should take about a minute.
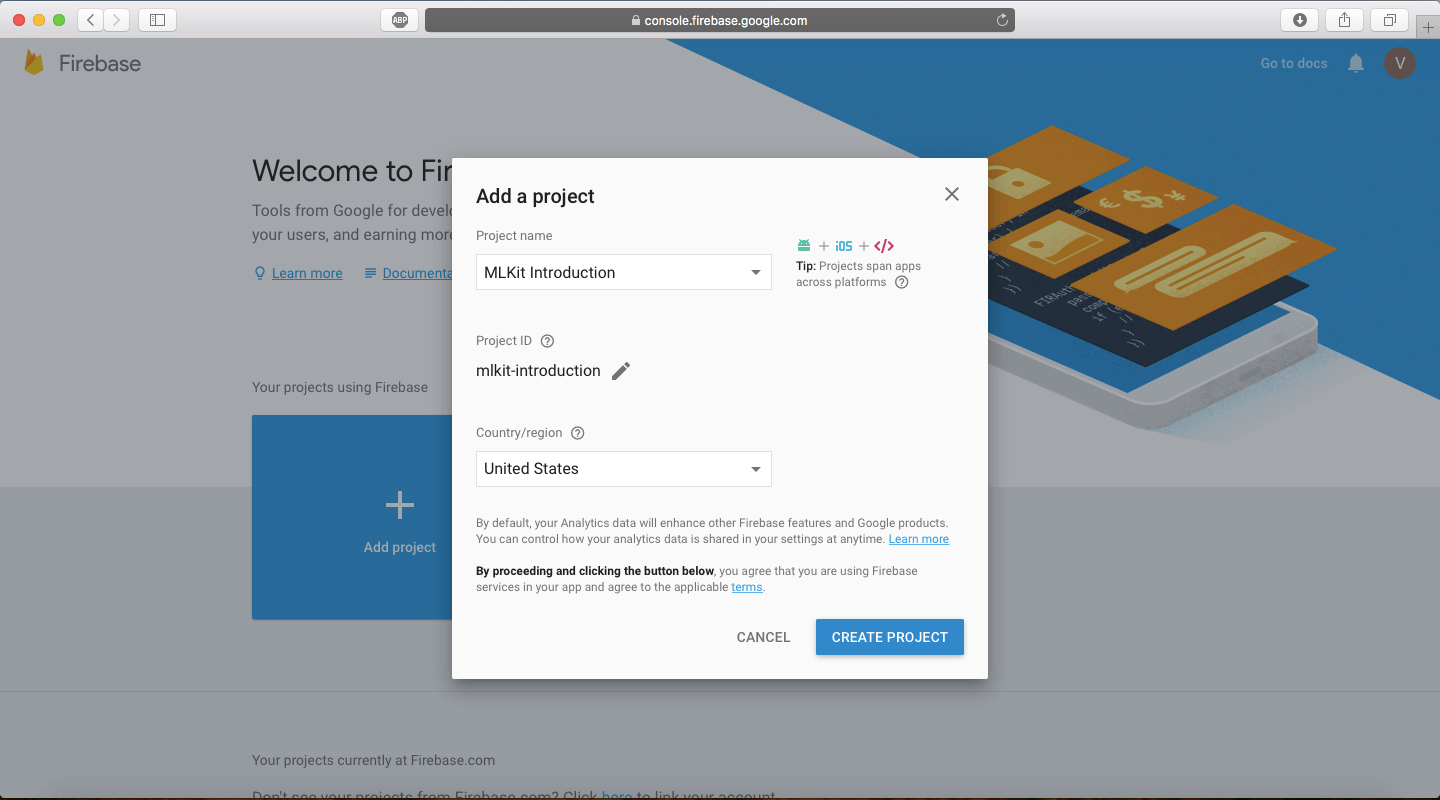
When everything is all done, your page should look like this!
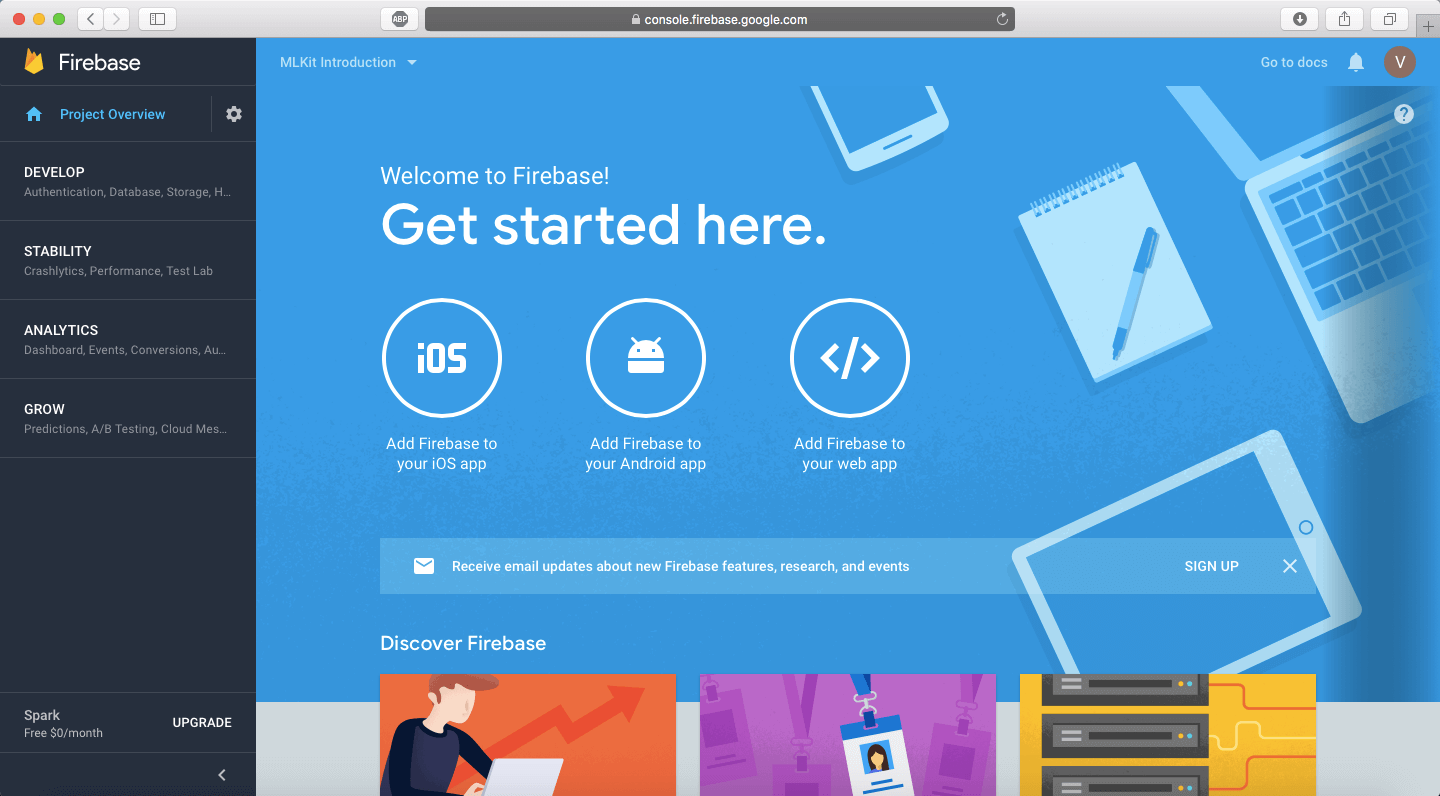
This is your Project Overview page and you’ll be able to manipulate a wide variety of Firebase controls from this console. Congratulations! You just created your first Firebase project! Leave this page as is and we’ll shift gears for a second and look at the iOS project. Download the starter project here.
A Quick Glance At The Starter Project
Open the starter project. You’ll see that most of the UI has been designed for you already. Build and run the app. You can see a UITableView with the different ML Kit options which lead to different pages.
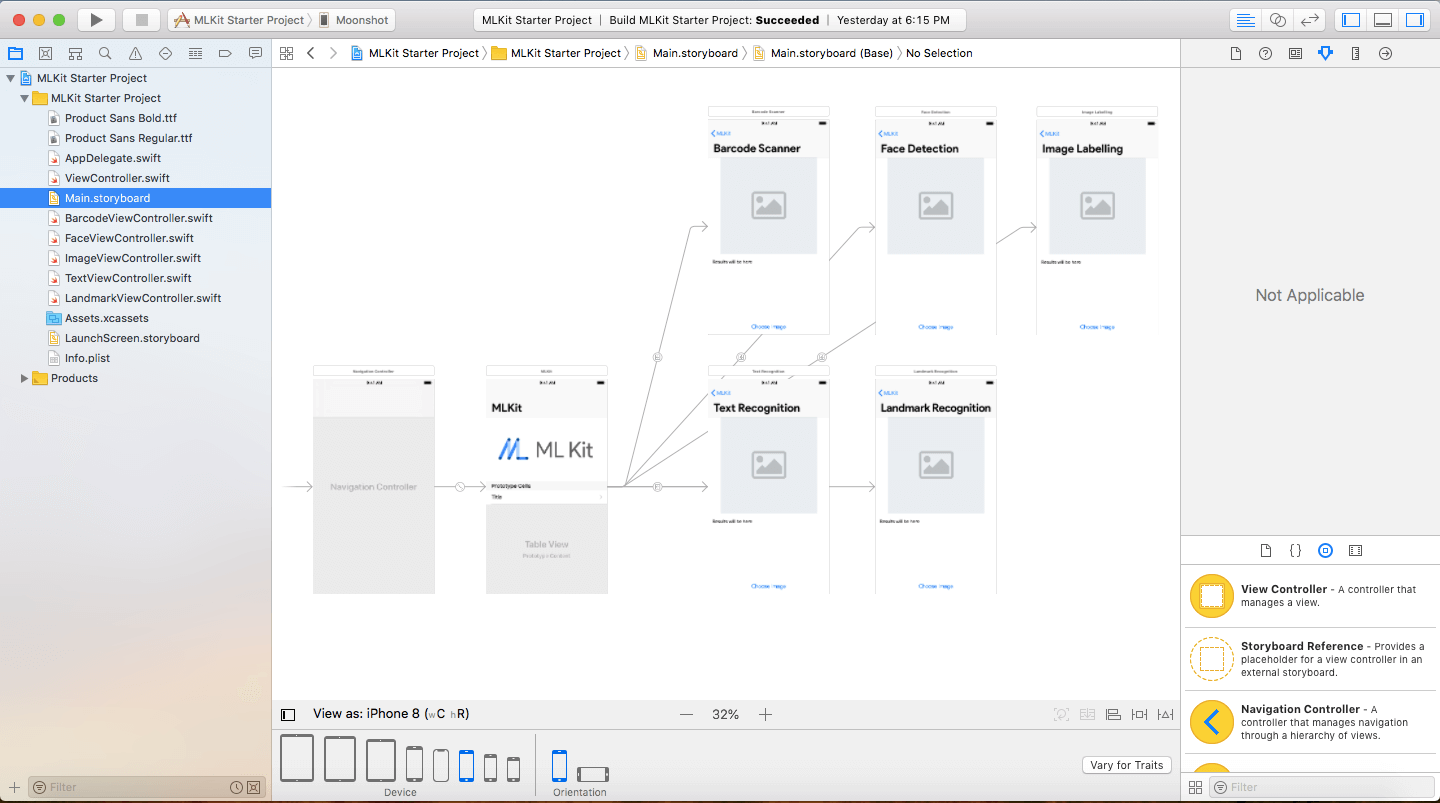
If you click on the Choose Image button, a UIImagePickerView pops up and choosing an image will change the empty placeholder. However, nothing happens. It’s up to us to integrate ML Kit and perform its machine learning tasks on the image.
Linking Firebase to the App
Go back to the Firebase console of your project. Click on the button which says “Add Firebase to your iOS App”.
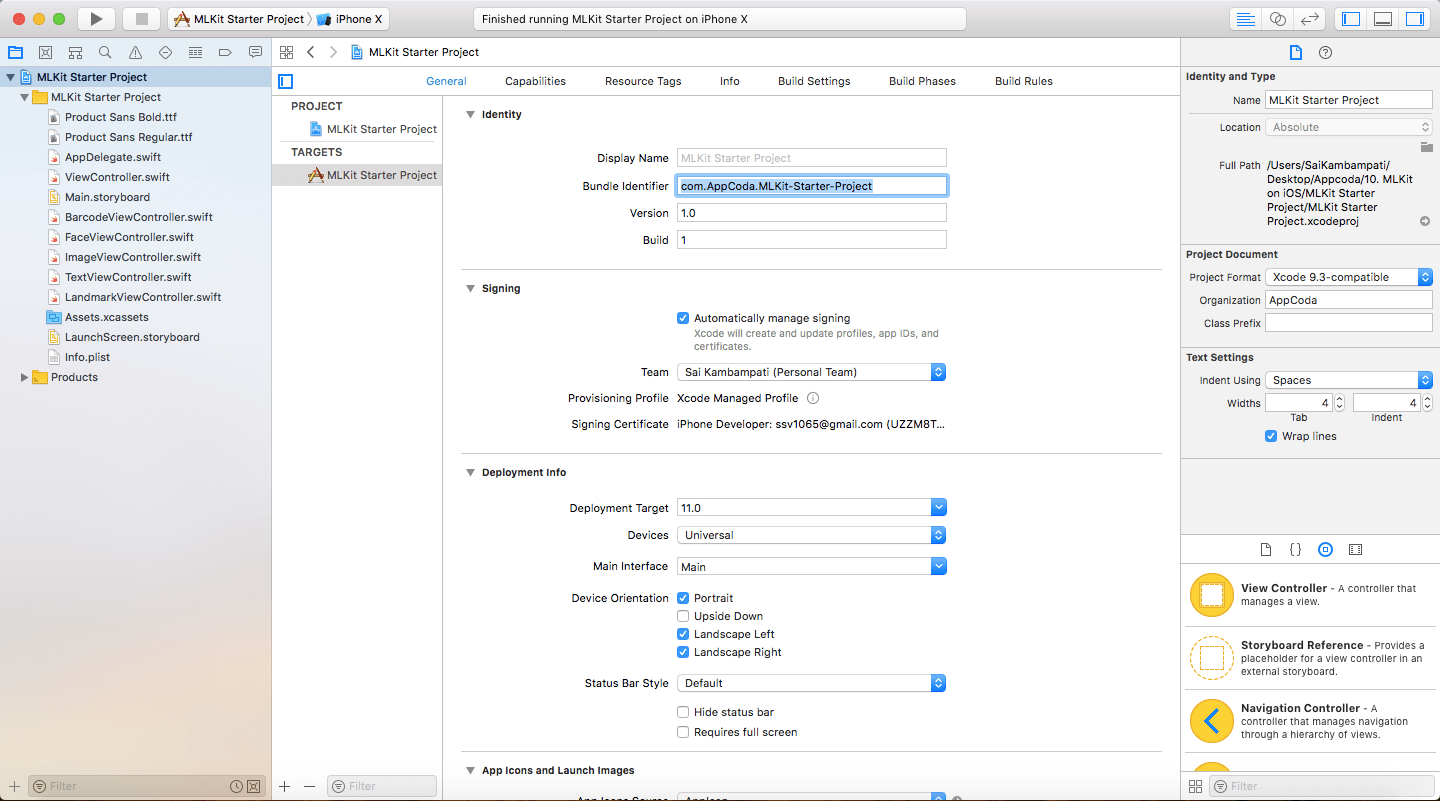
You should receive a popup now with instructions on how to link Firebase. The first thing to do is to link enter your iOS Bundle ID. That can be found in the Project Overview of Xcode in the General tab.
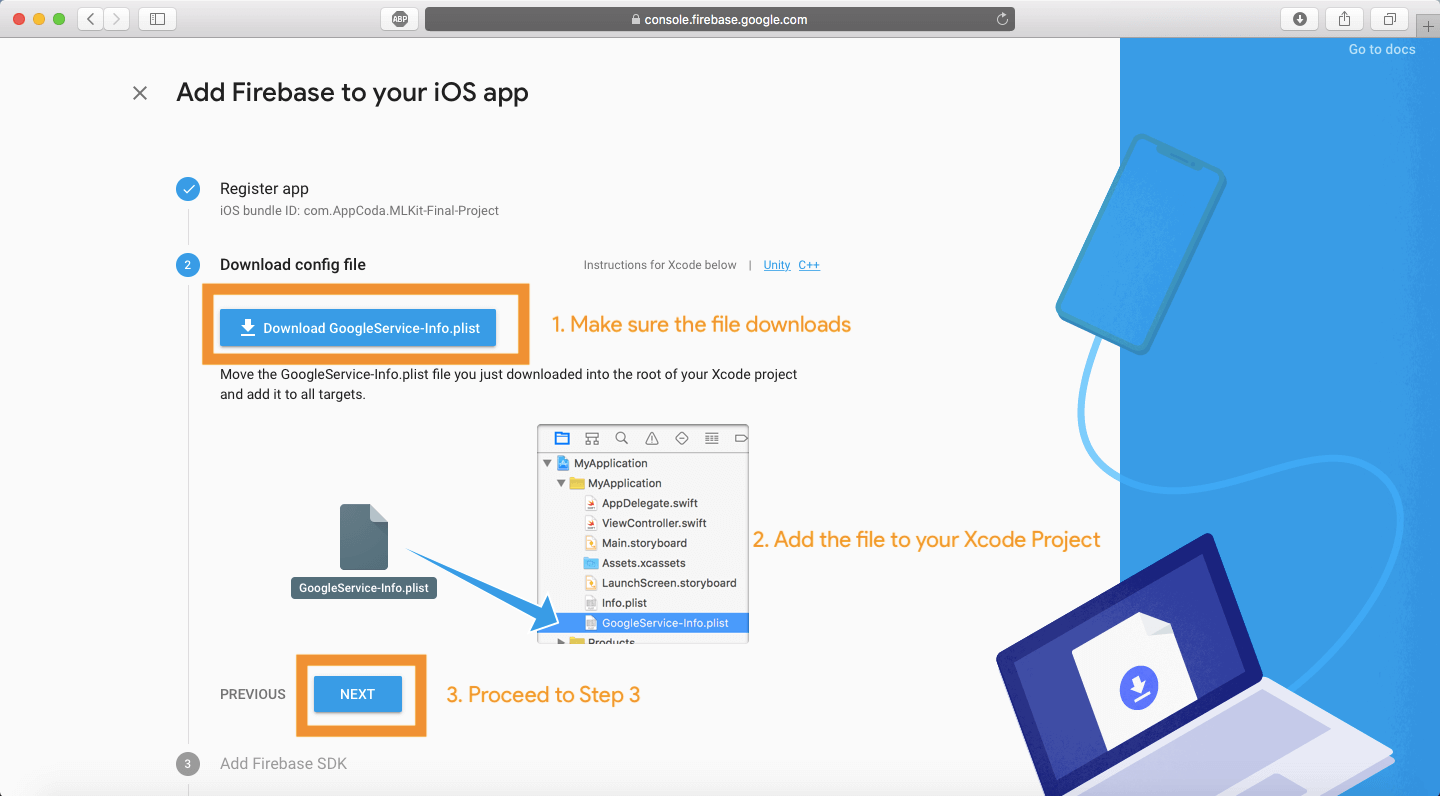
Enter that into the field and click the button titled Register App. You don’t need to enter anything into the optional text fields as this app is not going to go on the App Store. You’ll be guided to Step 2 where you are asked to download a GoogleService-Info.plist. This is an important file that you will add to your project. Click on the Download button to download the file.
Drag the file into the sidebar as shown on the Firebase website. Make sure that the Copy items if needed checkbox is checked. IF you’ve added everything, click on the Next button and proceed to Step 3.
Installing Firebase Libraries Using Cocoapods
This next step will introduce the idea of Cocoapods. Cocoapods are basically a way for you to import packages into your project in an easy manner. However, there can be a lot of disastrous consequences if any slight error is made. First, close all windows on Xcode and quit the application.
Open Terminal on your Mac and enter the following command:
cd <Path to your Xcode Project>
You are now in that directory.
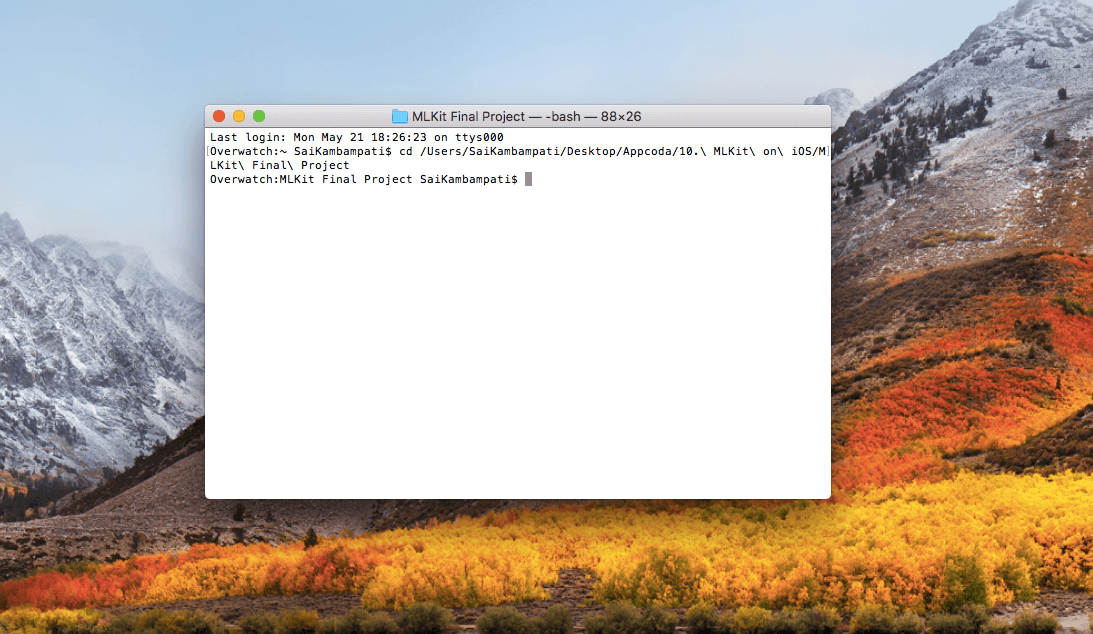
To create a pod, it’s quite simple. Enter the command:
pod init
Wait for a second and then your Terminal should look like this. Just a simple line was added.
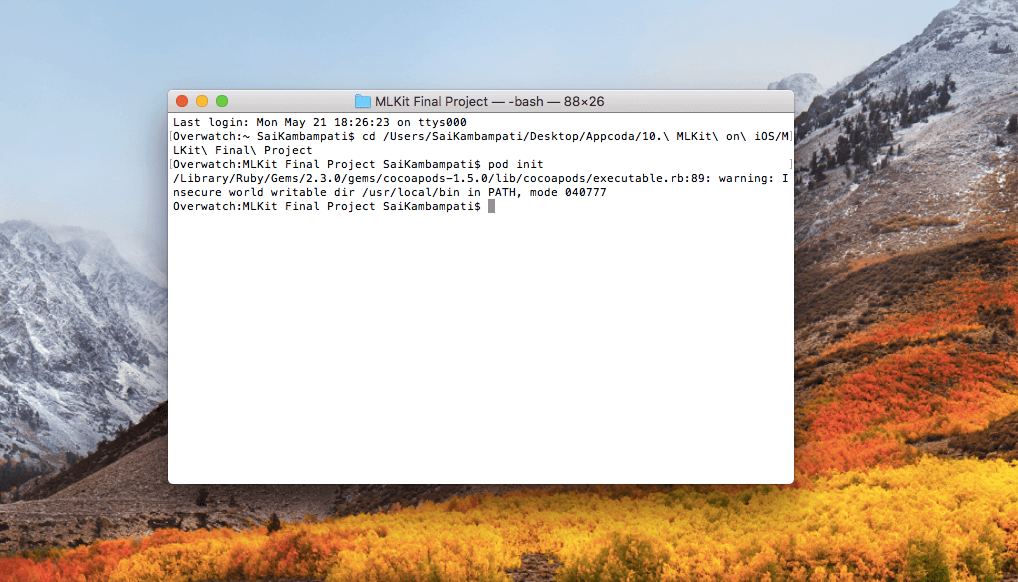
Now, let’s add all the packages we need to our Podfile. Enter the command in terminal and wait for Xcode to open up:
open -a Xcode podfile
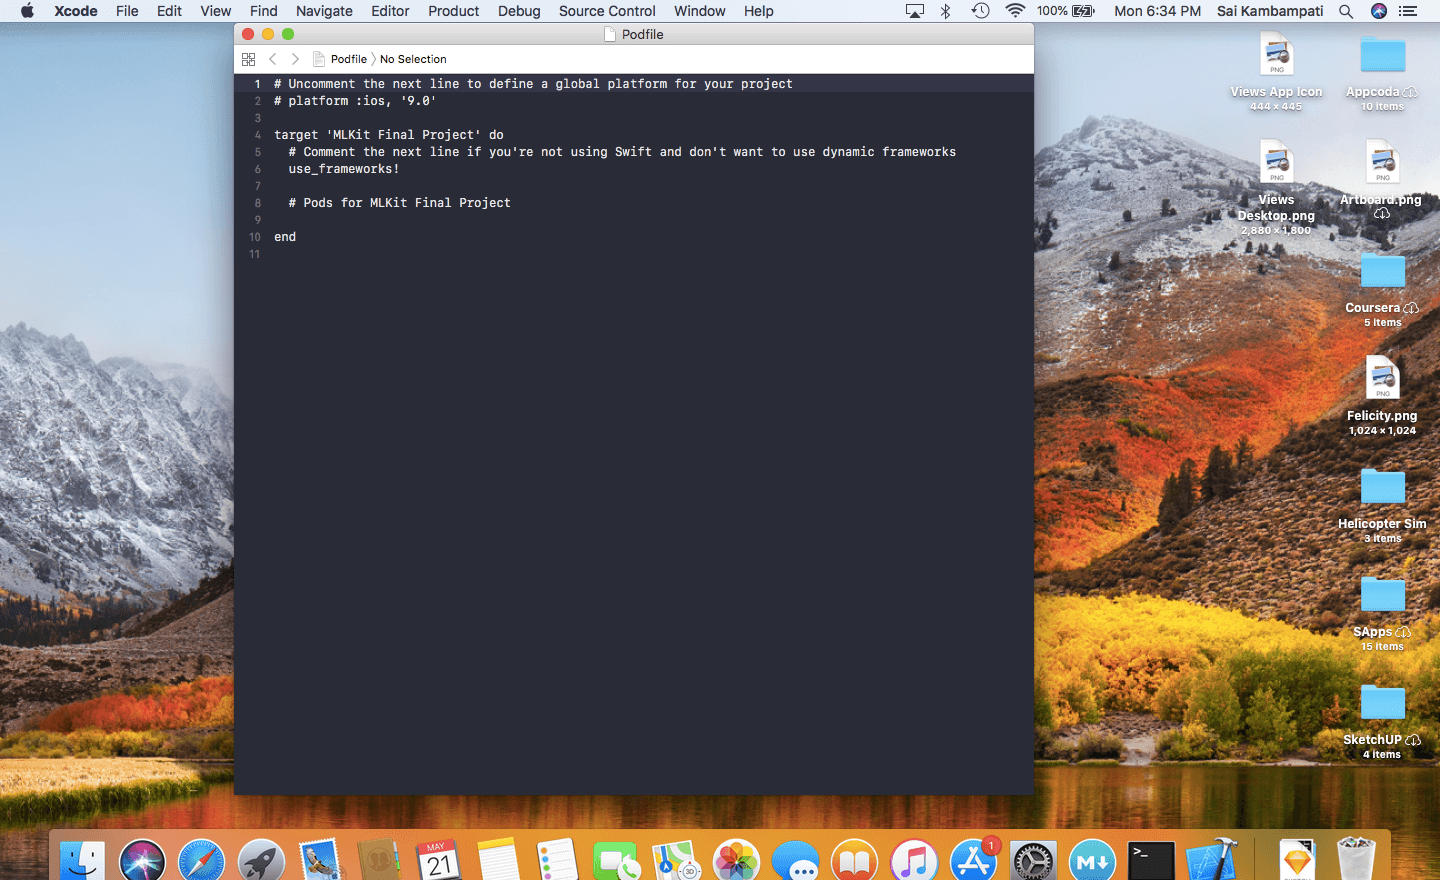
Underneath where it says # Pods for ML Kit Starter Project, type the following lines of code:
pod 'Firebase/Core'
pod 'Firebase/MLVision'
pod 'Firebase/MLVisionTextModel'
pod 'Firebase/MLVisionFaceModel'
pod 'Firebase/MLVisionBarcodeModel'
pod 'Firebase/MLVision'
pod 'Firebase/MLVisionLabelModel'
Your Podfile should look like this.
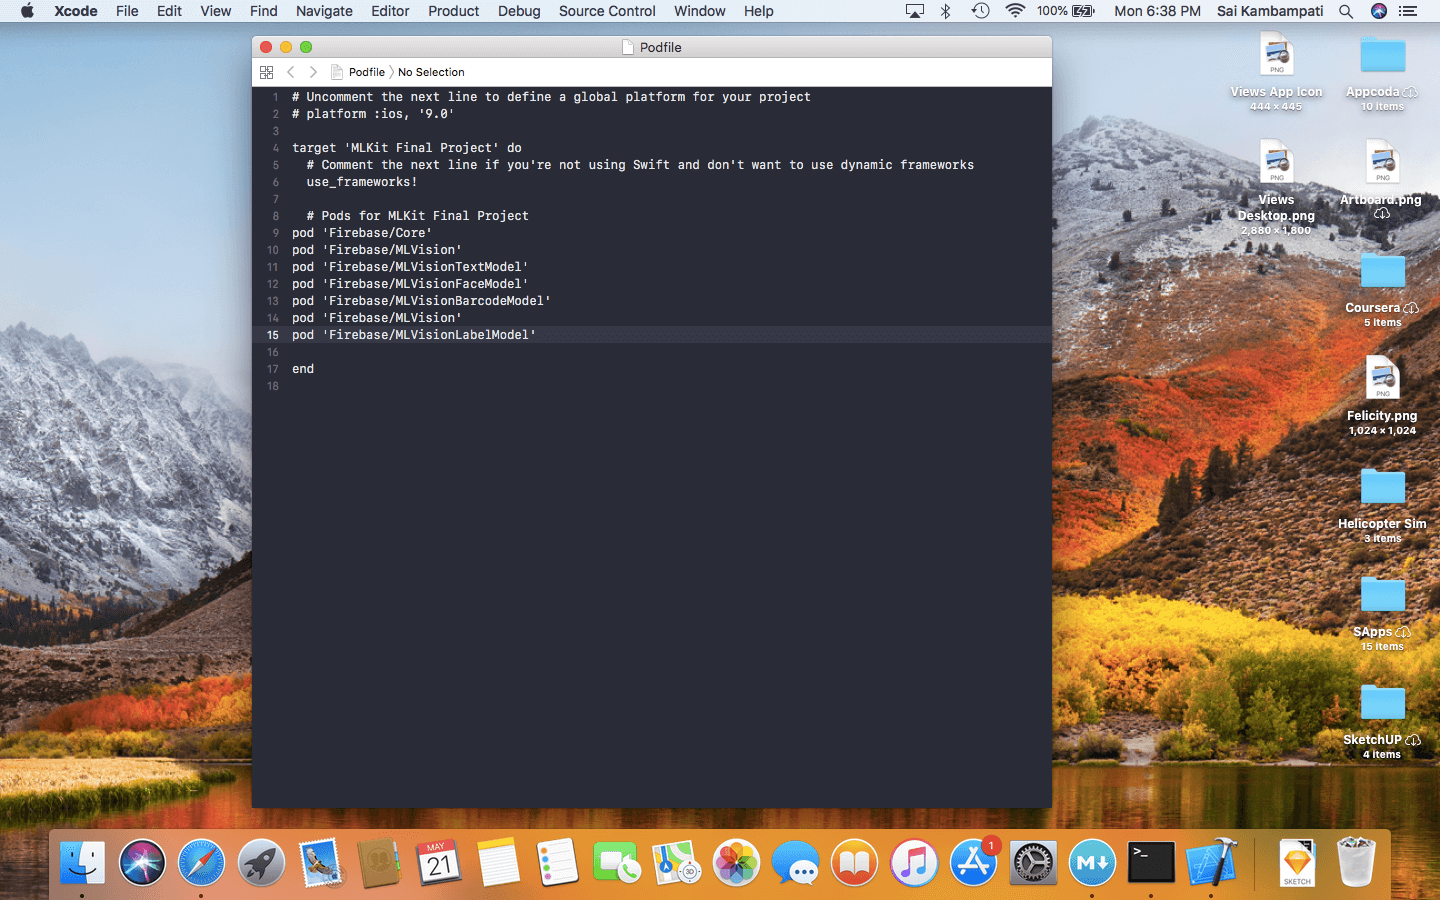
Now, there’s only one thing remaining. Head back to Terminal and type:
pod install
This will take a couple of minutes so feel free to take a break. In the meantime, Xcode is downloading the packages which we will be using. When everything is done and you head back over to the folder where your Xcode project is, you’ll notice a new file: a .xcworkspace file.
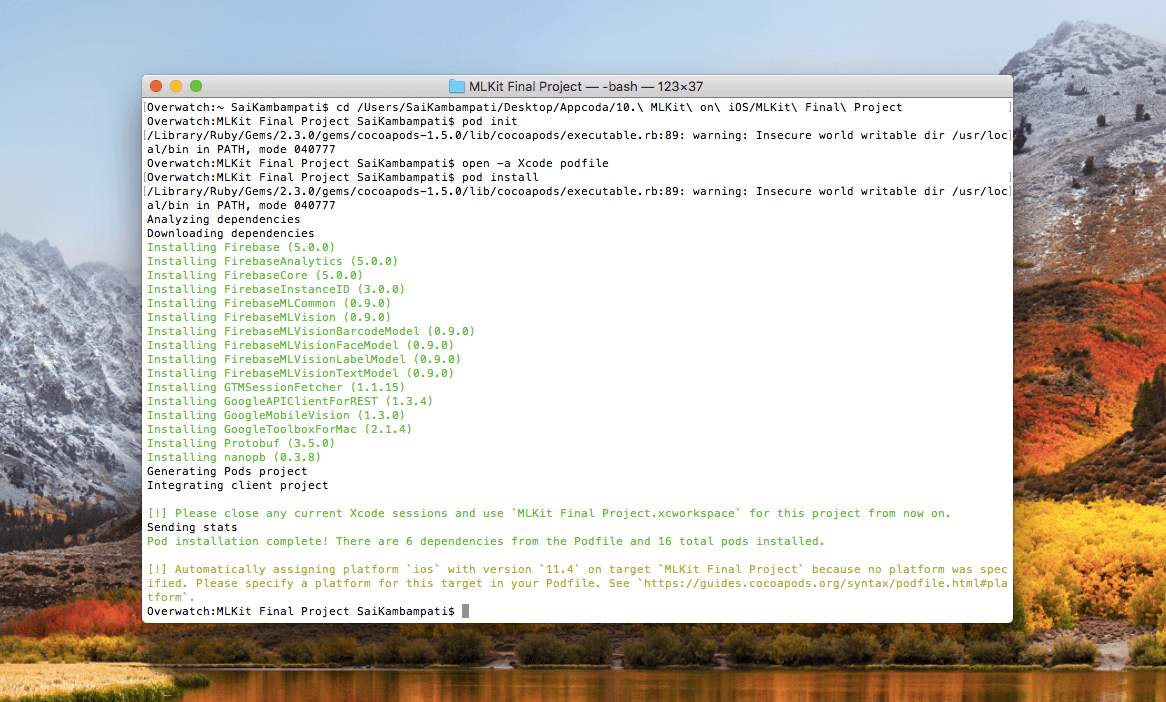
This is where most developer mess up: YOU SHOULD NEVER AGAIN OPEN THE .XCODEPROJ FILE! If you do and edit content there, the two will not be in sync and you will have to create a new project all over again. From now on, you should always open the .xcworkspace file.
Go back to the Firebase webpage and you’ll notice that we have finished Step 3. Click on the next button and head over to Step 4.
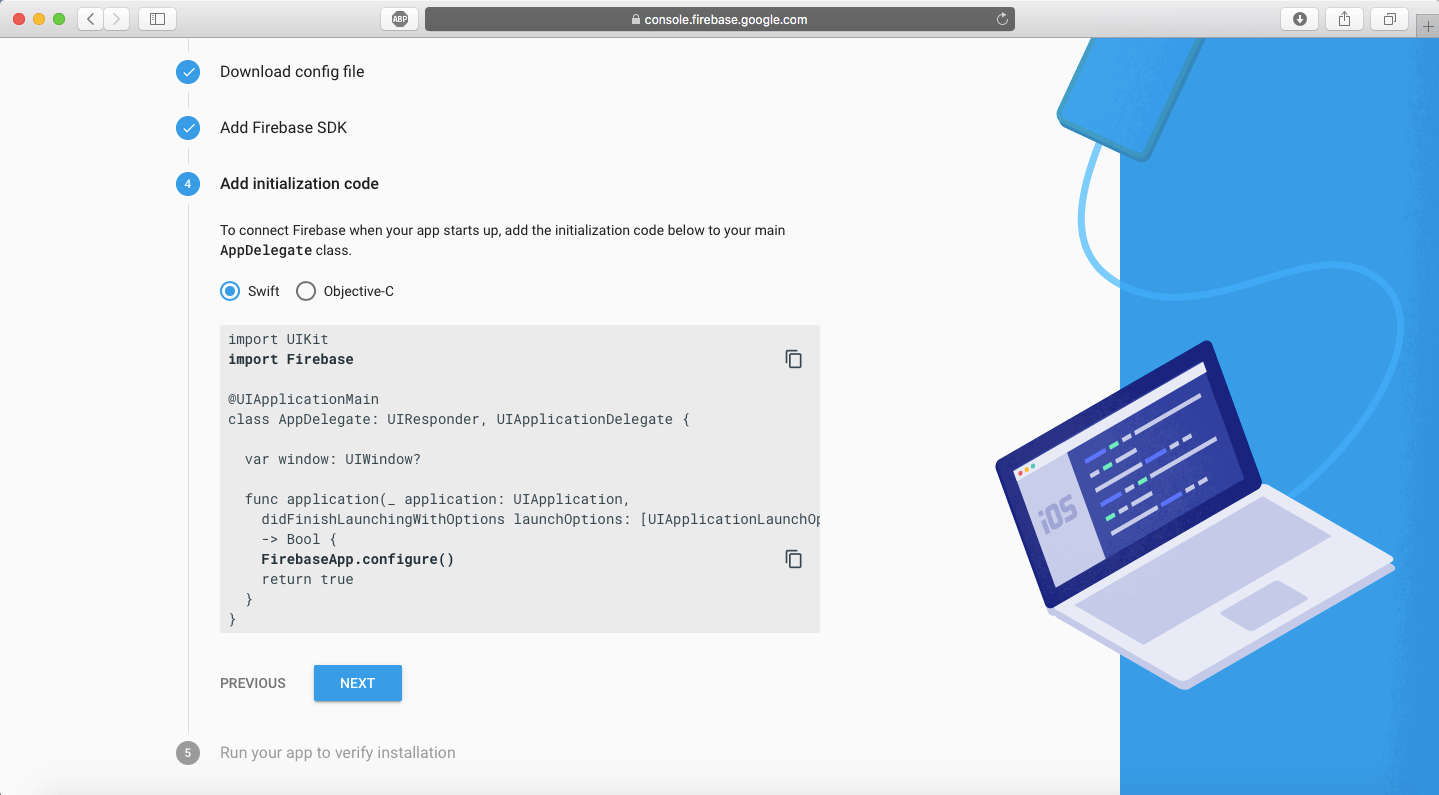
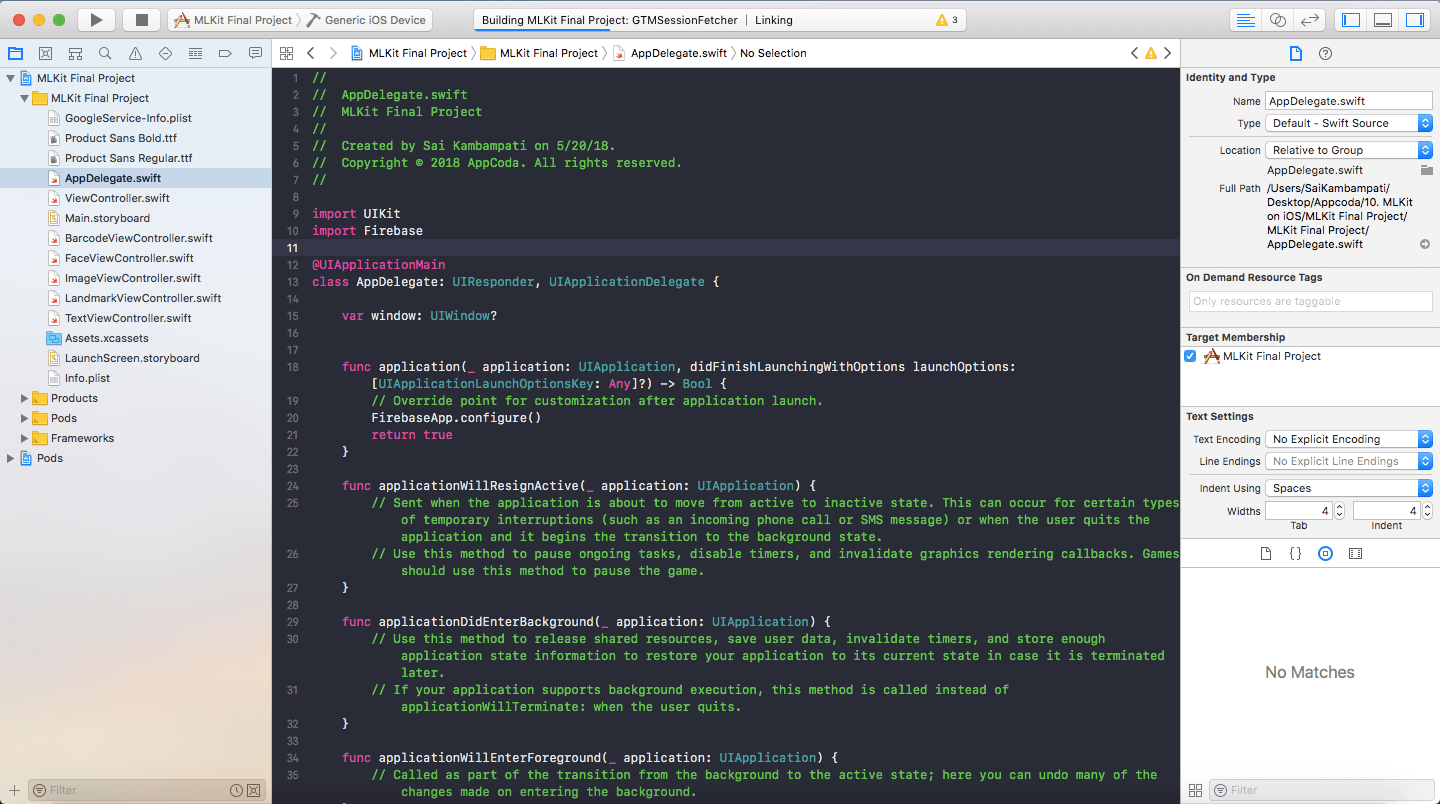
We are now being asked to open our workspace and add a few lines of code to our AppDelegate.swift. Open the .xcworkspace (again, not the .xcodeproj. I cannot iterate over how important this is) and go to AppDelegate.swift.
Once we’re in AppDelegate.swift, all we need to do is add two lines of code.
import UIKit
import Firebase

@UIApplicationMain
class AppDelegate: UIResponder, UIApplicationDelegate {

    var window: UIWindow?

    func application(_ application: UIApplication, didFinishLaunchingWithOptions launchOptions: [UIApplicationLaunchOptionsKey: Any]?) -> Bool {
        // Override point for customization after application launch.
        FirebaseApp.configure()
        return true
    }
All we are doing is importing the Firebase package and configuring it based on our GoogleService-Info.plist file we added earlier. You may get an error saying that it was not able to build the Firebase module but just press CMD+SHIFT+K to clean the project and then CMD+B to build it.
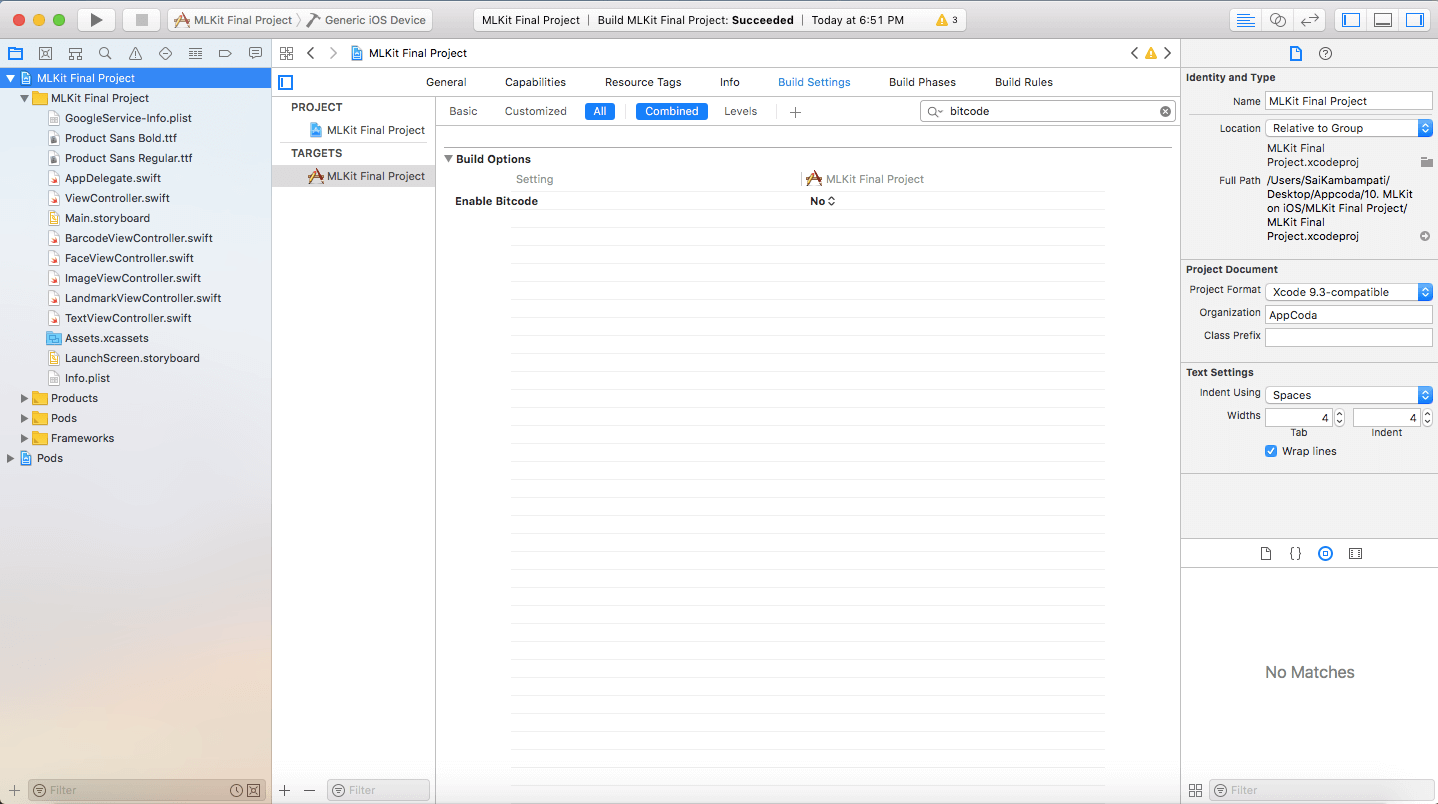
If the error persists, go to the Build Settings tab of the project and search for Bitcode. You’ll see an option called Enable Bitcode under Build Options. Set that to No and build again. You should be successful now!
Press the Next button on the Firebase console to go to Step 5. Now, all you need to do is run your app on a device and Step 5 will automatically be completed! You should then be redirected back to your Project Overview page.
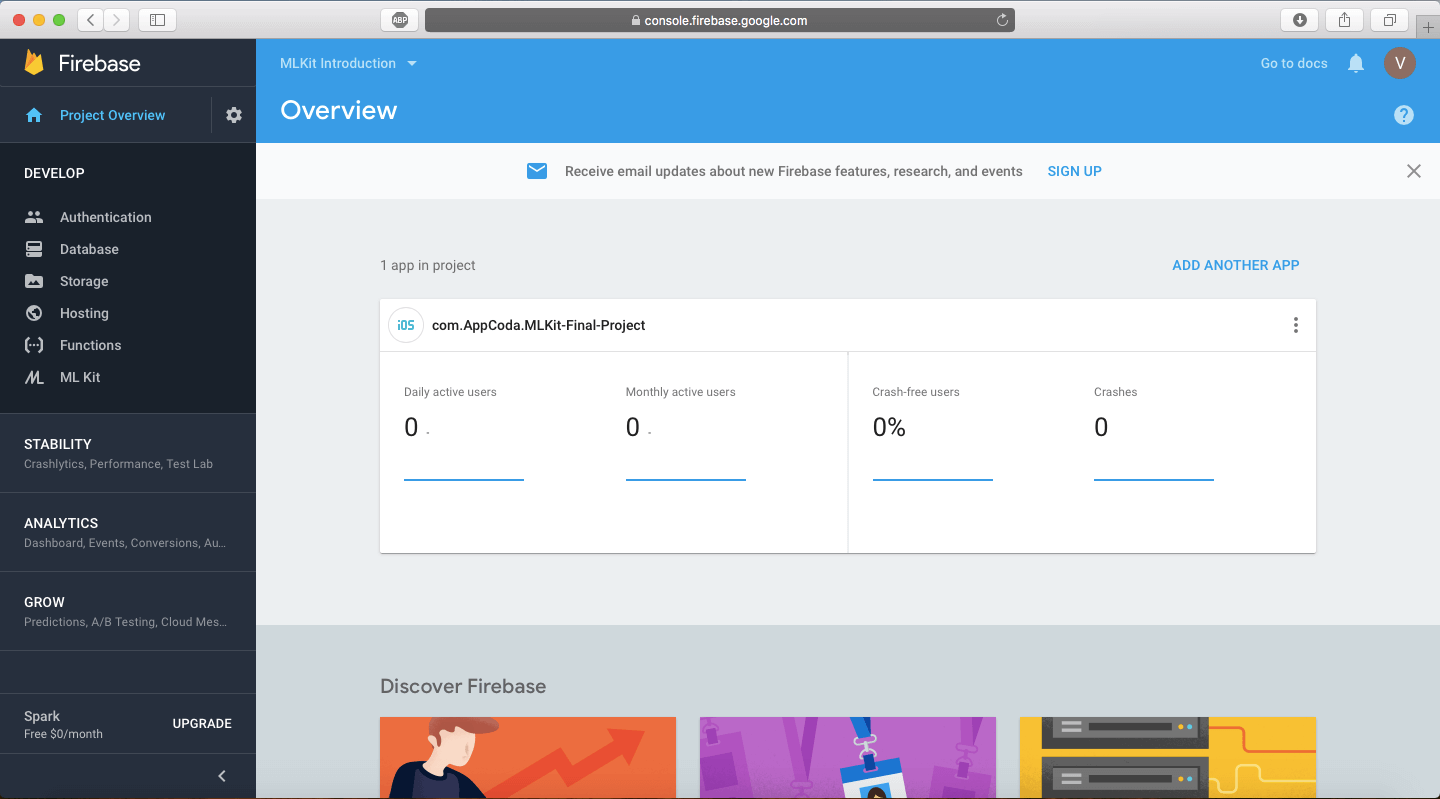
Congratulations! You are done with the most challenging part of this tutorial! All that left is adding the ML Kit code in Swift. Now it would be a perfect time to take a break but from now on, it’s just smooth cruising in a familiar code we know!
Barcode Scanning
The first implementation will be with Barcode Scanning. This is really simple to add to your app. Head to BarcodeViewController. You’ll see the code which happens when the Choose Image button is clicked. To get access to all the ML Kit protocols, we have to import Firebase.
import UIKit
import Firebase
Next, we need to define some variables which will be used in our Barcode Scanning function.
let options = VisionBarcodeDetectorOptions(formats: .all)
lazy var vision = Vision.vision()
The options variable tells the BarcodeDetector what types of Barcodes to recognize. ML Kit can recognize most common formats of barcodes like Codabar, Code 39, Code 93, UPC-A, UPC-E, Aztec, PDF417, QR Code, etc. For our purpose, we’ll ask the detector to recognize all types of formats. The vision variable returns an instance of the Firebase Vision service. It is through this variable that we perform most of our computations through.
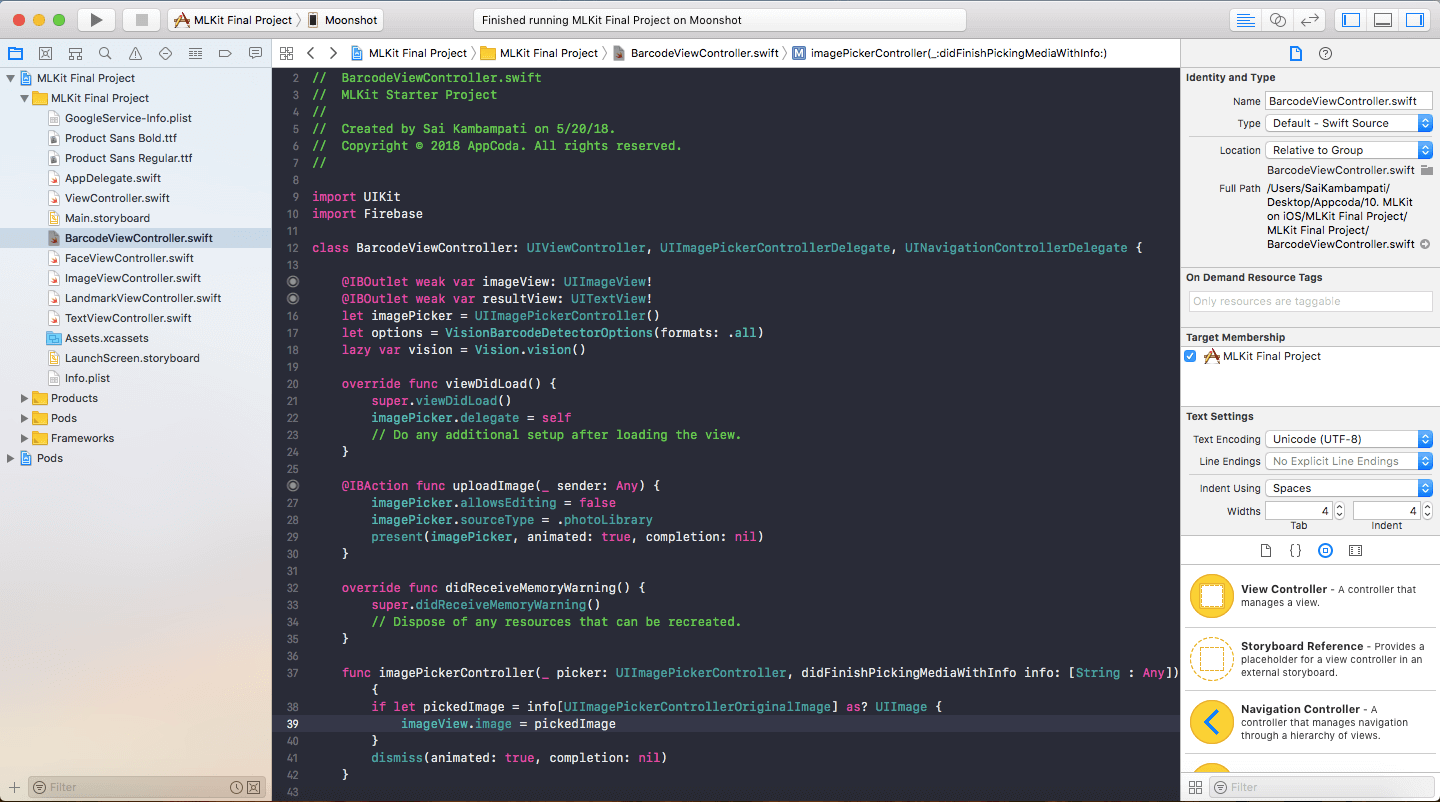
Next, we need to handle the recognition logic. We will implement all of this in the imagePickerController:didFinishPickingMediaWithInfo function. This function runs when we have picked an image. Currently, the function only sets the imageView to the image we choose. Add the following lines of code below the line imageView.image = pickedImage.
// 1
let barcodeDetector = vision.barcodeDetector(options: options)
let visionImage = VisionImage(image: pickedImage)

//2
barcodeDetector.detect(in: visionImage) { (barcodes, error) in
    //3
    guard error == nil, let barcodes = barcodes, !barcodes.isEmpty else {
        self.dismiss(animated: true, completion: nil)
        self.resultView.text = "No Barcode Detected"
        return
    }

    //4
    for barcode in barcodes {
        let rawValue = barcode.rawValue!
        let valueType = barcode.valueType

        //5
        switch valueType {
        case .URL:
            self.resultView.text = "URL: \(rawValue)"
        case .phone:
            self.resultView.text = "Phone number: \(rawValue)"
        default:
            self.resultView.text = rawValue
        }
    }
}
Here’s a quick rundown of everything that went down. It may seem like a lot but it’s quite simple. This will be the basic format for everything else we do for the rest of the tutorial.
- The first thing we do is define 2 variables:
barcodeDetectorwhich is a barcode detecting object of the Firebase Vision service. We set it to detect all types of barcodes. Then we define an image calledvisionImagewhich is the same image as the one we picked. - We call the
detectmethod ofbarcodeDetectorand run this method on ourvisionImage. We define two objects:barcodesanderror. - First, we handle the error. If there is an error or there are no barcodes recognized, we dismiss the Image Picker View Controller and set the
resultViewto say “No Barcode Detected”. Then wereturnthe function so the rest of the function will not run. - If there is a barcode detected, we use a for-loop to run the same code on each barcode recognized. We define 2 constants: a
rawValueand avalueType. The raw value of a barcode contains the data it holds. This can either be some text, a number, an image, etc. The value type of a barcode states what type of information it is: an email, a contact, a link, etc. - Now we could simply print the raw value but this wouldn’t provide a great user experience. Instead, we’ll provide custom messages based on the value type. We check what type it is and set the text of the
resultViewto something based on that. For example, in the case of a URL, we have theresultViewtext say “URL: ” and we show the URL.
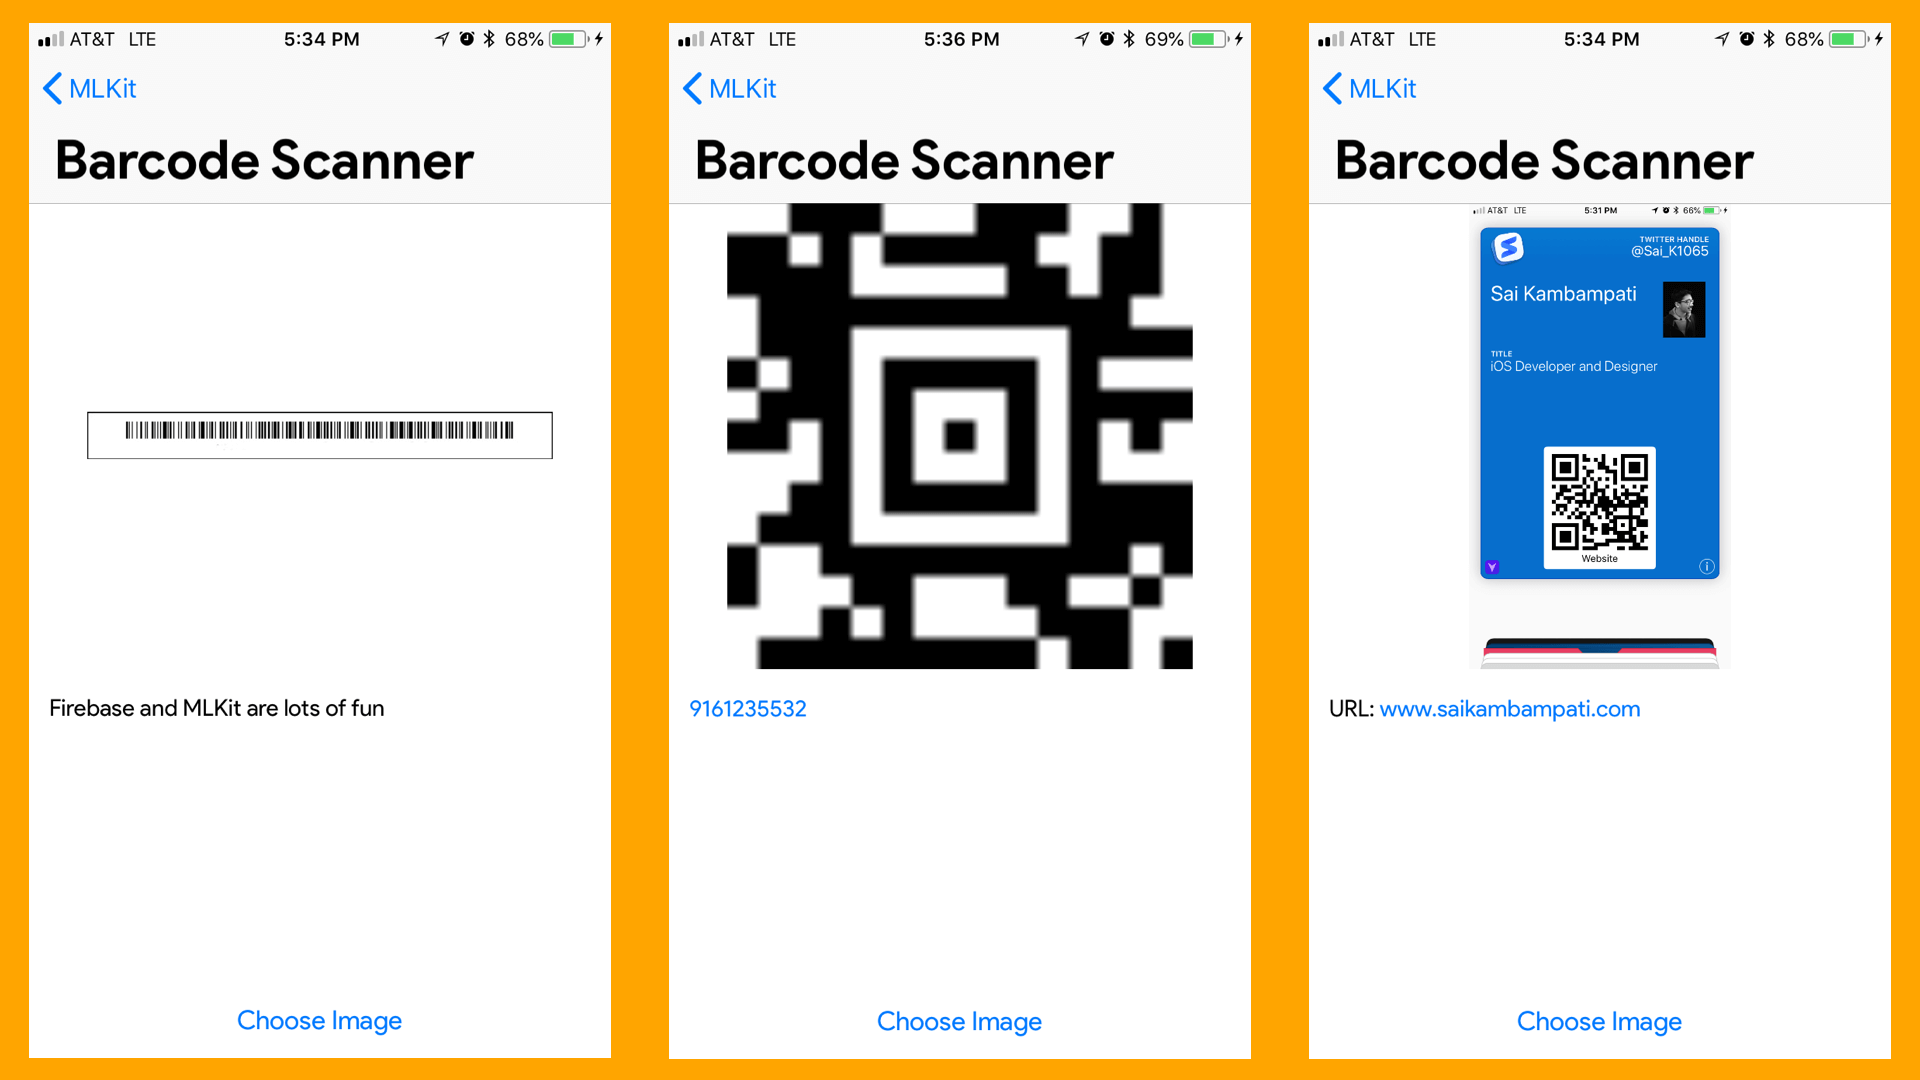
Build and run the app. It should work amazingly fast! What’s cool is that since resultView is a UITextView, you can interact with it and select on any of the detected data such as numbers, links, and emails.
Face Detection
Next, we’ll be taking a look at Face Detection. Rather than draw boxes around faces, let’s take it a step further and see how we can report if a person is smiling, whether their eyes are open, etc.
Just like before, we need to import Firebase and define some constants.
import UIKit
import Firebase
...
let options = VisionFaceDetectorOptions()
lazy var vision = Vision.vision()
The only difference here is that we initialize the default FaceDetectorOptions. And, we configure these options in the viewDidLoad method.
override func viewDidLoad() {
    super.viewDidLoad()
    imagePicker.delegate = self

    // Do any additional setup after loading the view.
    options.modeType = .accurate
    options.landmarkType = .all
    options.classificationType = .all
    options.minFaceSize = CGFloat(0.1)
}
We define the specific options of our detector in viewDidLoad. First, we choose which mode to use. There are two modes: accurate and fast. Since this is just a demo app, we’ll use the accurate model but in a situation where speed is important, it may be wiser to set the mode to .fast.
Next, we ask the detector to find all landmarks and classifications. What’s the difference between the two? A landmark is a certain part of the face such as the right cheek, left cheek, base of the nose, eyebrow, and more! A classification is kind of like an event to detect. At the time of this writing, ML Kit Vision can detect only if the left/right eye is open and if the person is smiling. For our purpose, we’ll be dealing with classifications only (smiles and eyes opened).
The last option we configure is the minimum face size. When we say options.minFaceSize = CGFloat(0.1), we are asking for the smallest desired face size. The size is expressed as a proportion of the width of the head to the image width. A value of 0.1 is asking the detector to search for the smallest face which is roughly 10% of the width of the image being searched.
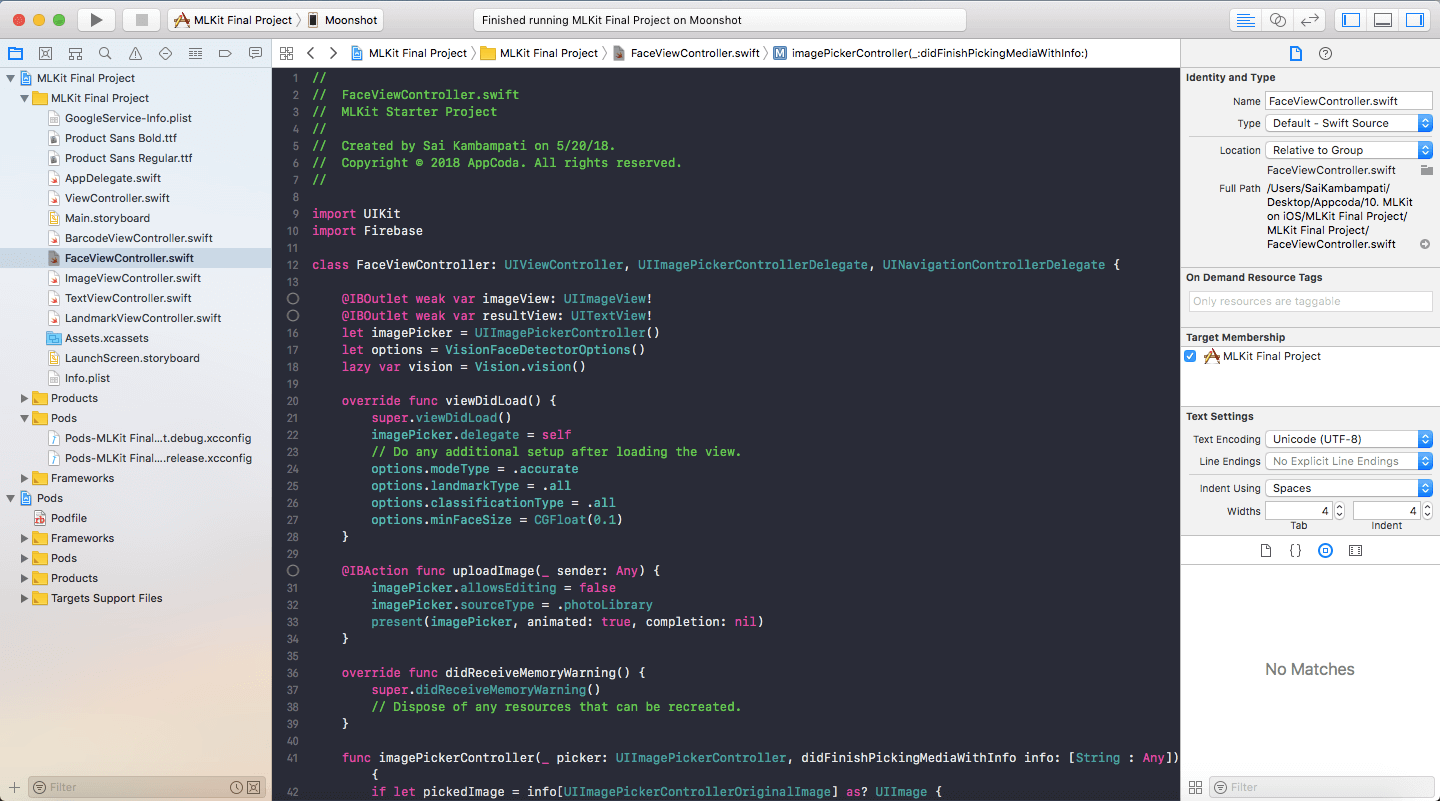
Next, we handle the logic inside the imagePickerController:didFinishPickingMediaWithInfo method. Right below the line imageView.image = pickedImage, type the following:
let faceDetector = vision.faceDetector(options: options)
let visionImage = VisionImage(image: pickedImage)
self.resultView.text = ""
This simply sets ML Kit Vision service to be a face detector with the options we defined earlier. We also define the visionImage to be the one we chose. Since we may be running this several times, we’ll want to clear the resultView.
Next, we call the faceDetector’s detect function to perform the detection.
//1
faceDetector.detect(in: visionImage) { (faces, error) in
    //2
    guard error == nil, let faces = faces, !faces.isEmpty else {
        self.dismiss(animated: true, completion: nil)
        self.resultView.text = "No Face Detected"
        return
    }
    //3
    self.resultView.text = self.resultView.text + "I see \(faces.count) face(s).\n\n"

    for face in faces {
        //4
        if face.hasLeftEyeOpenProbability {
            if face.leftEyeOpenProbability < 0.4 {
                self.resultView.text = self.resultView.text + "The left eye is not open!\n"
            } else {
                self.resultView.text = self.resultView.text + "The left eye is open!\n"
            }
        }

        if face.hasRightEyeOpenProbability {
            if face.rightEyeOpenProbability < 0.4 {
                self.resultView.text = self.resultView.text + "The right eye is not open!\n"
            } else {
                self.resultView.text = self.resultView.text + "The right eye is open!\n"
            }
        }

        //5
        if face.hasSmilingProbability {
            if face.smilingProbability < 0.3 {
                self.resultView.text = self.resultView.text + "This person is not smiling.\n\n"
            } else {
                self.resultView.text = self.resultView.text + "This person is smiling.\n\n"
            }
        }
    }
}
This should look very similar to the Barcode Detection function we wrote earlier. Here’s everything that happens:
- We call the
detectfunction on ourvisionImagelooking forfacesanderrors. - In case if there is an error or there are no faces, we set the
resultViewtext to “No Face Detected” and return the method. - If faces are detected, the first statement we print to the
resultViewis the number of faces we see. You’ll be seeing\na lot within the strings of this tutorial. This signifies a new line. - Then we deep dive into the specifics. If a
facehas a probability for the left eye being opened, we check to see what the probability is. In this case, I have set it to say that the left eye is closed if the probability is less than 0.4. The same goes for the right eye. You can change it to whatever value you wish. - Similarly, I check the smile probability and if it is less than 0.3, the person is most likely not smiling, otherwise, the face is smiling.
Build and run your code, see how it performs! Feel free to tweak the values and play around!
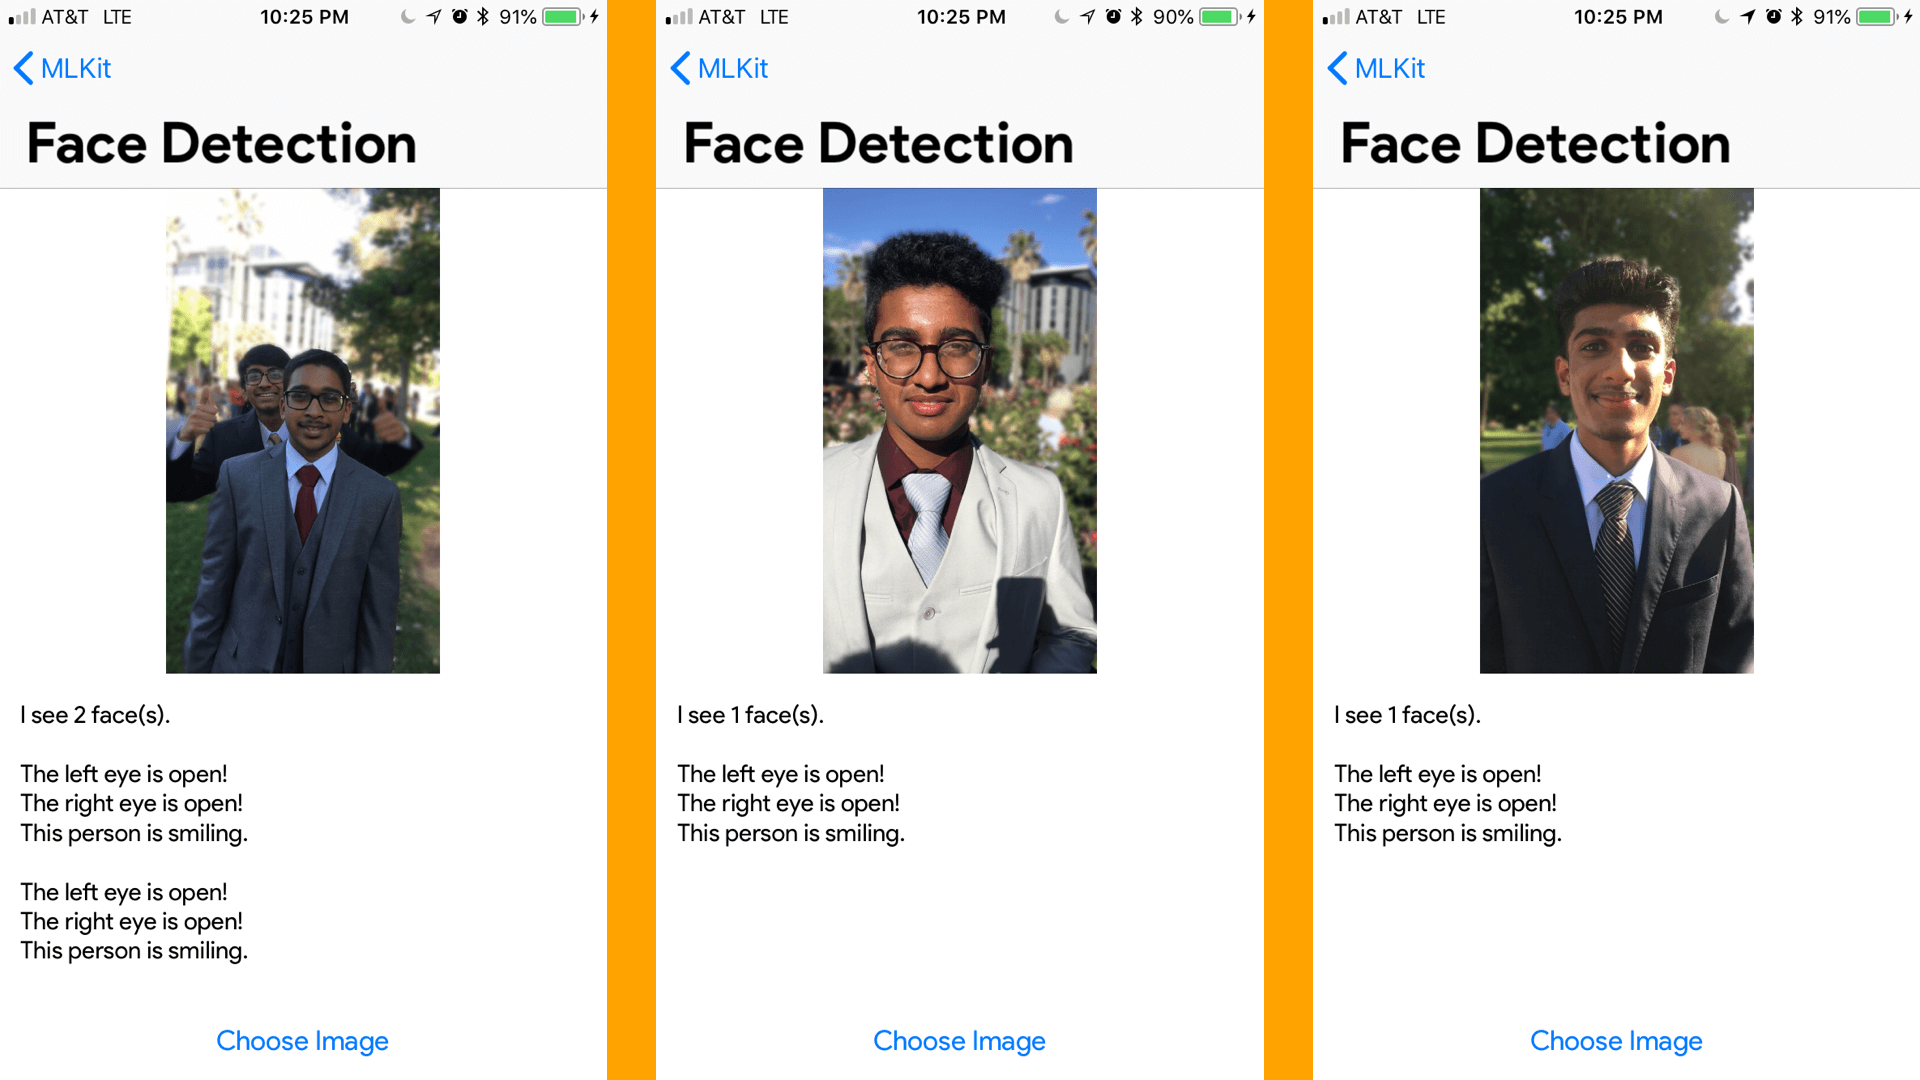
Image Labelling
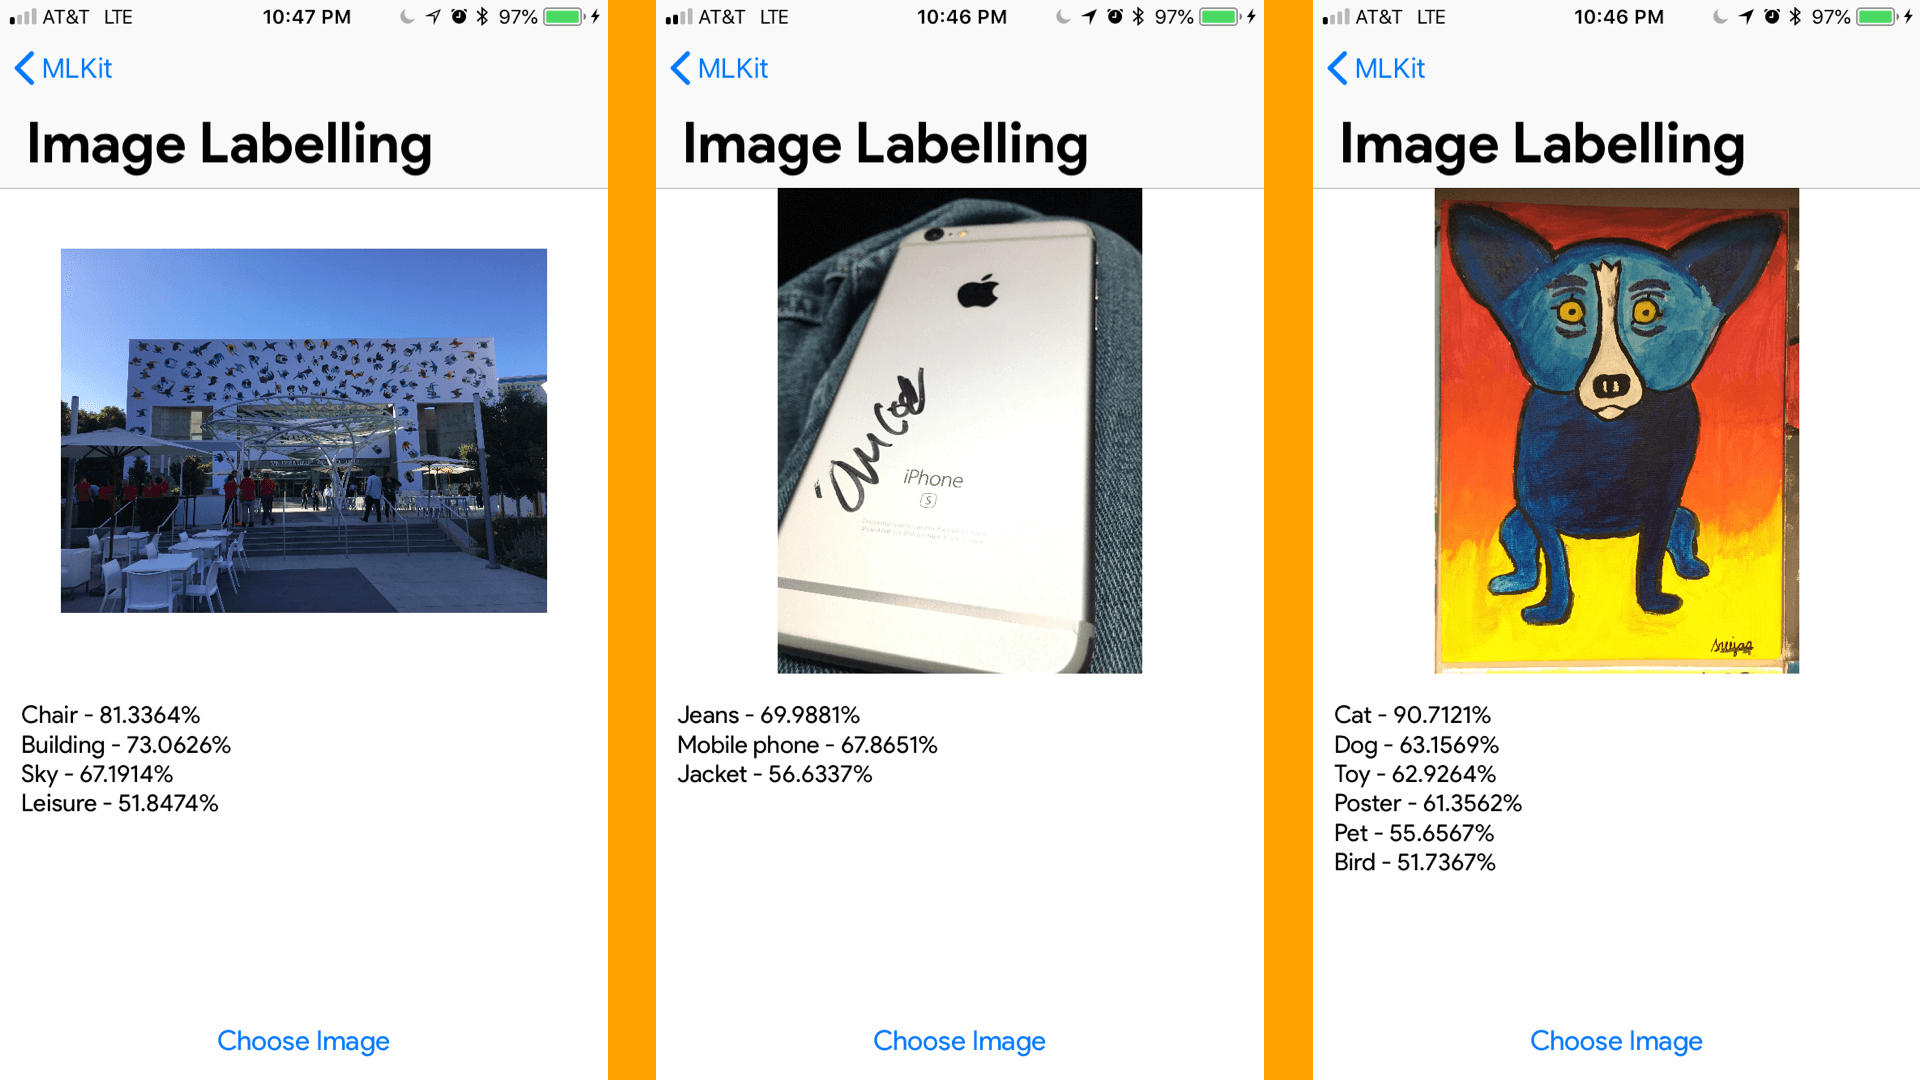
Next, we’ll check out labelling images. This is much easier than face detection. Actually, you have two options with Image Labelling and Text Recognition. You can either have all of the machine learning done on-device (which is what Apple would prefer since all the data belongs to the user, it can run offline, and no calls are made to Firebase) or you can use Google’s Cloud Vision. The advantage here is that the model will automatically be updated and a lot more accurate since it’s easier to have bigger, accurate model size in the cloud than on device. However, for our purposes, we’ll be continuing everything we have done so far and just implement the on-device version.
See if you can implement it on your own! It’s quite similar to the previous two scenarios. If not, that’s alright! Here’s what we should do!
import UIKit
import Firebase
...
lazy var vision = Vision.vision()
Unlike before, we’ll be using the default settings for the label detector so we only need to define one constant. Everything else, like before, will be in the imagePickerController:didFinishPickingMediaWithInfo method. Under imageView.image = pickedImage, insert the following lines of code:
//1
let labelDetector = vision.labelDetector()
let visionImage = VisionImage(image: pickedImage)
self.resultView.text = ""

//2
labelDetector.detect(in: visionImage) { (labels, error) in
    //3
    guard error == nil, let labels = labels, !labels.isEmpty else {
        self.resultView.text = "Could not label this image"
        self.dismiss(animated: true, completion: nil)
        return
    }

    //4
    for label in labels {
        self.resultView.text = self.resultView.text + "\(label.label) - \(label.confidence * 100.0)%\n"
    }
}
This should start to look familiar. Let me briefly walk you over the code:
- We define
labelDetectorwhich is telling ML Kit’s Vision service to detect labels from images. We definevisionImageto be the image we chose. We clear theresultViewin case we use this function more than once. - We call the
detectfunction onvisionImageand look forlabelsanderrors. - If there is an error or ML Kit wasn’t able to label an image, we return the function telling the user that we couldn’t label the image.
- If everything works, we set the text of
resultViewto be the label of the image and how confident ML Kit is with labelling that image.
Simple, right? Build and run your code! How accurate (or crazy) were the labels?
Text Recognition
We’re almost done! Optical Character Recognition, or OCR, has become immensely popular within the last two years in terms of mobile apps. With ML Kit, it’s become so much easier to implement this in your apps. Let’s see how!
Similar to image labelling, text recognition can be done via Google Cloud and through calls to the model in the cloud. However, we’ll work with the on-device API for now.
import UIKit
import Firebase
...
lazy var vision = Vision.vision()
var textDetector: VisionTextDetector?
Same as before, we call the Vision service and define a textDetector. We can set the textDetector variable to vision‘s text detector in the viewDidLoad method.
override func viewDidLoad() {
    super.viewDidLoad()
    imagePicker.delegate = self
    textDetector = vision.textDetector()
}
Next, we just handle everything in imagePickerController:didFinishPickingMediaWithInfo. As usual, we’ll insert the following lines of code below the line imageView.image = pickedImage.
//1
let visionImage = VisionImage(image: pickedImage)
textDetector?.detect(in: visionImage, completion: { (features, error) in
    //2
    guard error == nil, let features = features, !features.isEmpty else {
        self.resultView.text = "Could not recognize any text"
        self.dismiss(animated: true, completion: nil)
        return
    }

    //3
    self.resultView.text = "Detected Text Has \(features.count) Blocks:\n\n"
    for block in features {
        //4
        self.resultView.text = self.resultView.text + "\(block.text)\n\n"
    }
})
- We set
visionImageto be the image we chose. We run thedetectfunction on this image looking forfeaturesanderrors. - If there is an error or no text, we tell the user “Could not recognize any text” and return the function.
- The first piece of information we’ll give our users is how many blocks of text were detected.
- Finally, we’ll set the text of
resultViewto the text of each block leaving a space in between with\n\n(2 new lines).
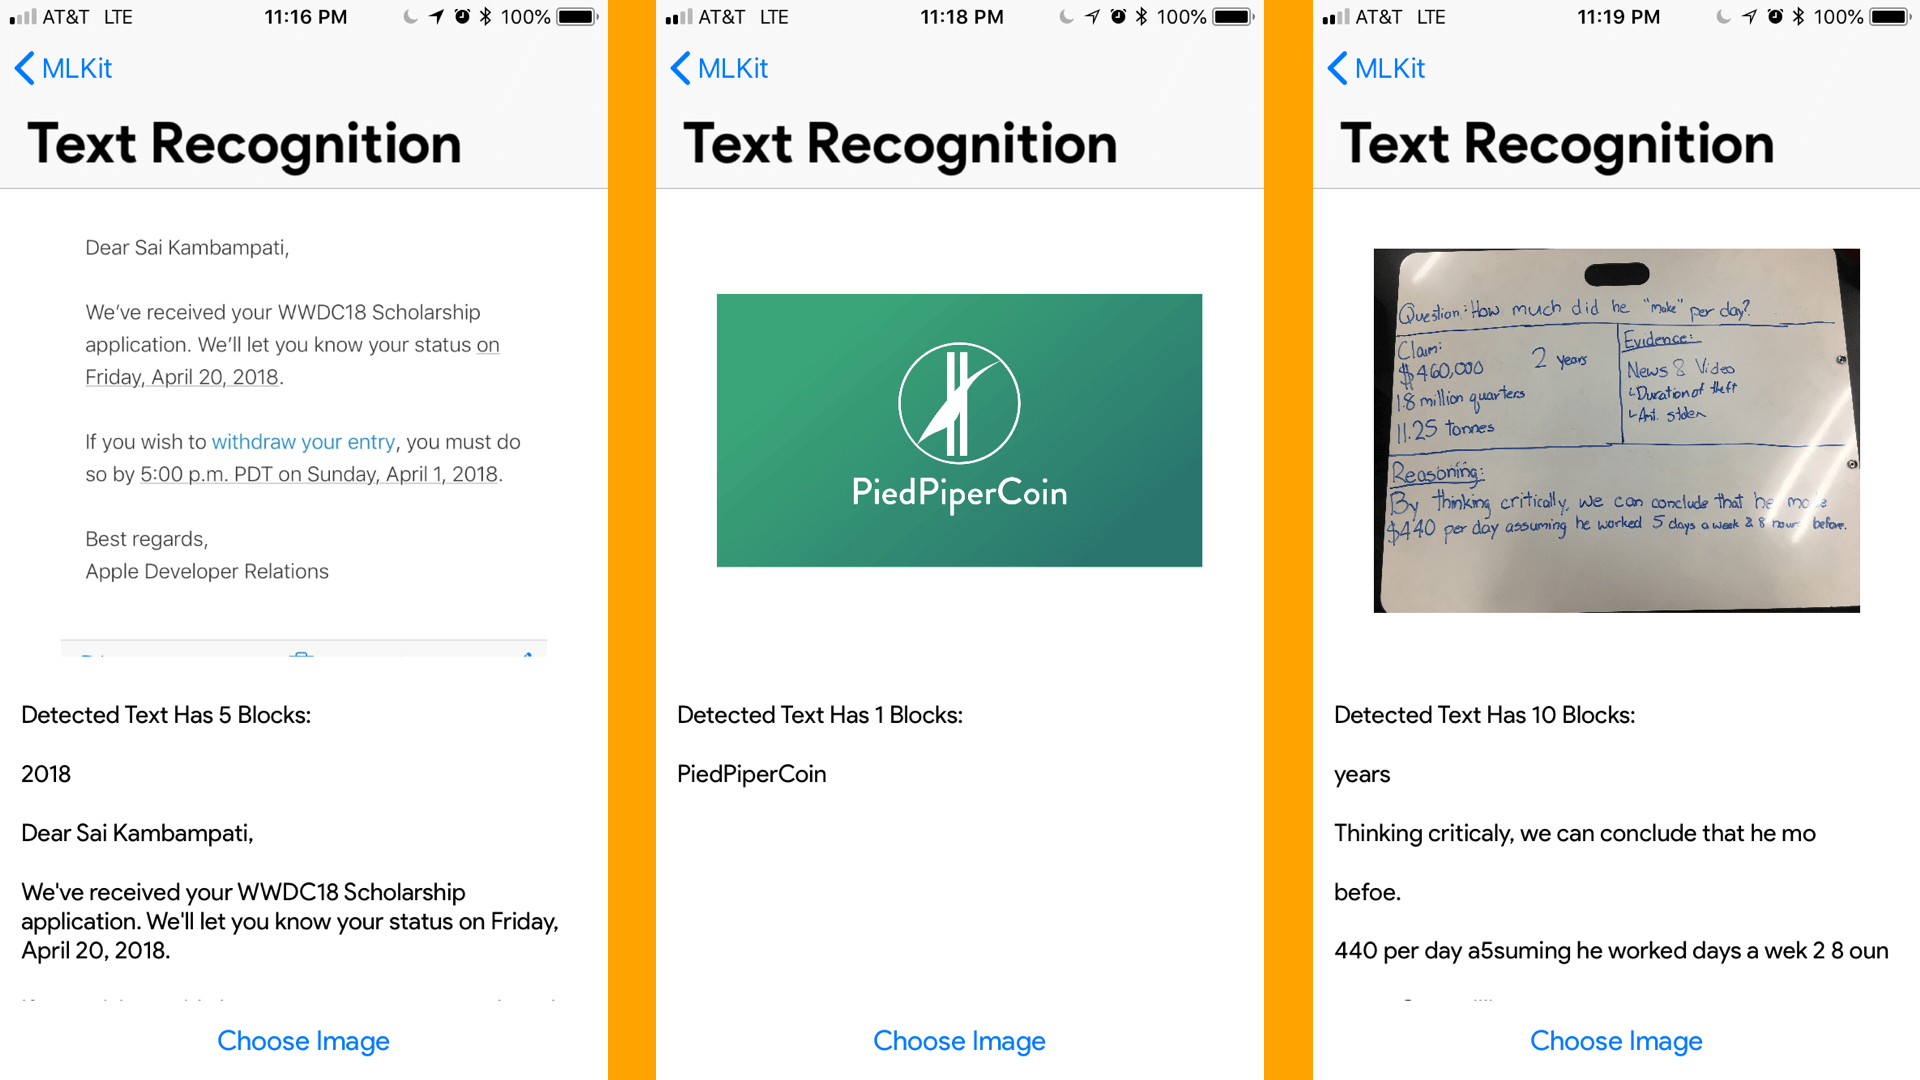
Test it out! Try putting it through different types of fonts and colors. My results have shown that it works flawlessly on printed text but has a really hard time with handwritten text.
Landmark Recognition
Landmark recognition can be implemented just like the other 4 categories. Unfortunately, ML Kit does not support Landmark Recognition on-device at the time of this writing. To perform landmark recognition, you will need to change the plan of your project to “Blaze” and activate the Google Cloud Vision API.
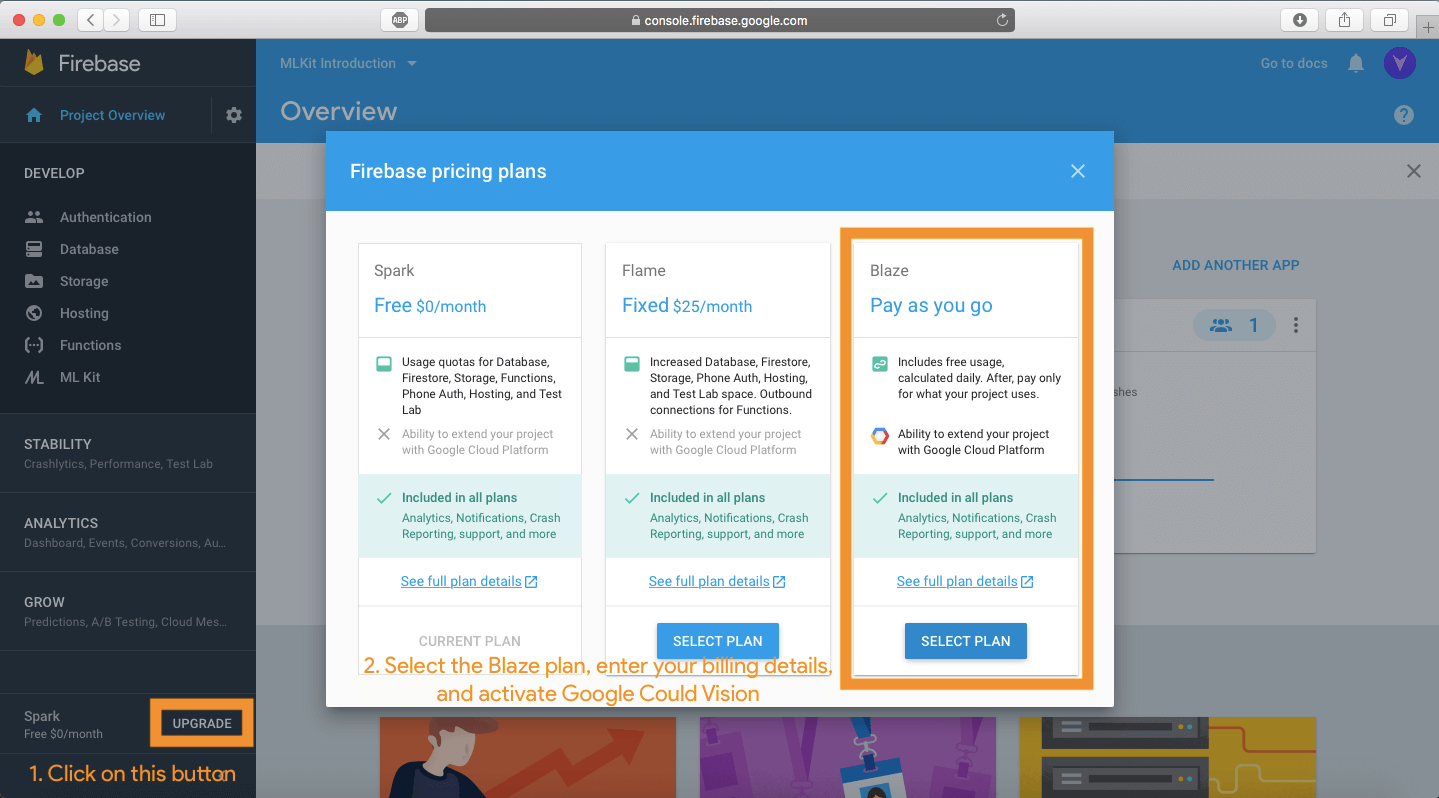
However, this is beyond the scope of this tutorial. If you do feel up to the challenge, you can implement the code using the documentation found here. The code is also included in the final project.
Conclusion
This was a really big tutorial, so feel free to scroll back up and review anything you may not have understood. If you have any questions, feel free to leave me a comment below.
With ML Kit, you saw how easy it is to implement smart machine learning features into your app. The scope of apps which can be created is large, so here’s some ideas for you to try out:
- An app which recognizes text and reads them back to users with visual disabilities
- Face Tracking for an app like Try Not to Smile by Roland Horvath
- Barcode Scanner
- Search for pictures based on labels
The possibilities are endless, it’s all based on what you can imagine and how you want to help your users. The final project can be downloaded here. You can learn more about the ML Kit API’s by checking out their documentation. Hope you learned something new in tthis tutorial and let me knowhow it went in the comments below!
For the full project, you can check it out on GitHub.


