Welcome to part 2 of the MapKit tutorial series. If you read part 1 of this tutorial, you should already be familiar with the basics of MapKit. Let’s get started with some of MapKit’s more advanced features!
You can get started by downloading the starter project from GitHub. This starter project is the completed project from part 1 of this tutorial, which you should read if you haven’t done so already.
Creating Polylines
In the last part of this tutorial series, we worked with overlays in MapKit. We rendered overlays on top of the map to show users key areas that we wanted to highlight. By combining annotations and overlays, you can really easily display rich data on top of a map. In our last example, we rendered a circle.
Let’s go ahead and try something more complex. Unlike what we get with MKCircle, MapKit doesn’t provide any predefined classes for other shapes, so we have to make our own.
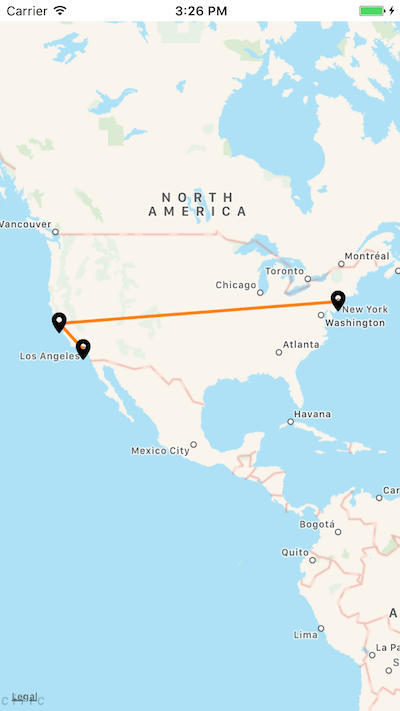
How about we start with the basics to create a polyline, or a line made up of multiple different points joined together? To keep things simple, we will draw a polyline between all of the cities we used in the last example. The class we use to draw polylines in MapKit is called MKPolyline, and it’s fairly easy to use. Let’s get started!
MKPolyline is a class that can be used to represent a connected sequence of line segments. You can create a polyline by constructing a MKPolyline object with a series of end-points like this:

First, head to ViewController.swift, where all of the magic related to our map is taking place. Then, move to the addAnnotations() method, where we are adding circular overlays to mapView. Go ahead and add the following to the end of the method:
var locations = places.map { $0.coordinate }
let polyline = MKPolyline(coordinates: &locations, count: locations.count)
mapView?.add(polyline)
These 3 lines of code do the following:
- Extract the coordinates of each of the places contained in
places. - Create a polyline from the places extracted in step 1.
- Add the polyline to the map view.
Here please take a special note of the way we pass in the coordinates parameter to the initializer for MKPolyline.
We need to provide an UnsafePointer<CLLocationCoordinate2D> instead of [CLLocationCoordinate2D]. Since CLLocationCoordinate2D is an Objective C structure and not an NSObject subclass, regular NSArray instances cannot handle it. We cannot provide our coordinates as an array directly because Swift is unable to bridge this array to its Objective C type, as there is no Objective C type for an array of C structs. Without getting into low level language topics such as bridging and memory management, it’s necessary to know that an array you pass to a function as an UnsafePointer must be declared with var, not let. You must also prefix the array’s name with an & to indicate to Swift that you wish to provide that parameter as an inout type. Additionally, you need to provide the count of the array you pass in so that Objective C can determine how many objects have been provided.
Your addAnnotations() function should look like this:
func addAnnotations() {
    mapView?.delegate = self
    mapView?.addAnnotations(places)

    let overlays = places.map { MKCircle(center: $0.coordinate, radius: 100) }
    mapView?.addOverlays(overlays)

    var locations = places.map { $0.coordinate }
    let polyline = MKPolyline(coordinates: &locations, count: locations.count)
    mapView?.add(polyline)
}
Now that we have provided the polyline overlay to MapKit, we need to tell MapKit how to render the overlay. Remember how we provided an MKCircleRenderer when we wanted to render a circle? We need to provide a renderer for polylines as well, but it’s suprisingly easy.
Let’s navigate to mapView(_: rendererFor:) in ViewController.swift and get started. The first thing we need to do is modify this method so that it can check what kind of overlay is being rendered and respond appropriately. We can do this using Swift’s is operator, which will allow us to check if one object is a subclass of another, like so:
if animal is Dog {

}

else {

}
As you can see, Swift’s type checking syntax is pretty awesome, and it lets us easily check the type of an object. Let’s use this principle and apply it to our MapKit scenario:
func mapView(_ mapView: MKMapView, rendererFor overlay: MKOverlay) -> MKOverlayRenderer {
    if overlay is MKCircle {
        let renderer = MKCircleRenderer(overlay: overlay)
        renderer.fillColor = UIColor.black.withAlphaComponent(0.5)
        renderer.strokeColor = UIColor.blue
        renderer.lineWidth = 2
        return renderer

    } else if overlay is MKPolyline {
        let renderer = MKPolylineRenderer(overlay: overlay)
        renderer.strokeColor = UIColor.orange
        renderer.lineWidth = 3
        return renderer
    }

    return MKOverlayRenderer()
}
Easy, right? We just check what kind of overlay we’re rendering and act accordingly. MKPolylineRenderer is self explanatory for those who have worked with MKCircle renderer, as the setup process is identical. Build and run the app, and voila! You should see a blue polyline that runs between New York, LA, and San Francisco.

Drawing Polygons
Now that we’ve drawn a polyline, let’s move on and see how to draw a polygon. If you don’t remember from Math class, a polygon is a closed shape made up of multiple points, with straight lines connecting each of the points. MapKit also provides us with a class for rendering polygons. It’s called MKPolygon.
As you may have inferred already, it’s pretty easy to use. Let’s go back to addAnnotations() and add our polygon. But before we do this, let’s clean up our code a little bit. Currently, our addAnnotations() function is responsible for adding annotations and a polyline. This doesn’t hold true to its name, so let’s make a new method called addPolyline() and move our polyline code from addAnnotations() to our new function:
func addPolyline() {
    var locations = places.map { $0.coordinate }
    let polyline = MKPolyline(coordinates: &locations, count: locations.count)

    mapView?.add(polyline)
}
Let’s also create an empty method called addPolygon():
func addPolygon() {

}
Finally, modify the viewDidLoad() method to call all of our overlay methods. Your viewDidLoad() method should look like this:
override func viewDidLoad() {
    requestLocationAccess()

    addAnnotations()
    addPolyline()
    addPolygon()
}
Okay, it is time to implement the addPolygon() method. To draw a polygon on map, you just need a few lines of code. Insert the following code in the method:
var locations = places.map { $0.coordinate }
let polygon = MKPolygon(coordinates: &locations, count: locations.count)
mapView?.add(polygon)
This is really similar to adding a polyline, and that’s intentional. Well-designed frameworks provide developers with consistency and predictability. MapKit’s mature API gives developers both of those things. Note that we still have the little oddity that we did when we worked with MKPolyline: we need to provide our [CLLocationCoordinate2D] as an UnsafePointer. Just like before, you need to declare your array with var and prefix its name with an & when passing it to the function.
Great! We just need to provide MapKit with a renderer like we did for MKCircle and MKPolyline. Head to mapView(_: rendererFor:) in ViewController.swift and add a third branch to the if statement we were using before:
else if overlay is MKPolygon {

}
Now we can check if we’re rendering a polygon and respond appropriately. As we did before, we’re going to set up a renderer and return it so that MapKit knows how to display our polygon. Add the following code to the if branch:
let renderer = MKPolygonRenderer(polygon: overlay as! MKPolygon)
renderer.fillColor = UIColor.black.withAlphaComponent(0.5)
renderer.strokeColor = UIColor.blue
renderer.lineWidth = 2
return renderer
Easy, right? We set up another renderer just like we did with our other shapes and return it. Your mapView(_: rendererFor:) should look like this:
func mapView(_ mapView: MKMapView, rendererFor overlay: MKOverlay) -> MKOverlayRenderer {
    if overlay is MKCircle {
        let renderer = MKCircleRenderer(overlay: overlay)
        renderer.fillColor = UIColor.black.withAlphaComponent(0.5)
        renderer.strokeColor = UIColor.blue
        renderer.lineWidth = 2
        return renderer

    } else if overlay is MKPolyline {
        let renderer = MKPolylineRenderer(overlay: overlay)
        renderer.strokeColor = UIColor.orange
        renderer.lineWidth = 3
        return renderer

    } else if overlay is MKPolygon {
        let renderer = MKPolygonRenderer(polygon: overlay as! MKPolygon)
        renderer.fillColor = UIColor.black.withAlphaComponent(0.5)
        renderer.strokeColor = UIColor.orange
        renderer.lineWidth = 2
        return renderer
    }

    return MKOverlayRenderer()
}
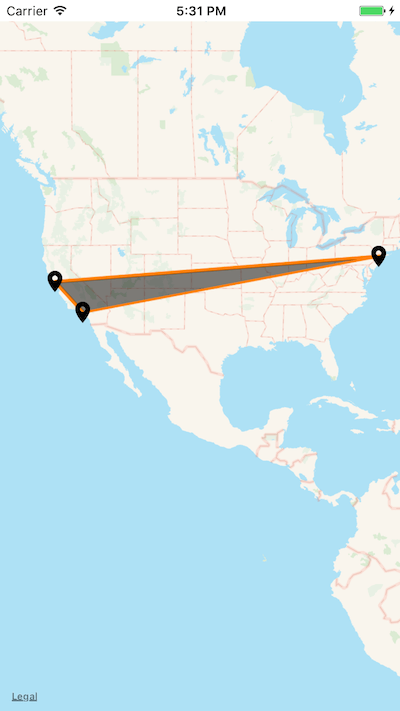
Now, build and run. Let’s take a look. You should see a polygon between the 3 cities shown on the map.

You should notice that the overlays we have provided scale proportionately, depending on the scale of the map. This makes adding overlays superior to adding a subview to MKMapView because overlays scale and translate automatically, but regular views would not.
Adding Callouts
So far, we’ve learned how to display annotations, circles, polylines, and polygons. Now, let’s revisit annotations and make ours better. What if someone using our app doesn’t know which city is which? For example, what if someone does not know which of the 3 cities is New York?
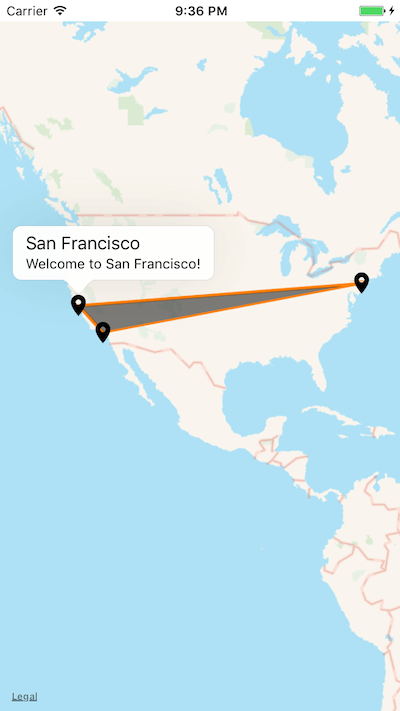
We should provide a way for them to check. We can do this with callouts, which are little bubbles that appear when annotations are tapped. Currently, tapping an annotation in our app does nothing. But we can make it work by showing a callout bubble.
Go to mapView(_: viewFor:) in ViewController.swift and update the if branch of our code that returns an annotation view for our custom annotations. We need to tell MapKit that the annotation views we’re providing can show callouts. Unsurprisingly, this is easy. Before return annotationView, add a line of code that reads annotationView.canShowCallout = true, so that mapView(_: viewFor:) reads like this:
func mapView(_ mapView: MKMapView, viewFor annotation: MKAnnotation) -> MKAnnotationView? {
    if annotation is MKUserLocation {
        return nil
    } else {
        let annotationView = mapView.dequeueReusableAnnotationView(withIdentifier: "annotationView") ?? MKAnnotationView()
        annotationView.image = UIImage(named: "place icon")
        annotationView.canShowCallout = true
        return annotationView
    }
}
Easy, right? Let’s build and run and see what happens. Tap on an annotation view and observe the callout that appears.

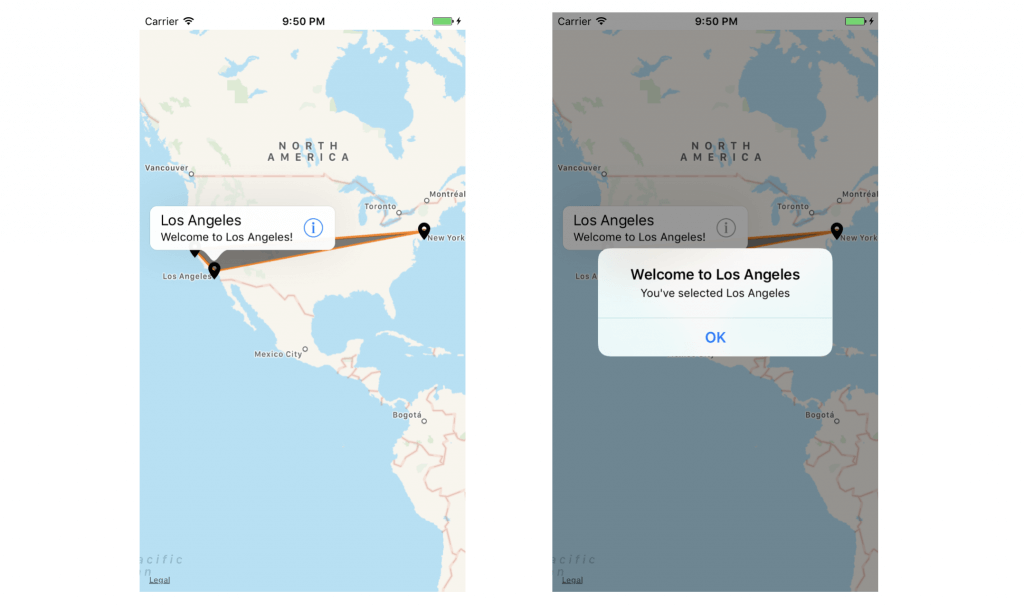
Now, our users can easily check what city they’re looking at, just by tapping. Let’s expand this ability a little bit further by allowing our users to view more detail within a callout. First, we need to add buttons to our callout. This is easy to do. Modify mapView(_: viewFor:):
func mapView(_ mapView: MKMapView, viewFor annotation: MKAnnotation) -> MKAnnotationView? {
    if annotation is MKUserLocation {
        return nil

    } else {
        let annotationView = mapView.dequeueReusableAnnotationView(withIdentifier: "annotationView") ?? MKAnnotationView()
        annotationView.image = UIImage(named: "place icon")
        annotationView.rightCalloutAccessoryView = UIButton(type: .detailDisclosure)
        annotationView.canShowCallout = true
        return annotationView
    }
}
Now our callout will display a detail disclosure button when it’s clicked. We can respond to this button being clicked with a MKMapViewDelegate function called mapView(_: annotationView: calloutAccessoryControlTapped:).
Let’s implement this function in the ViewController.swift:
func mapView(_ mapView: MKMapView, annotationView view: MKAnnotationView, calloutAccessoryControlTapped control: UIControl) {
    guard let annotation = view.annotation as? Place, let title = annotation.title else { return }

    let alertController = UIAlertController(title: "Welcome to \(title)", message: "You've selected \(title)", preferredStyle: .alert)
    let cancelAction = UIAlertAction(title: "OK", style: .cancel, handler: nil)
    alertController.addAction(cancelAction)
    present(alertController, animated: true, completion: nil)
}
This method will be called whenever a user taps on a button in a callout. It will retrieve the name of the city that belongs to that callout and display it in the alert. Give it a try. Build and run, tap a city, and then select a callout. You should see a message in the console that prints the name of the city the user selected.

Wrapping up
I hope you enjoyed this tutorial! Even more importantly, I hoped you gained some valuable knowledge that you can use in your own apps. If you have any questions or comments, feel free to comment them below. Good luck!
For reference, you can download the complete Xcode project on GitHub.


