

Editor’s note: After we published the animation tutorial a few weeks ago, we got quite a lot of requests about publishing a complete game tutorial. This week, Rafael will show you how to write a simple Maze game using the iPhone’s built-in accelerometer.
This is our first tutorial about developing an iPhone game. In the next series of tutorials we are going to learn how to create a simple Maze game. In this game players have to guide a pacman-like figure to navigate through a maze and find the exit, while avoiding to collide with any moving ghosts. For the navigation, The user will guide the pacman with the aid of the iPhone’s accelerometer.
As the app is a little bit complex and we have to introduce several programming frameworks, we will split the game tutorial into three parts:
- In this first part we’ll set up all the required elements of the game such as designing the maze and animating the obstacles.
- For the second part, we’ll cover the accelerometer and show you how to move the pacman.
- In the last part of tutorial, you’ll learn how to detect collisions.
Creating the App
Okay, let’s get started and build the game. Open Xcode and create a new Project, choose the template Single View Application as shown below:

Creating Simple Maze Game
In the next screen enter Maze as the product name and set com.appcoda in the company identifier field. Select the “Use Authomatic Reference Counting” option, but deselect the “Use Storyboard” as we are not going to use storyboards for this project. Click next and create.

Setting Xcode Project Option
Next we will tell Xcode the supported orientation of our app. We do not want the app to rotate when the user rotates the iPhone, otherwise we will not achieve the desired effect with the accelerometer. Thus the app will only support the “Landscape” orientation. Select the project by clicking its name in the Navigator pane, that would open in the Editor pane a window where we can change the global properties of the project. Find the section labeled “Supported Interface Orientations” and deselect all of them except the “Landscape Right”, as it is shown in the next figure:

Setting interface orientation
Also, in the section related to the Status Bar, check “Hide during application launch” for visibility. We do not want to display the status bar while playing the game.
Designing the Maze and Game Characters
Let’s first design the maze interface. Select the AppViewController.xib file from Xcode’s Navigator to display the View Controller on the Editor Pane. From the list of objects, select the UIView as we have to change some of its properties. From the Utility Pane, select the Attributes Inspector and make the following changes:
- Set the orientation to Landscape
- Set the status bar option to None
- Change the background to black

Setting the interface option
Adding Images to Project
Next, we have to add all the graphics used in the game to the project. Download the image pack which comes with the following images:
![]()
![]()
![]()

After downloading the images, extract the zip archive and add them to the Maze project.

Adding images to Xcode Project
Now we can add those images to our view. We will start with the pacman sprite. Drag an UIImageView from object library and place it on the left side of the screen and centered. Don’t worry about the size of the view yet. Select the UIImageView and choose the Attributes Inspector. Select the pacman.png file as the image. Our pacman sprite should appear on the screen. Now we can change the size of the image view. From the Xcode main menu, click Editor -> “Size to Fit Content” option.

Adding Pacman Image
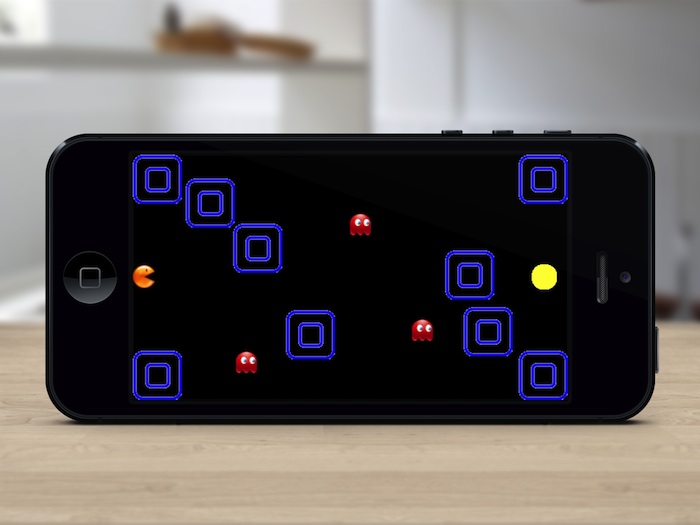
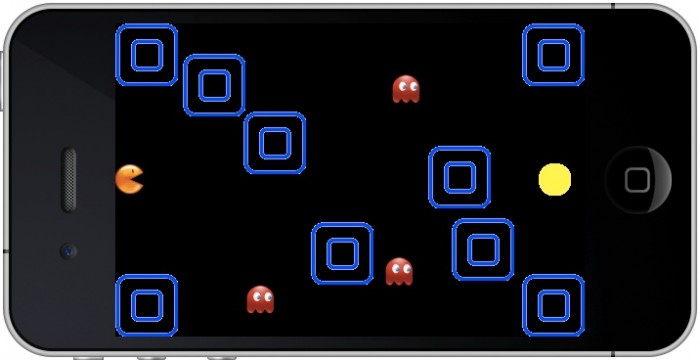
Repeat the same step for the rest of the graphics. Put all the elements in a position similar to the following screenshot of the game. Make sure the ghosts are placed near the screen border.

The Maze Game Interface
Associate the Image View with Code
Lastly, we have to create IBOutlets for the UIImageViews we have created. We will start again with the pacman. In order to do that, select the AppViewController.xib file and change the Editor to the Assistant mode. The AppViewController.h file should be opened. Press control key and drag from the UIImageView to the AppViewController.h to create an IBOutlet. Set the name as pacman, type as UIImageView and storage as “Strong”.

Adding an outlet for Pacman
Repeat the same procedure for the three little ghosts and the exit image. Name them as ghost1, ghost2, ghost3 and exit respectively.
For the walls, we are going to use a different technique. Instead of using an IBOutlet for each of them, we will use an IBOutletCollection. This allows us to associate all of them with a single NSArray object. Select any of the walls and control drag them in the AppViewController.h, as shown in the below screenshot:

Associate Wall Image
For the connection, select Outlet Collection. Name it as “wall” with type as “UIImageView”. For the rest of the wall images, use the same procedure but associate it with the same outlet collection as we have created.
Your code of AppViewController.h should look like below:
@interface APPViewController : UIViewController

@property (strong, nonatomic) IBOutlet UIImageView *pacman;
@property (strong, nonatomic) IBOutlet UIImageView *ghost1;
@property (strong, nonatomic) IBOutlet UIImageView *ghost2;
@property (strong, nonatomic) IBOutlet UIImageView *ghost3;
@property (strong, nonatomic) IBOutlet UIImageView *exit;

@property (strong, nonatomic) IBOutletCollection(UIImageView) NSArray *wall;

@end
Adding the Required Frameworks
We need the CoreMotion framework in order to use the accelerometer. This framework is not included by default in our application, thus we have to add it manually. Select the project from the Navigator pane. In the editor pane, select the “Build Phases” tab, and from that tab, open the “Link Binary With Libraries” section, as shown in the below screen:

Build Phases Tab
Next click on the “+” button to open the list of available frameworks, and from that list, select the CoreMotion and click add:

Adding CoreMotion Framework
On top of that, we need to import the Quartz Core framework. Quartz Core is a collection of API for image processing and video image manipulation. We will make use of the CABasicAnimation class to create basic animation. Use the procedure as described above to import the QuartzCore framework into your project.
Animating the Ghost Images Using QuartzCore
Now we have configured all the elements required by the game and we could start the real coding. Accelerometer? No, we’ll leave it to the second and third parts of the series. We’ll first take a look how to animate the ghost images.
As said above, we will use the QuartzCore’s CABasicAnimation class to animate our ghosts. First we have to include the required header files. Open the AppViewController.h file and add the following include line:
#import ;
Next, open the AppViewController.m and add the following code in the viewDidLoad method to animate the first ghost:
CGPoint origin1 = self.ghost1.center;
CGPoint target1 = CGPointMake(self.ghost1.center.x, self.ghost1.center.y-124);

CABasicAnimation *bounce1 = [CABasicAnimation animationWithKeyPath:@"position.y"];
bounce1.fromValue = [NSNumber numberWithInt:origin1.y];
bounce1.toValue = [NSNumber numberWithInt:target1.y];
bounce1.duration = 2;
bounce1.autoreverses = YES;
bounce1.repeatCount = HUGE_VALF;

[self.ghost1.layer addAnimation:bounce1 forKey:@"position"];
In the first two lines, we define the starting point and the end point of the animation. Then we create a CABasicAnimation object by specifying that we want to move along the y axis (animationWithKeyPath), from the origin.y point (fromValue) to the target.y point (toValue). We also set the duration of animation to 2 seconds (duration). In other word, the ghost image should come back to its original position once it has reached the target point (autoreverses). Finally, we want the animation to repeat forever, so we set the repeatCount as HUGE_VALF, that is a fancy way to say it should repeat forever.
Do the same for the other two ghosts and here are the code:
CGPoint origin2 = self.ghost2.center;
CGPoint target2 = CGPointMake(self.ghost2.center.x, self.ghost2.center.y+284);
CABasicAnimation *bounce2 = [CABasicAnimation animationWithKeyPath:@"position.y"];
bounce2.fromValue = [NSNumber numberWithInt:origin2.y];
bounce2.toValue = [NSNumber numberWithInt:target2.y];
bounce2.duration = 2;
bounce2.repeatCount = HUGE_VALF;
bounce2.autoreverses = YES;
[self.ghost2.layer addAnimation:bounce2 forKey:@"position"];

CGPoint origin3 = self.ghost3.center;
CGPoint target3 = CGPointMake(self.ghost3.center.x, self.ghost3.center.y-284);
CABasicAnimation *bounce3 = [CABasicAnimation animationWithKeyPath:@"position.y"];
bounce3.fromValue = [NSNumber numberWithInt:origin3.y];
bounce3.toValue = [NSNumber numberWithInt:target3.y];
bounce3.duration = 2;
bounce3.repeatCount = HUGE_VALF;
bounce3.autoreverses = YES;
[self.ghost3.layer addAnimation:bounce3 forKey:@"position"];
Compile and Test the App
OK, it is time to compile and test our application. If we did everything correctly, you should see the pacman and the maze. The three little ghosts should be moving up and down.
What’s Coming Next?
Is it cool to develop a maze game? This is just the beginning of the series. In the next tutorial, we’ll explain how to work with the iPhone’s accelerometer so as to let player navigate the maze.
For your complete reference, you can download the Xcode project from here. As always, leave us feedback if you experience any problem with the project.
Update: Part 2 of the maze game tutorials is now available.


