

In the past two tutorials, we covered the basics of UICollectionView and header/footer customization. You should already know how to display items using UICollectionView. However, we haven’t covered how to interact with the collection view cell.
As mentioned before, the Collection View works in a way pretty much like Table View. But to give you a better idea, we’ll show how to interact with the collection items such as the ways to handle single and multiple item selection. To provide you with a working example of how the item selection works, we’ll continue to improve the Recipe app. Here are what we’re going to implement:
- To demonstrate how you can handle single selection, we’ll improve the Recipe app. When user taps a recipe photo, the app will bring up a modal view and display the photo in larger size.
- We’ll also implement Facebook sharing in the app in order to show you multiple item selection. Users are allowed to select multiple photos and share them on Facebook.
The interface of the app is very simple and will not win any design award. However, it’ll give you an idea of how to interact with collection view. To spare you from setting up the Xcode project, you can download this Xcode template. Please note that the Xcode project is created using Xcode 4.6 and tested on iOS 6. If you find any problem opening/compiling the project, please upgrade your Xcode to the latest version.
Handling Single Selection
First, we’ll improve the Recipe app to handle single selection. When user taps any of the recipe photo, the app will bring up a modal view to display the photo in higher resolution.
Designing the User Interface
To begin, let’s design the view controller for displaying the recipe photo. Go to Storyboard, drag a View Controller from Object library. Then add an Image View to it and set the width and height to 320 and 200 respectively. Lastly, add a navigation bar to the top of view and assign it with a Bar Button Item. Set the name of the button item as “Close”. Your View Controller should look similar to the below one:

Designing the Modal View Controller
As we want to display the view controller when user taps any of the recipe photo in the collection view, we’ll connect the collection view with the view controller using a segue. Press the control button, click on the “Recipe View Cell” and drag it towards the View Controller. Select “modal” for the style and set the segue identifier to “showRecipePhoto”.

Segue Connection
If you compile and run the app, you’ll end up with an empty view when selecting any of the recipe photo. As we haven’t provided the code implementation, the modal view controller has no idea of the selected recipe photo. So, create a new class (as a subclass of UIViewController) and name it as “RecipeViewController”. In Storyboard, select the view controller we just created and set the custom class to RecipeViewController.

Set the custom class as RecipeViewController
Next, we’ll establish a connection between the image view and the RecipeViewController.h. Press and hold the control key, click the image view and drag it towards the “RecipeViewController.h”. Name the variable as “recipeImageView”. Repeat the same procedure and establish a connection with “action” type for the close button.

Establish Variable Connection
Into the Code
In order to let other controllers pass the image name, we’ll also add a “recipeImageName” property for this purpose. Here is the code excerpt of the RecipeViewController.h:
@interface RecipeViewController : UIViewController

@property (weak, nonatomic) IBOutlet UIImageView *recipeImageView;
@property (weak, nonatomic) NSString *recipeImageName;

- (IBAction)close:(id)sender;

@end
When displayed, the RecipeViewController will load the specified recipe image in the image view. So in the RecipeViewController.m, change the viewDidLoad method to the following:
- (void)viewDidLoad
{
    [super viewDidLoad];
	self.recipeImageView.image = [UIImage imageNamed:self.recipeImageName];
}
Okay, we have completed the implementation of RecipeViewController. But there is still one thing left. How can we identify the selected item of the collection view and pass the image name to the RecipeViewController? We’ll implement the prepareForSegue:sender: method in RecipeCollectionViewController, which is the source view controller of the segue. Select the “RecipeBookViewController.m” and add the following code:
- (void)prepareForSegue:(UIStoryboardSegue *)segue sender:(id)sender {
    if ([segue.identifier isEqualToString:@"showRecipePhoto"]) {
        NSArray *indexPaths = [self.collectionView indexPathsForSelectedItems];
        RecipeViewController *destViewController = segue.destinationViewController;
        NSIndexPath *indexPath = [indexPaths objectAtIndex:0];
        destViewController.recipeImageName = [recipeImages[indexPath.section] objectAtIndex:indexPath.row];
        [self.collectionView deselectItemAtIndexPath:indexPath animated:NO];
    }
}
Note: If you forget how segue works, it is highly recommended to check out our segue tutorial before proceeding.
The UICollectionView class provides the indexPathsForSelectedItems method that returns the index paths for the selected items. You may wonder why there are multiple index paths returned. The reason is that UICollectionView supports multiple selection that we’ll cover in the next section. Each of the index path corresponds to a particular selected item. As for this example, we only have single item selection. Therefore, we’ll pick the first index path and retrieve the selected image (Line 5-6).
In collection view, when user taps on a collection cell, the cell changes to the highlighted state and then to the selected state. Therefore, we add a line of code to deselect the selected item once the image is displayed in the modal view controller.
Don’t forget to add the import statement at the very beginning of RecipeCollectionViewController.m, otherwise, your code won’t compile properly:
#import "RecipeViewController.h"
Now, let’s build and run the app. After the app is launched, tap any of the recipe and you should see a modal view showing the selected recipe image.

Recipe App – Single Selection
If you’ve tried to close the modal view, it doesn’t work properly. Obviously, we leave out the implementation of the “close” method in RecipeViewController. Simply edit the following method in the RecipeViewController.m and add a line of code:
- (IBAction)close:(id)sender {
    [self dismissViewControllerAnimated:YES completion:NULL];
}
This dismissViewControllerAnimated method tells the view controller to dismiss. Compile and run the app again. The close button should now work.
Handling Multiple Selection
UICollectionView supports both single and multiple selection. However, user is allowed to select single item by default. The allowsMultipleSelection property of UICollectionView class controls whether multiple items can be selected simultaneously. To enable multiple selection, the trick is to set the property to YES.
To give you a better idea of how multiple selection works, we’ll continue to tweak the Recipe app. User are allowed to select multiple recipes and share them on Facebook in the following ways:
- User taps the “Share” button in the navigation bar to start the sharing process and the button title is automatically changed to “Upload”.
- User selects the recipe photos to share.
- After the selection, user taps the “Upload” button. The app will bring up the Facebook dialog to share the photos on Facebook.
Note: We assume that you’re familiar with the implementation of Facebook sharing. If you’re new to it, we recommend you to check out the Facebook sharing tutorial before moving on.
Designing the User Interface
We’ll first add the “Share” button in the navigation bar. Go to Storyboard, drag a Bar Button Item from Object library and add it to the navigation bar of Recipe Collection View Controller.

Adding the Share Button
Like before, establish a connection between the Share button and RecipeCollectionViewController.h. Name the property as “shareButton”. We also add an action method that is called when the Share button is tapped.

Establish Connections with the Share Button
Your code of RecipeCollectionViewController.h should look like this:
@interface RecipeCollectionViewController : UICollectionViewController
@property (weak, nonatomic) IBOutlet UIBarButtonItem *shareButton;
- (IBAction)shareButtonTouched:(id)sender;

@end
Into the Code
The Recipe app now offers two modes: single selection and multiple selection. When user taps the “Share” button, the app will go into the multiple selection mode that allows user to select multiple photos for sharing. To support the multiple selection mode, we’ll add two variables to the RecipeCollectionViewController.m:
- shareEnabled – it’s a boolean variable to indicate the selection mode. If it’s set to YES, it indicates the “Share” button is tapped and multiple selection is enabled.
- selectedRecipes – it’s an array to store the selected recipes
Your code should look like below:
@interface RecipeCollectionViewController () {
    NSArray *recipeImages;
    BOOL shareEnabled;
    NSMutableArray *selectedRecipes;
}
In addition, add the following line of code in viewDidLoad method to initialize the array:
selectedRecipes = [NSMutableArray array];
Managing Item Selection and Deselection
The UICollectionViewDelegate protocol defines methods that allow you to manage the selection and highlighting of items in a collection view. When user selects an item, the collectionView:didSelectItemAtIndexPath: method is invoked. We’ll implement this method and add the selected items into the selectedRecipes array. Place the following code before the “@end” statement:
- (void)collectionView:(UICollectionView *)collectionView didSelectItemAtIndexPath:(NSIndexPath *)indexPath
{
    if (shareEnabled) {
        // Determine the selected items by using the indexPath
        NSString *selectedRecipe = [recipeImages[indexPath.section] objectAtIndex:indexPath.row];
        // Add the selected item into the array
        [selectedRecipes addObject:selectedRecipe];
    }
}
The UICollectionViewCell class provides a property to set the background view of a selected item. To indicate a selected item, we’ll change the background image of collection cell to a different image (i.e. photo-frame-selected.png). Simply place the following code in the collectionView:cellForItemAtIndexPath: method:
cell.selectedBackgroundView = [[UIImageView alloc] initWithImage:[UIImage imageNamed:@"photo-frame-selected.png"]];

Change the background image for selected cell
Not only we have to handle item selection, we also need to cater for deselection. For any reasons, user may deselect an item from the collection view. When an item is deselected, it should be removed from the selectedRecipes array. So place the following code after the above method:
- (void)collectionView:(UICollectionView *)collectionView didDeselectItemAtIndexPath:(NSIndexPath *)indexPath
{
    if (shareEnabled) {
        NSString *deSelectedRecipe = [recipeImages[indexPath.section] objectAtIndex:indexPath.row];
        [selectedRecipes removeObject:deSelectedRecipe];
    }
}
Next, we’ll move onto the implementation of shareButtonTouched: method, which is called when user taps the Share button. Edit the method with the following code:
- (IBAction)shareButtonTouched:(id)sender {
    if (shareEnabled) {

        // Post selected photos to Facebook
        if ([selectedRecipes count] > 0) {
            if([SLComposeViewController isAvailableForServiceType:SLServiceTypeFacebook]) {
                SLComposeViewController *controller = [SLComposeViewController composeViewControllerForServiceType:SLServiceTypeFacebook];

                [controller setInitialText:@"Check out my recipes!"];
                for (NSString *recipePhoto in selectedRecipes) {
                    [controller addImage:[UIImage imageNamed:recipePhoto]];
                }

                [self presentViewController:controller animated:YES completion:Nil];
            }
        }

        // Deselect all selected items
        for(NSIndexPath *indexPath in self.collectionView.indexPathsForSelectedItems) {
            [self.collectionView deselectItemAtIndexPath:indexPath animated:NO];
        }

        // Remove all items from selectedRecipes array
        [selectedRecipes removeAllObjects];

        // Change the sharing mode to NO
        shareEnabled = NO;
        self.collectionView.allowsMultipleSelection = NO;
        self.shareButton.title = @"Share";
        [self.shareButton setStyle:UIBarButtonItemStylePlain];

    } else {

        // Change shareEnabled to YES and change the button text to DONE
        shareEnabled = YES;
        self.collectionView.allowsMultipleSelection = YES;
        self.shareButton.title = @"Upload";
        [self.shareButton setStyle:UIBarButtonItemStyleDone];

    }
}
To help you understand the above, let’s take a look at the code line by line:
Line 35-38: If sharing mode is originally disabled, we’ll put the app into sharing mode and enables multiple selection. At the same time, we change the title of button to “Upload”.
Line 5-16: In sharing mode, after user taps the “Upload” button, we’ll bring up Facebook composer. The SLComposeViewController comes with some built-in methods to allow you easily upload multiple photos. We simply use the “addImage” method to attach the images.
Line 19-24: After uploading the photos to Facebook, we deselect the selected items and remove them from the selectedRecipes array.
Line 27-30: Lastly, we switch back to the single selection mode.
As “SLComposeViewController” is a class provided by the Social framework, remember to import the Social.h file at the very top of the “RecipeCollectionViewController.m”:
#import
By default, the Social framework is not included in the Xcode project. To compile the app properly, add the “Social.framework” in the project. In the Project Navigator, select the “CollectionViewDemo” project. In the Content Area, select “CollectionViewDemo” under Targets and click “Build Phases”. Expand “Link Binary with Libraries” and click the “+” button to add the “Social.framework”.

Add Social Framework
We’re almost done. However, if you run the app now, you’ll end up with a bug. After switching to the sharing mode, the modal view still appears when you select any of the recipe photos. This is not what we expect. The reason is that the segue is invoked every time when the collection cell is tapped. With the release of iOS 6, you can specify if you want the segue to be triggered by using a new method called shouldPerformSegueWithIdentifier. Obviously, we only want to trigger the segue when it’s in single selection mode. Place the following code before the “@end” statement:
- (BOOL)shouldPerformSegueWithIdentifier:(NSString *)identifier sender:(id)sender
{
    if (shareEnabled) {
        return NO;
    } else {
        return YES;
    }
}
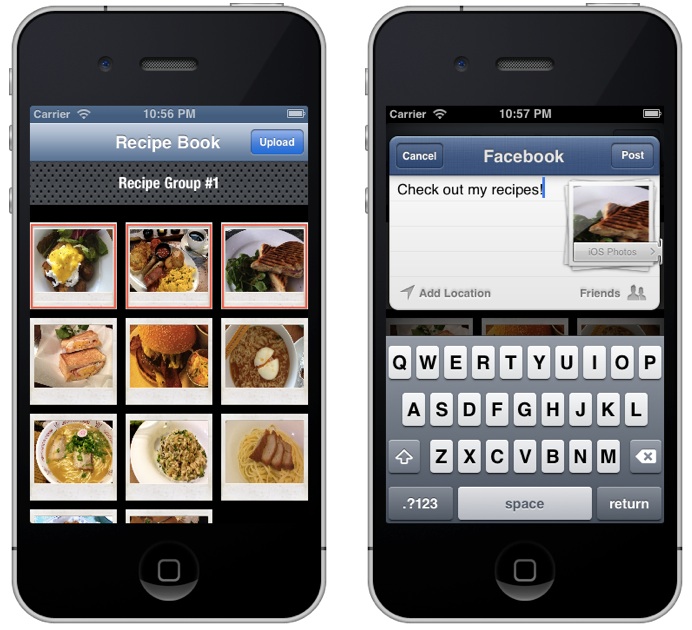
Great! Now compile and run the app again. Tap the Share button, select a few recipe photos and tap the Upload button to share them over Facebook.

Recipe App – Multiple Selection
What’s Coming Next
I hope you love this tutorial. For your complete reference, you can download the complete Xcode project from here. After going through the series of Collection View tutorials, you should know how to arrange data items in grid view, add header/footer view and interact with the collection cells.
In the coming tutorial, we’ll look into something new and show you how to manage audio in your iOS app. As always, if you have any problem or suggestions about the tutorial, leave us comment and share your thought.


