

Editor’s note: In part 1 of the multipeer connectivity series, we gave an introduction of the Multipeer Connectivity Framework and built chat feature of the demo app. The Multipeer Connectivity Framework is one of the many new frameworks introduced in iOS 7. As you can see in part 1, the framework allows developers to easily establish communication between nearby devices and implement features for data exchanging. In part 2 of the series, let’s continue to explore the Multipeer Connectivity Framework and see how we can implement the file sharing feature.
Enter the multipeer connectivity tutorial.
We’ll continue to work on the demo app. If you haven’t read the first part of the tutorial series, go back and check it out.
Setup The File Sharing User Interface
Previously, we’ve implemented the chat feature. Now let’s go to implement the second great feature of our sample application, the file sharing. As usual, we’ll start by setting up the interface on Interface Builder, therefore click on the Main.storyboard file to let it appear.
As a first step, go to the Second View Controller scene and select and delete the default contents of it. Then, add the following controls from the Objects Library, setting the same time the properties as described next:
- UILabel
- Frame: X=20, Y=20, Width=280, Height=21
- Text: My files:
- UITableView
- Frame: X=0, Y=49, Width=320, Height=519
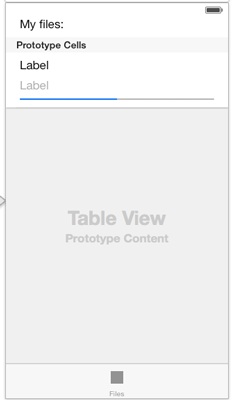
Next, on the table view add a UITableViewCell object, and set its Row Height value to 80. Add the following subviews to it:
- UILabel
- Frame: X=20, Y=8, Width=280, Height=21
- Tag: 100
- UILabel
- Frame: X=20, Y=37, Width=280, Height=21
- Tag: 200
- Color: Light Gray
- UIProgressView
- Frame: X=20, Y=66, Width=280, Height=2
- Tag: 300
As a final step, select the prototype cell, and in the Attributes Inspector of the Utilities Pane, set the newFileCellIdentifier value to the Identifier field, under the Table View Cell section. Using this identifier we will dequeue the cell later in code.
Here is how the scene should look like after all having added all these controls:
Now, let’s create an IBOutlet property to connect it to the table view. Open the SecondViewController.h file and add the next declaration:
@interface SecondViewController : UIViewController
@property (weak, nonatomic) IBOutlet UITableView *tblFiles;
@end
Also, once being in this file, adopt some required protocols as we’ll need to implement some delegate methods, as shown below:
@interface SecondViewController : UIViewController
Go back to the Interface Builder and connect the tblFiles property to the table view, exactly as you did in the previous interface configurations. After having done so, we are ready to proceed and write some code.
Sharing Files
We’ll begin the implementation on the SecondViewController class just like we did in the chat feature, meaning that we’ll first declare and instantiate an application delegate object, so we are able to access the mcManager object.
Go to the top of the SecondViewController.m file and import the AppDelegate.h file:
#import "AppDelegate.h"
Next, declare an object to the private section of the interface:
@interface SecondViewController ()
@property (nonatomic, strong) AppDelegate *appDelegate;
@end
Finally, instantiate it in the viewDidLoad method:
- (void)viewDidLoad
{
    [super viewDidLoad];

    _appDelegate = (AppDelegate *)[[UIApplication sharedApplication] delegate];
}
For the sake of the sample application, two demo files are provided to be used for sharing from peer to peer, the sample_file1.txt and the sample_file2.txt. It’s a good time now to download them and add them to the project.
These two files, along with any files that will be transfered from other peers, should reside in the Documents directory of the application. Also, before we begin sending and receiving any file, we need to display them on our table view.
So, let’s start working on all this, and our first task will be to take the sample files from the application bundle and copy them to the documents directory. We’ll do that by using a private method that we’ll create right next, but first, let’s declare it in the private section of the interface. Apart from the method declaration, we will also declare a NSString object to keep the documents directory path:
@interface SecondViewController ()
...

@property (nonatomic, strong) NSString *documentsDirectory;

-(void)copySampleFilesToDocDirIfNeeded;

@end
Let’s go to the implementation now:
-(void)copySampleFilesToDocDirIfNeeded{
    NSArray *paths = NSSearchPathForDirectoriesInDomains(NSDocumentDirectory, NSUserDomainMask, YES);
    _documentsDirectory = [[NSString alloc] initWithString:[paths objectAtIndex:0]];

    NSString *file1Path = [_documentsDirectory stringByAppendingPathComponent:@"sample_file1.txt"];
    NSString *file2Path = [_documentsDirectory stringByAppendingPathComponent:@"sample_file2.txt"];

    NSFileManager *fileManager = [NSFileManager defaultManager];
    NSError *error;


    if (![fileManager fileExistsAtPath:file1Path] || ![fileManager fileExistsAtPath:file2Path]) {
        [fileManager copyItemAtPath:[[NSBundle mainBundle] pathForResource:@"sample_file1" ofType:@"txt"]
                             toPath:file1Path
                              error:&error];

        if (error) {
            NSLog(@"%@", [error localizedDescription]);
            return;
        }

        [fileManager copyItemAtPath:[[NSBundle mainBundle] pathForResource:@"sample_file2" ofType:@"txt"]
                             toPath:file2Path
                              error:&error];

        if (error) {
            NSLog(@"%@", [error localizedDescription]);
            return;
        }
    }
}
First of all, we specify and keep the documents directory path to the documentsDirectory object. This is necessary, as we are going to need it a few times later. Next, the destination path for the sample files is specified and it’s checked if each one of them exists in the documents directory. If any of them is not found, then they are copied from the main bundle to the documents directory, and if any error occurs (hopefully not), we just log its description.
Now we have to call it, and the suitable place to do so is in the viewDidLoad method.
- (void)viewDidLoad
{
    ...
    [self copySampleFilesToDocDirIfNeeded];
}
From now on, every time that the view controller is loaded our application will search for those files in the documents directory and will copy them there if they don’t exist.
Regarding the table view, we want it to display all existing files, so we are able to tap on any of them and send them to other peers. That means subsequently that we need to use an array as the datasource for the table view, and this array must contain all files existing on the Documents directory. So, let’s go to declare a NSMutableArray object:
@interface SecondViewController ()
...

@property (nonatomic, strong) NSMutableArray *arrFiles;
@end
How should we add objects to the arrFiles array? Simply by reading all files from the Documents directory and getting their names. For that reason we will need one more private method that will do exactly that. Let’s declare it too:
@interface SecondViewController ()
...

-(NSArray *)getAllDocDirFiles;

@end
Moving straight ahead to its implementation, we are going to use a NSFileManager object to get all contents of the Documents directory as a NSArray object, and then return this array:
-(NSArray *)getAllDocDirFiles{
    NSFileManager *fileManager = [NSFileManager defaultManager];
    NSError *error;
    NSArray *allFiles = [fileManager contentsOfDirectoryAtPath:_documentsDirectory error:&error];

    if (error) {
        NSLog(@"%@", [error localizedDescription]);
        return nil;
    }

    return allFiles;
}
There is nothing difficult to this method. If any error occurs, we just show a description to the log. Now, it’s time to add objects to the arrFiles array for first time, and this will take place on the viewDidLoad method.
- (void)viewDidLoad
{
    ...
    _arrFiles = [[NSMutableArray alloc] initWithArray:[self getAllDocDirFiles]];
}
We are ready to display data on the table view. For starters, let’s make self the delegate and datasource of it, while being in the viewDidLoad:
- (void)viewDidLoad
{
    ...
    [_tblFiles setDelegate:self];
    [_tblFiles setDataSource:self];
}
To let our sample files appear on the table view upon the view controller loading, we need to force it to do that after our arrFiles array have got its values. Therefore add just this line on the viewDidLoad method:
- (void)viewDidLoad
{
    ...
    [_tblFiles reloadData];
}
Before you run and test what we’ve done so far in this view controller, you need to implement the table view delegate and datasource required methods. So, here they are:
-(NSInteger)numberOfSectionsInTableView:(UITableView *)tableView{
    return 1;
}


-(NSInteger)tableView:(UITableView *)tableView numberOfRowsInSection:(NSInteger)section{
    return [_arrFiles count];
}


-(UITableViewCell *)tableView:(UITableView *)tableView cellForRowAtIndexPath:(NSIndexPath *)indexPath{
    UITableViewCell *cell;

    cell = [tableView dequeueReusableCellWithIdentifier:@"CellIdentifier"];

    if (cell == nil) {
        cell = [[UITableViewCell alloc] initWithStyle:UITableViewCellStyleDefault reuseIdentifier:@"CellIdentifier"];
        [cell setAccessoryType:UITableViewCellAccessoryDisclosureIndicator];
    }

    cell.textLabel.text = [_arrFiles objectAtIndex:indexPath.row];

    [[cell textLabel] setFont:[UIFont systemFontOfSize:14.0]];

    return cell;
}


-(CGFloat)tableView:(UITableView *)tableView heightForRowAtIndexPath:(NSIndexPath *)indexPath{
    return 60.0;
}
If you want, run the application to test it, but the only thing you’ll see for now is just the listing of the sample files.
Let’s keep going to enable the application send a file once it gets selected. What we actually want to happen, is when tapping on a table view row, a list of all peers to appear so we choose the peer that the selected file should be sent to. To make things easy for us and for the purposes of this example, we will use a UIActionSheet object, where each button of it will represent a peer. We want the action sheet to appear every time we tap on a row, so let’s see how this is done:
-(void)tableView:(UITableView *)tableView didSelectRowAtIndexPath:(NSIndexPath *)indexPath{
    NSString *selectedFile = [_arrFiles objectAtIndex:indexPath.row];
    UIActionSheet *confirmSending = [[UIActionSheet alloc] initWithTitle:selectedFile
                                                                delegate:self
                                                       cancelButtonTitle:nil
                                                  destructiveButtonTitle:nil
                                                       otherButtonTitles:nil];

    for (int i=0; i < [[_appDelegate.mcManager.session connectedPeers] count]; i++) {
        [confirmSending addButtonWithTitle:[[[_appDelegate.mcManager.session connectedPeers] objectAtIndex:i] displayName]];
    }

    [confirmSending setCancelButtonIndex:[confirmSending addButtonWithTitle:@"Cancel"]];

    [confirmSending showInView:self.view];

    _selectedFile = [_arrFiles objectAtIndex:indexPath.row];
    _selectedRow = indexPath.row;
}
We start the implementation of the tableview:didSelectRowAtIndexPath: method by creating an action sheet object, providing the selected file name as its title. It might look weird that we set the nil value to all button titles, but this is done in purpose. It would be really handful to us if we could create a nil-terminated string that would contain all peer display names and set them as button titles, but unfortunately there is no way to do that. Therefore there is the for loop, where we add each single peer name one by one as a button to the action sheet. Right after the loop, we set the cancel button, which is necessary in case we just want to close the action sheet, and finally we display it.
Using the last two lines we keep the selected file name and the selected row in two private members, as we will need to know these two values later. Xcode throws an error though, as we haven't still declared them, so let's do it now:
@interface SecondViewController ()
...
@property (nonatomic, strong) NSString *selectedFile;
@property (nonatomic) NSInteger selectedRow;
@end
Now every time that a file is selected on the table view, an action sheet appears, containing every peer name as a button so we can choose the file's recipient. But what is going to happen after we have a peer selected on the action sheet? Well, nothing, as we haven't implemented any behaviour yet.
We need to implement the actionSheet:clickedButtonAtIndex: delegate method (that's also why we adopted the UIActionSheetDelegate protocol previously). In there, after having checked that a peer name has been tapped and not the cancel button, we will invoke another new to us method of the Multipeer Connectivity framework, named sendResourceAtURL:withName:toPeer:withCompletionHandler:. Actually, this is a method of the MCSession class. In the completion handler we will check if any error has occurred during the sending process, or if the file has successfully sent. In any case, we will let us know about the result.
An important thing necessary to be denoted here is the fact that this method returns a NSProgress object. NSProgress is a new class in iOS 7, so pay a visit to the Apple's documentation if you'd like to know more about it. Anyway, we care about the results of the method, as this is our only way to keep track of the sending progress and update our UI by showing a percentage value of the completion of the whole process. However, there is a big trap here and that is that our interface will freeze if we call this method on the main thread. Don't worry though, as this is an easy obstacle to overcome. We will simply do our entire job inside a dispatch_async block, so our interface will remain responsive while sending files.
Just a last note before we see its implementation. As this is a demo application, we want to know what files come from other peers, so we make sure that our code really works. Therefore, as you'll see in the implementation right next, we slightly modify the file name, by adding the peer's display name.
The implementation:
-(void)actionSheet:(UIActionSheet *)actionSheet clickedButtonAtIndex:(NSInteger)buttonIndex{
if (buttonIndex != [[_appDelegate.mcManager.session connectedPeers] count]) {
NSString *filePath = [_documentsDirectory stringByAppendingPathComponent:_selectedFile];
NSString *modifiedName = [NSString stringWithFormat:@"%@_%@", _appDelegate.mcManager.peerID.displayName, _selectedFile];
NSURL *resourceURL = [NSURL fileURLWithPath:filePath];
dispatch_async(dispatch_get_main_queue(), ^{
NSProgress *progress = [_appDelegate.mcManager.session sendResourceAtURL:resourceURL
withName:modifiedName
toPeer:[[_appDelegate.mcManager.session connectedPeers] objectAtIndex:buttonIndex]
withCompletionHandler:^(NSError *error) {
if (error) {
NSLog(@"Error: %@", [error localizedDescription]);
}
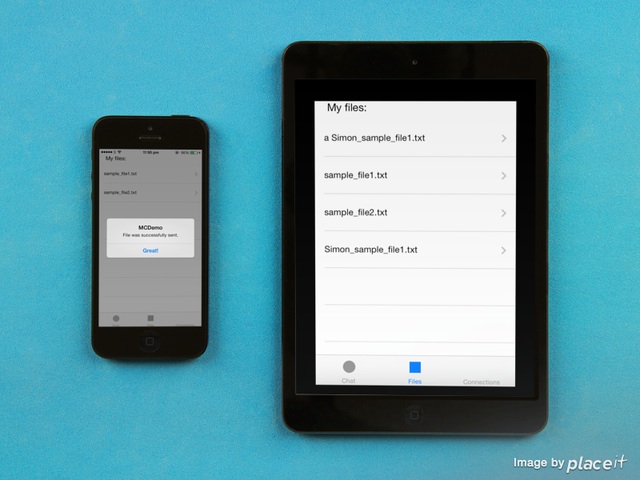
else{
UIAlertView *alert = [[UIAlertView alloc] initWithTitle:@"MCDemo"
message:@"File was successfully sent."
delegate:self
cancelButtonTitle:nil
otherButtonTitles:@"Great!", nil];
[alert performSelectorOnMainThread:@selector(show) withObject:nil waitUntilDone:NO];
[_arrFiles replaceObjectAtIndex:_selectedRow withObject:_selectedFile];
[_tblFiles performSelectorOnMainThread:@selector(reloadData)
withObject:nil
waitUntilDone:NO];
}
}];
});
}
}
Let me point a few things out regarding this code fragment:
- Any error description is just logged, but in the case of a successful sending we show an alert view to the user. Note that this code runs on a secondary queue, so we show the alert view on the main thread of the application.
- You'll probably wonder what those two lines are, just right after the alert view:
[_arrFiles replaceObjectAtIndex:_selectedRow withObject:_selectedFile];
[_tblFiles performSelectorOnMainThread:@selector(reloadData) withObject:nil waitUntilDone:NO];
Well, as you will finally find out by yourself and as I have already stated, a percentage value is going to be displayed next to the selected file name during the sending process, indicating the whole progress. After a sending has been completed, we need to simply show the file name again, so that's what we do here. We just replace the combined file name and progress value with the single file name, by updating the array and the table view subsequently. Further than that, here it's clearly shown why we kept the selected row and file name on the selectedRow and selectedFile members respectively.
- Where do we keep track of the progress? Nowhere yet, as it's necessary to say that the NSProgress class contains a property named fractionCompleted that gives us the progress as a double value. Moreover, all NSProgress class properties, including the fractionCompleted, are KVO (Key-Value Observing), so we must observe for any value changes of this property and update appropriately our UI.
So, having said all that, it's clear that our next goal is to observe the fractionCompleted value of the progress. To do that, add the next code fragment right before the dispatch_async block closing:
-(void)actionSheet:(UIActionSheet *)actionSheet clickedButtonAtIndex:(NSInteger)buttonIndex{
    if (buttonIndex != [[_appDelegate.mcManager.session connectedPeers] count]) {
        ...

        dispatch_async(dispatch_get_main_queue(), ^{
            NSProgress *progress = ...

            [progress addObserver:self
                       forKeyPath:@"fractionCompleted"
                          options:NSKeyValueObservingOptionNew
                          context:nil];
        });
    }
}
With this way, we register our class with the progress object, so we can observe any changes on it.
Now, implement the next one, so we are notified about all value changes of the fractionCompleted property.
-(void)observeValueForKeyPath:(NSString *)keyPath ofObject:(id)object change:(NSDictionary *)change context:(void *)context{
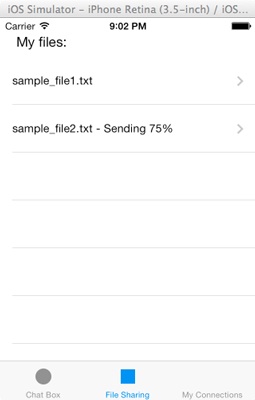
NSString *sendingMessage = [NSString stringWithFormat:@"%@ - Sending %.f%%",
_selectedFile,
[(NSProgress *)object fractionCompleted] * 100
];
[_arrFiles replaceObjectAtIndex:_selectedRow withObject:sendingMessage];
[_tblFiles performSelectorOnMainThread:@selector(reloadData) withObject:nil waitUntilDone:NO];
}
As you see, we create a new string value that contains both the selected file name and the current progress expressed as a percentage value. This string replaces the existing object at the specific index in the array, and the table view is updated on the main thread, so it reflects the sending progress.
If you feel so, go and give it a try. Send files and watch it working. The recipient won't receive anything yet, as for the time being we have implemented the sender's side, but not the receiver's.
Let's focus now on the actions that should be taken when a file is received. In this case, we are going to use the table view cell prototype we previously added in the Interface Builder. While a file receiving is in progress, we will display in the last row of the table view such a cell, showing the file's name, the sender and the progress using the progress view object. When a file has been successfully received, this cell will be replaced by a default, normal cell that will display just the file name, exactly as the sample files are shown.
Open the MCManager.m file, and locate the session:didStartReceivingResourceWithName:fromPeer:withProgress: delegate method. Its name clearly states its purpose, and we will use it to keep track of the progress while a new file is being received. In here we will act just like we did at the previous two session delegate methods, simply by adding the parameter values into a NSDictionary object and posting a new notification.
There is something more we'll do here though. As we want to watch the progress of the file being received and update our progress view accordingly, we will register the class with the NSProgress object of the parameter, so we can observe any changes taking place on the fractionCompleted property. Actually, we are going to do the exact same thing we previously did on the file sending feature implementation, where we also added code for observing the fractionCompleted changes. So, here it is:
-(void)session:(MCSession *)session didStartReceivingResourceWithName:(NSString *)resourceName fromPeer:(MCPeerID *)peerID withProgress:(NSProgress *)progress{

    NSDictionary *dict = @{@"resourceName"  :   resourceName,
                           @"peerID"        :   peerID,
                           @"progress"      :   progress
                           };

    [[NSNotificationCenter defaultCenter] postNotificationName:@"MCDidStartReceivingResourceNotification"
                                                        object:nil
                                                      userInfo:dict];


    dispatch_async(dispatch_get_main_queue(), ^{
        [progress addObserver:self
                   forKeyPath:@"fractionCompleted"
                      options:NSKeyValueObservingOptionNew
                      context:nil];
    });
}
As you see, we also use a dispatch_async block to observe the progress.
Now, implement the next method so we are notified on any progress changing:
-(void)observeValueForKeyPath:(NSString *)keyPath ofObject:(id)object change:(NSDictionary *)change context:(void *)context{
    [[NSNotificationCenter defaultCenter] postNotificationName:@"MCReceivingProgressNotification"
                                                        object:nil
                                                      userInfo:@{@"progress": (NSProgress *)object}];
}
Every time that the progress is changed, we will post a new notification.
Let's head back to the SecondViewController.m file now, and let's deal with these two new notifications. In the viewDidLoad method add the next code snippet:
- (void)viewDidLoad
{
    ...
    [[NSNotificationCenter defaultCenter] addObserver:self
                                             selector:@selector(didStartReceivingResourceWithNotification:)
                                                 name:@"MCDidStartReceivingResourceNotification"
                                               object:nil];

    [[NSNotificationCenter defaultCenter] addObserver:self
                                             selector:@selector(updateReceivingProgressWithNotification:)
                                                 name:@"MCReceivingProgressNotification"
                                               object:nil];
}
The didStartReceivingResourceWithNotification: and the updateReceivingProgressWithNotification: are both private methods that we will implement right next. Let's begin by declaring them in the private section of the interface:
@interface SecondViewController ()
...
-(void)didStartReceivingResourceWithNotification:(NSNotification *)notification;
-(void)updateReceivingProgressWithNotification:(NSNotification *)notification;
@end
Let's go with the first one:
-(void)didStartReceivingResourceWithNotification:(NSNotification *)notification{
    [_arrFiles addObject:[notification userInfo]];
    [_tblFiles performSelectorOnMainThread:@selector(reloadData) withObject:nil waitUntilDone:NO];
}
What we do here is pretty clear: We add the user info dictionary of the notification as an object to the arrFiles array, and we reload the table view data so the new file name, the sender and the initial value of the project to be displayed. But are they really going to be displayed? The answer is not until we update the tableView:cellForRowAtIndexPath: method of the table view, as it is currently able to show just string values in the default cell type. Let's see the code first:
-(UITableViewCell *)tableView:(UITableView *)tableView cellForRowAtIndexPath:(NSIndexPath *)indexPath{
UITableViewCell *cell;
if ([[_arrFiles objectAtIndex:indexPath.row] isKindOfClass:[NSString class]]) {
cell = [tableView dequeueReusableCellWithIdentifier:@"CellIdentifier"];
if (cell == nil) {
cell = [[UITableViewCell alloc] initWithStyle:UITableViewCellStyleDefault reuseIdentifier:@"CellIdentifier"];
[cell setAccessoryType:UITableViewCellAccessoryDisclosureIndicator];
}
cell.textLabel.text = [_arrFiles objectAtIndex:indexPath.row];
[[cell textLabel] setFont:[UIFont systemFontOfSize:14.0]];
}
else{
cell = [tableView dequeueReusableCellWithIdentifier:@"newFileCellIdentifier"];
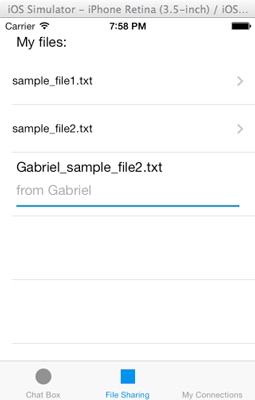
NSDictionary *dict = [_arrFiles objectAtIndex:indexPath.row];
NSString *receivedFilename = [dict objectForKey:@"resourceName"];
NSString *peerDisplayName = [[dict objectForKey:@"peerID"] displayName];
NSProgress *progress = [dict objectForKey:@"progress"];
[(UILabel *)[cell viewWithTag:100] setText:receivedFilename];
[(UILabel *)[cell viewWithTag:200] setText:[NSString stringWithFormat:@"from %@", peerDisplayName]];
[(UIProgressView *)[cell viewWithTag:300] setProgress:progress.fractionCompleted];
}
return cell;
}
Here is the deal: Our strategy is to check the kind of the class for each object existing in the arrFiles array. If it's a NSString value, then the code we already have written is executed. However, if the object of the array that is about to be processed is kind of NSDictionary class, then we dequeue the prototype cell using the identifier we set in the Interface Builder, and then based on the tag values of each subview added to it, we set the dictionary values, after having them extracted from the dictionary object.
Besides this method, alter the following as well:
-(CGFloat)tableView:(UITableView *)tableView heightForRowAtIndexPath:(NSIndexPath *)indexPath{
    if ([[_arrFiles objectAtIndex:indexPath.row] isKindOfClass:[NSString class]]) {
        return 60.0;
    }
    else{
        return 80.0;
    }
}
That's necessary so the last row to have the appropriate height when a file is being received and everything to be properly displayed.
If you run the app now, you'll see that when a file is starting to be received, a new row appears on the table view, but you'll notice that there's no progress at all. That's because we haven't implemented the updateReceivingProgressWithNotification: private method yet, and now it's the right time to do it.
-(void)updateReceivingProgressWithNotification:(NSNotification *)notification{
    NSProgress *progress = [[notification userInfo] objectForKey:@"progress"];

    NSDictionary *dict = [_arrFiles objectAtIndex:(_arrFiles.count - 1)];
    NSDictionary *updatedDict = @{@"resourceName"  :   [dict objectForKey:@"resourceName"],
                           @"peerID"        :   [dict objectForKey:@"peerID"],
                           @"progress"      :   progress
                           };


    [_arrFiles replaceObjectAtIndex:_arrFiles.count - 1
                         withObject:updatedDict];

    [_tblFiles performSelectorOnMainThread:@selector(reloadData) withObject:nil waitUntilDone:NO];
}
What's actually taking place here is quite simple. From the current dictionary existing in the arrFiles array, we get the file name and the peer display name, and using the updated progress we add all these three objects to a new dictionary. Then we replace the previous dictionary existing in the last index of the array with the new one, and lastly we reload the table view.
If you run it now, you'll see that when a file is being received the progress view perfectly shows the progress.
One last thing remains to be done, and that is to save the file in the Documents directory once it's received. For the last time in this tutorial, let's open the MCManager.m file and let's go now to the session:didFinishReceivingResourceWithName:fromPeer:atURL:withError: delegate method. This one is invoked when a resource has been received, and as usual, we'll post a new notification.
-(void)session:(MCSession *)session didFinishReceivingResourceWithName:(NSString *)resourceName fromPeer:(MCPeerID *)peerID atURL:(NSURL *)localURL withError:(NSError *)error{

    NSDictionary *dict = @{@"resourceName"  :   resourceName,
                           @"peerID"        :   peerID,
                           @"localURL"      :   localURL
                           };

    [[NSNotificationCenter defaultCenter] postNotificationName:@"didFinishReceivingResourceNotification"
                                                        object:nil
                                                      userInfo:dict];

}
Let's move back to the SecondViewController.m file, and let's make our class able to observe for this notification too inside the viewDidLoad method:
{
    ...
    [[NSNotificationCenter defaultCenter] addObserver:self
                                             selector:@selector(didFinishReceivingResourceWithNotification:)
                                                 name:@"didFinishReceivingResourceNotification"
                                               object:nil];
}
Following the same steps that many times followed until now, let's declare the didFinishReceivingResourceWithNotification: method:
@interface SecondViewController ()
...
-(void)didFinishReceivingResourceWithNotification:(NSNotification *)notification;
@end
As you'll see in the implementation, we copy the file (the resource in general) from the URL temporarily been stored to the Documents directory. At the end of the method, we remove all objects from the arrFiles array, and we re-read the entire Documents directory contents. There is nothing special that should be discussed any further, so here it is:
-(void)didFinishReceivingResourceWithNotification:(NSNotification *)notification{
    NSDictionary *dict = [notification userInfo];

    NSURL *localURL = [dict objectForKey:@"localURL"];
    NSString *resourceName = [dict objectForKey:@"resourceName"];

    NSString *destinationPath = [_documentsDirectory stringByAppendingPathComponent:resourceName];
    NSURL *destinationURL = [NSURL fileURLWithPath:destinationPath];

    NSFileManager *fileManager = [NSFileManager defaultManager];
    NSError *error;
    [fileManager copyItemAtURL:localURL toURL:destinationURL error:&error];

    if (error) {
        NSLog(@"%@", [error localizedDescription]);
    }

    [_arrFiles removeAllObjects];
    _arrFiles = nil;
    _arrFiles = [[NSMutableArray alloc] initWithArray:[self getAllDocDirFiles]];

    [_tblFiles performSelectorOnMainThread:@selector(reloadData) withObject:nil waitUntilDone:NO];
}
The file sharing feature has been now completed, and that also means that our demo application is totally ready!
Compile And Run The App
I'd be surprised if you haven't run the application yet. However, if that's your case, then now it's the best and appropriate time to do it. Try it using a couple of devices, or a device and the iPhone Simulator. Make connections, send text messages and share files.e
Summary
The Multipeer Connectivity framework is a brand-new feature on iOS 7. In this tutorial series, we walked through only from a few of its potentialities, as they don't stop here. There are a lot of things one could still explore, such as how to take security issues under account. Further than that, possibilities for new kind of applications are now available, with just one limitation, your imagination. This framework offers nice tools, and how they'll be used it's up to every developer's desire. Through this tutorial I tried to offer an intro point to all those who would like to deal with Multipeer Connectivity, and I hope you find it really useful. Happy Multipeer Connections!
For your complete reference, you can download the Xcode project of the demo app from here. Feel free to leave me feedback and comment below.


