SwiftUI has made it very easy for developers to create a list view, similar to a table view in UIKit. When working with table view in UIKit, you can easily configure a cell’s indicator by setting the accessoryType property. For example, to disable the disclosure indicator, you set the property to .none like this:
cell.accessoryType = .noneIn SwiftUI, it seems Apple doesn’t offer an API to configure the disclosure indicator in the list view. In this short tutorial, I will show you a workaround to hide disclosure indicators if you need to.
Let’s begin with a simple list view:
struct ContentView: View {
    var body: some View {
        NavigationView {
            List(1..<50) { index in

                NavigationLink(destination: Text("Item #\(index)")) {
                    Text("Item #\(index)")
                }

            }

            .navigationTitle("Demo")
        }
    }
}
If you run the code in the preview pane, you will see the list view showing a list of text items. Tapping any of the items will bring you to the detailed view.

As you can see, when adopting NavigationLink, the built-in list view automatically displays a disclosure indicator in each row of data. The question is how you can hide or remove the indicator.
Hiding Disclosure Indicator
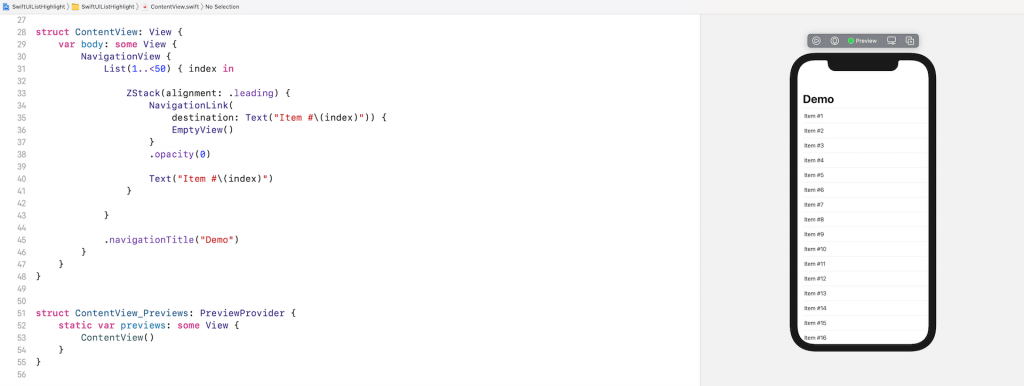
Both the List view and NavigationLink do not come with a modifier for you to configure the appearance of the disclosure indicator. To hide the indicator, you can modify the code like below:
struct ContentView: View {
    var body: some View {
        NavigationView {
            List(1..<50) { index in

                ZStack(alignment: .leading) {
                    NavigationLink(
                        destination: Text("Item #\(index)")) {
                        EmptyView()
                    }
                    .opacity(0)

                    Text("Item #\(index)")
                }

            }

            .navigationTitle("Demo")
        }
    }
}
The trick is to embed the NavigationLink and Text view in a ZStack. For the navigation link, instead of presenting the Text view, we change it to display an empty view. And, we attach the opacity modifier to NavigationLink and set its value to 0.
If you test the change in the preview, the disclosure indicator should disappear.

I hope you find this workaround useful. Feel free to leave me a comment if you have any questions.


