

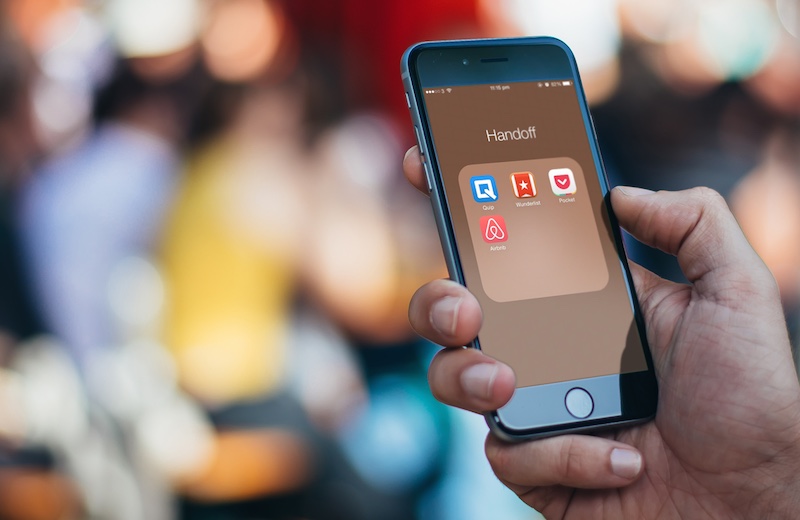
I am going to start this tutorial with the following wonderful scenario: Imagine that you are working with an application in your Mac, and then you decide to continue in your iPad while lying on your couch in your living room. After a while, you’re leaving home, but you keep working on the same application in your iPhone. Simply put, you keep doing what you do, no matter where you are. Wouldn’t be something like that really cool? Well, now that’s feasible! How?
iOS 8 introduces a brand new capability named Handoff. What it does is simple; it allows us to start working with an app on an iOS device, and continue to another one, assuming that all devices run the latest version of the operating system. It is also supported by the new Mac OS named Yosemite.
The basic idea behind Handoff is that whatever a user does to an app consists of an activity, and such an activity can be associated with a specific user in more than one device. Programmatically, the class representing an activity is called NSUserActivity, and we’ll work a lot with it. Also, all devices must be physically near so the Handoff can work. Further than that, there are two prerequisites: The first is that a valid iCloud account is needed, and users should be logged in to every device that’s about to be used. Actually, by using the same iCloud account to all devices if possible for user activities to be continued uninterrupted when switching between them (devices) and to be associated with the same user. The second prerequisite is useful in the case where two or more different apps must be able to hand off and continue the same user activities. In this case the apps must be signed with the same team identifier (Team ID) in Xcode.
An application can have as many user activities as necessary, so when continuing to another device there’s no interruption or data loss. For example, to a note taking app, composing the note can be one activity, and previewing a note could be another. There are no specific rules regarding the amount of user activities. Generally an app should support as many activities as the tasks that should be continued are, as long as they distinct rationally.
There are three interactions that take place when working with Handoff. These are:
- Creating a new user activity that’s about to be continued to another device.
- Updating an existing user activity with new data when is needed.
- Continuing a user activity to another device.
We’ll see all of the above in the sample app of the today’s tutorial.
Each user activity is identified by an activity type, which is a string describing the activity. Before doing any implementation regarding Handoff, new entries with the activity types must be added to the .plist file of the app, so it’s known to the app what activities will be supported. The same activity types are used in code as well when implementing the handoff feature. Apple recommends to use a reverse DNS style for the activity type, such as: com.appcoda.handoff.tutorial.view. We’ll see later how activity types are used in both the .plist and the code, and we’ll properly name the ones that we’re about to support.
Generally, the data that is transferred from device to device using Handoff must be small in size, so the user can keep working to the continuing app almost instantly. Handoff supports streaming as well, and that’s the way that should be followed when relatively big amount of data is needed to be transferred. However, in this tutorial we won’t deal with streams at all, we’ll just suffice to the basic Handoff functionality so we learn how can be implemented.
Note that the Handoff can be tested in real devices only, and you’ll need at least two of them running iOS 8.0 or newer. It doesn’t matter if they’re iPhones, iPads, or combination of them.
All the above consist of the basic knowledge you should have regarding the Handoff technology. I strongly encourage you to take the time and study the official Apple documentation, or watch the session video #219 of the WWDC 2014, so you get a deeper understanding on what is coming next.
Demo App Overview
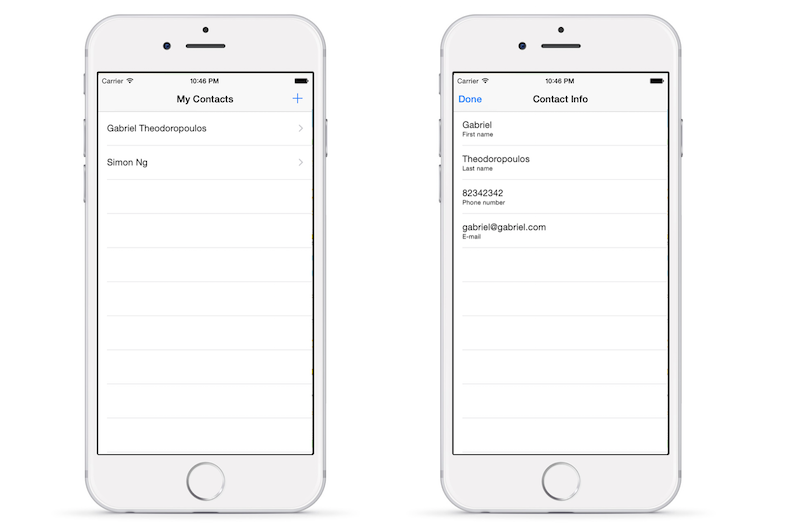
Handoff is supported by both document-based and non document-based applications. In this tutorial we’ll stick to the second case in order to see how to implement the Handoff capability directly. The sample app of this tutorial is going to be a simple contacts app with three distinct features:
- Adding a new contact.
- Listing all contacts.
- Viewing a contact details.
Of course, this is a demo app, therefore our app will support adding only the following basic information:
- First name
- Last name
- Phone number
Also, we are not going to implement any contact editing functionality. Our goal is not to build a complete contacts app, just an app good enough of being capable to try Handoff. As you may presume, it’s going to be a navigation-based application. The following images illustrate a sample of it:
In order to save us some time, I’ll provide you with a starter project to begin with. More details about it can be found in the next part, but I’m telling you in advance that it contains the interface designed in the Interface Builder only. We’ll add all the required code step by step in the upcoming sections.
Once the basic functionality of the sample app is ready, we’ll implement the Handoff. We’ll do the necessary additions to the .plist file regarding the activity types, and then we’ll create and update the user activities as needed. Lastly, we’ll support the activity continuation by performing the proper implementation.
Talking a bit more about the activity types, we are going to have two of them, and respectively we’ll support two user activities: One for adding and one for viewing a contact’s info. The activity types will be named com.appcoda.handoffdemo.edit-contact and com.appcoda.handoffdemo.view-contact accordingly. I think that you can guess that the app’s name is going to be HandoffDemo.
So, now that you have a taste of what we are really going to deal with it’s time to keep going. I’ll provide you with more information and details about the app specifics as we move along.
The Starting Point
So, as I just said we’re not going to build a new application from the scratch. Instead, I provide you with a jumpstart project to work with, which you can download here.
Once you get it, open it in Xcode and take a look at the interface. Notice that apart from the normal segues that I added for transitioning from one view controller to another, there are also unwind segues. I purposely created them, because as you’ll see later we will need to act when the respective view controllers get dismissed.
Also, in the project there are three view controller classes. In the default ViewController class we’ll list all the added contacts. In the EditContactViewController class we’ll implement the feature of adding a new contact, while in the ViewContactViewController class we’ll display the details of a selected contact.
In the starter project you’ll see that Xcode shows two errors, one in the ViewController.swift file, and one in the ViewContactViewController.swift file. Don’t worry about them. They are issued because the tableview delegate and datasource methods are missing. In the next parts of the tutorial we are going to implement them, so the errors will go away.
Lastly, the application is going to be Universal, meaning that it will capable of running in both iPhone and iPad devices.
When you get familiarized with the starter project, just keep going to the next part.
An Auxiliary Class
We will begin writing some code by creating a very simple class. This class will be used as a structure for storing the details of a contact. It will contain some member variables regarding the contact details and some handy methods for saving and loading the contacts, as well as for converting the single properties into a dictionary and back.
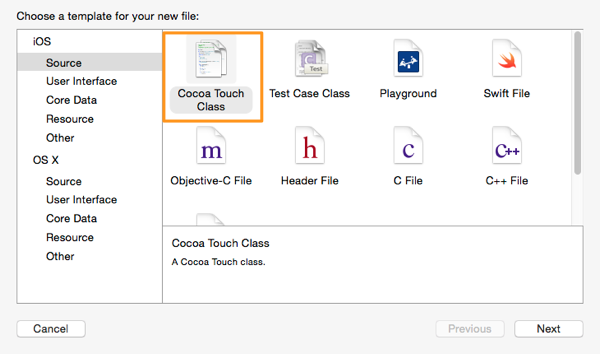
At first, we must create a new file, so go to the File > New > File… menu of Xcode. In the Source category of the iOS section select the Cocoa Touch Class template and then click Next.
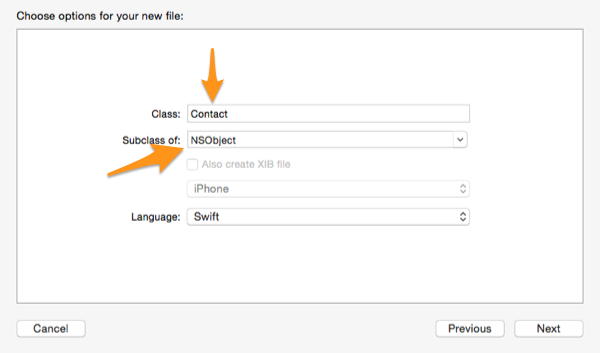
In the next window specify the NSObject value to the Subclass of: field, and name the new class Contact:
Lastly, click on the Create button to let the new class to be created.
Next, open that file and add the following, simple content:
class Contact: NSObject {

    var firstname: NSString?

    var lastname: NSString?

    var phoneNumber: NSString?

    var email: NSString?

    let documentsDirectory: NSString?
}
First of all, we set the NSObject class as the parent of ours, because we’ll use some methods that this class provides. Also, as you can see, we have four variables for the contact details, and one variable for representing the documents directory of the app. In the next step we define the initializer method (init method), and specify the value of the last variable. Here it is:
override init() {
    let pathsArray = NSSearchPathForDirectoriesInDomains(NSSearchPathDirectory.DocumentDirectory, NSSearchPathDomainMask.UserDomainMask, true)
    documentsDirectory = pathsArray[0] as String
}
We’ll need the path to the documents directory, because we’ll implement two quite useful methods for saving and loading the contact details. But before that, let’s write two other methods. The first one which is shown to the next segment converts the properties regarding the contact details into a dictionary object, and then it returns it:
func getDictionaryFromContactData() -> Dictionary {
    var dictionary: [String: String] = ["firstname": firstname!, "lastname": lastname!, "phonenumber": phoneNumber!, "email": email!]

    return dictionary
}
The second method does the exact opposite thing; it “extracts” the contact details from a dictionary and set the proper values to the respective properties:
func getContactDataFromDictionary(dictionary: Dictionary) {
    firstname = dictionary["firstname"] as? String
    lastname = dictionary["lastname"] as? String
    phoneNumber = dictionary["phonenumber"] as? String
    email = dictionary["email"] as? String
}
The above two methods will become useful in both this class, and later during the handoff implementation.
Now, let’s implement a method that we’ll use to save the contacts to a file in the documents directory. Take a look at the implementation first, and then we’ll talk about it:
func saveContact() {
let contactsFilePath = documentsDirectory?.stringByAppendingPathComponent("contacts")
var allContacts = loadContacts()
allContacts.addObject(self)
var allContactsConverted = NSMutableArray()
for var i=0; i
Let's see what is going on in the above snippet. Initially we set the path to the contacts file. It's obvious that the file is named contacts. Next, we load all the existing contacts from that file to a variable, using a method that we will implement right next. As you'll find out, the loadContacts method returns either a NSMutableArray array with Contact objects, or an array simply initialized. In any case, we add the new object (self) to that array.
What we want to do next is just to save the array's contents to a file using the writeToFile method of the NSArray class. This method creates a property list file (plist). However, the array's contents must be property list compatible objects, such as NSString, NSData, NSDictionary or NSArray. In our case the contents of the allContacts array are objects of type Contact, and that means that the mentioned method for writing the array contents to the file won't work. So, the workaround is to convert the contents of the array into something that can be stored into a property list file, and what's better than using the first method we implemented in this class and converting all existing objects to dictionaries? That's exactly happens in the above loop. Ultimately, once all the Contact objects of the allContacts array get converted and added to the allContactsConverted array, the contents of the last one are written to the specified path.
Now, we can load the contacts from the file, performing more or less the opposite process:
func loadContacts() -> NSMutableArray {
let contactsFilePath = documentsDirectory?.stringByAppendingPathComponent("contacts")
var allContacts = NSMutableArray()
if NSFileManager.defaultManager().fileExistsAtPath(contactsFilePath!) {
let savedContactsArray = NSMutableArray(contentsOfFile: contactsFilePath!)
for var i=0; i)
allContacts.addObject(tempContact)
}
}
return allContacts
}
In the above implementation, once the path to the contacts file is specified, we initialize a mutable array. If the contacts file exists, then we load its contents to a second, temporary array, and convert each object of it from a dictionary to a Contact object. This is what is finally added to the allContacts array in the loop body. At the end, we return the array that contains the Contact objects.
Lastly, we will add a class method:
class func updateSavedContacts(contacts: NSMutableArray) {
let documentsDirectory = NSSearchPathForDirectoriesInDomains(NSSearchPathDirectory.DocumentDirectory, NSSearchPathDomainMask.UserDomainMask, true)[0] as String
let contactsFilePath = documentsDirectory.stringByAppendingPathComponent("contacts")
var contactsConverted = NSMutableArray()
for var i=0; i
With this one, we will replace the existing contacts file with a new one containing the contents of the parameter array. The details of its implementation are similar to the previous functions'. It will be useful when we'll delete a contact.
Our class is ready. We'll use it as a tool along our way, as it consists of a convenient way to handle the contact data.
Editing Contacts
We'll continue building our app by implementing the contact editing functionality. For starters, select the EditContactViewController.swift file in the Project Navigator. For now, and besides the default code generated by Xcode, in the starter project they have been added the connected IBOutlet properties and the saveContact IBAction method only. Currently, we have a little work to do in order to make this feature functioning. Two things must be done:
- We must make the Return button of the keyboard responsive, so the keyboard is disappeared when it's tapped.
- We must implement the saveContact IBAction method, so the new contact can be properly saved.
Also, we must create a new protocol, so the parent view controller, the ViewController class, gets notified when a new contact is saved. This is required so the new contact to be added to the contacts list.
Let's begin by making the Return button working. To do that, we must adopt first the UITextFieldDelegate protocol. Go to the class header line, and add it as shown below:
class EditContactViewController: UIViewController, UITextFieldDelegate
Next, go to the viewDidLoad method and make our class the delegate of all the textfields being in the view controller:
override func viewDidLoad() {
super.viewDidLoad()
txtFirstName.delegate = self
txtLastName.delegate = self
txtPhoneNumber.delegate = self
txtEmail.delegate = self
}
Lastly, implement the next textfield delegate method:
func textFieldShouldReturn(textField: UITextField) -> Bool {
textField.resignFirstResponder()
return true
}
As you see, the only thing we do is to resign the textfield from first responder. We don't actually care which textfield is.
At this point, I'm just telling you in advance that we are going to return to the above method later, in order to add a command that is needed for the handoff functionality. But as I said, later...
Now, before we save the contact, it's seems to be a better idea to implement the custom protocol I was talking about earlier. In it, we are going to declare just one delegate method. By adopting the delegation pattern, we'll be able to tell the parent class that a new contact has been saved, and to pass that contact to it as an object as well.
Walk yourself at the top of the file, right below the import UIKit command and before the class opening. There, just add the next lines:
protocol EditContactViewControllerDelegate{
func contactWasSaved(contact: Contact)
}
Next, go inside the class body, and declare the following delegate variable:
var delegate: EditContactViewControllerDelegate?
Okay, the protocol is now ready, so let's implement the IBAction method. Go to the body of the saveContact method. For first time we are about to use the class we created to the previous section of the tutorial. For starters, we'll use an object of this class to store the values from the textfields to it as shown next, and of course, to save the new contact permanently:
@IBAction func saveContact(sender: AnyObject) {
var editedContact = Contact()
editedContact.firstname = txtFirstName.text
editedContact.lastname = txtLastName.text
editedContact.phoneNumber = txtPhoneNumber.text
editedContact.email = txtEmail.text
editedContact.saveContact()
}
Next, we'll call our custom delegate method to inform the parent class that a new contact has been created and saved:
@IBAction func saveContact(sender: AnyObject) {
...
self.delegate?.contactWasSaved(editedContact)
}
Finally, we just need to pop the view controller. If you took a look at the interface of the starter project that you downloaded, and at the segues specifically, then you would have definitely found out that in both the EditContactViewController and the ViewContactViewController scenes I created unwind segues (segues for dismissing the view controllers). That may seem strange to you initially, but I added them for one specific reason only: I want us to have full control over these two view controllers when they are dismissed, because at that moment we'll need later to stop the handoff from functioning. We won't talk about that now, so let's make the view controller to go away when saving a new contact:
@IBAction func saveContact(sender: AnyObject) {
...
self.performSegueWithIdentifier("idUnwindSegueEditContact", sender: self)
}
Our work in this view controller is over, but just for now. When we'll focus on the handoff implementation we'll come back, as there is a series of tasks we need to perform. Besides that, in the next part we'll see how we will use the delegate method we created here.
Listing Contacts
When our demo app gets launched we want to display a tableview with all the contacts listed in it. For now, we must only load all saved contacts from the disk (from the documents directory), and then simply show them. Don't forget however that we must also implement the contactWasSaved delegate method too.
Let's get started. At first, open the ViewController.swift file. Go to the beginning of the class and add the following declaration:
var contactsArray: NSMutableArray!
Next, define the following function that will help us to load the contacts:
func loadContacts(){
let contact = Contact()
contactsArray = contact.loadContacts()
}
Of course, we should not forget to call it in the viewDidLoad method as shown next:
override func viewDidLoad() {
super.viewDidLoad()
loadContacts()
}
At this point we know that every time the ViewController scene is loaded, the contactsArray will either contain all the contacts (as objects of the Contact class), or it will be simply initialized. Now, let's focus a bit on the tableview methods that must be implemented. You may have noticed that I have already adopted the UITableViewDelegate and UITableViewDatasource protocols in the starter project you downloaded, and I've made the ViewController class the delegate and the datasource of the tableview. So, let's begin by the easy ones:
func numberOfSectionsInTableView(tableView: UITableView) -> Int {
return 1
}
func tableView(tableView: UITableView, numberOfRowsInSection section: Int) -> Int {
return contactsArray.count
}
func tableView(tableView: UITableView, heightForRowAtIndexPath indexPath: NSIndexPath) -> CGFloat {
return 60.0
}
I'm pretty sure that is clear to anyone what is happening in the above three methods, therefore I'm not commenting anything here.
The only interesting tableview method at this point is the next one, where we dequeue the prototype cell with the identifier idCellContact, and then we "extract" each Contact object from the contactsArray array with aim to get the first and last name of each one:
func tableView(tableView: UITableView, cellForRowAtIndexPath indexPath: NSIndexPath) -> UITableViewCell {
var cell = tableView.dequeueReusableCellWithIdentifier("idCellContact") as UITableViewCell
let contact = contactsArray.objectAtIndex(indexPath.row) as Contact
cell.textLabel.text = contact.firstname! + " " + contact.lastname!
return cell
}
As you see, we only make the first and last name visible when we list the contacts. The concatenation of the two respective strings above is simple enough, as you can see.
Speaking of tableview methods, why don't we implement one more handy method so we are able to delete an existing contact? Here you are:
func tableView(tableView: UITableView, commitEditingStyle editingStyle: UITableViewCellEditingStyle, forRowAtIndexPath indexPath: NSIndexPath) {
if editingStyle == UITableViewCellEditingStyle.Delete {
deleteContactAtIndex(indexPath.row)
}
}
The deleteContactAtIndex method is one that we'll implement right next. In it, we pass as an argument the index of the contact we want to delete. Let's see the new method:
func deleteContactAtIndex(index: Int){
contactsArray.removeObjectAtIndex(index)
Contact.updateSavedContacts(contactsArray)
tblContacts.reloadData()
}
At first we remove the proper Contact object from the array, and then we call the updateSavedContacts class method of the Contact class to save the remaining objects (if exist) back to file. Lastly, we reload the tableview data so it reflects the changes that have been done.
As I said earlier, we also need to implement the contactWasSaved delegate method. In it, we only want to add the new contact to the contacts array, and then reload the tableview data. Its implementation is fairly simple, so let's see it:
func contactWasSaved(contact: Contact) {
contactsArray.addObject(contact)
self.tblContacts.reloadData()
}
Alternatively, we could have loaded the contacts from the file once again.
Now go to the class header line and adopt the EditContactViewControllerDelegate protocol:
class ViewController: UIViewController, UITableViewDelegate, UITableViewDataSource, EditContactViewControllerDelegate
The above addition was necessary, but we're still not over. The ViewController class must be set as the delegate of the EditContactViewController instance, and something like that is done in the prepareForSegue(segue:sender:) function when working with segues. This function is called every time that the EditContactViewController view controller is about to be appeared, and our goal is to get an instance of that view controller from the segue and set this class as its delegate. Here it is:
override func prepareForSegue(segue: UIStoryboardSegue, sender: AnyObject?) {
if segue.identifier == "idSegueEditContact"{
var editContactViewController = segue.destinationViewController as EditContactViewController
editContactViewController.delegate = self
}
}
Our initial implementation in the ViewController.swift class is now over, so we can move to the next part where we'll build the contact detail viewing feature.
Viewing Contact Details
The ViewContactViewController view controller will not be used for anything other than displaying the details of the selected contact. No other functionality will be added, and even for a demo application, I must admit that implementing such a view controller it might be a bit pointless. However, no matter of how useful or not it is, this view controller will give us a great opportunity to try the Handoff feature even more, therefore in this section we'll perform the initial implementation, and later or we'll add the Handoff support.
The contact of which the details will be displayed will be passed in the ViewContactViewController view controller as a single object, after it has been selected in the ViewController view controller. In order for this to happen, we must do some preparation and then pass the proper object. So, open the ViewContactViewController.swift file, and at the top of the class add the next declaration:
var contact: Contact!
This variable will be used throughout the class for displaying (and later for handing off) the contact details.
In the starter project of the application I already adopted the tableview related protocols, and I made this class the delegate and the datasource of the tableview. That means that we only have to write the minimum required methods in order the tableview to properly show the contact info.
As you'll see in the code segment that follows, there's nothing particularly difficult. I'm giving you at once all four methods so we can save some time:
func numberOfSectionsInTableView(tableView: UITableView) -> Int {
return 1
}
func tableView(tableView: UITableView, numberOfRowsInSection section: Int) -> Int {
if let validContact = contact{
return 4
}
else{
return 0
}
}
func tableView(tableView: UITableView, cellForRowAtIndexPath indexPath: NSIndexPath) -> UITableViewCell {
var cell = tableView.dequeueReusableCellWithIdentifier("idCellContact") as UITableViewCell
switch indexPath.row{
case 0:
cell.textLabel.text = contact.firstname!
cell.detailTextLabel?.text = "First name"
case 1:
cell.textLabel.text = contact.lastname!
cell.detailTextLabel?.text = "Last name"
case 2:
cell.textLabel.text = contact.phoneNumber!
cell.detailTextLabel?.text = "Phone number"
default:
cell.textLabel.text = contact.email!
cell.detailTextLabel?.text = "E-mail"
}
return cell
}
func tableView(tableView: UITableView, heightForRowAtIndexPath indexPath: NSIndexPath) -> CGFloat {
return 60.0
}
Before we return the number of rows that we want the tableview to have, we must be sure that the contact object isn't nil. Therefore we use the optional binding to make sure that there are actual values to be displayed in the tableview. Also, by looking at the tableView(tableView:cellForRowAtIndexPath:) method you can assume that in the text label of each cell we set the proper contact detail, but further than that we also set a descriptive value as a subtitle in the detail text label of the cell.
Now, let's return to the ViewController.swift file, and let's add the necessary code for passing the selected object to the view contact view controller. First of all, we must keep track of the selected contact, and to be precise, of the contact object's index in the contactsArray array. Go to the place where all the variable declarations exist, and add the next as well:
var indexOfContactToView: Int!
Actually, in the above variable we'll store the row index of the tapped cell. However, this can only happen if we implement the tableView(tableView:didSelectRowAtIndexPath:) method of the tableview delegate. The definition of this method will be simple, as we only need to keep track of the tapped cell and then perform the proper segue for transitioning to the ViewContactViewController view controller:
func tableView(tableView: UITableView, didSelectRowAtIndexPath indexPath: NSIndexPath) {
indexOfContactToView = indexPath.row
self.performSegueWithIdentifier("idSegueViewContact", sender: self)
}
Performing the above segue is important, as the prepareForSegue(segue:sender:) method will be called before the real transition gets happen, and this is the best place to pass the selected contact object.
Go to the prepareForSegue(segue:sender:) method, and append the next lines:
override func prepareForSegue(segue: UIStoryboardSegue, sender: AnyObject?) {
...
if segue.identifier == "idSegueViewContact"{
var viewContactViewController = segue.destinationViewController as ViewContactViewController
viewContactViewController.contact = contactsArray.objectAtIndex(indexOfContactToView) as Contact
}
}
That was the finishing touch in our effort to show a contact's details once it's been selected. At this point you may run the app and see how it actually works. From now on, we are going to focus on the Handoff capability only.
Configuring the Plist File
As I said in the introduction of this tutorial, the handoff logic is based on the user activity concept, and the class that's responsible for handling user activities programmatically is named NSUserActivity. Additionally, I also mentioned that each activity has one or more activity types; a simple string written in reverse DNS style that uniquely identifies a specific activity among devices and apps.
The last one is extremely important, as by using the activity types applications can recognize what activities are allowed to be shared and continued to other devices. As a developer, defining the activity types is one of the first things you should consider if you are about to work with Handoff. Always have in mind that an activity type must be unique, so be careful when naming each one.
In order for an app to know the supported activity types that should be handed off, a list with all of them is required to exist in it, and more specifically in the Info.plist file. In there, a new entry must be added. That entry has special key naming and its type is an array.
In the Project Navigator, open the Supporting Files group, and then click on the Info.plist file to display its contents.

Next, either go to the Editor > Add Item option, or click on the small add button as shown below to add a new entry:

The name of the new key should be NSUserActivityTypes. Make sure that you are not mistyping it, so you'd better just copy-paste it. The type of it must be an array.
Once you properly configure the name and type of the new item, add two new items and be sure that they are contained in the above array. Both of them must be String values, as they represent the activity types of the user activities we want to support. We want to add a user activity when editing a contact, and one more when viewing the details of an existing one. So, in the new two items specify the following values respectively:
com.appcoda.handoffdemo.edit-contact
com.appcoda.handoffdemo.view-contact
The above string values are in reverse DNS style, and they're unique. Usually the format you should adopt is either: com.yourcompany.somethingUnique, or com.yourcompany.appName.somethingUnique. If you want, you can even avoid completely the above format for the activity types, however it's the recommended way by Apple.

Now save the file and you'll be fine here. The activity types must always be defined in the plist file in order for the Handoff to properly work. From this point on, we are able to... hand off!
Handing Off When Editing a Contact
When starting to implement the Handoff feature to an application, the first thing in code is to always create a new user activity, or in other words, an object of the NSUserActivity class properly configured. Before we begin writing any code though, let me say an important fact first.
In iOS the handoff functionality is based on the UIKit framework. Since version 8.0, the UIResponder class contains a property named userActivity for encapsulating a user activity defined to a responder (such as a view controller), and a couple of useful methods that we're about to use soon. That means two things: At first, you can write: self.userActivity, even though you haven't declared such a property with no problem at all, as it's inherited by the UIResponder class. At second, don't try to declare a property such this one: var userActivity: NSUserActivity?, because the compiler won't let you do so. It's like you're trying to declare the same property twice. The userActivity name isn't available.
Having said all the above, let's get started by opening the EditContactViewController.swift file. Initially, we'll define a new custom function, which we'll use to create a new user activity. Besides the initialization, a title for the activity can also be set, but the most important thing is that a dictionary with the data that should be handed off should also be set. In the method that follows we don't specify such a dictionary for a simple reason: We're going to call it when the view is loaded, and at that time there's no data to send yet. Is it pointless then to create the user activity? No, it's not because the activity must initialized in any case.
func createUserActivity() {
userActivity = NSUserActivity(activityType: "com.appcoda.handoffdemo.edit-contact")
userActivity?.title = "Edit Contact"
userActivity?.becomeCurrent()
}
As you see, we use the proper activity type upon initialization. Make sure that the string in the activity initialization matches to any of the strings you add in the plist file. The last command is also important and is required, as this is the one that actually makes the activity ready to be handed off.
The above method must be called somewhere, and the obvious option is to do that in the viewDidLoad method. However, we won't do it and I'll tell you why: As you'll see a bit later, the activity that should be continued will be passed to this view controller using a special method that the UIResponder class has, and it will be assigned to the userActivity property of the view controller. That happens before the view controller gets loaded, and here is the problem. If we call the createUserActivity method in the viewDidLoad, then the userActivity property will be re-initialized, and we won't have the chance to handle the received activity.
So, based on the above, we'll call the createUserActivity in the viewDidAppear method, just as shown next:
override func viewDidAppear(animated: Bool) {
super.viewDidAppear(animated)
createUserActivity()
}
Notice that by simply creating the activity the handoff won't work, as there's no data to send.
Now, the question is when our app should send data while we're editing a contact. A nice and quite convenient solution for the demo app we build would be to do so every time that the Return button is tapped in the keyboard. If you remember, we have already implemented the respective textfield delegate method (textFieldShouldReturn(textfield:)), so we can use it. But not yet!
One of the user activity related methods that the UIResponder class contains is the updateUserActivityState:. The role of this method is simple and in accordance to what its name suggests; to update the user activity's state, and in our case we'll use it to pass the data we want to be handed off to the activity object. This method can be called as many times as necessary, and it's our duty to override it and add the proper implementation in it. Let's take a look at it, and then there's more to discuss:
override func updateUserActivityState(activity: NSUserActivity) {
let contact = Contact()
contact.firstname = txtFirstName.text
contact.lastname = txtLastName.text
contact.phoneNumber = txtPhoneNumber.text
contact.email = txtEmail.text
activity.addUserInfoEntriesFromDictionary(contact.getDictionaryFromContactData())
super.updateUserActivityState(activity)
}
Let me now explain. I said previously that the user activity object accepts a dictionary with the data that we want to handoff (the so-called userInfo dictionary). To do that we use a very handy method called addUserInfoEntriesFromDictionary: that the NSUserActivity class provides us with. Its argument, the getDictionaryFromContactData is a method we implemented in the Contact class. If you recall, its job is to return a Dictionary object created by the properties of a contact object.
An important notice: Keep in mind that every time the above method is called, the userInfo dictionary of the activity is empty. So, don't try to append data to it, instead provide it always with the data you want to be handed off with the activity.
So, in short, in the above method we create a new, temporary Contact object, we set the contact details to the respective properties, and we handoff the (existing) data of this contact by converting all the above properties into a dictionary and adding it to the user activity. We should not forget to call the respective updateUserActivityState: of the super class of course, as we override this method here.
Now, before we go to the Contact class and implement the above method that we used in advanced, we'd better say to our application where the updateUserActivityState: method should be called. We have already said that this will take place in the textFieldShouldReturn: delegate method of the textfield, so go there and append the next line:
func textFieldShouldReturn(textField: UITextField) -> Bool {
...
userActivity?.needsSave = true
return true
}
The needsSave property of the NSUserActivity class is actually a flag which if is true, then it makes the user activity object to update its state and eventually to handoff any existing data. Of course, instead of the needsSave property, you could just write this in the above method:
updateUserActivityState(self.userActivity!)
This command would also work just fine.
Finally, there's one last action that we should perform regarding the user activity. That is to stop it when the view controller is about to pop from the navigation controller, and more specifically when the unwind segue is about to be performed. Go to the prepareForSegue(segue:sender:) method (uncomment it if it's commented by default), and then add the next contents to it:
override func prepareForSegue(segue: UIStoryboardSegue, sender: AnyObject!) {
if segue.identifier == "idUnwindSegueEditContact"{
self.userActivity?.invalidate()
}
}
By calling the invalidate method of the user activity object we actually stop the handoff operation for the current view controller.
So, doing a very quick recap here, we have actually done four things:
- We initialized a user activity.
- We overrode the user activity's update method so we can handoff data any time we want to.
- We said the app when to handoff data.
- We stopped the user activity upon the view controller dismissal.
We'll see some of the above once again in the ViewContactViewController class.
Handing Off When Viewing a Contant's Details
In the last part we saw how we can handoff data when editing a contact, and when exactly to do so. Now, we'll do almost the same thing, but this time things will be a bit simpler.
First of all, open the ViewContactViewController.swift file, as we're going to support the handoff in this class too. This one, compared to the EditContactViewController, has one great difference: It doesn't update any data at all, therefore we don't need to update the user activity's state. We just need to create a new activity and provide it with the contact data, so it can be handed off right after the view controller has appeared.
Exactly as we previously did, we'll create a new function named createUserActivity. In this, we'll initialize the activity using the second activity typed we declared to the plist file, we'll set a title, and finally, we'll make the new activity the current one. Let's see all that in code now:
func createUserActivity() {
userActivity = NSUserActivity(activityType: "com.appcoda.handoffdemo.view-contact")
userActivity?.title = "View Contact"
userActivity?.becomeCurrent()
}
The contact object we used above, is the one that's being passed from the ViewController class when the segue is performed.
Now, the createUserActivity method must be called, and we'll do that in the viewDidAppear method:
override func viewDidAppear(animated: Bool) {
super.viewDidAppear(animated)
createUserActivity()
}
Next, we must override the activity's update state method, where we should provide the dictionary with the data that must be handed off along with the activity:
override func updateUserActivityState(activity: NSUserActivity) {
userActivity?.userInfo = contact.getDictionaryFromContactData()
super.updateUserActivityState(activity)
}
It's not necessary to make the needsSave property of the NSUserActivity class true. By default when the activity will be created it will call this method, it will update its state and eventually the handoff will take place.
Finally, we should not forget that the activity must be stopped before the view controller gets dismissed. So, go to the prepareForSegue(segue:sender:) method, check if the segue that is about to be performed is the unwind one, and add the next few lines:
override func prepareForSegue(segue: UIStoryboardSegue, sender: AnyObject!) {
if segue.identifier == "idUnwindSegueViewContact" {
self.userActivity?.invalidate()
}
}
Now the handoff will work even when viewing a contact's details.
Continuing a User Activity
Up to now we have implemented quite enough handoff related code, but still it can't be tested because it remains a one-way process for the time being. What we also have to do is to add the necessary code so the app can continue an activity that is being handed off by another device.
The continuation of an activity is a two-stage job: First, two application delegate methods regarding the received activity must be implemented, and then some extra work for handling the received data must be done to the view controller of interest.
We are going to see all the above in details, and for starters open the AppDelegate.swift file. When receiving data to a continuing device, iOS uses two delegate methods to inform the application when an activity is about to be continued but no data is still available, and when an activity has been handed off along with its data.
In the first case the developer has two options. To either let iOS inform the user about the activity, or to write any necessary code that will prepare the user about the activity that will be continued. Usually, the second option involves the creation of some GUI elements which indicate that a process is on its way, such as displaying an activity indicator (spinner) or something like that. In this demo app we won't bother with it, so we'll just leave iOS to inform users about the upcoming user activity. Right next you are given with the implementation of that delegate method:
func application(application: UIApplication, willContinueUserActivityWithType userActivityType: String) -> Bool {
println(userActivityType)
return false
}
By returning false we pass the control of the user information to iOS. Remember that if you decide to manually handle the user activity that is about to be continued, you must change the return type of the method to true. The println command exists for demo reasons only, so you can see in the output the activity type of the activity that will be continued.
The interesting part is when an activity arrives and contains data. The delegate method that should be implemented in this case is the application(application:userActivity:restorationHandler:). The main goal when defining this method is to pass the user activity object to the proper view controller, so the app is able to handle and display the data that receives and continue from the point where the user has left off to the originating device. This might sound a bit tricky to achieve, but the UIResponder class gives us the solution once again, so let's talk about that before we implement the method I just mentioned.
In a previous section I mentioned that the UIResponder class contains a couple of useful methods, and we already used the first one when we updated the state of the user activity in the EditContactViewController and the ViewContactViewController classes. The second one is related to the continuity, and is called restoreUserActivity(activity:). There is only one important detail that must become understood here: This method must be implemented to every view controller existing to the hierarchy up to the view controller of interest, and to each one must be called the restoreUserActivity: of the next view controller, until the top most one is reached. In the last one the received data will be handled and displayed properly, so the user can continue working.
The details of the above will become clear as we move along. Initially, in the AppDelegate.swift file add the next method definition:
func application(application: UIApplication, continueUserActivity userActivity: NSUserActivity, restorationHandler: ([AnyObject]!) -> Void) -> Bool {
if let win = window {
let navController = win.rootViewController as UINavigationController
let viewController = navController.topViewController as ViewController
viewController.restoreUserActivityState(userActivity)
}
return true
}
At first, we must be sure that the window of the application has been initialized, so we use the optional binding as shown above. Then, with the first two lines we access the ViewController view controller through the navigation controller. Next, we make a call to the restoreUserActivity: method of that class, so we pass the received activity to it. We'll make this class in turn to call the same method in the EditContactViewController or in the ViewContactViewController class, depending on the activity type. By returning true we tell iOS that we've handled the continuing activity.
Let's go now to the ViewController.swift file. As I said, we must pass the continuing user activity to the next, proper view controller. In order to do that, we must keep the received activity from the restoreUserActivity: to a property of the class and then use it in the prepareForSegue(segue:sender:) method. So, at the top of the class declare the following:
var continuedActivity: NSUserActivity?
Now, let's implement the new method:
override func restoreUserActivityState(activity: NSUserActivity) {
continuedActivity = activity
if activity.activityType == "com.appcoda.handoffdemo.edit-contact" {
self.performSegueWithIdentifier("idSegueEditContact", sender: self)
}
else{
self.performSegueWithIdentifier("idSegueViewContact", sender: self)
}
super.restoreUserActivityState(activity)
}
The received activity is passed here as a parameter. As you see, we store it to the property we previously declared. Then, depending on the activity type we perform the proper segue. Lastly, we make a call to the respective super method because we override it here.
Now, let's go to the prepareForSegue(segue:sender:) method, where we'll modify a bit our code as needed. Let's start with the segue of the edit contact view controller:
override func prepareForSegue(segue: UIStoryboardSegue, sender: AnyObject?) {
if segue.identifier == "idSegueEditContact"{
...
if let activity = continuedActivity {
editContactViewController.restoreUserActivityState(activity)
}
}
...
}
Here we use the continuedActivity object as the argument of the restoreUserActivity: method of the edit contact view controller (we'll implement it next).
We must also update the code regarding the view contact view controller:
override func prepareForSegue(segue: UIStoryboardSegue, sender: AnyObject?) {
if segue.identifier == "idSegueEditContact"{
...
}
if segue.identifier == "idSegueViewContact"{
var viewContactViewController = segue.destinationViewController as ViewContactViewController
if let activity = continuedActivity {
viewContactViewController.restoreUserActivityState(activity)
}
else{
viewContactViewController.contact = contactsArray.objectAtIndex(indexOfContactToView) as Contact
}
}
}
Now, we can go to the EditContactViewController.swift file. This is the place where we'll make use of the received activity, we'll get its data and display it to the textfields. The implementation of the restore activity method is simple, as we'll only assign the continuing activity object to the userActivity object of the responder.
override func restoreUserActivityState(activity: NSUserActivity) {
userActivity = activity
super.restoreUserActivityState(activity)
}
As simple as that. But it's not enough in order to display the data. In the viewDidAppear method we'll check if the userInfo dictionary of the user activity contains data, and if exists, we'll use it:
override func viewDidAppear(animated: Bool) {
super.viewDidAppear(animated)
if let userInfo = userActivity?.userInfo {
var contact = Contact()
contact.getContactDataFromDictionary(userInfo)
txtFirstName.text = contact.firstname
txtLastName.text = contact.lastname
txtPhoneNumber.text = contact.phoneNumber
txtEmail.text = contact.email
}
createUserActivity()
}
In this implementation we declare a temporary Contact object, and through this we use the getContactDataFromDictionary method so as to "extract" the data from the userInfo dictionary. Then we assign the proper values to the textfields, and we're done. By doing all the above a handed off activity can be now continued to another device successfully. We'll see it in action in a while.
Finally, let's make the ViewContactViewController capable of continuing an activity. Open the ViewContactViewController.swift file, and add the restore activity method:
override func restoreUserActivityState(activity: NSUserActivity) {
userActivity = activity
super.restoreUserActivityState(activity)
}
And, similarly to the previous view controller, let's implement the viewDidAppear method:
override func viewDidAppear(animated: Bool) {
super.viewDidAppear(animated)
if let userInfo = userActivity?.userInfo {
contact = Contact()
contact.getContactDataFromDictionary(userInfo)
tblContactInfo.reloadData()
}
createUserActivity()
}
At this point, our app can continue a handed off activity as expected. The whole process of continuing an activity might look somehow weird at the beginning, however if you look closely at the steps we followed here everything will become pretty clear.
Some Finishing Touches
Before we run the app and test the application for first time, it's necessary to add one more delegate method to the AppDelegate.swift file. Looking back at what we have already done, you'll notice that we haven't handled any error case at all.
In the next code snippet you'll see the new method you should add to that file. Notice that no actual error handling is taking place, we just display a couple of messages to the output.
func application(application: UIApplication, didFailToContinueUserActivityWithType userActivityType: String, error: NSError) {
println(error.localizedDescription)
println(userActivityType)
}
Besides that, there's one more delegate method that you could optionally implement, and it's shown below:
func application(application: UIApplication, didUpdateUserActivity userActivity: NSUserActivity) {
println(userActivity)
println(userActivity.userInfo)
}
This method is called when the state of an activity is updated, and I present it only for informative reasons. For testing only, we display the activity that's being updated, and the userInfo dictionary of it.
Now, all the necessary delegate methods regarding the continuity exist to our app, so we're ready to take a taste of it when running.
Compile and Run the App
As I said to the introduction of this tutorial, the handoff capability can be tested in real devices only. So, build and run the app to two iPhones, two iPads, or any combination of them, and then test it. Add a new contact or view an existing one, and look at the lock screen of the second device for a new icon appearing at the bottom left side of the screen. Use it to let the application continue your activity from where you left off. Alternatively, you can unlock the second device and double-push the Home button. In the app switcher, at the very left side you can see an application instance created by the handed off activity. Tap it and the application will also launch and display the proper view controller with the data that have received.
The following images illustrate the functionality of the app. In my demo run, the originating device is an iPhone, and the continuing device is an iPad mini.
Adding a new contact on iPhone:

The app icon appears at the bottom-left side of the lock screen on the iPad:

Sliding up the app icon opens the app to the point that I was left off on the iPhone:

Viewing the contact details on iPhone (the app on the iPad has been terminated):

By pushing the Home button twice on the iPad, an instance of the application with the handed off activity is appeared at the left side:

The app loads the view contact view controller to display the contact details:

Summary
In this tutorial we met a brand new capability of iOS 8, and we went through several steps until we manage to build a fully working app utilizing the Handoff feature. If you focus on the handoff's specifics only, you'll see that implementing it is relatively easy, as long as you stick to the simple rules that govern it. Keep in mind to always be careful when setting up the activity types of your application, so there won't be any conflicts. As a last word I must say that even though the Handoff works perfectly to the demo app, we didn't make the contacts list of the continuing device (the stored contacts) to get updated with the list of the originating app. It doesn't matter however, as our goal was to see how Handoff is implemented. Besides that, this could be the topic of another tutorial regarding Handoff. I hope you find this post useful, and leave any thoughts you may have in the comments area. Have fun!
For your reference, you can download the complete Xcode project here.


