In any user interface, focus plays a crucial role in determining which element receives the next input. SwiftUI provides a powerful set of tools and view modifiers that allow you to control and manage focus in your apps. By using these modifiers, you can indicate which views are eligible to receive focus, detect which view currently has focus, and even programmatically control the focus state.
In this tutorial, we will explore the ins and outs of SwiftUI’s focus management API, empowering you to create engaging and interactive user experiences. Specifically, we will dive deep into the usage of key property wrappers like @FocusState, @FocusedValue, and @FocusObject.
Working with @FocusState
Let’s first start with @FocusState. With this wrapper, developers can easily manage the focus of specific views and track whether a view is currently in focus. To observe and update the focus state of a view, we commonly use the focused modifier in conjunction with the @FocusState property wrapper. By leveraging these APIs, you’ll gain precise control over the focus behavior of SwiftUI views.
To provide you with a clearer understanding of how focused and @FocusState work together, let’s walk through an example.
struct FocusStateDemoView: View {

    @State private var comment: String = ""

    @FocusState private var isCommentFocused: Bool

    var body: some View {
        VStack {
            Text("👋Help us improve")
                .font(.system(.largeTitle, design: .rounded, weight: .black))

            TextField("Any comment?", text: $comment)
                .padding()
                .border(.gray, width: 1)
                .focused($isCommentFocused)

            Button("Submit") {
                isCommentFocused = false
            }
            .controlSize(.extraLarge)
            .buttonStyle(.borderedProminent)

        }
        .padding()
        .onChange(of: isCommentFocused) { oldValue, newValue in
            print(newValue ? "Focused" : "Not focused")
        }
    }
}
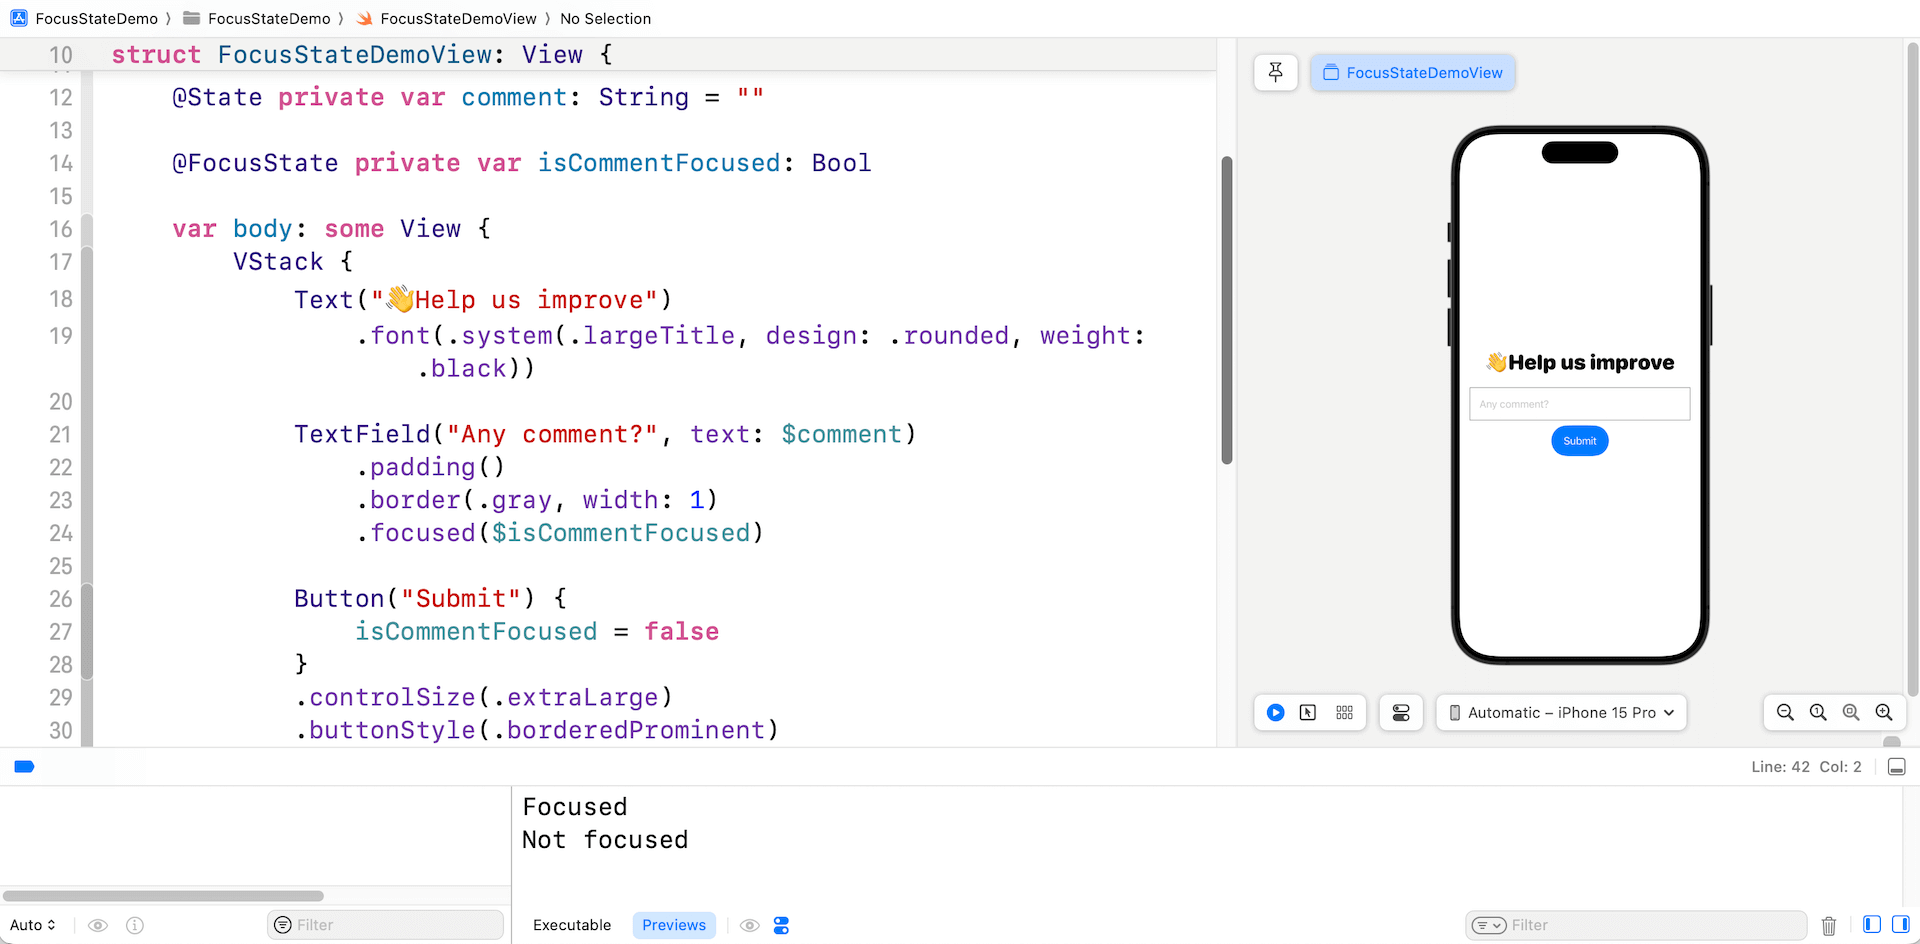
In the code above, we create a simple form with a “comment” text field. We have a property named isCommentFocused, which is annotated with @FocusState to keep track of the focus state of the text field. For the “comment” field, we attach the focused modifier and bind the isCommentFocused property.
By doing so, SwiftUI automatically monitors the focus state of the “comment” field. When the field is in focus, the value of isCommentFocused will be set to true. Conversely, when the field loses focus, the value will be updated to false. You can also programmatically control the focus of the text field by updating its value. For instance, we reset the focus by setting isCommentFocused to false when the Submit button is tapped.
The onChange modifier is used to reveal the change of the focus state. It monitors the isCommentFocused variable and print out its value.
When you test the app demo in the preview pane, the console should display the message “Focused” when the “comment” field is in focus. Additionally, tapping the Submit button should trigger the message “Not focused” to appear.

Using Enum to Manage Focus States
Using a boolean variable works effectively when you only need to track the focus state of a single text field. However, it can become cumbersome when you have to handle the focus state of multiple text fields simultaneously.
Rather than boolean variables, you can define an enum type which conforms to Hashable to manage the focus states of multiple text fields (or SwiftUI views).
Let’s continue to illustrate this technique with the same app demo. We will add two more text fields including name and email to the form view. Here is the modified program:
struct FocusStateDemoView: View {

    enum Field: Hashable {
        case name
        case email
        case comment
    }

    @State private var name: String = ""
    @State private var email: String = ""
    @State private var comment: String = ""

    @FocusState private var selectedField: Field?

    var body: some View {
        VStack {
            Text("👋Help us improve")
                .font(.system(.largeTitle, design: .rounded, weight: .black))

            TextField("Name", text: $name)
                .padding()
                .border(.gray, width: 1)
                .focused($selectedField, equals: .name)

            TextField("Email", text: $email)
                .padding()
                .border(.gray, width: 1)
                .focused($selectedField, equals: .email)

            TextField("Any comment?", text: $comment)
                .padding()
                .border(.gray, width: 1)
                .focused($selectedField, equals: .comment)

            Button("Submit") {
                selectedField = nil
            }
            .controlSize(.extraLarge)
            .buttonStyle(.borderedProminent)

        }
        .padding()
        .onChange(of: selectedField) { oldValue, newValue in
            print(newValue ?? "No field is selected")
        }
    }
}
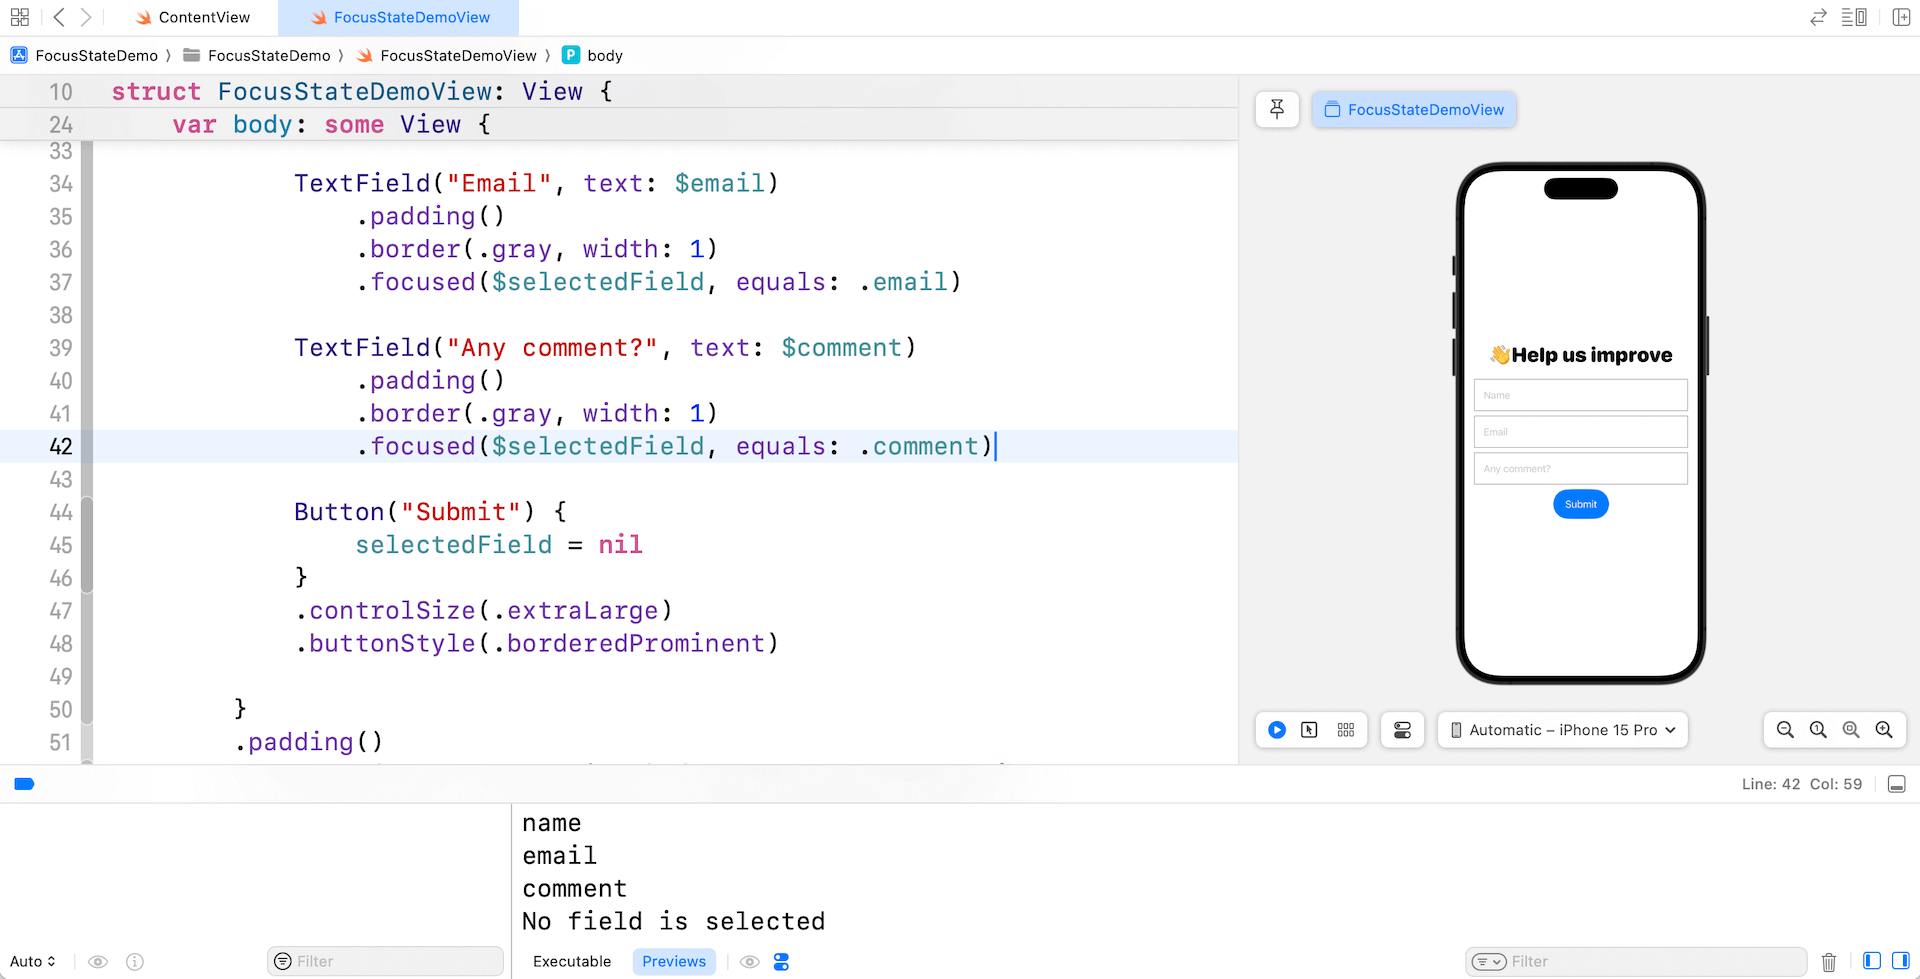
To efficiently manage the focus of multiple text fields, we avoid defining additional boolean variables and instead introduce an enum type called Field. This enum conforms to the Hashable protocol and defines three cases, each representing one of the text fields in the form.
Using this enum, we utilize the @FocusState property wrapper to declare the selectedField property. This property allows us to conveniently track the currently focused text field.
To establish the connection, each text field is associated with the focused modifier, which binds to the focus state property using the matching value. For example, when the focus moves to the “comment” field, the binding sets the bound value to .comment.
You can now test the code changes. When you tap any of the fields, the console will display the name of the respective text field. However, if you tap the Submit button, the console will show the message “No field is selected.”

You are allowed to programmatically change the focus of the text field. Let’s change the action block of the Submit button like this:
Button("Submit") {
    selectedField = .email
}
By setting the value of selectedField to .email for the Submit button, the app will automatically shift the focus to the email field when the Submit button is tapped.
Working with FocusedValue
Now that you should understand how @FocusState works, let’s switch over to the next property wrapper @FocusedValue. This property wrapper allows developers to monitor the value of the currently focus text field (or other focusable views).
To better understand the usage, let’s continue to work on the example. Let’s say, we want to add a preview section below the form that displays the user’s comment, but we only want the comment to be visible when the comment field is focused. Below is the sample code of the preview section:
struct CommentPreview: View {

    var body: some View {
        VStack {
            Text("")
        }
        .frame(minWidth: 0, maxWidth: .infinity)
        .frame(height: 100)
        .padding()
        .background(.yellow)
    }
}
And, we put the preview right below the Submit button like this:
struct FocusStateDemoView: View {

    ...

    var body: some View {
        VStack {

            .
            .
            .

            Button("Submit") {
                selectedField = nil
            }
            .controlSize(.extraLarge)
            .buttonStyle(.borderedProminent)

            Spacer()

            CommentPreview()
        }
        .padding()
        .onChange(of: selectedField) { oldValue, newValue in
            print(newValue ?? "No field is selected")
        }
    }
}
In order to monitor the change of the comment field, we first create a struct that conforms to the FocusedValueKey protocol. In the struct, we define the type of the value to observe. In this case, comment has a type of String.
struct CommentFocusedKey: FocusedValueKey {
    typealias Value = String
}
Next, we provide an extension for FocusedValues with a computed property that uses the new key to get and set values.
extension FocusedValues {
    var commentFocusedValue: CommentFocusedKey.Value? {
        get { self[CommentFocusedKey.self] }
        set { self[CommentFocusedKey.self] = newValue }
    }
}
Once you have all these set up, you can attach the focusedValue modifier to the “comment” text field and specify to observe the comment’s value.
TextField("Any comment?", text: $comment)
    .padding()
    .border(.gray, width: 1)
    .focused($selectedField, equals: .comment)
    .focusedValue(\.commentFocusedValue, comment)
Now go back to the CommentPreview struct and declare a comment property using the @FocusedValue property wrapper:
struct CommentPreview: View {

    @FocusedValue(\.commentFocusedValue) var comment

    var body: some View {
        VStack {
            Text(comment ?? "Not focused")
        }
        .frame(minWidth: 0, maxWidth: .infinity)
        .frame(height: 100)
        .padding()
        .background(.yellow)
    }
}
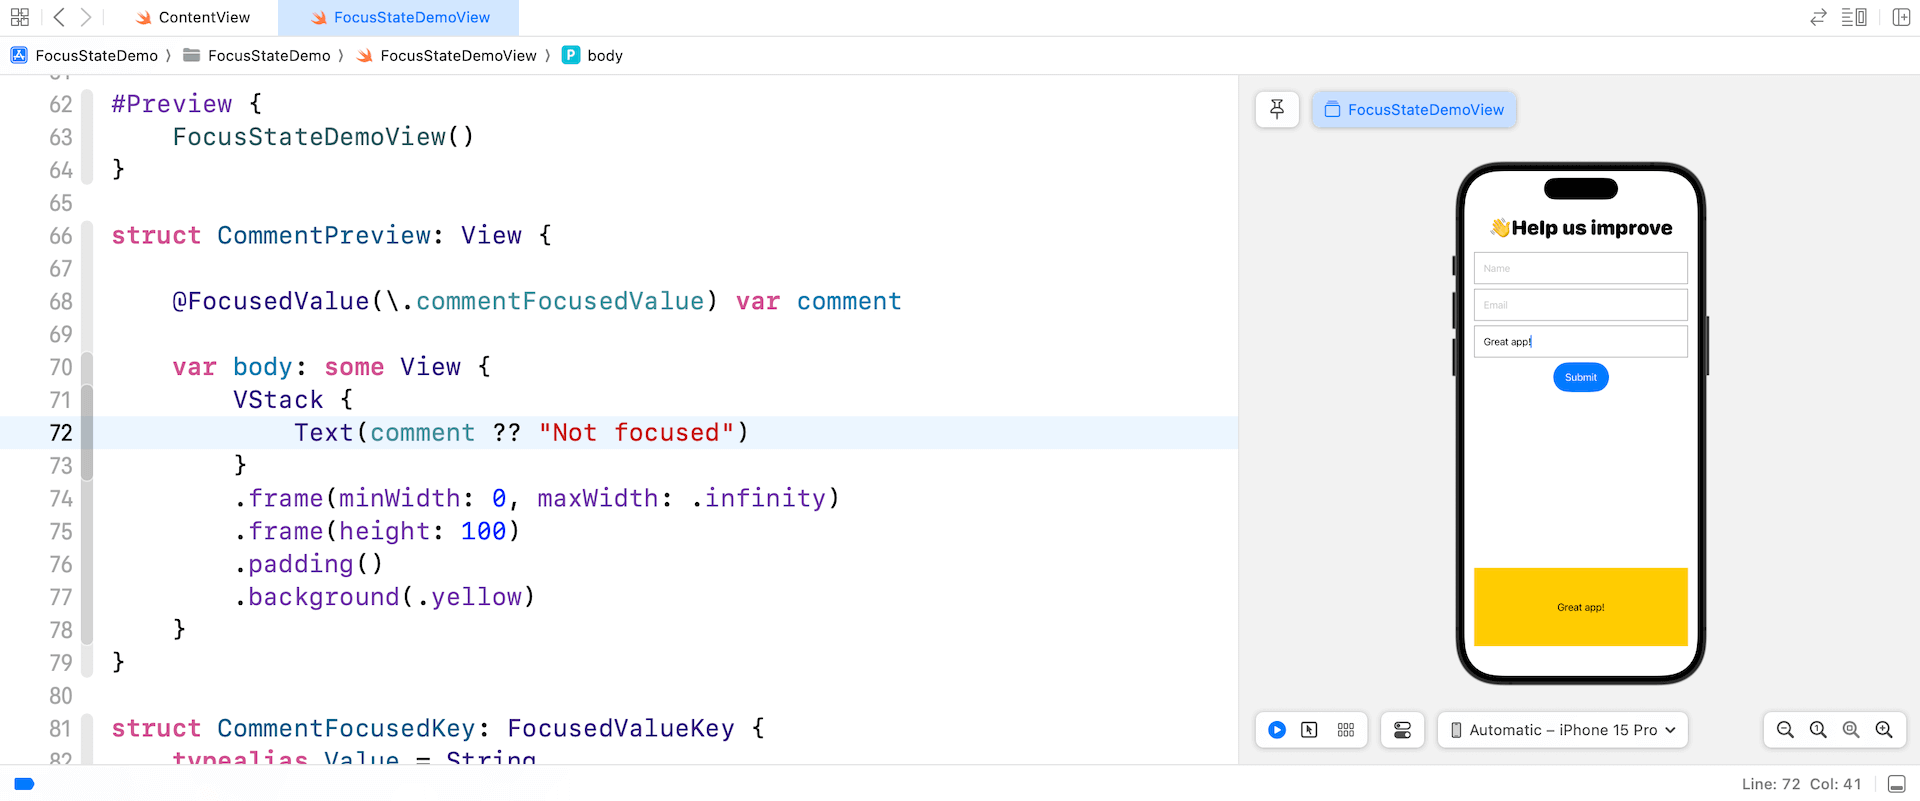
We utilize the @FocusedValue property wrapper to monitor and retrieve the most recent value of the comment field when it is in focus.
Now, as you type any text in the comment field, the preview section should display the same value. However, when you navigate away from the comment field, the preview section will display the message “Not focused.”

Using @FocusedObject
@FocusedValue is used to monitor the change of a value type. For reference type, you can use another property wrapper called @FocusedObject. Let’s say, on top of the comment field, you want to display the content of the name and email fields in the preview section.
To do that, you can define a class that conforms to the ObservableObject protocol like this:
class FormViewModel: ObservableObject {
    @Published var name: String = ""
    @Published var email: String = ""
    @Published var comment: String = ""
}
In the form view, we can declare a state object for the view model:
@StateObject private var viewModel: FormViewModel = FormViewModel()To associate the observable object with the focus, we attach the focusedObject modifier to the text fields like below:
TextField("Name", text: $viewModel.name)
    .padding()
    .border(.gray, width: 1)
    .focused($selectedField, equals: .name)
    .focusedObject(viewModel)

TextField("Email", text: $viewModel.email)
    .padding()
    .border(.gray, width: 1)
    .focused($selectedField, equals: .email)
    .focusedObject(viewModel)

TextField("Any comment?", text: $viewModel.comment)
    .padding()
    .border(.gray, width: 1)
    .focused($selectedField, equals: .comment)
    .focusedObject(viewModel)
For the CommentPreview struct, we use the @FocusedObject property wrapper to retrieve the change of the values:
struct CommentPreview: View {

    @FocusedObject var viewModel: FormViewModel?

    var body: some View {
        VStack {
            Text(viewModel?.name ?? "Not focused")
            Text(viewModel?.email ?? "Not focused")
            Text(viewModel?.comment ?? "Not focused")
        }
        .frame(minWidth: 0, maxWidth: .infinity)
        .frame(height: 100)
        .padding()
        .background(.yellow)
    }
}
Summary
This tutorial explains how to use SwiftUI’s focus management API, specifically @FocusState, @FocusedValue, and @FocusedObject. By leveraging these wrappers, you can efficiently monitor changes in focus state and access the values of focusable views. These powerful tools enable developers to deliver enhanced user experiences across various platforms, including iOS, macOS, and tvOS applications.
I hope you enjoy this tutorial. If you have any questions, please leave me comment below.


