

Welcome to my first tutorial on Flutter. I have never written any post on cross-platform or hybrid app framework but Flutter has changed this mindset of mine.
Previously, I have developed on React Native, Cordova, Phone Gap, Ionic and now of these really work out for me until I found Flutter along with its huge community of developers and its showcase apps.
What is Flutter?
In a nutshell, it is a multi-layered system, such that higher layers are easier to use and allow you to express a lot with little code and lower layers give you more control at the expense of having to deal with some complexity.
Flutter Framework is written entirely in Dart. Most of the engine is written in C++, with Android-specific parts written in Java, and iOS-specific parts written in Objective-C. Like React Native, Flutter also provides reactive-style views, but Flutter takes a different approach to avoid performance problems caused by the need for a JavaScript bridge by using a compiled programming language, namely Dart.
Dart is compiled “ahead of time” (AOT) into native code for multiple platforms. This allows Flutter to communicate with the platform without going through a JavaScript bridge that does a context switch. It also compiles to native code which in turn improves app startup times.
In Flutter, it is all about Widgets. Widgets are the elements that affect and control the view and interface to an app.
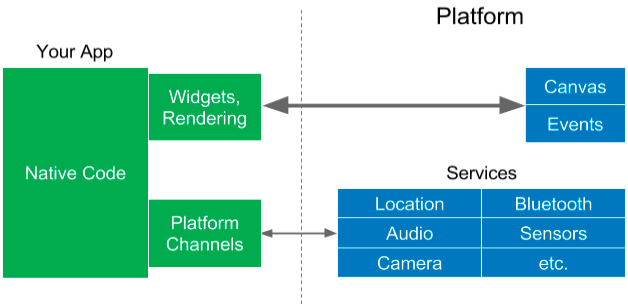
Flutter renders the widget tree and paints it to a platform canvas. This is nice and simple (and fast). It’s Hot-Reload capability allows real-time development experience.
You can read more about Flutter and learn about its goodness here.
Getting Started
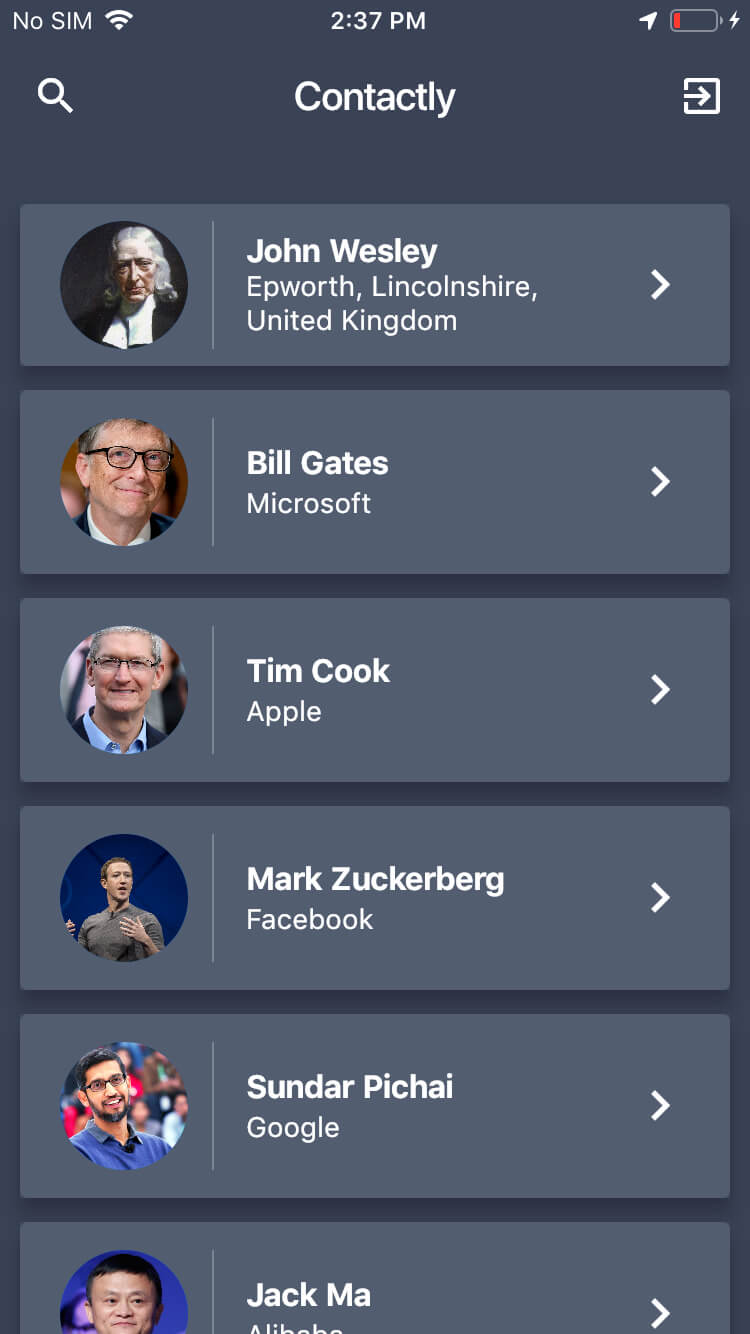
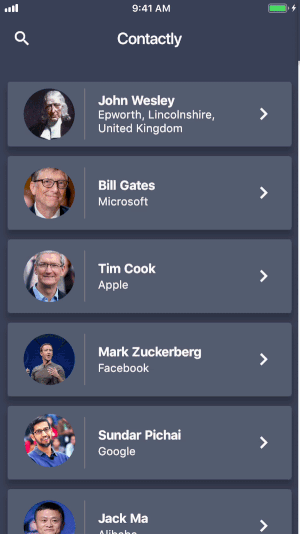
Today, we will be building a very simple Flutter app that can be deployed on both iOS & Android called Contactly as we go through this tutorial. This is a very simple Contacts List app which will demonstrate the capabilities of Flutter. Capabilities include:
- TextField & Validations
- Button Clicks
- Navigations
- Image Rendering (Local & Online)
- Error Alert Dialog
- Scrollable List View
- List View Search
- JSON File Parsing
- JSON to Objects Mapping
- Opening External Web Browser
The final product of this app should look something like this:
It includes these features:
- Login via a Pin Code.
- Load a list of contacts from JSON.
- Search for a particular contact.
- Tap to view contact details.
- Tap to view contact info in an external browser.
The Flutter’s Project Structure
While you haven’t built any apps using Flutter, let me give you a quick overview of its project structure. Later when you create a Flutter project, you should see a project structure as such:
- android – for generating the Android app. And, in case you need to add an Android platform-specific implementation, you will implement it here.
- assets – for storing images, data file, etc
- ios – for generating the iOS app. And, in case you need to add an iOS platform-specific implementation, you will implement it here.
- lib – contains the main code of your application. Later, you will see we create all the code files here.
- test – for unit testing. However, we will not go into it in this tutorial.
I know you can’t wait to try out Flutter. Let’s dive in and set up all the required tools on your machine.
Installing Flutter
At the time of this writing, I’m using the following machine configuration and software version:
- Macbook Pro running macOS High Sierra
- Android Studio 3.2.1
- Xcode 10.1
- Flutter 1.0
I cannot guarantee that my tutorial will work for every configuration and platform, hence, I will not include configuration troubleshooting here to keep this tutorial short and objective-oriented.
First up, head over to Flutter Installation page to install Flutter. I will skip the steps here as the steps in the document is detailed enough.
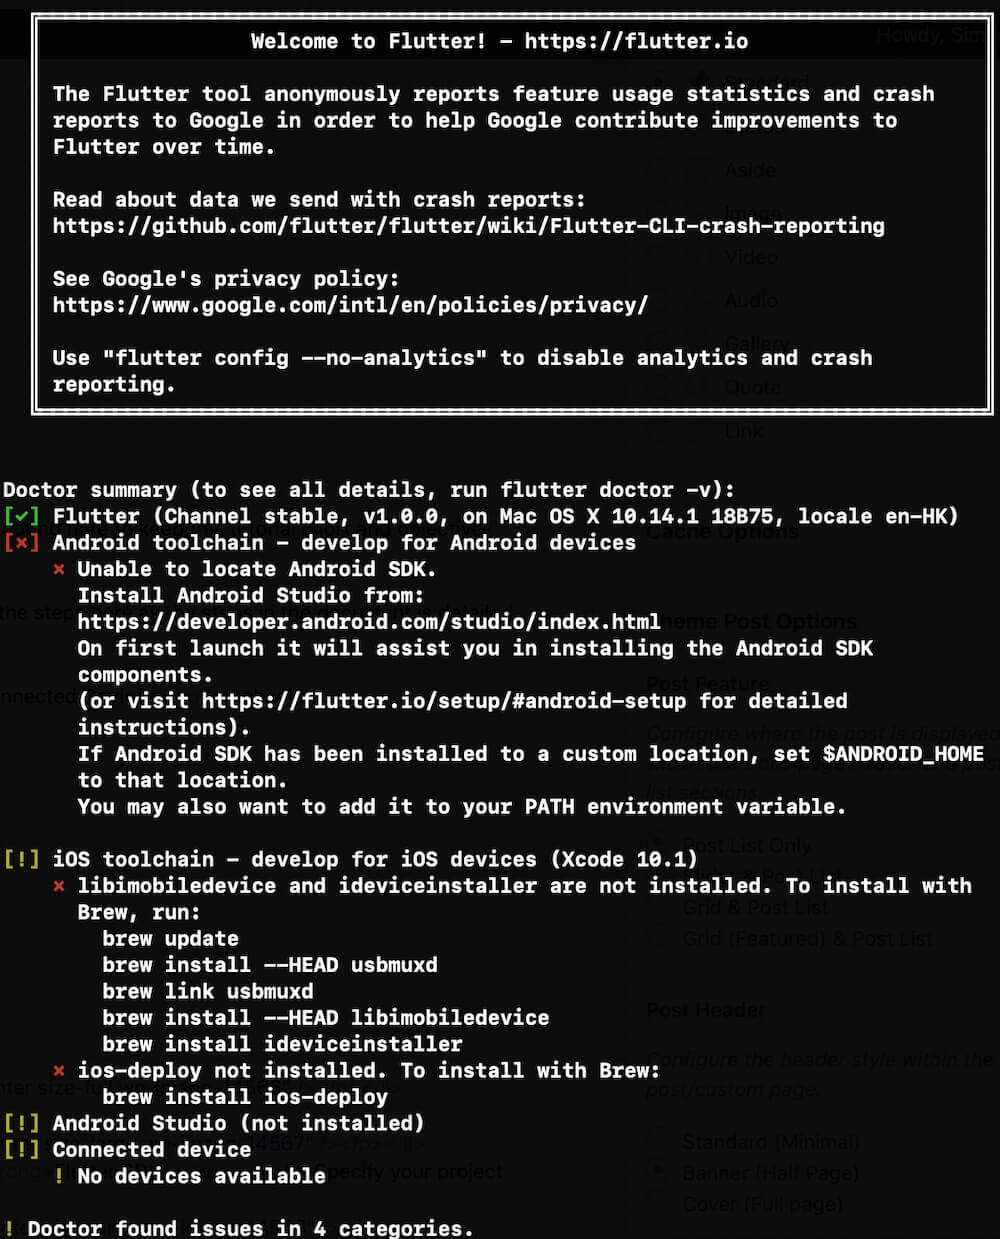
Once you run flutter doctor and you got (1~4 checked), you are good to go! It’s not necessary to have Connected Devices checked.
Doctor summary (to see all details, run flutter doctor -v):
[✓] Flutter (Channel stable, v1.0.0, on Mac OS X 10.13.6 17G4015, locale en-SG)
[✓] Android toolchain - develop for Android devices (Android SDK 28.0.3)
[✓] iOS toolchain - develop for iOS devices (Xcode 10.1)
[✓] Android Studio (version 3.2)
[✓] Connected device (2 available)
If you have encountered any errors like below, follow the suggested solutions to fix it. For example, if your Mac has not installed with Android Studio, head over to this website to download the software. Just make sure you have the first 4 items checked before moving on.
Creating a new Flutter Project
With Flutter installed, now let’s start to build your first Flutter project.
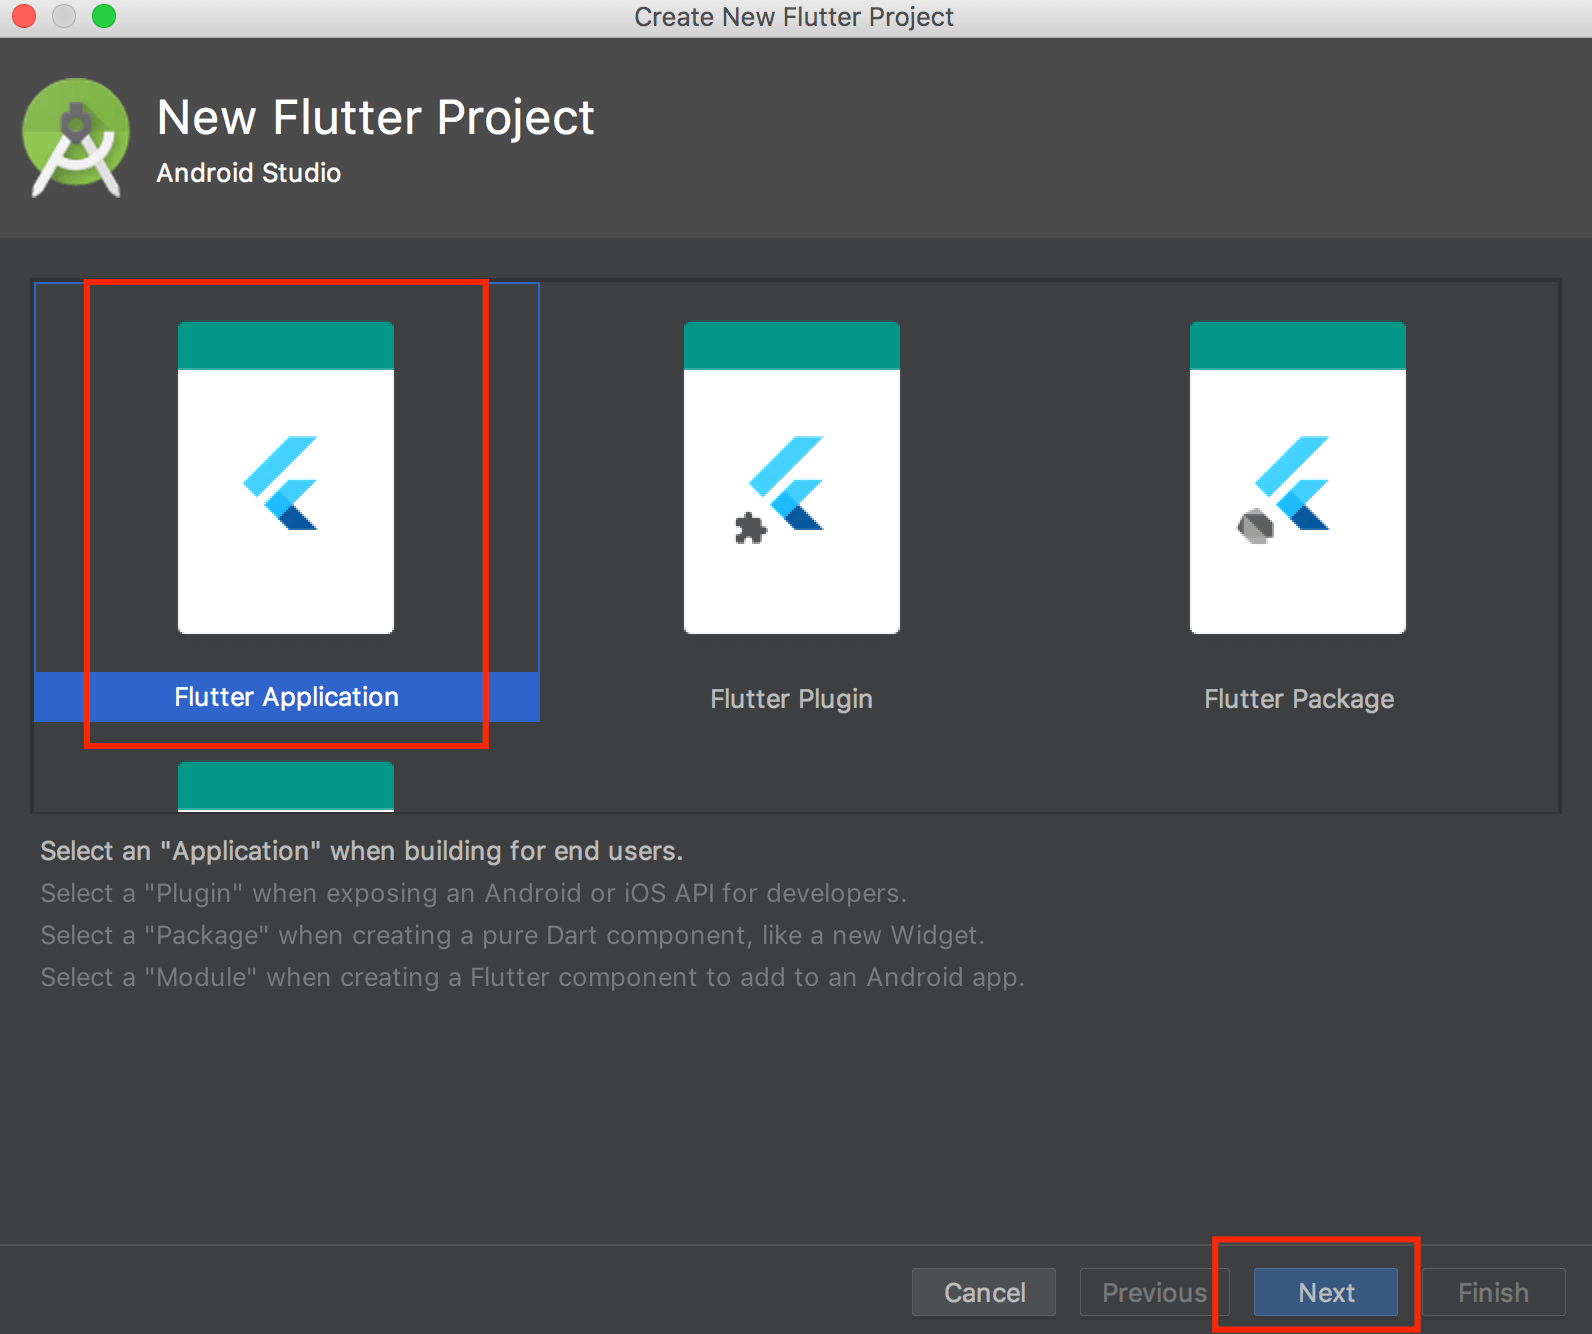
First, fire up Android Studio and click Start a new Flutter Project.

Next, select Flutter Application and click Next.
Then fill in Project name as contactly, or anything you like. By default, it should show your default path of the Flutter path. In case it doesn’t work for you, navigate and specify your own Flutter SDK path. Optionally, you can change your project location and give a simple description. Then, click Next.
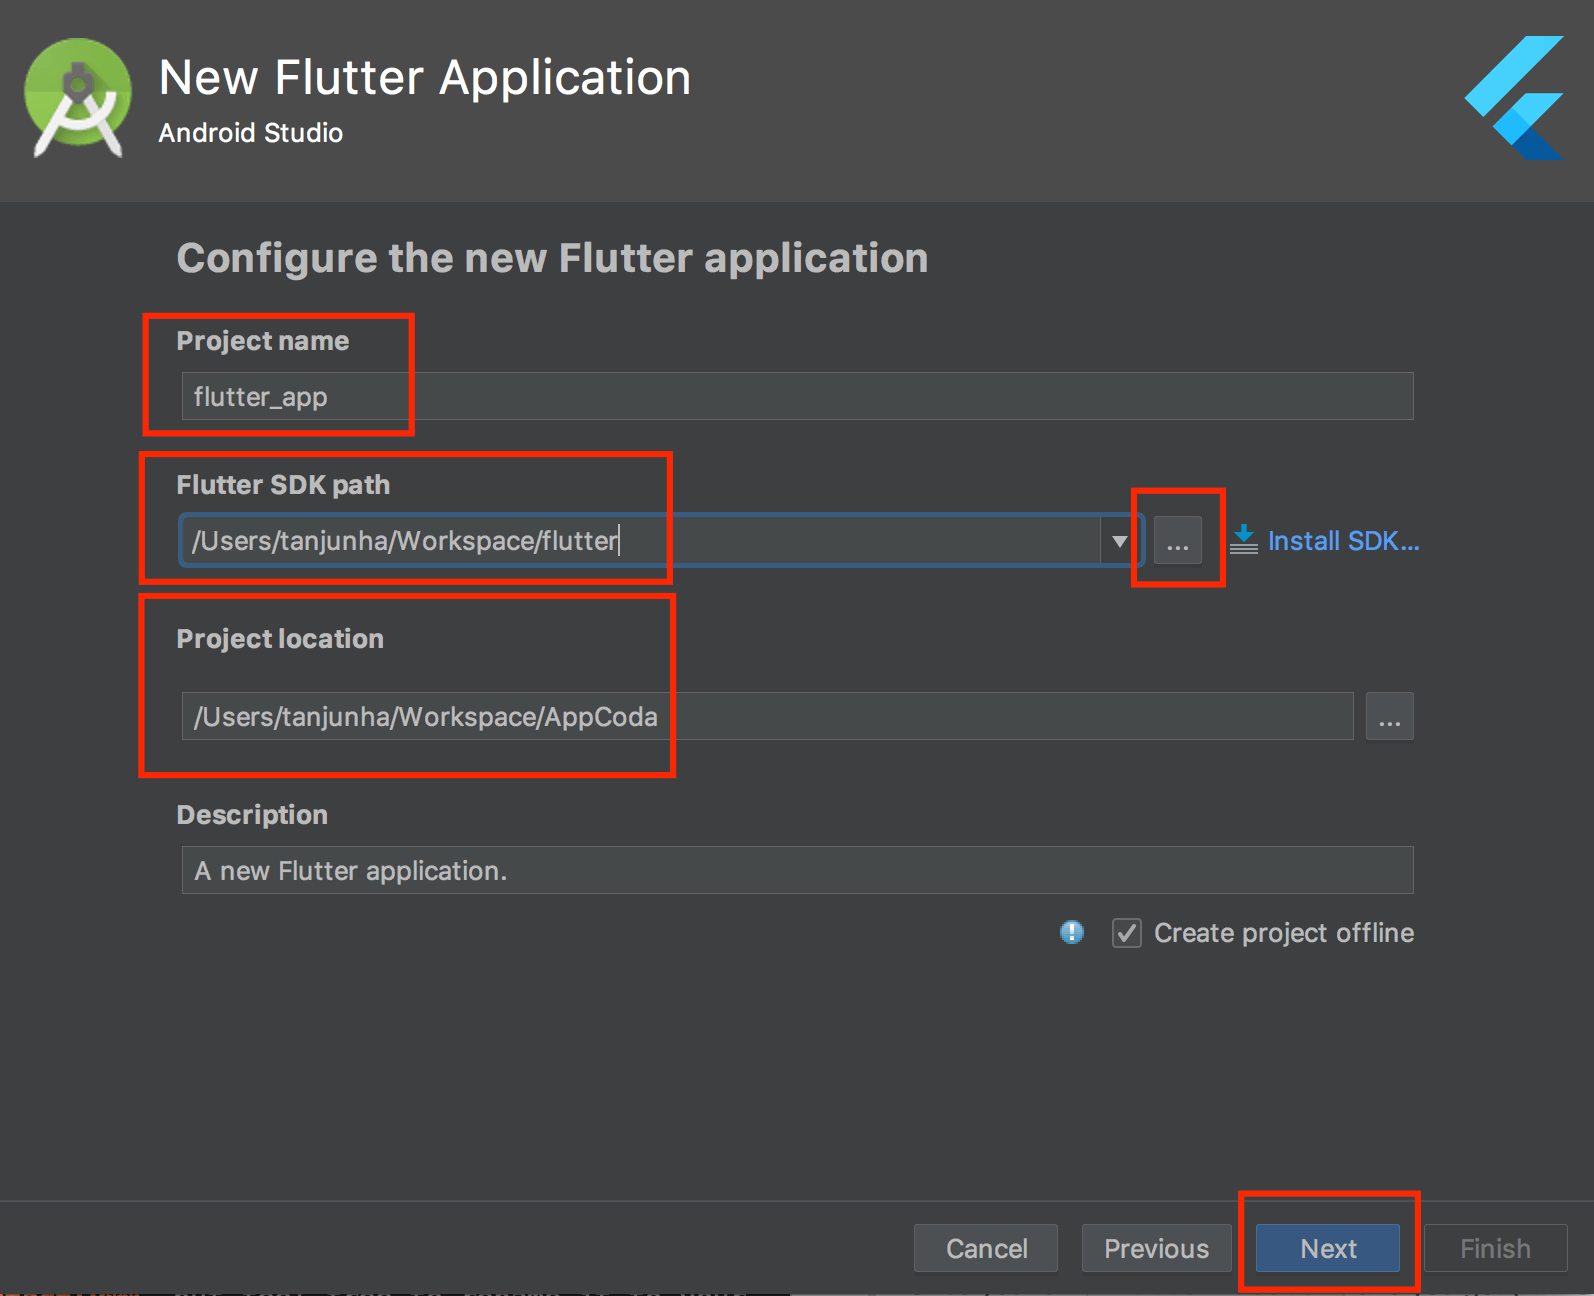
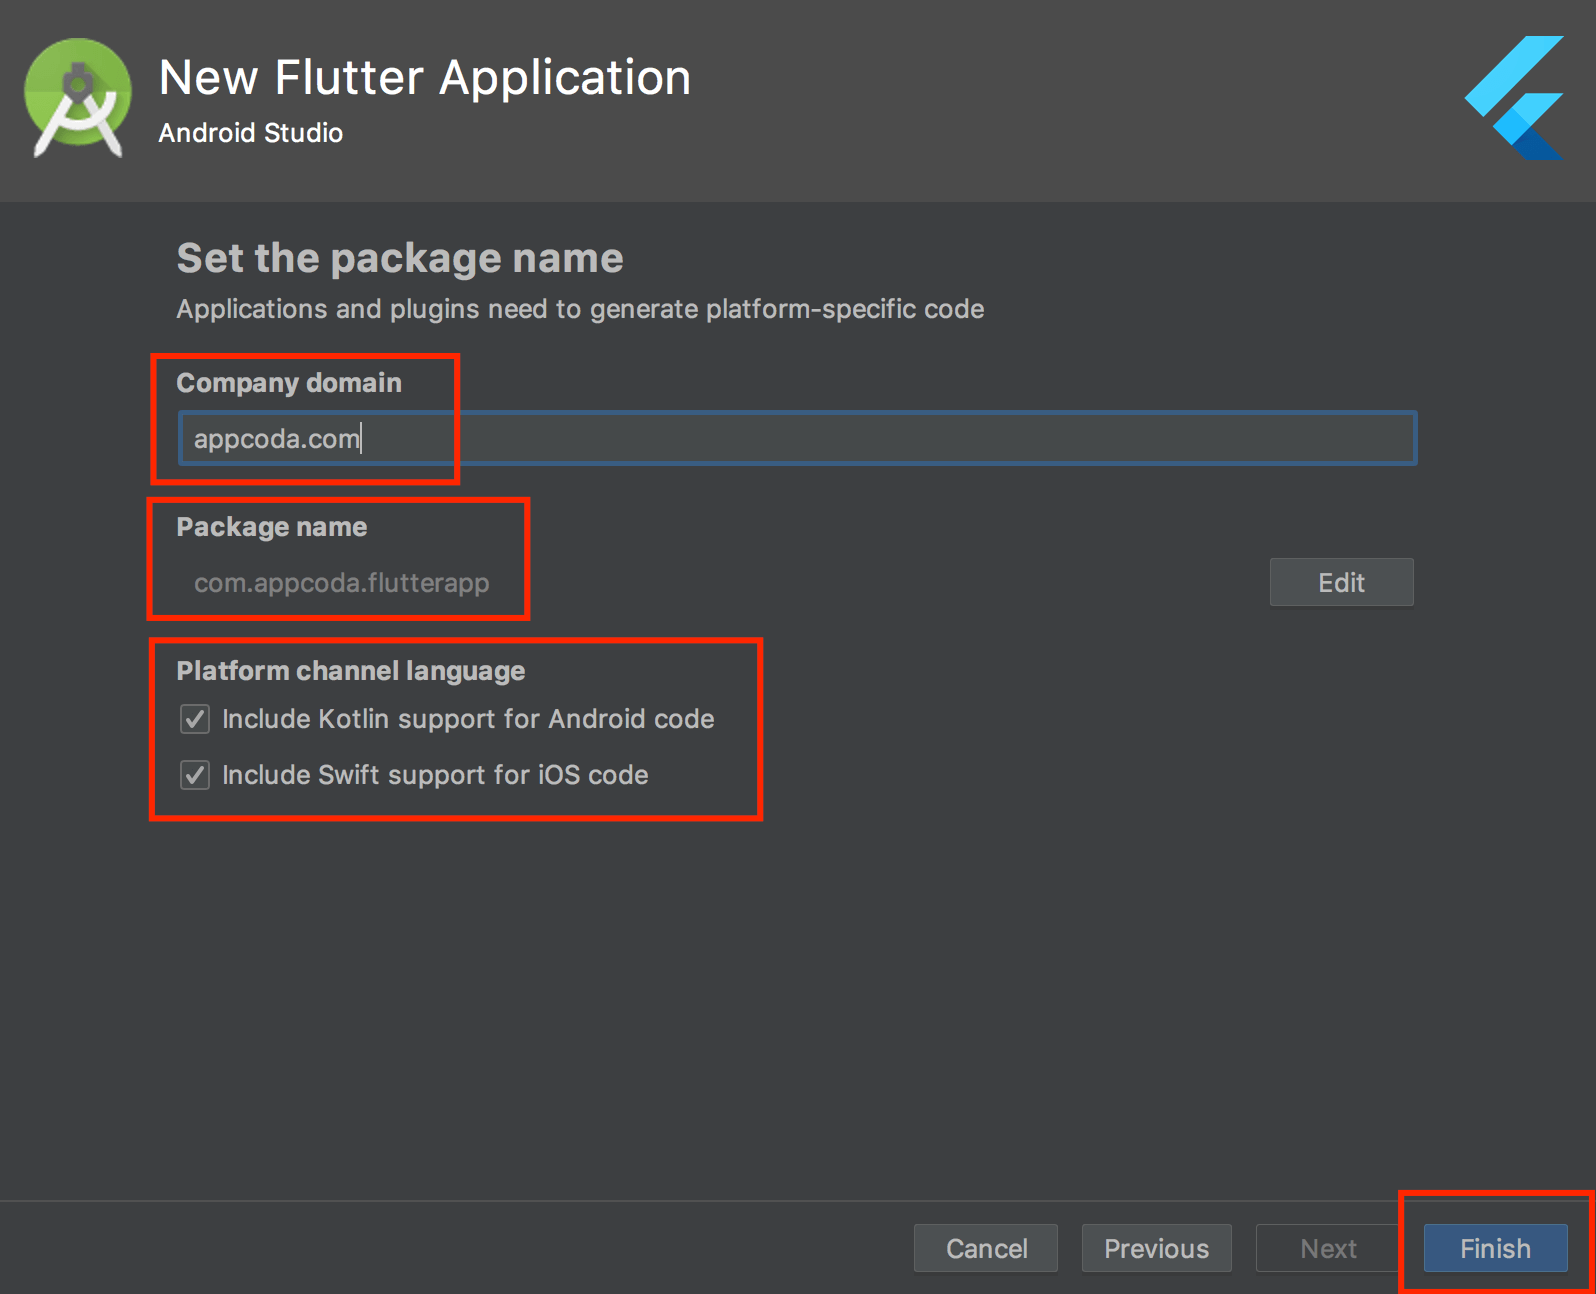
Finally, fill in a Company domain. This will be replicated in your Bundle Identifier (iOS) & Package Name (Android). For my case, I checked both Kotlin & Swift support. Then, click Finish.
Trying out an App on iOS Simulator
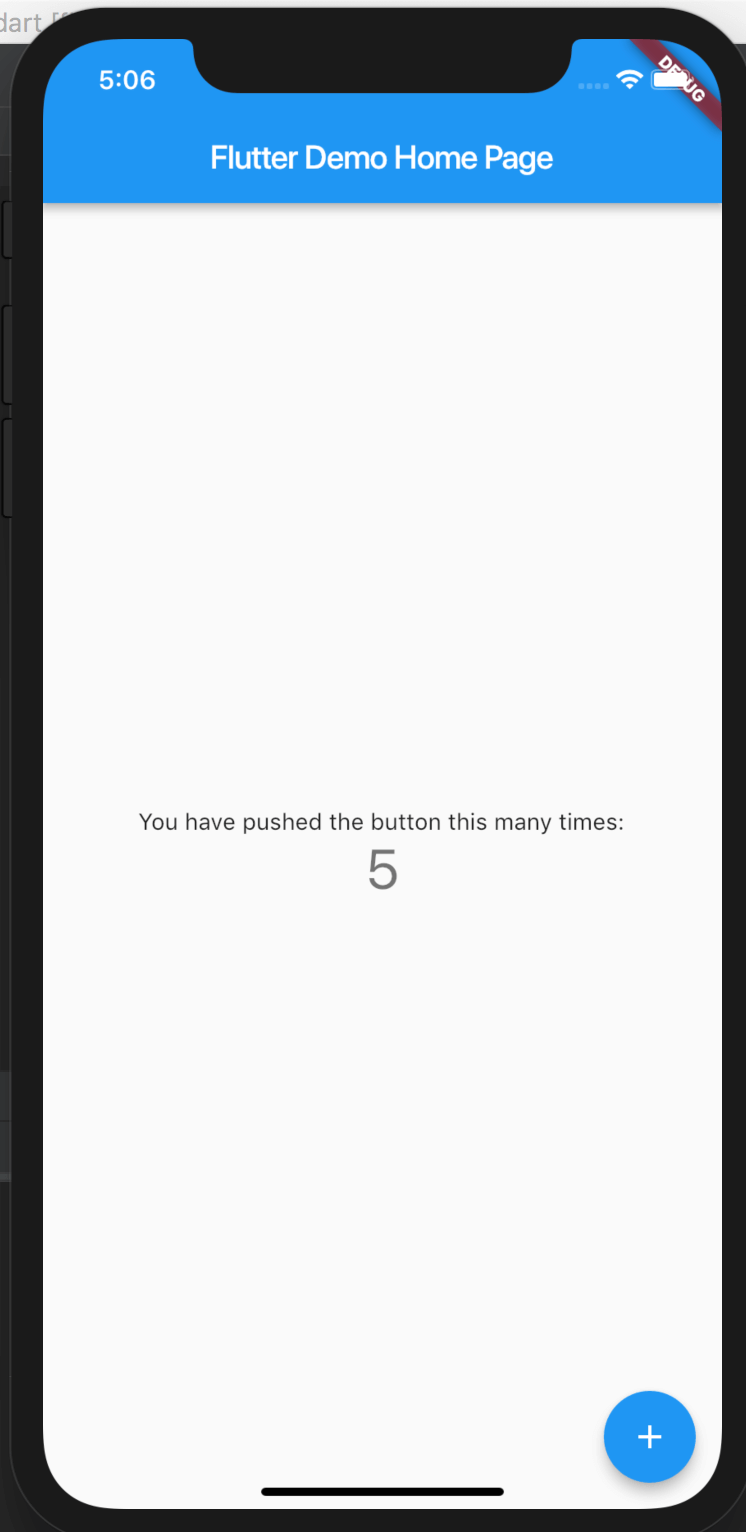
Once you started your Flutter Application, some boilerplate code is automatically generated with a sample app that allows you to hit a button and perform some text updates. Before we make any code changes, it is a good checkpoint to try running it on your iOS simulator.
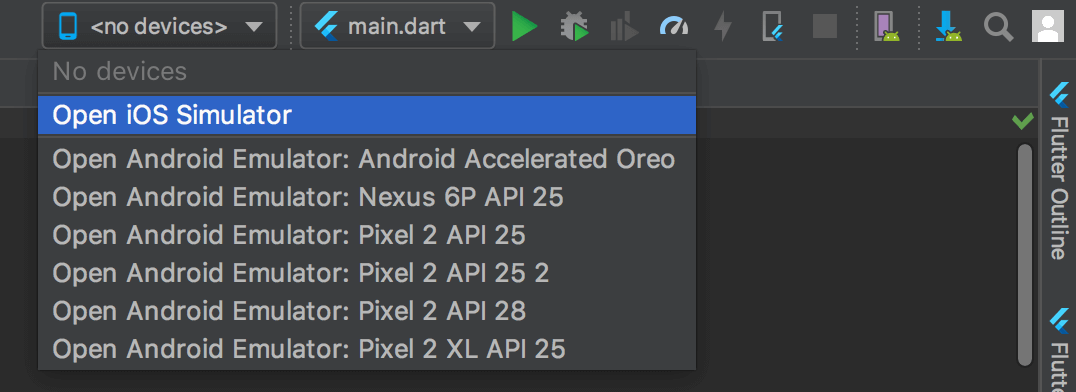
To run the app, find the dropdown list somewhere at the top right that says <no devices>, click on it and select Open iOS Simulator.
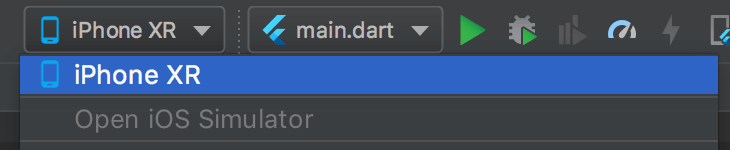
Your last selected simulator hardware will be chosen, which is iPhone XR for my case.
Click Run, which is the green triangle, and the app should open in your simulator. You should be able to interact with the Demo app and push a few buttons!
Building the Main Page
With the demo app running successfully, we are now ready to start building our first Flutter App!
Let’s start by deleting all the code in main.dart. Yes! Press command-a to select the whole code snippet and hit Delete.
Now we will begin to write the code from scratch. First, insert the following line of code to import the material package:
import 'package:flutter/material.dart';
This package is essential for building the UI of the app. To ensure that the app knows what to run after it finishes launching, add the main() method like this:
void main() => runApp(ContactlyApp());
It’s always a good practice to organize files into separate packages and put the constants in a separate. So, let’s create the helper package and the Constants.dart file to place some of our constant values we will be using in this app.
Right-click on the lib folder and then select New > Package. Name the package helpers.
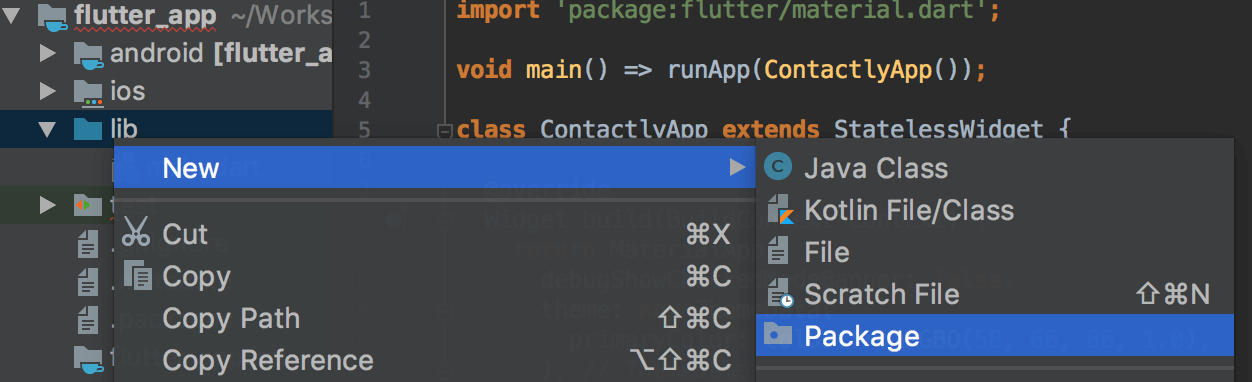
Now we have a separate folder to store our helper classes. To create a new dart file, right-click on helpers and then select New > File. Name it Constants.dart.
In Constants.dart, insert the following code:
import 'package:flutter/material.dart';

// Colors
Color appDarkGreyColor = Color.fromRGBO(58, 66, 86, 1.0);

// Strings
const appTitle = "Contactly";
Here we import the same material package, so we can use the Color declaration and declare an appTitle to be used app-wide.
Now head back to main.dart and add this import statement after the first import line.
import 'helpers/Constants.dart';
Let’s start building our Main Page by adding these lines of codes:
class ContactlyApp extends StatelessWidget {

  @override
  Widget build(BuildContext context) {
    return MaterialApp(
      debugShowCheckedModeBanner: false,
      title: appTitle,
      theme: new ThemeData(
        primaryColor: appDarkGreyColor,
      ),
    );
  }

}
MaterialApp is one of the convenience widgets which allows customisations like adding navigation routes, appBar etc. Setting debugShowCheckedModeBanner to false will get rid of the Red Debug label at the top right. We use our declared appTitle in our constant file here to give it a title. Then, we set the primaryColor.
All the code looks good here and you might be eager to try running it. If you really did, you will get a huge red-colored error screen!
This is because we are not yet ready to paint the canvas. Be Patient!
In most tutorials, they will guide you on building everything into main.dart. But I find that we could make it cleaner by separating each page into separate files, which you will be eventually doing so when building production-ready apps.
Meanwhile, Android Studio should indicate an error in the widget_test.dart file. Since we change the class name from MyApp to ContactlyApp, you should change the following line of code from:
await tester.pumpWidget(MyApp());
to:
await tester.pumpWidget(ContactlyApp());
Building the Login Page
Now let’s go ahead to create a new page called LoginPage.dart and place it under lib. Perform the same ritual of importing material package.
Here we will be creating a Stateless Widget since we don’t need to store any form of data. You can find more details about Stateless VS Stateful here.
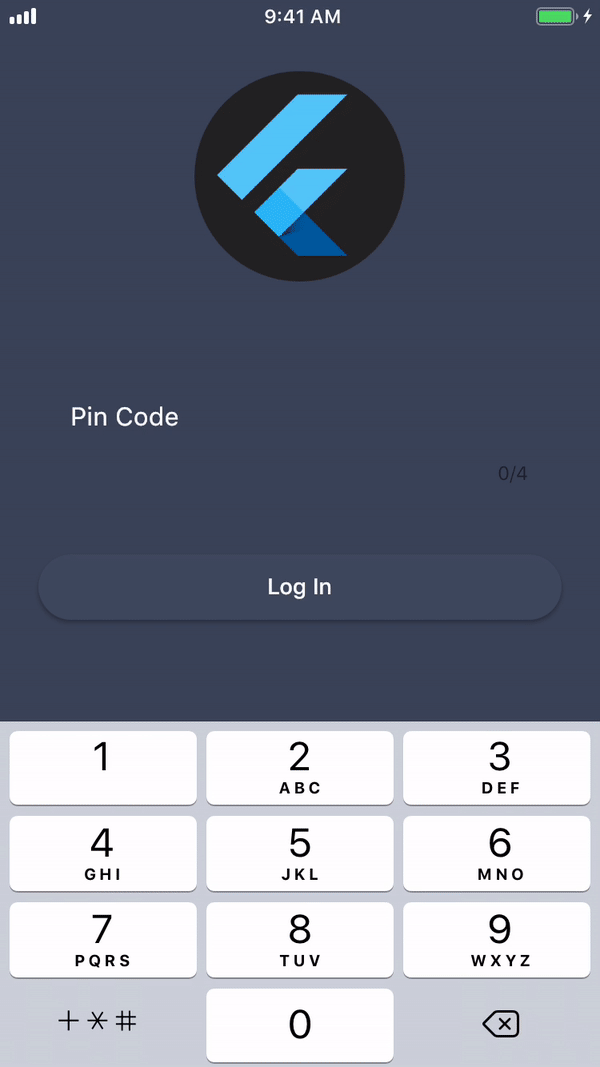
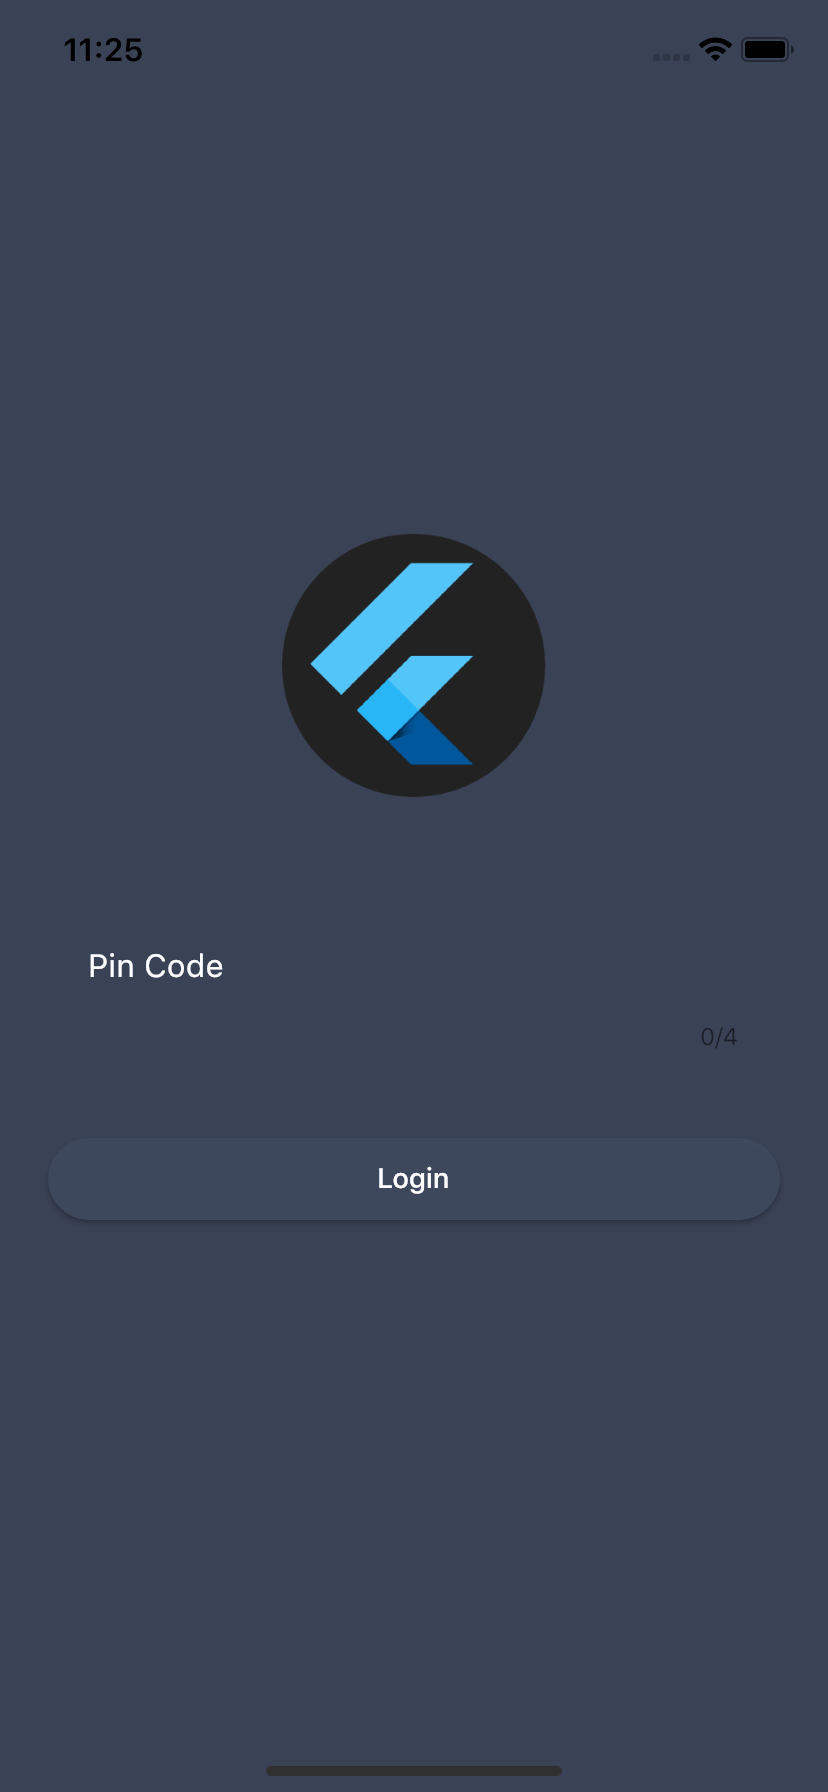
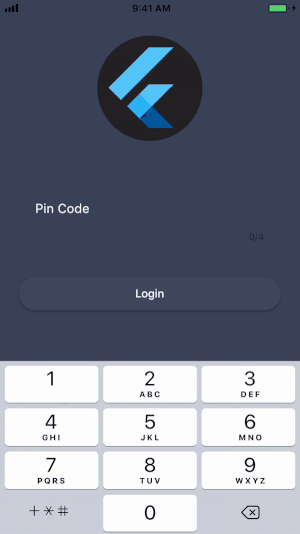
Before we go into the code, let’s look at how the login screen should look like:

As you can see, the screen has the following components:
- An Image Logo.
- A TextField with Placeholder.
- A Login Button.
To implement the screen component, insert the following code. Just copy & paste it first, we will go through them in awhile!
import 'package:flutter/material.dart';
import 'helpers/Constants.dart';

// 1
class LoginPage extends StatelessWidget {

  // 2
  final _pinCodeController = TextEditingController();

  // 3
  @override
  Widget build(BuildContext context) {
     // 3a
    final logo = CircleAvatar(
        backgroundColor: Colors.transparent,
        radius: bigRadius,
        child: appLogo,
    );

     // 3b
    final pinCode = TextFormField(
      controller: _pinCodeController,
      keyboardType: TextInputType.phone,
      maxLength: 4,
      maxLines: 1,
      autofocus: true,
      decoration: InputDecoration(
          hintText: pinCodeHintText,
          contentPadding: EdgeInsets.fromLTRB(20.0, 10.0, 20.0, 10.0),
          border: OutlineInputBorder(
            borderRadius: BorderRadius.circular(32.0),
          ),
          hintStyle: TextStyle(
              color: Colors.white
          )
      ),
      style: TextStyle(
        color: Colors.white,
      ),
    );

     // 3c
    final loginButton = Padding(
      padding: EdgeInsets.symmetric(vertical: 16.0),
      child: RaisedButton(
        shape: RoundedRectangleBorder(
          borderRadius: BorderRadius.circular(24),
        ),
        onPressed: () {},
        padding: EdgeInsets.all(12),
        color: appGreyColor,
        child: Text(loginButtonText, style: TextStyle(color: Colors.white)),
      ),
    );

     // 3d
    return Scaffold(
      backgroundColor: appDarkGreyColor,
      body: Center(
        child: ListView(
          shrinkWrap: true,
          padding: EdgeInsets.only(left: 24.0, right: 24.0),
          children: <Widget>[
            logo,
            SizedBox(height: bigRadius),
            pinCode,
            SizedBox(height: buttonHeight),
            loginButton
          ],
        ),
      ),
    );
  }
}
And, for the Constants.dart file, please update it like this to add a number of constants that we use in the build method:
import 'package:flutter/material.dart';

// Colors
Color appDarkGreyColor = Color.fromRGBO(58, 66, 86, 1.0);
Color appGreyColor = Color.fromRGBO(64, 75, 96, .9);

// Strings
const appTitle = "Contactly";
const pinCodeHintText = "Pin Code";
const loginButtonText = "Login";

// Images
Image appLogo = Image.asset('assets/images/flutter-logo-round.png');

// Sizes
const bigRadius = 66.0;
const buttonHeight = 24.0;
OMG! That’s a huge chunk of code! Yes, but no worries. This is the first time we are really going deep into huge piles of the Dart code. Trust me, after going through these, you will get more familiar with how Flutter works 🙂
I have broken down this large piece of code into 3 major parts so that we can digest them easier:
- As mentioned earlier, we will be creating a stateless widget for our
LoginPagehere. This is why we extend the class fromStatelessWidget. - Since the app has a text file for user input, we will instantiate an instance of
TextEditingControllerhere, which has a main responsibility of handling all text editing logic. - For the
buildmethod, it is required to be implemented when we extendStatelessWidgetto draw the UI canvas of the page. If we don’t implement the method, an error will be thrown. Furthermore, there are 4 other variables created here:- First, we have our
logo. It is embedded in a Circular Frame by using the CircularAvatar class. It also has anappLogoimage.If you run the app now, you will probably end up with an error saying that the image asset cannot be loaded. We know the path is given to load the Image but there are 2 missing pieces: the image itself and the path that we need to include inpubspec.yaml.First, you can get the logo image I use from here. Then, create a new directory called
assetsin the root directory, and create a sub-directory calledimages.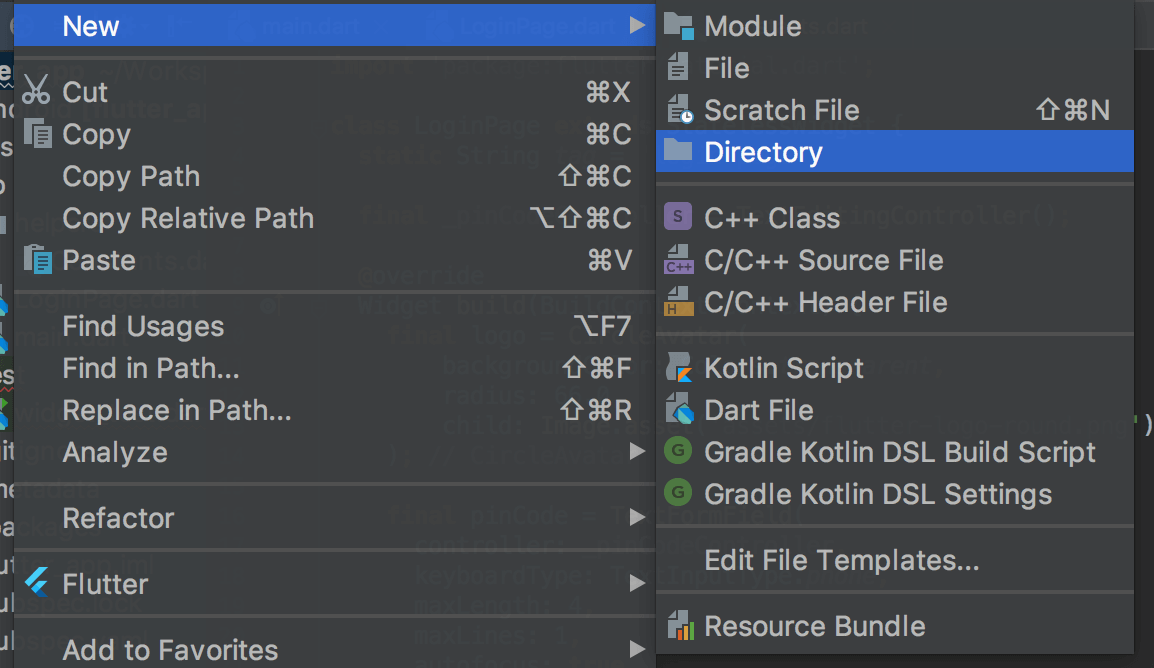
Your image should be placed in
root/assets/images.
Then, go to
pubspec.yamland add the following code to inform the app what assets to bundle together during runtime so it can be loaded.assets: - assets/images/flutter-logo-round.pngPlease note that you must add the configuration above to the `flutter:` section like this:
flutter: assets: - assets/images/flutter-logo-round.png - Now that we have our logo loaded properly, let’s move to the next UI item,
pinCode. It is a TextFormField. We set our_pinCodeControllerunder this TextFormField with a prefix_which tells the compiler that this variable isprivate. You can read thesettingsas most are self-explanatory likekeyboardTypeisphone,maxLengthis4characters,maxLinesis1,autoFocusset to true to straightaway trigger keyboard when page is displayed. We also give the textfield a simple styling usingdecorationandstyle. - Next, our
loginButton. We create a padding on all sides (left, right, top, bottom) using symmetric. We also use RaisedButton which automatically comes with the elevation UI effect when user interacts with it. - Lastly, we return the main UI structural class called Scaffold which sticks all our newly created UI components together in a ListView.
- First, we have our
That was like an Effiel Tower of Codes! UI codes are tough 😭
Before we run the app, we also need to tell our main() to run LoginPage as the home page. So, head back to main.dart and add home: LoginPage() after theme. Your build code should look like this:
@override
Widget build(BuildContext context) {
return MaterialApp(
debugShowCheckedModeBanner: false,
title: appTitle,
theme: new ThemeData(
primaryColor: appDarkGreyColor,
),
home: LoginPage() // just added
);
}
Also, you will need to import LoginPage.dart at the very beginning of the file:
import 'LoginPage.dart';
Now run the app! You should see the Login Screen like this:
Cool, right? Let’s continue to build the rest of the screens.
Building Contacts List Page
Now we are warmed up a little, we can go a bit faster. We will now build the main feature of this app, the Contact List page. We will create a new file called HomePage.dart. Once you created the file, make sure you import material package:
import 'package:flutter/material.dart';
Contacts List Page will be a Stateful widget since we need to maintain the state of our contacts data. So add these first few lines of boilerplate codes:
class HomePage extends StatefulWidget {
@override
_HomePageState createState() {
return _HomePageState();
}
}
class _HomePageState extends State<HomePage> {
}
The first class HomePage will be called and used when navigating/presenting the page, while the private class _HomePageState will be called everytime the HomePage is called. This is also the mutable state object which we will maintain as the page get called.
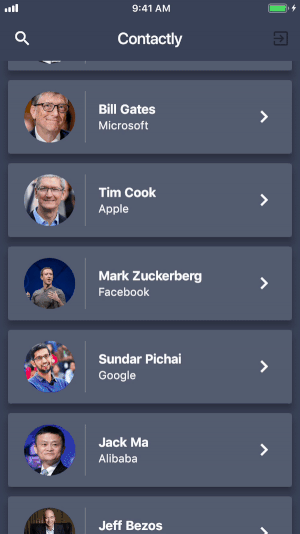
Before we dive into coding again, let’s look at how our contact list screen looks like:
There are many things that we will need to do here:
- Allowing navigation from
LoginPagetoHomePage(Routing). - Populating JSON data and map to ListView.
- Displaying the list of contacts
- Adding Search feature
Setting up the Routing
Let’s hook up our navigation route between LoginPage & HomePage. Head over to Constants.dart and add these tags:
// Pages
const loginPageTag = 'Login Page';
const homePageTag = 'Home Page';
Then, go to main.dart and add these just before our build function:
final routes = <String, WidgetBuilder>{
loginPageTag: (context) => LoginPage(),
homePageTag: (context) => HomePage(),
};
You will also need to import the HomePage.dart file:
import 'HomePage.dart';
The code above allows us to use tags to associate each individual page. 🙂 Finally, let’s add the routes to our build function just after home.
Widget build(BuildContext context) {
...
home: LoginPage(),
routes: routes
);
}
We can’t really test this out yet as we have not implemented the UI for our ListView. So, let’s do that first.
Populate JSON data and map to ListView
For this demo, I store all the contact data in a JSON file. You can download the sample JSON file here and create a data folder under assets. Put the records.json file into the folder. Then, update pubspec.yaml with the below asset configuration:
assets:
    - assets/images/flutter-logo-round.png
- assets/data/records.json
Now that we have prepared the JSON data, we will need to create:
- The
Recordclass to hold the data of each item. - The
RecordListclass to hold the list of data. - The
RecordServiceclass to perform the loading task.
Record Class to hold a Contact
First, let’s create a new models package under lib and create a new file named Record.dart. You can insert these lines of code into the file:
class Record {
  String name;
  String address;
  String contact;
  String photo;
  String url;

  Record({
    this.name,
    this.address,
    this.contact,
    this.photo,
    this.url
  });

  factory Record.fromJson(Map<String, dynamic> json){
    return new Record(
        name: json['name'],
        address: json['address'],
        contact: json ['contact'],
        photo: json['photo'],
        url: json['url']
    );
  }
}
Dart provides factory constructors to support the factory pattern. The factory constructor is able to return values (objects). Here it parses the given JSON string and returns a Record instance, which represents a contact.
RecordList Class to hold the list of Contacts
In the same models package, create another file called RecordList.dart. Then, put in these lines of code:
import 'Record.dart';

class RecordList {
  List<Record> records = new List();

  RecordList({
    this.records
  });

  factory RecordList.fromJson(List<dynamic> parsedJson) {

    List<Record> records = new List<Record>();

    records = parsedJson.map((i) => Record.fromJson(i)).toList();

    return new RecordList(
      records: records,
    );
  }
}
RecordService Class to perform the loading task
Lastly, create another file named RecordService.dart in the same package and insert the following code:
import 'RecordList.dart';
import 'package:flutter/services.dart' show rootBundle;
import 'dart:convert';

class RecordService {

  Future<String> _loadRecordsAsset() async {
    return await rootBundle.loadString('assets/data/records.json');
  }

  Future<RecordList> loadRecords() async {
    String jsonString = await _loadRecordsAsset();
    final jsonResponse = json.decode(jsonString);
    RecordList records = new RecordList.fromJson(jsonResponse);
    return records;
  }

}
Here, the loadRecords() function parses the records.json file and map it into a RecordList object, holding a list of Record objects. The keyword Future should be new to you if you are unfamiliar with Dart. To perform asynchronous operation in Dart, we use futures. Future objects (futures) represent the results of asynchronous operations.
Implementing the Home Page to list the Contacts
Now let’s use what we have implemented in our HomePage. Open the HomePage.dart and add these import statements at the very beginning:
import 'models/Record.dart';
import 'models/RecordList.dart';
import 'models/RecordService.dart';
Other than listing the contact records, the home page has a search feature that lets users search the contacts. So, first, declare the following variables in the _HomePageState class of the HomePage.dart file:
final TextEditingController _filter = new TextEditingController();

RecordList _records = new RecordList();
RecordList _filteredRecords = new RecordList();

String _searchText = "";

Icon _searchIcon = new Icon(Icons.search);

Widget _appBarTitle = new Text(appTitle);
Here is the purpose of each variable:
- We declared
_filterso we can implement a listener for our searches. - We declared
recordsto keep the state of our raw data, as well asfilteredRecordsto keep the state of searched data. - We use
_searchTextto validate our searches. - The
_searchIconis an Icon representation. - The
_appBarTitleis really just a text widget which we will use widely.
Since it’s a Stateful widget, we can add some small settings when the state is initialized:
@override
  void initState() {
    super.initState();

    _records.records = new List();
    _filteredRecords.records = new List();

    _getRecords();
  }

  void _getRecords() async {
    RecordList records = await RecordService().loadRecords();
    setState(() {
      for (Record record in records.records) {
        this._records.records.add(record);
        this._filteredRecords.records.add(record);
      }
    });
  }
In the init state of the home page, we empty our records data and get fresh data from the JSON file. Here we don’t need to really use an Async Call, but it is to introduce its concept and how you could call it if you were to perform a data fetch from a server.
Remember that in our previous section, we return a Scaffold in the build function as the main UI structure. So, continue to insert the following code to create the UI structure:
@override
  Widget build(BuildContext context) {
    return Scaffold(
      appBar: _buildBar(context),
      backgroundColor: appDarkGreyColor,
      body: _buildList(context),
      resizeToAvoidBottomPadding: false,
    );
  }
Like most ListView pages we have seen in mobile apps, there is a navigation bar at the top. In the code above, the appBar is the navigation bar. We specify to call _buildBar(context) to generate the bar, however, we haven’t implemented the function yet. So, continue to insert the following code:
Widget _buildBar(BuildContext context) {
    return new AppBar(
      elevation: 0.1,
      backgroundColor: appDarkGreyColor,
      centerTitle: true,
      title: _appBarTitle,
      leading: new IconButton(
            icon: _searchIcon
      )
    );
  }
Next, it’s the body. Again, we haven’t implemented the _buildList(context) function. Continue to add these lines of code:
Widget _buildList(BuildContext context) {
    if (!(_searchText.isEmpty)) {
    _filteredRecords.records = new List();
      for (int i = 0; i < _records.records.length; i++) {
        if (_records.records[i].name.toLowerCase().contains(_searchText.toLowerCase())
            || _records.records[i].address.toLowerCase().contains(_searchText.toLowerCase())) {
          _filteredRecords.records.add(_records.records[i]);
        }
      }
    }

    return ListView(
      padding: const EdgeInsets.only(top: 20.0),
      children: this._filteredRecords.records.map((data) => _buildListItem(context, data)).toList(),
    );
  }
Here, we handle the mapping of our RecordList data into our ListVew, and also handle any searches performed.
The final piece of our ListView is the UI for each ListViewItem. Let’s create the _buildListItem function:
Widget _buildListItem(BuildContext context, Record record) {
    return Card(
      key: ValueKey(record.name),
      elevation: 8.0,
      margin: new EdgeInsets.symmetric(horizontal: 10.0, vertical: 6.0),
      child: Container(
        decoration: BoxDecoration(color: Color.fromRGBO(64, 75, 96, .9)),
        child: ListTile(
          contentPadding:
          EdgeInsets.symmetric(horizontal: 20.0, vertical: 10.0),
          leading: Container(
              padding: EdgeInsets.only(right: 12.0),
              decoration: new BoxDecoration(
                  border: new Border(
                      right: new BorderSide(width: 1.0, color: Colors.white24))),
              child: Hero(
                  tag: "avatar_" + record.name,
                  child: CircleAvatar(
                    radius: 32,
                    backgroundImage: NetworkImage(record.photo),
                  )
              )
          ),
          title: Text(
            record.name,
            style: TextStyle(color: Colors.white, fontWeight: FontWeight.bold),
          ),
          subtitle: Row(
            children: <Widget>[
              new Flexible(
                  child: new Column(
                      crossAxisAlignment: CrossAxisAlignment.start,
                      children: <Widget>[
                        RichText(
                          text: TextSpan(
                            text: record.address,
                            style: TextStyle(color: Colors.white),
                          ),
                          maxLines: 3,
                          softWrap: true,
                        )
                      ]))
            ],
          ),
          trailing:
          Icon(Icons.keyboard_arrow_right, color: Colors.white, size: 30.0),
          onTap: () {},
        ),
      ),
    );
  }
This is a long chunky piece of code. We can again break down and digest this in a simpler way:
- We used a given material design class called Card to create our Card-Like UI.
- In each Card, we have a ListTile. And in each ListTile we have:
- leading:
CircleAvatarImage wrapped in Hero which will allow us to do some cool animation as we navigate to the detail page later. (Record’s Photo) - title: It holds the name of the contact.
- subtitle: It is wrapped in Flexible to allow growing texts.
- trailing: It is a right arrow icon to signify interactivity.
- leading:
After implementing all these, it’s almost ready to run the app and test it out! One last thing to make it work is to handle the onPressed event of the login button. Previously, we haven’t specified anything in the implementation. Now go to LoginPage.dart and change the onPressed event of the loginButton variable to the following:
onPressed: () {
          Navigator.of(context).pushNamed(homePageTag);
        },
That’s it! Hit the run button and try to navigate the app from the login page to the home page!
Adding Search Feature
To allow search capability, we have to enable the text editor’s listener. Insert the code below after the _buildListItem method of the HomePage.dart file:
_HomePageState() {
    _filter.addListener(() {
      if (_filter.text.isEmpty) {
        setState(() {
          _searchText = "";
          _resetRecords();
        });
      } else {
        setState(() {
          _searchText = _filter.text;
        });
      }
    });
  }

  void _resetRecords() {
    this._filteredRecords.records = new List();
    for (Record record in _records.records) {
      this._filteredRecords.records.add(record);
    }
  }
The search process starts by tapping the search icon. When the search is triggered, we will perform some UI changes:
- The search icon will change to the
closeicon. - The
appTitlewill become a search field. - As we input search the text, the list will reload and re-render with the filtered results.
So here is the code you need. Continue to add the following method to handle the search:
void _searchPressed() {
    setState(() {
      if (this._searchIcon.icon == Icons.search) {
        this._searchIcon = new Icon(Icons.close);
        this._appBarTitle = new TextField(
          controller: _filter,
          style: new TextStyle(color: Colors.white),
          decoration: new InputDecoration(
            prefixIcon: new Icon(Icons.search, color: Colors.white),
            fillColor: Colors.white,
            hintText: 'Search by name',
            hintStyle: TextStyle(color: Colors.white),
          ),
        );
      } else {
        this._searchIcon = new Icon(Icons.search);
        this._appBarTitle = new Text(appTitle);
        _filter.clear();
      }
    });
  }
In order to trigger _searchPressed(), add this method in onPressed to _buildBar:
Widget _buildBar(BuildContext context) {
    ...
    icon: _searchIcon,
    onPressed: _searchPressed
    ...
}
Now you’re ready to go! Try running the app now and perform some searches! like “Mark”.
Building Contact Details Page
To finish up our Contactly App, let’s build our final Details Page to allow the app to show some more info about a contact. Let’s look at how the final screen looks like first:
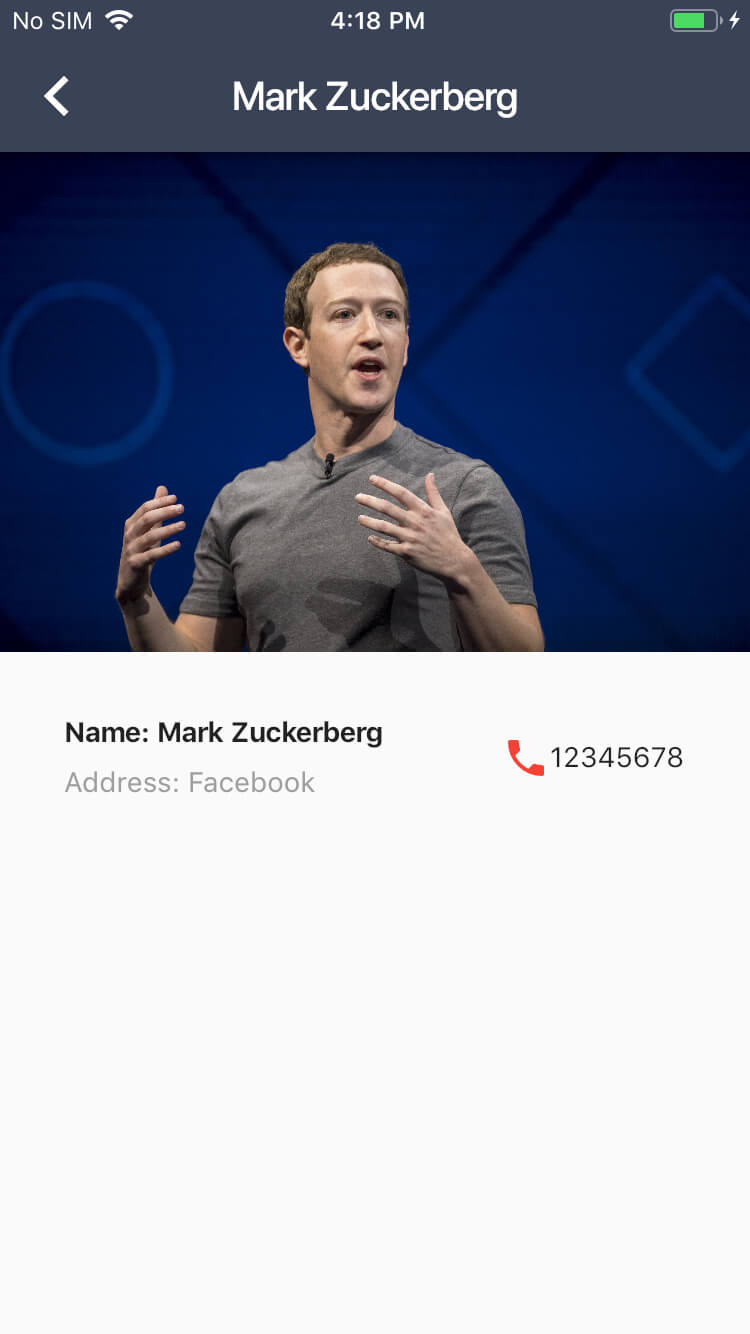
It shows the contact’s profile image, its name, address, and phone number. One hidden feature not shown here is to allow user to navigate to an external web browser to view the technology’s website. So let’s get started!
In lib, create a new file called DetailsPage.dart and paste in the following code:
import 'package:flutter/material.dart';
import 'models/Record.dart';

// 1
class DetailPage extends StatelessWidget {
  final Record record;
  // 2
  DetailPage({this.record});

  @override
  Widget build(BuildContext context) {
    return new Scaffold(
        appBar: new AppBar(
          title: new Text(record.name),
        ),
        body: new ListView(
            children: <Widget>[
              Hero(
                tag: "avatar_" + record.name,
                child: new Image.network(
                    record.photo
                ),
              ),
              // 3
              GestureDetector(
                   onTap: () {
                     URLLauncher().launchURL(record.url);
                   },
                  child: new Container(
                    padding: const EdgeInsets.all(32.0),
                    child: new Row(
                      children: [
                        // First child in the Row for the name and the
                        // Release date information.
                        new Expanded(
                          // Name and Address are in the same column
                          child: new Column(
                            crossAxisAlignment: CrossAxisAlignment.start,
                            children: [
                              // Code to create the view for name.
                              new Container(
                                padding: const EdgeInsets.only(bottom: 8.0),
                                child: new Text(
                                  "Name: " + record.name,
                                  style: new TextStyle(
                                    fontWeight: FontWeight.bold,
                                  ),
                                ),
                              ),
                              // Code to create the view for address.
                              new Text(
                                "Address: " + record.address,
                                style: new TextStyle(
                                  color: Colors.grey[500],
                                ),
                              ),
                            ],
                          ),
                        ),
                        // Icon to indicate the phone number.
                        new Icon(
                          Icons.phone,
                          color: Colors.red[500],
                        ),
                        new Text(' ${record.contact}'),
                      ],
                    ),
                  )
              ),
            ]
        )
    );
  }
}
Here is what this above code does:
- We create a
StatelessWidgetfor ourDetailsPage. - We create a constructor to take in a
Recordobject (i.e. the selected contact) fromHomePage. - Based on the
Recordobject, we build the UI and populate the following fields:- Photo
- Name
- Address
- Phone Number
- URL
You should notice a new UI component called GestureDetector. As its name suggests, this widget class is designed to detect touches. When a user touches one of the fields, the app will call URLLauncher().launchURL(record.url) to load the URL in a web browser. This URLLauncher class is not ready yet.
Let’s create a new file called URLLauncher.dart in the helpers directory.
To perform a url launch, we need to install a new package called url-launcher. To do this, we need to update our pubspec.yaml like this:
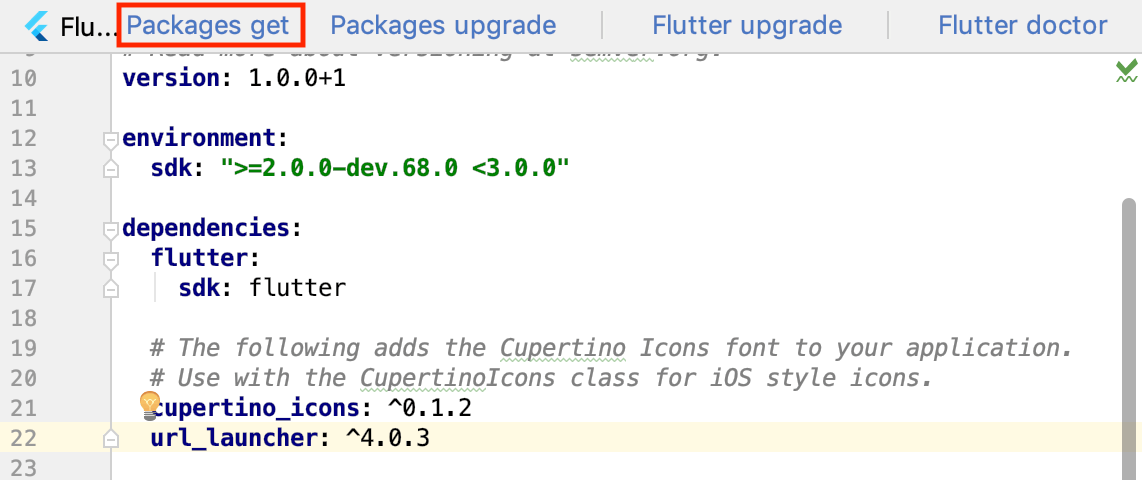
Here we add a line of configuration to load the url_launcher. After editing, run flutter packages get by hitting the Packages Get button. This is how we install extra packages to increase the capabilities of our app 🙂 Great! You have just gained another skill!
Now go back to URLLauncher.dart, insert the following code to implement the launchURL method:
import 'package:url_launcher/url_launcher.dart';

class URLLauncher {

  launchURL(String url) async {
    if (await canLaunch(url)) {
      await launch(url);
    } else {
      throw 'Could not launch $url';
    }
  }

}
Head back to the DetailsPage.dart file and import the file we just implemented:
import 'helpers/URLLauncher.dart';
Great! The last step is to enable the navigation from HomePage to DetailsPage. Head back to HomePage.dart and edit the onTap: event of the _buildListItem method like this:
Widget _buildListItem(BuildContext context, Record record) {
            ...
          onTap: () {
            Navigator.push(
                context, MaterialPageRoute(builder: (context) => new DetailPage(record: record)));
          },
        ),
      ),
    );
  }
Also, don’t forget to import the following file in HomePage.dart:
import 'DetailsPage.dart';
Viola! You are done with the app (not just iOS but Android too)! Run it and enjoy your great work 🙂
Conclusion
You have just gone through a very basic tutorial to get you started in developing on Flutter. In my own opinion, Flutter is developed based on the knowledge of popular mobile apps around where we can easily build UI components in just a few lines of codes. While its scalability is still questionable, we can see that Google and it’s community is investing a lot in this framework, and we could possibly forsee a bright future ahead for Flutter, striving past React Native.
You can download the finished project here.


