In this day and age, it is practically impossible to build a fully self-contained app that users will really like. As such, iOS developers are reaching out beyond the tools and resources provided by Apple for access to data and storage. A fantastic option for developers is the backend-as-a-service, or BaaS.
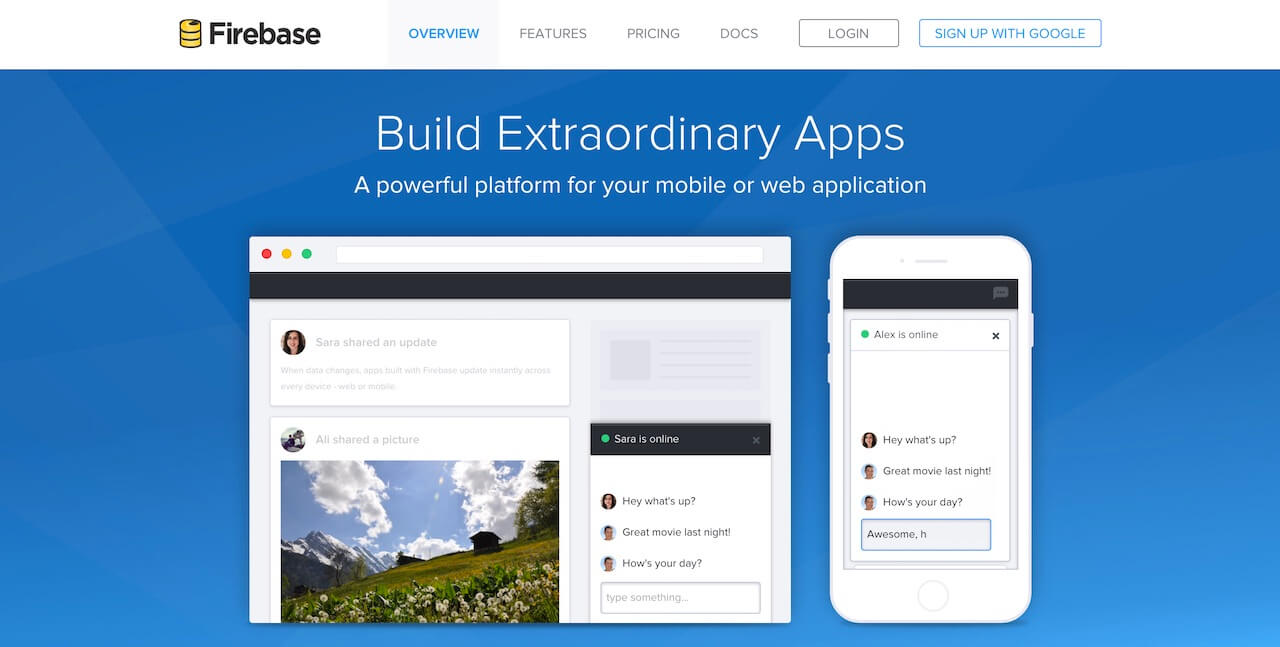
Among the best and most popular BaaSs is Google’s Firebase. Actually, Firebase is positively fantastic in performance, implementation, and upkeep. The key to Firebase’s immediate value is its realtime database that stores data in JSON. Any change in the database is immediately synced across all clients, or devices, that use the same database. In other words, Firebase is ridiculously fast; everything is updated instantly.
Firebase also offers user authentication along with storage, and all data is transferred via a secure SSL connection. For authentication, we can choose from any combination of email and password, Facebook, Twitter, GitHub, Google, or a custom solution.
In addition to iOS, Firebase has SDKs for Android and JavaScript. All platforms can share the same database, and Firebase scales apps automatically.
It’s tough to imagine Firebase being an affordable option with all of these features. So here’s the catch…
Nope, there is no catch. At the time of writing this tutorial, Firebase is free for up to 100 simultaneous connections. That’s a ton. 100 open network connections can support a pretty popular app. For $49 per month, the cap disappears.
About FirebaseJokes
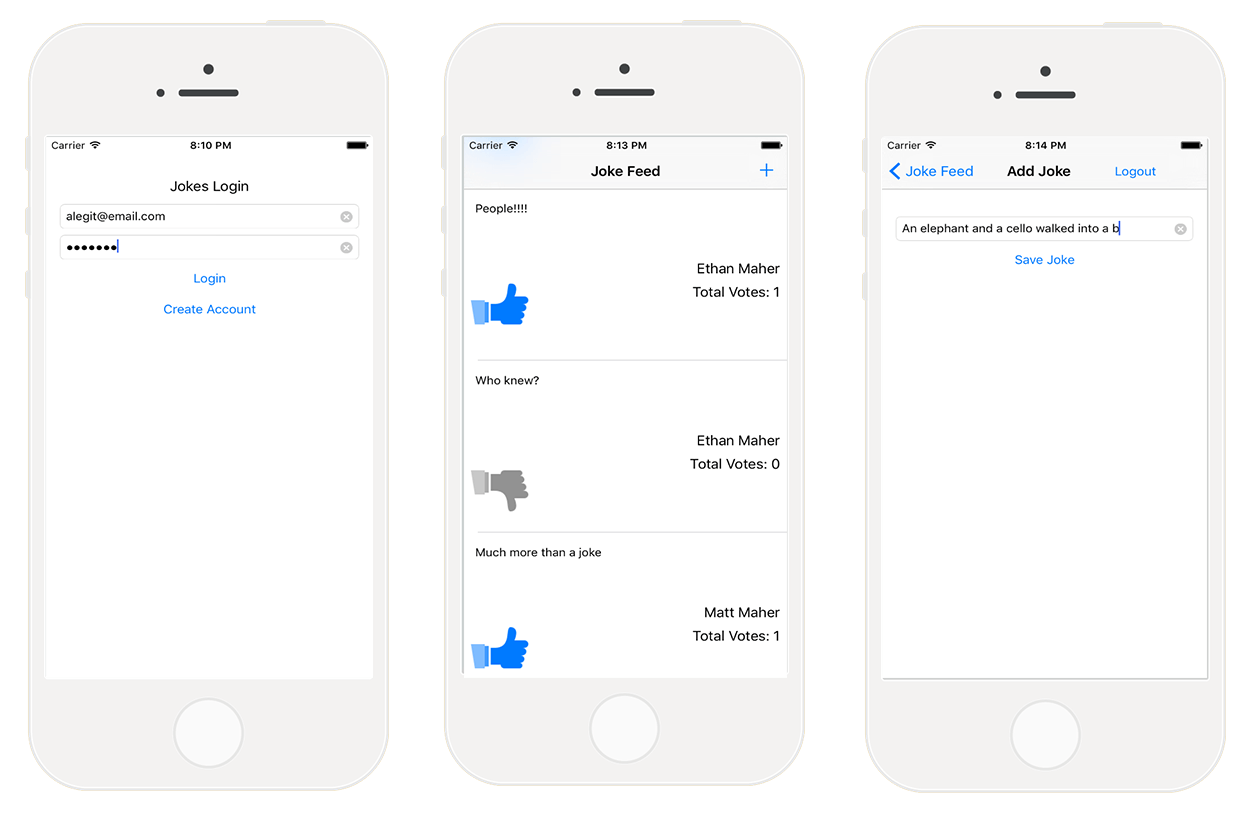
Today, we’ll be building a Joke posting app using Firebase. In the app, we will let users create an account and login using email and password. Users will be able to post a joke, and the table view will instantly update. The update will also immediately occur if another user posts a new joke. For fun, we’ll also add a voting function to the app, so the funniest jokes can receive the credit that they deserve.
Here’s a list of the features that we will implement into FirebaseJokes:
- Create an account
- Login with email and password
- Logout
- Skip login for logged in users
- Post new jokes
- Load jokes onto a UITableView with author and a vote count
- Vote for the good jokes
Let’s checkout the Starter Project.
First, let’s open Main.Storyboard to get a visual idea of the app.

As we progress through the app, we will travel, logically, from point to point to ensure that the implementation of Firebase makes sense. This is a great product, and it’s easy and fun to use. Building FirebaseJokes will be time well spent.
Time to Checkout Firebase
Let’s head over to Firebase and signup for a Firebase account, or login if you already have an account. The SIGN UP WITH GOOGLE option is a breeze. After signing up, we’re going to skip the 5 Minute Tutorial, as it is intended for JavaScript applications. We will, however, checkout an iOS version in a bit.
To get a look at what Firebase is all about, click Manage App in My First App. This new area is known as Firebase Forge. It is a very cool graphical debugger, and it’s worth taking the suggested tutorial. The Forge tutorial will guide you through creating keys, values, and even children using the plus symbol. Sort of has a JSON look to it, doesn’t it? To exit the brief Forge tutorial, click Dashboard in the upper-left corner of the screen.
Create a New App
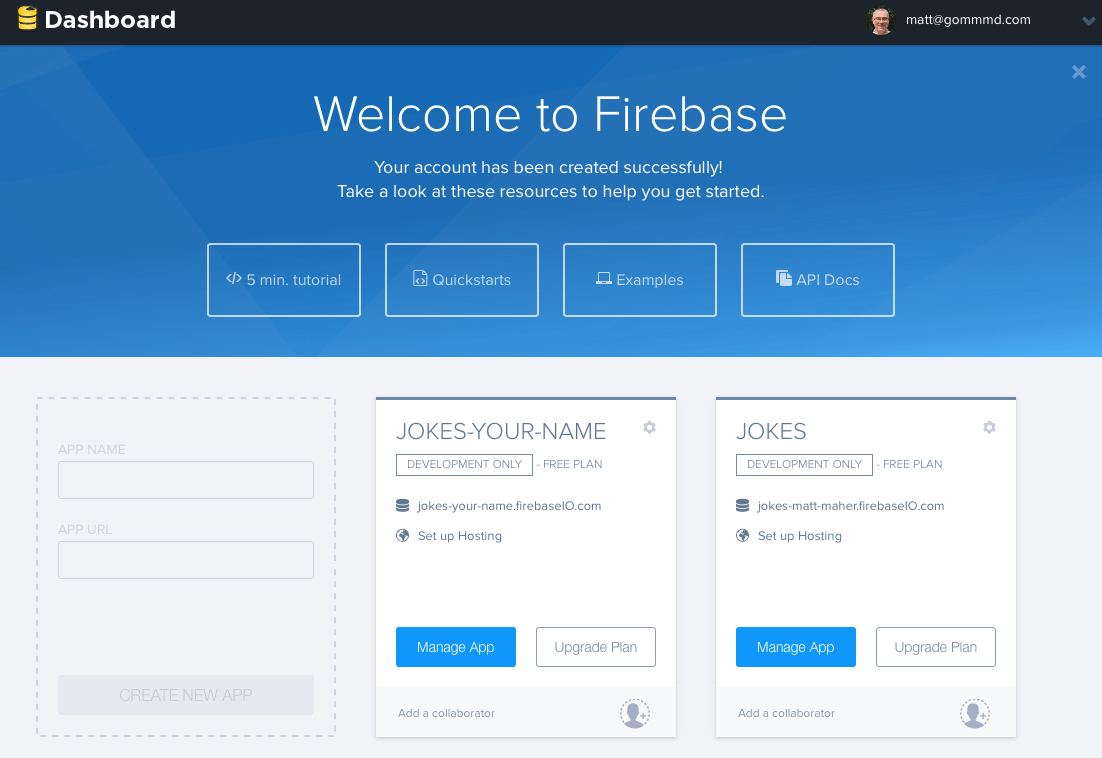
It’s time to create FirebaseJokes. To the left of My First App, click the faded box to create a new app. For the APP NAME, enter “Jokes”. In the APP URL field, enter “jokes-your-name”, with “your-name” being your personal name. This field must be unique, as it is the actual url for your app. Finally, tap CREATE NEW APP and then the Manage App button.
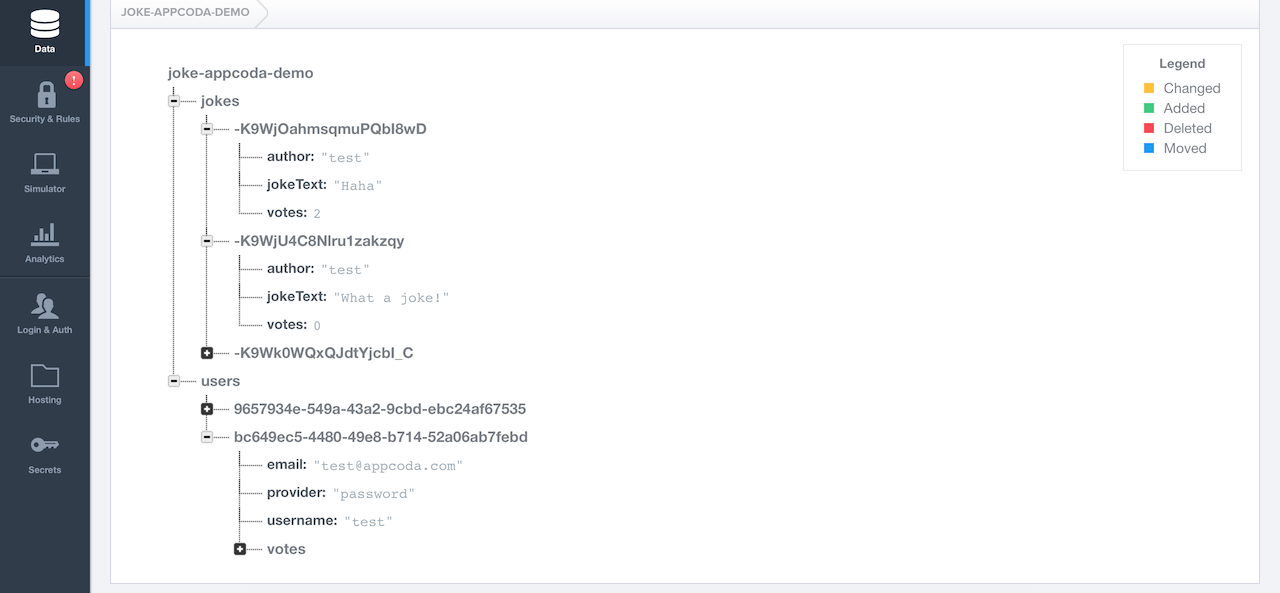
Here we are – our very own Forge screen. Here, we’ll actually be able to see the data instantly update as is does in our app. We can also enter app data directly into Forge. To get an idea of how our app will work, from a data perspective, we’ll enter some data manually.
- Click the Plus symbol in the jokes-your-name row.
- Enter “jokes” into the name field.
- Click the Plus symbol in the new jokes row.
- Enter a random number into the name field.
- Click the Plus symbol in the new random number row.
- Enter “jokeText” into the name field.
- Enter “What did one computer say to the other? 11001001010101” into the value field.
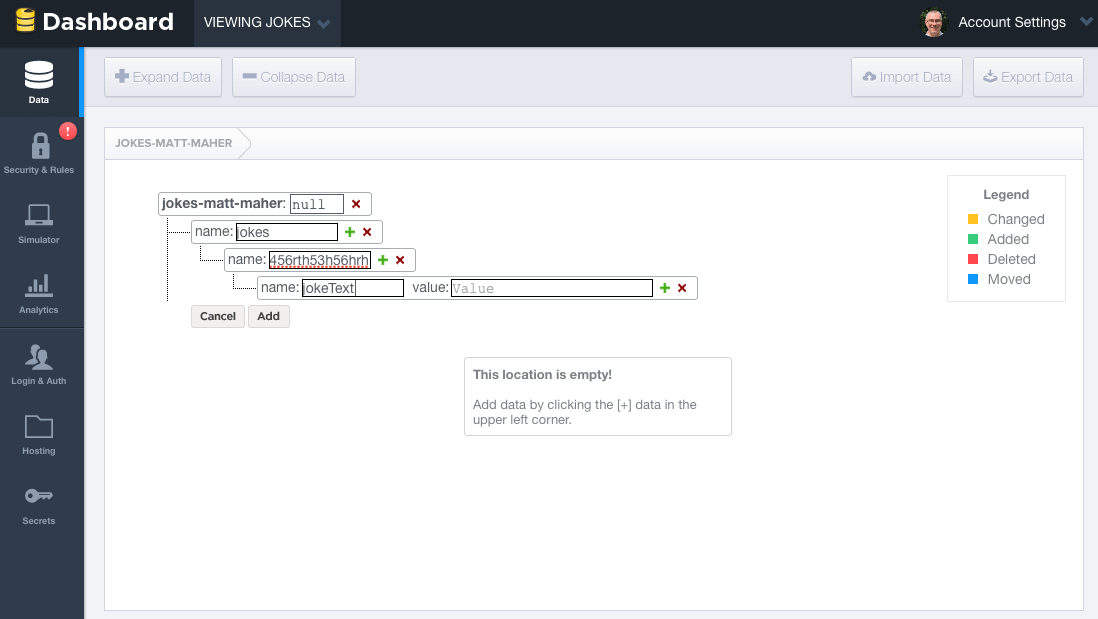
This is an example of how a joke will look. We’ll be adding a bit more to “jokes”, and we also need “users”, but it will look a lot like this. It’s fun and a good practice to peek back at Forge from time to time to look at the data created by an app.
One point I would like to point out is that all Firebase database data is stored as JSON objects. Unlike Parse, there are no tables or records. When we add data to Firebase’s database, it actually becomes a key in the existing JSON structure. For example, the data you just created looks as follows:
|
1 2 3 4 5 6 7 |
{ "jokes" : { "e32e223r44" : { "jokeText" : "What did one computer say to the other? 11001001010101" } } } |
Now that you have some basic understanding of Firebase database data, let’s move on.
But before we move on to user authentication, let’s delete the data that we created, as we’ll be doing it all programmatically from within the app.
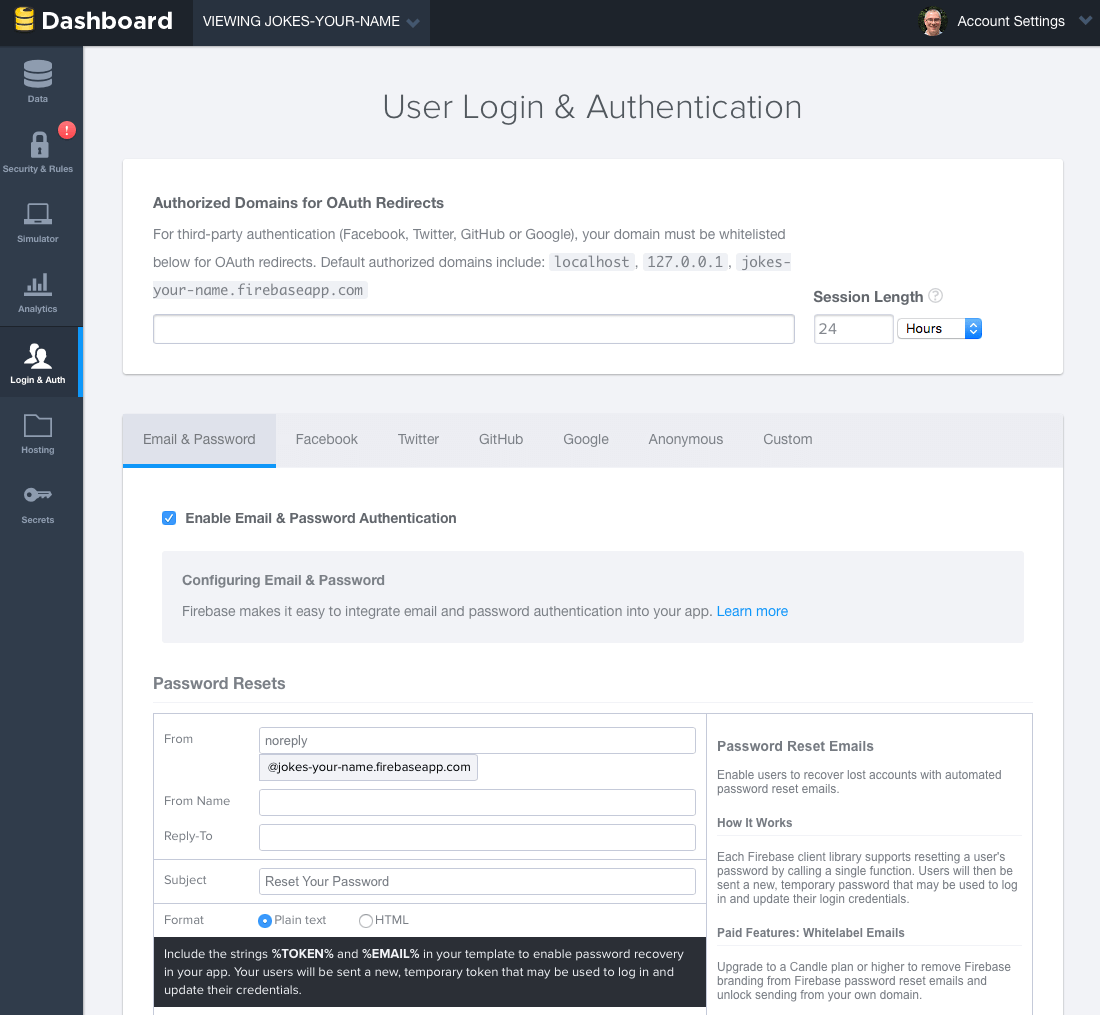
For FirebaseJokes, we will be using Email and Password authentication. To enable this feature, click Login & Auth in the left-side panel in Forge. In Email & Password, click the box to Enable Email & Password Authentication. This is also a good opportunity to browse. Just below the box that we clicked is information on password recovery. Also, it is worth looking through the other authentication options.
Installing Firebase SDK and Configuring the Base URL
To get the base url for our Firebase app, navigate back to Forge. The url for our Forge screen is the url for our app, so let’s copy it and paste is into BASE_URL in Constants.swift in Xcode.
|
1 2 3 |
import Foundation let BASE_URL = "https://jokes-matt-maher.firebaseio.com" |
Now, it’s finally time to install Firebase SDK into our app. Before we do that, however, we need CocoaPods. If you haven’t installed CocoaPods, excellent instructions for installing CocoaPods can be found directly from CocoaPods.
Once CocoaPods is up and running, open Terminal. Run the following commands to initialize Cocoapods in your Xcode project:
|
1 2 |
cd <your-xcode-project-directory> pod init |
And then type the following command to open the Podfile in Xcode:
|
1 |
open -a Xcode Podfile |
Next, edit the file like this:
|
1 2 3 4 |
platform :ios, '8.0' use_frameworks! pod 'Firebase', '>= 2.5.0' |
Then, run the following command to download the Firebase SDK:
|
1 |
pod install |
Now it’s time for Xcode. Make sure you open the FirebaseJokes.xcworkspace file to start coding.
Using Firebase SDK
First, we’ll be doing a little bit of setup in our DataService.swift file to make things a little easier. Primarily, we need some good references!
|
1 2 3 4 5 6 7 8 9 10 11 12 13 14 15 16 17 18 19 20 21 22 23 24 25 26 27 28 29 30 |
import Foundation import Firebase class DataService { static let dataService = DataService() private var _BASE_REF = Firebase(url: "\(BASE_URL)") private var _USER_REF = Firebase(url: "\(BASE_URL)/users") private var _JOKE_REF = Firebase(url: "\(BASE_URL)/jokes") var BASE_REF: Firebase { return _BASE_REF } var USER_REF: Firebase { return _USER_REF } var CURRENT_USER_REF: Firebase { let userID = NSUserDefaults.standardUserDefaults().valueForKey("uid") as! String let currentUser = Firebase(url: "\(BASE_REF)").childByAppendingPath("users").childByAppendingPath(userID) return currentUser! } var JOKE_REF: Firebase { return _JOKE_REF } } |
To use Firebase, all you need to do is import the Firebase framework. This DataService class is a service class that interacts with Firebase. To read and write data, we need to create a Firebase database reference with the Firebase URL. The base URL is the URL of our Joke database. Later we’ll save our users and jokes as child nodes. To access the child nodes, you can just append the node name (e.g. users) to the base URL. For easy access, we also create references to the child nodes.
Create a New User Account
CreateAccountViewController.swift is where we will start. As with all files that use Firebase, we’ll need to import it at the top.
|
1 2 3 4 |
import UIKit import Firebase class CreateAccountViewController: UIViewController { |
In createAccount(), we will collect the text from the fields and attempt to use them to create a new user. This occurs with Firebase’s createUser() method. Update the method like this:
|
1 2 3 4 5 6 7 8 9 10 11 12 13 14 15 16 17 18 19 20 21 22 23 24 25 26 27 28 29 30 31 32 33 34 35 36 37 38 39 40 41 |
@IBAction func createAccount(sender: AnyObject) { let username = usernameField.text let email = emailField.text let password = passwordField.text if username != "" && email != "" && password != "" { // Set Email and Password for the New User. DataService.dataService.BASE_REF.createUser(email, password: password, withValueCompletionBlock: { error, result in if error != nil { // There was a problem. self.signupErrorAlert("Oops!", message: "Having some trouble creating your account. Try again.") } else { // Create and Login the New User with authUser DataService.dataService.BASE_REF.authUser(email, password: password, withCompletionBlock: { err, authData in let user = ["provider": authData.provider!, "email": email!, "username": username!] // Seal the deal in DataService.swift. DataService.dataService.createNewAccount(authData.uid, user: user) }) // Store the uid for future access - handy! NSUserDefaults.standardUserDefaults().setValue(result ["uid"], forKey: "uid") // Enter the app. self.performSegueWithIdentifier("NewUserLoggedIn", sender: nil) } }) } else { signupErrorAlert("Oops!", message: "Don't forget to enter your email, password, and a username.") } } |
Assuming that there are no issues with the information entered by the prospective new user, the user will be created and logged into the app. For any missing information, we’ll display an alert. Therefore, insert the following method in the class:
|
1 2 3 4 5 6 7 8 9 |
func signupErrorAlert(title: String, message: String) { // Called upon signup error to let the user know signup didn't work. let alert = UIAlertController(title: title, message: message, preferredStyle: UIAlertControllerStyle.Alert) let action = UIAlertAction(title: "Ok", style: .Default, handler: nil) alert.addAction(action) presentViewController(alert, animated: true, completion: nil) } |
The actual saving occurs in createNewAccount() in DataService.swift.
|
1 2 3 4 5 6 |
func createNewAccount(uid: String, user: Dictionary<String, String>) { // A User is born. USER_REF.childByAppendingPath(uid).setValue(user) } |
To save data to the Firebase database, you can just call the setValue method. In the above code, it’ll save the user object to the users database reference under the given uid child node (e.g. /users/1283834/).
Other than saving the user to the Firebase database, we will be storing the uid for the user in NSUserDefaults. This will allow us to keep track of the current user.
Login a User
Before we dig too deep, let’s import Firebase into LoginViewController.swift. Here, we’ll check to see if someone is logged in already and attempt to log the user in if they are not.
In viewDidAppear(), we check if our stored “uid” is nil and if the user has an account. If the user passes, he or she can skip login. Otherwise, it’s time to punch in some credentials.
|
1 2 3 4 5 6 7 8 9 |
override func viewDidAppear(animated: Bool) { super.viewDidAppear(animated) // If we have the uid stored, the user is already logger in - no need to sign in again! if NSUserDefaults.standardUserDefaults().valueForKey("uid") != nil && DataService.dataService.CURRENT_USER_REF.authData != nil { self.performSegueWithIdentifier("CurrentlyLoggedIn", sender: nil) } } |
tryLogin() is the action method that is invoked when the user taps the Login button. Update the method like below and insert the helper method loginErrorAlert:
|
1 2 3 4 5 6 7 8 9 10 11 12 13 14 15 16 17 18 19 20 21 22 23 24 25 26 27 28 29 30 31 32 33 34 35 36 37 38 39 40 41 42 43 |
@IBAction func tryLogin(sender: AnyObject) { let email = emailField.text let password = passwordField.text if email != "" && password != "" { // Login with the Firebase's authUser method DataService.dataService.BASE_REF.authUser(email, password: password, withCompletionBlock: { error, authData in if error != nil { print(error) self.loginErrorAlert("Oops!", message: "Check your username and password.") } else { // Be sure the correct uid is stored. NSUserDefaults.standardUserDefaults().setValue(authData.uid, forKey: "uid") // Enter the app! self.performSegueWithIdentifier("CurrentlyLoggedIn", sender: nil) } }) } else { // There was a problem loginErrorAlert("Oops!", message: "Don't forget to enter your email and password.") } } func loginErrorAlert(title: String, message: String) { // Called upon login error to let the user know login didn't work. let alert = UIAlertController(title: title, message: message, preferredStyle: UIAlertControllerStyle.Alert) let action = UIAlertAction(title: "Ok", style: .Default, handler: nil) alert.addAction(action) presentViewController(alert, animated: true, completion: nil) } |
Firebase has built-in support for user authentication with email address and password. The tryLogin() method uses Firebase’s authUser() method to see if the email and password match a user account. If so, we save the “uid” and navigate into the app. If not, we alert them to try something else.
Now that the app is ready for user registration and sign on, it’s time to dive into the jokes.
The Joke Model
What is a joke? This philosophical question might be best answered later, or turned into a joke on FirebaseJokes. For us, we’ll be mapping out our Joke model.
Let’s navigate to Joke.swift and import Firebase. In our database, a joke will be represented by an odd-looking ID number. This auto-generated number will contain all of the joke’s properties, which are as follows.
- jokeText
- jokeVotes
- username (the joke’s author)
We initialize a new joke in init(), where the joke’s id, or key, and the jokes data, in dictionary format, will be passed.
|
1 2 3 4 5 6 7 8 9 10 11 12 13 14 15 16 17 18 19 20 21 22 23 24 25 26 27 28 29 30 31 32 33 34 35 36 37 38 39 40 41 42 43 44 45 46 47 48 49 50 |
class Joke { private var _jokeRef: Firebase! private var _jokeKey: String! private var _jokeText: String! private var _jokeVotes: Int! private var _username: String! var jokeKey: String { return _jokeKey } var jokeText: String { return _jokeText } var jokeVotes: Int { return _jokeVotes } var username: String { return _username } // Initialize the new Joke init(key: String, dictionary: Dictionary<String, AnyObject>) { self._jokeKey = key // Within the Joke, or Key, the following properties are children if let votes = dictionary["votes"] as? Int { self._jokeVotes = votes } if let joke = dictionary["jokeText"] as? String { self._jokeText = joke } if let user = dictionary["author"] as? String { self._username = user } else { self._username = "" } // The above properties are assigned to their key. self._jokeRef = DataService.dataService.JOKE_REF.childByAppendingPath(self._jokeKey) } } |
Adding New Jokes
In AddJokeViewController.swift, now would be a good time to import Firebase. Here, the user will enter a joke, and we will send it to where it needs to go to display, instantly, on all devices.
Starting in viewDidLoad(), we will get the current user’s username, so we can credit her or him as the author of the well-crafted new joke.
|
1 2 3 4 5 6 7 8 9 10 11 12 13 14 15 |
override func viewDidLoad() { super.viewDidLoad() // Get username of the current user, and set it to currentUsername, so we can add it to the Joke. DataService.dataService.CURRENT_USER_REF.observeEventType(FEventType.Value, withBlock: { snapshot in let currentUser = snapshot.value.objectForKey("username") as! String print("Username: \(currentUser)") self.currentUsername = currentUser }, withCancelBlock: { error in print(error.description) }) } |
When saveJoke() is called, the newJoke dictionary is created using the text from the jokeField, 0 for the current number of votes, and the current user’s username as the author. These values are assigned to their respective ids and sent over to createNewJoke() in DataService for saving.
Declare the following variable in the AddJokeViewController class:
|
1 |
var currentUsername = "" |
And update the saveJoke method like this:
|
1 2 3 4 5 6 7 8 9 10 11 12 13 14 15 16 17 18 19 20 21 22 23 24 |
@IBAction func saveJoke(sender: AnyObject) { let jokeText = jokeField.text if jokeText != "" { // Build the new Joke. // AnyObject is needed because of the votes of type Int. let newJoke: Dictionary<String, AnyObject> = [ "jokeText": jokeText!, "votes": 0, "author": currentUsername ] // Send it over to DataService to seal the deal. DataService.dataService.createNewJoke(newJoke) if let navController = self.navigationController { navController.popViewControllerAnimated(true) } } } |
We use a dictionary object to temporarily hold the joke data. The actual saving of the joke is passed to the createNewJoke method of DataService. In DataService.swift, add the createNewJoke method:
|
1 2 3 4 5 6 7 8 9 10 11 12 |
func createNewJoke(joke: Dictionary<String, AnyObject>) { // Save the Joke // JOKE_REF is the parent of the new Joke: "jokes". // childByAutoId() saves the joke and gives it its own ID. let firebaseNewJoke = JOKE_REF.childByAutoId() // setValue() saves to Firebase. firebaseNewJoke.setValue(joke) } |
Again, you can save the joke with the Firebase method, setValue(). But note that we use the Joke database reference and call the childByAutoId method. When childByAutoId is invoked, Firebase generates a timestamp-based, unique ID for each joke. This ensures that each joke is associated with an unique ID.
Logout the Current User
Normally, this would be placed in Settings or a Profile area, but we’ll go ahead and enable the user to logout in AddJokeViewController.swift. Actually, maybe this ought to be a joke.
logout() uses Firebase’s unauth() method to logout a user. In addition to logging out, though, we need to remove the user’s “uid” from our storage and send them back to LoginViewController.
Update the logout method like this:
|
1 2 3 4 5 6 7 8 9 10 11 12 13 14 15 |
@IBAction func logout(sender: AnyObject) { // unauth() is the logout method for the current user. DataService.dataService.CURRENT_USER_REF.unauth() // Remove the user's uid from storage. NSUserDefaults.standardUserDefaults().setValue(nil, forKey: "uid") // Head back to Login! let loginViewController = self.storyboard!.instantiateViewControllerWithIdentifier("Login") UIApplication.sharedApplication().keyWindow?.rootViewController = loginViewController } |
Forgetting to remove the user’s “uid” will cause issues when a new user tried to log into the app, and that is a good thing to avoid.
Displaying All of the Jokes
Finally it comes to the retrieval of data from Firebase. We’ll be listing all of the jokes in a UITableView located in JokesFeedTableViewController.swift. Here, we will import Firebase, to no surprise.
Beginning is viewDidLoad(), we set our observeEventType() method. Firebase data is retrieved by attaching an asynchronous listener to a database reference. This awesome method is not only called in viewDidLoad() upon navigation to JokesFeedTableViewController.swift, it is called whenever there is a change in the jokes side of our database.
|
1 2 3 4 5 6 7 8 9 10 11 12 13 14 15 16 17 18 19 20 21 22 23 24 25 26 27 28 29 30 31 32 33 34 35 36 37 38 39 40 |
var jokes = [Joke]() override func viewDidLoad() { super.viewDidLoad() // observeEventType is called whenever anything changes in the Firebase - new Jokes or Votes. // It's also called here in viewDidLoad(). // It's always listening. DataService.dataService.JOKE_REF.observeEventType(.Value, withBlock: { snapshot in // The snapshot is a current look at our jokes data. print(snapshot.value) self.jokes = [] if let snapshots = snapshot.children.allObjects as? [FDataSnapshot] { for snap in snapshots { // Make our jokes array for the tableView. if let postDictionary = snap.value as? Dictionary<String, AnyObject> { let key = snap.key let joke = Joke(key: key, dictionary: postDictionary) // Items are returned chronologically, but it's more fun with the newest jokes first. self.jokes.insert(joke, atIndex: 0) } } } // Be sure that the tableView updates when there is new data. self.tableView.reloadData() }) } |
A snapshot is provided by the method. Using this snapshot, we can build the array of jokes that we’ll be using to populate our tableView. For Firebase Jokes, we will be listing the newest jokes at the top. Since Firebase will return the jokes chronologically, by their creation time, we can just build the array backward.
As nice as it is to have a constantly up-to-date array of jokes, we should remember to reload the data in the tableView so everyone can see it.
The rest of our work is done between tableView:cellForRowAtIndexPath: and our custom cell, JokeCellTableViewCell.swift. In tableView:cellForRowAtIndexPath:, we send an individual joke to configureCell() in JokeCellTableViewCell.swift.
|
1 2 3 4 5 6 7 8 9 10 11 12 13 14 15 16 17 18 19 20 21 22 23 24 25 26 27 28 29 30 31 |
override func numberOfSectionsInTableView(tableView: UITableView) -> Int { return 1 } override func tableView(tableView: UITableView, numberOfRowsInSection section: Int) -> Int { return jokes.count } override func tableView(tableView: UITableView, cellForRowAtIndexPath indexPath: NSIndexPath) -> UITableViewCell { let joke = jokes[indexPath.row] // We are using a custom cell. if let cell = tableView.dequeueReusableCellWithIdentifier("JokeCellTableViewCell") as? JokeCellTableViewCell { // Send the single joke to configureCell() in JokeCellTableViewCell. cell.configureCell(joke) return cell } else { return JokeCellTableViewCell() } } |
configureCell(), in JokeCellTableViewCell.swift, is where we set the labels and listen for a vote tap.
|
1 2 3 4 5 6 7 8 9 10 11 12 13 14 15 16 17 18 19 20 21 22 23 24 25 26 27 28 29 30 31 32 33 |
func configureCell(joke: Joke) { self.joke = joke // Set the labels and textView. self.jokeText.text = joke.jokeText self.totalVotesLabel.text = "Total Votes: \(joke.jokeVotes)" self.usernameLabel.text = joke.username // Set "votes" as a child of the current user in Firebase and save the joke's key in votes as a boolean. voteRef = DataService.dataService.CURRENT_USER_REF.childByAppendingPath("votes").childByAppendingPath(joke.jokeKey) // observeSingleEventOfType() listens for the thumb to be tapped, by any user, on any device. voteRef.observeSingleEventOfType(.Value, withBlock: { snapshot in // Set the thumb image. if let thumbsUpDown = snapshot.value as? NSNull { // Current user hasn't voted for the joke... yet. print(thumbsUpDown) self.thumbVoteImage.image = UIImage(named: "thumb-down") } else { // Current user voted for the joke! self.thumbVoteImage.image = UIImage(named: "thumb-up") } }) } |
The UITapGestureRecognizer is set, programmatically, in awakeFromNib(). Also, we’ll be needing a Joke and Firebase reference.
|
1 2 3 4 5 6 7 8 9 10 11 12 13 |
var joke: Joke! var voteRef: Firebase! override func awakeFromNib() { super.awakeFromNib() // UITapGestureRecognizer is set programatically. let tap = UITapGestureRecognizer(target: self, action: "voteTapped:") tap.numberOfTapsRequired = 1 thumbVoteImage.addGestureRecognizer(tap) thumbVoteImage.userInteractionEnabled = true } |
In voteTapped(), another listener waits for the tap. In this method, the vote is saved to the current user’s “votes” with a key matching the key id of the joke, and a value of true. This is sent via the voteRef path created in configureCell().
|
1 2 3 4 5 6 7 8 9 10 11 12 13 14 15 16 17 18 19 20 21 22 23 24 25 26 |
func voteTapped(sender: UITapGestureRecognizer) { // observeSingleEventOfType listens for a tap by the current user. voteRef.observeSingleEventOfType(.Value, withBlock: { snapshot in if let thumbsUpDown = snapshot.value as? NSNull { print(thumbsUpDown) self.thumbVoteImage.image = UIImage(named: "thumb-down") // addSubtractVote(), in Joke.swift, handles the vote. self.joke.addSubtractVote(true) // setValue saves the vote as true for the current user. // voteRef is a reference to the user's "votes" path. self.voteRef.setValue(true) } else { self.thumbVoteImage.image = UIImage(named: "thumb-up") self.joke.addSubtractVote(false) self.voteRef.removeValue() } }) } |
voteTapped() also relays the tap as a boolean value to addSubtractVote() in Joke.swift. A true value means that the user has voted for the joke; whereas, false means that the user has not yet voted for it.
|
1 2 3 4 5 6 7 8 9 10 11 12 13 14 15 |
// Add or Subtract a Vote from the Joke. func addSubtractVote(addVote: Bool) { if addVote { _jokeVotes = _jokeVotes + 1 } else { _jokeVotes = _jokeVotes - 1 } // Save the new vote total. _jokeRef.childByAppendingPath("votes").setValue(_jokeVotes) } |
addSubtractVote(), in Joke.swift, uses the boolean value to add or subtract the vote from the joke. Then, Firebase’s setValue() method is used to update the vote in the Joke side of the database.
Test the App
Now you’re ready to test the app. Create a new user, and add a few jokes. You should be able to vote the jokes. And if you go up to the Firebase dashboard, you should see the users and jokes that have been created.
In Conclusion
We did it! This is a rather entertaining little app that users will love for its responsiveness. We’ve also gained valuable experience with Firebase.
Feel free to checkout the finished FirebaseJokes project on GitHub.
There are a world of possibilities with Firebase as an iOS developer. Working through FirebaseJokes will serve as a good start, but it is just the beginning.
Checkout some other user authentication options, add features to FirebaseJokes, explore some chat functionality; literally, the possibilities are endless.
A bit of advice regarding images: Firebase does have relatively modest storage allowances, so images should be stored elsewhere. Storage won’t be an issue with text-based apps like ours, but it would be a good idea to use another service for larger files.
Here’s to having a great time incorporating Firebase into your future projects!

A lifelong hobbyist, Matt went pro as a mobile developer in the early 2010s and has developed primarily iOS applications since; many of which are published on the App Store. In addition to his own projects, Matt has assisted in the build and upkeep of half of a decade’s worth of applications for clients in the US and around the world. In addition to his development work, Matt has nearly 15 years of teaching experience and is a Berklee educated jazz musician.
Comments
 Weinan Feng
AuthorThanks for the tutorial! Firebase is a great platform. I was thinking of moving onto Firebase since Parse announced shut down. However I finally decided to use Backendless because it has a easier solution for uploading photos which Firebase is lacking.
 ZappDev
AuthorYou could also try contentful.com. Pretty amazing tool, specially helpful with multiple images.
 Weinan Feng
AuthorThanks ZappDev! 🙂
 ZappDev
AuthorSweet, tutorial thanks. 🙂
 Josh S.
Author1. What if I wanted to make one of the authentication fields optional? For instance with the username.
2. How would I implement a “Forgot your password” feature?
 Grant Park
Author1. I’m not sure if that’s possible. Firebase provides anonymous authentication, however.
2. DataService.dataService.BASE_REF.resetPassword…
 Bionik6
AuthorNice tutorial.
But for your models you could use private setters instead of declaring a field private with an underscore and then write its getter method. Let’s see how we can implement this on your joke model:
class Joke {
private var _jokeRef: Firebase!
private(set) var jokeKey: String!
private(set) var jokeText: String!
private(set) var jokeVotes: Int!
private(set) var username: String!
// No need to write getter methods
}
 Simon Ng
AuthorThanks for your tips!
 John Tezuka
AuthorHi Simon,
I have tried reaching you through email multiple times over the past two weeks to no avail. I am unsatisfied with a recent purchase of the intermediate swift book, and would like a refund.
 Simon Ng
AuthorJohn, would you please send us email at support[at]appcoda.com? We will handle the request immediately.
 murat yasar
AuthorWow, thanks for the contribution!
 tranhieu
AuthorFirebase doesn’t support push notification, so sad. 🙁
 Simon Ng
AuthorYou may take a look at Batch.
https://batch.com/parse-replacement-with-firebase
 tranhieu
Authoryes, thank you, so, http://www.kinvey.com is the good choice.
 PrettyITGirl.com
Authorthanks to you, Simon. I discovered Batch, will use this in the future! THANKS!
 timbojill
AuthorCan you modify this to make an instagram/twitter type app ?
 Matt Maher
AuthorIt’s a good start. I’d keep the images somewhere else, though. https://imageshack.com is worth a look.
 murat yasar
AuthorWhy would you choose to keep the images somewhere else? Why is that a better option to storing images as data-uri in Firebase? Huge thanks for the informative tutorial btw.
 Tim R
Tim R
AuthorI am trying to integrate the login from this project what exactly am I doing wrong?
 Jerry Ray Matthew Raby
AuthorIt is more clean for me to add a validation check if the user is logged in within the app delegate and to update the root view controller to the navigation controller if so. This way the app doesn’t diplay the login screen for a brief second and auto loads the tableview.
 Matt Maher
AuthorVery good point – thanks for the contribution!
 DBC
DBC
AuthorHow would you do this in the app delegate?
 Jerry Ray Matthew Raby
AuthorTwo ways that I tried, each with a different impact. You can use
Firebase’s built in method to check if a user is authenticated
rootref.observeAuthEventWithBlock. Plug this into the app delegate
or you can add it to a helper class and call the function in the app
delegate from the helper class; if you use a helper class the function will need to have a completion block added to it so you can return if the user is logged in or not. If user is logged in you can change the root view controller to the navigation controller. I did this first and
it results in the app loading the login view and immediately after it
loads the navigation controller.
I wasn’t able to get this to load the navigation controller immediately on app start because the firebase method above has to listen for the authentication post. So instead I created a custom class to store the user object directly on the disk when the user is created or logged in. In the app delegates didFinishLaunchingWithOptions method, I check if the stored user object exists and load the nav controller if so. This results in the nav controller loading without ever displaying the login view. Only issue I didn’t check at first was that the user object is stored to the disk, but that doesn’t mean the user is still authenticated. By default firebase was terminating a session after a day. So in my home view I had to add a check to ensure the user was still logged in and if not ask them to update their login and logout the user if not. I liked this approach better for a more fluid UI. I changed the default session termination after this, but believed it would be good to keep it in the project.
 DBC
DBC
AuthorThank you!
 Raed Alahmari
AuthorI can’t figure it out? Can you help?
 Barbulescu Bogdan
AuthorHi Jerry, I cannot log my user out. Even if I delete the app, Firebase will keep the user logged in. Please see my question at http://stackoverflow.com/questions/39175359/firebase-user-can-not-be-logged-out-swift . Many thanks
 marlon monroy
AuthorYES THATS HOW IT SHOULD BE DONE
 Alan Browning
AuthorI’m stuck on importing the Firebase framework. Xcode keeps complaining that there’s “no such module”. I’ve installed cocoapods according to the instructions, my Podfile matches the tutorial, and I’m using the unaltered starter file. What gives?
 ZappDev
AuthorDid you open the project file or the workspace? You should use the workspace file when using Cocoapods.
 Dino Costa
AuthorHere’s the tutorial you should follow to install Firebase: https://www.youtube.com/watch?v=009UrLVlAbo.
After running ‘pod install’ you have to open the .xcworkspace file in xcode, then create a new Objective-C file named ‘Temp’ in you project folder and in the .h file write
#import
You can now delete your Temp.m file and Firebase and now you can use ‘import Firebase’ in your .swift files.
 Alan Browning
AuthorThanks Dino! The bridging header did the trick.
This is a great tutorial, but it’d be even better if it were updated with this info. 🙂
 murat yasar
AuthorThanks a lot for the tutorial Appcoda! Please make a part 2 tutorial to this one!
Best, Murat
 fbara
fbara
AuthorIt worked great for me and was very helpful. Thanks!
 thecodelady
AuthorQuestion: When I add a new joke the table view reload the entire array so that it shows duplicate entries. Any suggestions on how to fix this? For ex: Table shows JokeA, JokeB, JokeC. I add JokeD and when the table reloads it shows Joke D, JokeA, JokeB, JokeC, JokeA, JokeB JokeC. Any help would be greatly apprecitated. i have self.jokes.insert(joke, atIndex:0) but really not sure why this is happening.
 HafizDeveloper
AuthorWOW I must say. Once again a great job thumbs up well don to the Appcoda team. Just one question: How can we have a profile image. So like the user can set a profile image. Please teach us how to do that 🙂 Anyways just subscried to the newsletter. Great JOB guys. You guys ROCK @Simon Ng @Matt Maher
 Bionik6
AuthorYou just upload the image to another service like Amazon Web Services and you store the url of that image in your Firebase “table”.
 Sean Lee
Author@Bionik6:disqus : If I were to modify this app to a short-video/photo sharing app, how and where should I store these files? AWS, iCloud using CloudKit (can’t be independent from iCloud auth, right?)? Is Firebase even an option? Thanks!
 Bionik6
AuthorNo, Firebase won’t store the video or photo. You just apply the same technique. You could write a function to upload the resource (image or video) to the cloud (AWS or iCloud), then you store the link or that resource to firebase. I think this is the best option.
 Sean Lee
AuthorI see. If you don’t mind a newbie like me asking few more questions: (1) when storing resources to AWS or iCloud, how do I make sure that the author but not other users has rights to edit/delete. (2) Do you know of good ways to learn how to work with AWS Mobile Hub in Xcode (Swift)? (3) Does Parse provide handy solution to this situation? Understanding that it is going away, I’m just curious to know whether Parse, as it is today, would be a workable solution. Many thanks!
 Bionik6
AuthorThe response for your questions:
1- You could write custom code for that, it will depend to the app you’re building, if it’s a sharing photos/videos app, you just retrieve the resources from the cloud and show that without giving options to edit or remove it.
2- A good way to learn more about those services will be to read first their documentation and trying to integrate them in some sample projects.
3- Parse will shutdown the next year and people are migrating to other services, so I don’t see why you would like to integrate it in your apps?
 Sean Lee
AuthorHuge help. Many thanks.
 HafizDeveloper
AuthorHow do I order all the posts from newest to oldest?
 makthrow
Authorisn’t this an error?
NSUserDefaults.standardUserDefaults().setValue(result [“uid”], forKey: “uid”)
getting an nil error when NS User defaults tries to retrieve forKey “uid”
 Aduantas
AuthorHi Matt, this is a very nice tutorial. Thanks for this. When I’m running the app in the simulator, I run into an error when I try to create a user, which then crashes the app. The error is
‘FirebaseInternalError’, reason: ‘For a custom Firebase host, you must first set your authentication server before using authentication features!’
I wonder if you, or any other people following the tutorial, have run into a similar problem, or know what might cause this. I’m only using email and password authentication.
 skyracer
AuthorI have been able to get pretty far in my own app thanks to your tutorial 🙂
In my app, user’s vote (in the form of string) is being passed to the tableview from another VC. As a result I would like to call addSubtractVote() from didSelectRowAtIndexPath while keeping the reference to the username, can you give me some pointers as to how to achieve that? Thanks!
 Steve
Steve
AuthorI don’t get why you’re making these weird Java style setters. Swift is generating these for you! If you need to intercept setting or getting then use property observers. All this boilerplate Java code is totally wrong.
 domino
Authorhi,great tutorial.how can i return the jokes ordering them by the number of likes?
 Richard Walsh
AuthorThis was a great getting started tutorial, but for some reason, in my tableview it is returning a dictionary id as jokeText value.
For example it is returning, BKcb3siVskWH, I’ve copied the code line for line from above, and when I look at my firebase dashboard that key is no where to be found. When I print out lines in the init method for Joke, the value is there and correct. But once it hits configureCell it outputs BKcb3siVskWH.
 James Hartley
AuthorHow would you implement this into an already built app? I have tried, but the logout and others don’t allow a way to go back to the other areas of the app.
 James Hartley
AuthorHow can you make the logout button go back to a different place? When you logout, it shows the login page without navigation at the top, so there is nowhere to go.
 James Hartley
AuthorIs there anyway to put the date in there? Maybe below the vote count to show when the user posted? Is that possible?
 Isuru Nanayakkara
AuthorThanks for the tutorial. I especially admire adhering to MVC and putting logic in separate classes instead of throwing it all inside the view controller simply because this is a tutorial project. It’s nice to learn good practices along the way.
 Razvan Julian
AuthorCould you help me to fix: “fatal error: unexpectedly found nil while unwrapping an Optional value
(lldb)”?
 DBC
DBC
AuthorI found that if I have this app on two devices and I touch the vote button on each device at the same time for the same joke, it only updates the total votes by 1 but it should update by 2. Same if I remove two votes at the same time. Any idea why this is occurring?
 Rioodi
AuthorCan you explain it more if you don’t mind
 Rioodi
AuthorHi,
I used the joke ref so I can delete the joke but the problem is that I can delete any joke that other people add. Anyone tried to solve it?
 Charles Kang
AuthorWhen I first completed the tutorial, my signup and login were working completely fine. Now I cannot sign up. Login is fine, but for some reason I keep getting an invalid email address whenever I try and sign up
I’ve tried using the exact same parameters in the tutorial app and in my app, but for some reason I keep getting this error.
Here are both gists:
https://gist.github.com/charleshkang/59c65570b56dcb7d6821f4ac771dbc37
https://gist.github.com/charleshkang/f8e2398c2ce0f004342264e05c82ba76
 Tsaraboulidis Agis
AuthorHey there i would like to ask with the current setup, how i can upload photos to firebase. i mean that i want the user to choose a photo when his is create an account and then this photo will be uploaded to firebase. How i can achieve this?
 Charles Kang
AuthorDataService.dataService.CURRENT_USER_REF.observeEventType(FEventType.Value, withBlock: { snapshot in
let currentUser = snapshot.value.objectForKey(“username”) as! String
self.currentUsername = currentUser
}, withCancelBlock: { error in
print(error.description)
})
}
let currentUser = snapshot.value.objectForKey(“username”) as! String is giving me insane problems. i’m getting a [NSNull objectForKey] unrecognized selector error, and I’m really not sure where I should be looking. I’ve looked throughout my other files and it has to be happening in this section of code?
 Alex
Alex
Authoris it the same updating a picture?
 Martyn
AuthorI’m having issues when I click to add a joke, I log in fine and get passed straight to the joke feed, but when I click + I get the following error:
fatal error: unexpectedly found nil while unwrapping an Optional value
let currentUser = snapshot.value.objectForKey(“username”) as! String
I’m guessing its getting no user passed across, how would I fix this?
I’ve even tried just loading the completed demo but I get the same error
 Raed Alahmari
AuthorThis tutorial need code update Firebase changed everything
 allenlinli
AuthorStuck from here. I think Firebase uses a different API now.
private var _BASE_REF = FireBase(url: "(BASE_URL)")
 kazim
kazim
AuthorI’m struck here as well, any guide ?
and here as well
var JOKE_REF: Firebase {
return _JOKE_REF
}
 ranzrrx
Authornot working on last version. new ppl do not loose the time!
 Martyn
AuthorDid you manage to get this working before the firebase update, I cant seem to pass the current logged in user to add joke
 Alberto Hirota
AuthorI have the same issue
 Charles Kang
AuthorPlease update this after the Firebase update, I’d really love that because right now I’m having a lot of issues post-update 🙁
 Waseef Akhtar
AuthorI’ve had issues with Firebase update. What I did was use the Legacy Dashboard instead. And instead of installing the framework via Podfule, I installed it manually: https://www.firebase.com/docs/ios/alternate-setup.html
By installing it manually, you also need a Objective-C Header-Bridging file because all the dependencies are written in Objective-C.
 Magnus Singer
AuthorIs this project open-source?
 guest_dev
AuthorFor readers, please check the upgrade guide for Firebase 3.0 as some old implementation might be deprecated.
Official guide: https://firebase.google.com/support/guides/firebase-ios#import_your_project_to_the_new_firebase_console_numbered
 Waseef Akhtar
AuthorThis works perfectly!
Two things that I’d like to include are that:
a ) I couldn’t use Firebase( ) because of new updates to Firebase framework. What I did was not install it via Podfile but rather manually, as documented here: https://www.firebase.com/docs/ios/alternate-setup.html
b ) The Add Joke gives a run-time error because the username does not get saved into the database when creating a new account. To resolve this, change
let user = [“provider”: authData.provider!, “email”: email!, “username”: username!]
in the createAccount( ) method in CreateAccountViewController. That should solve the issue.
 Collins
AuthorWorking on an Android version of the same. Are there major changes are should make on the code?
 Pejo Zmaj
AuthorGreat tutorial, but, will it be updated to Firebase 3.0?
Also how about to check if username is already in use, and how about inserting “repeat password” with checking if password is same in “password” field and “Repeat password” field?
I am trying to make similar app with inserting images instead of jokes, but I am stuck on Firebase erro, because I have installed Firebase 3 pods, and this codes are for Firebase 2.
Hope soon we will se update, in that reason, I have sign for newsletter. 😉
 Alberto Hirota
Authordid you fix all the issues with firebase 3?
 Pejo Zmaj
AuthorYes Alberto, thanks. 😉
I manage to resolve all problems with Firebase 3 and Swift 2.2, even learn some new tricks. Thanks.
 Alberto Hirota
Authorcould you share, how did you solve it? I would really appreciate
 Egemen Okur
AuthorHi guys did you fix the problem with updating it ?
 Alberto Hirota
AuthorYes, I did
 Egemen Okur
Authorhow did you solve it , can you send it to me
 Egemen Okur
Authorhow did you solve it , could you send me the project via github or email please ?
 Egemen Okur
Author[email protected]
 Egemen Okur
Authoralberto ? can you send it to me please i need it really fast .. [email protected]
 Alberto Hirota
Authorjust sent you
 Pejo Zmaj
AuthorAlberto, here is where I resolve my problem:
https://www.youtube.com/channel/UCOMjxHuYV0xJEC1v0ovVQIg
Great tutorials from guys named Zero2Launch. I used their code and approach, I learn from them a lot.
Be aware that code will change a bit in a month, because Swift 3 is on the way, and codes are a little different, but basically it is very very similar, almost same.
Firebase register/login/logout codes will stay same, only you’ll have to adjust it for Swift 3.
 Rioodi
AuthorI hope the app will it be updated to Firebase 3.0
 frank miller
Authorthe Logout button does not work in the code!?
 Vatsal Shukla
AuthorHello Sir,
i’ve a question about child node in firebase.
Database Structure
(1) users (root)
(1.1) childByAutoId
(1.1.1) username
(1.1.2) email
Question
how to check that username = foo is available or not?
 Vatsal Shukla
AuthorHello Sir,
i’ve a question about child node in firebase.
Database Structure
(1) users (root)
(1.1) childByAutoId
(1.1.1) username
(1.1.2) email
Question
how to check that username = foo is available or not?
 Anant Kumar
AuthorI see a bunch of “undeclared type ‘Firebase'” errors. Help is appreciated.
 kazim
kazim
Authormee too any help ??
 kelomaniack
AuthorHi, thank you very much, but the whole project is deprecated.
It needs to be updated to the lastest version of Firebase.
Otherwise it is not much of a help…
 ahmad labeeb
Authoris there an update for swift 3 and xcode 8.3.3
 ranzrrx
Authori am getting a lot of errors in Xcode 8 and iOS10.10…:(
 Pedro Solís García
AuthorHi! Nice tutorial this one! But unfortunatelly, Firebase has been updated and with it, the way of codding may of its features… I checked the GitHub project and it seems that it has not been updated since before Firebase has been updated.
Are you or someone planning to create a new post about managing Firebase database and storage (images etc.)? It would be great to complete the posts provided by your colleagues Simon and James.
Thanks to you and all your team for providing such useful information and tutorials!! You are really amazing!
 Florian Marcu
AuthorWow, this is awesome. I was able to build http://iosapptemplates.com/templates/firebase-ios-shopping-app-template, using this tutorial. Thank you so much!!
 Jackie
AuthorWhat a shame this has never been updated. I hope some day it is.