
Quite often it’s required from iOS applications to be capable of performing search in specific data that is displayed in a tableview. Undoubtably, most of developers have faced that situation, and the most usual approach to that is to use the default controls that the iOS SDK provides. Up to iOS 8, Apple was providing a special control for performing searches in tableviews named UISearchDisplayController. This controller, in conjunction with the UISearchBar was making possible to add search features quite easily in an application. Nevertheless, this belongs to history now.
Since iOS 8 coming, things changed a bit. First of all, the UISearchDisplayController has been deprecated, even though it’s provided as an available control in the Interface Builder’s controls collection in Xcode. A new controller named UISearchController has been given in its place. In spite of this change though, no visual control exists for it in the controls collection in Interface Builder; instead, it must be initialized and configured programmatically, but this is a really easy task, and you’ll see that later on.
Besides all the above, there’s another interesting point regarding the searching in a tableview datasource. iOS SDK provides a predefined appearance for the search bar, and that bar is suitable in many cases. However, when the UI of the app is highly customized, then it’s quite possible the default search bar format not to fit in the whole look and feel of the app. In that case the search bar must be customized appropriately so as to be a non-distinguishable part of the app ecosystem.
So, having said all the above, it’s time to present shortly what this tutorial is all about. I could say that through this text I’m aiming in two things: My first goal is to demonstrate how the new UISearchController presented in iOS 8 can be used so it’s possible to search and filter data using the default iOS search bar. You’ll see through the sample code we are about to write that configuring it it’s an easy process, regardless the fact that a visual control in the Interface Builder doesn’t exist.
My second goal is to show you how you can override the default search bar appearance and customize it according to the app look and feel. As you’ll see next, we have to subclass both the UISearchController and the UISearchBar classes, but the code we’ll add to them is straightforward enough. Actually, the subclasses we’ll implement in the following parts will be made in a quite general way, so you can reuse them in your projects as well.
At this point this introductory part comes to its end, so let’s go to see first of all the demo app details, and then let’s bring it in life.
Demo App Overview
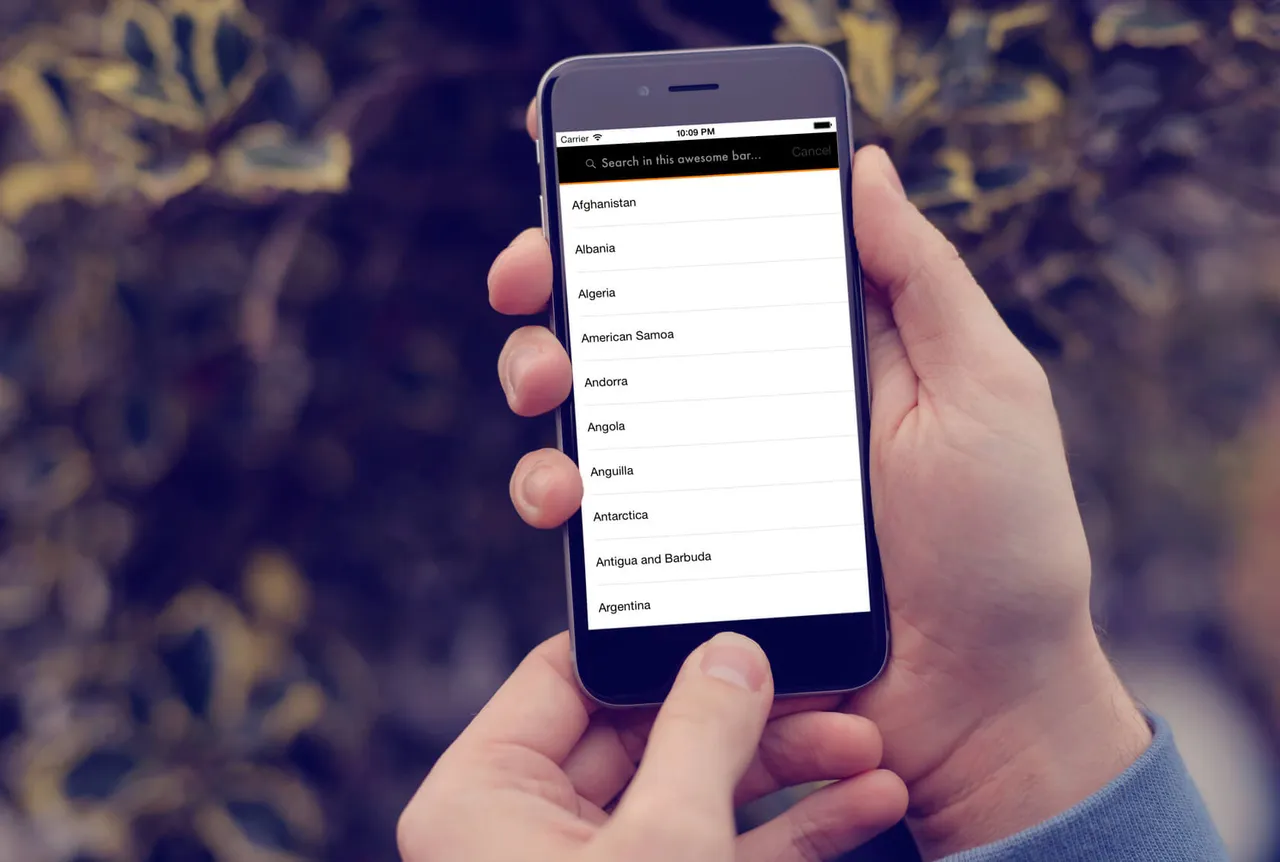
The following two images demonstrate our goals in this tutorial:
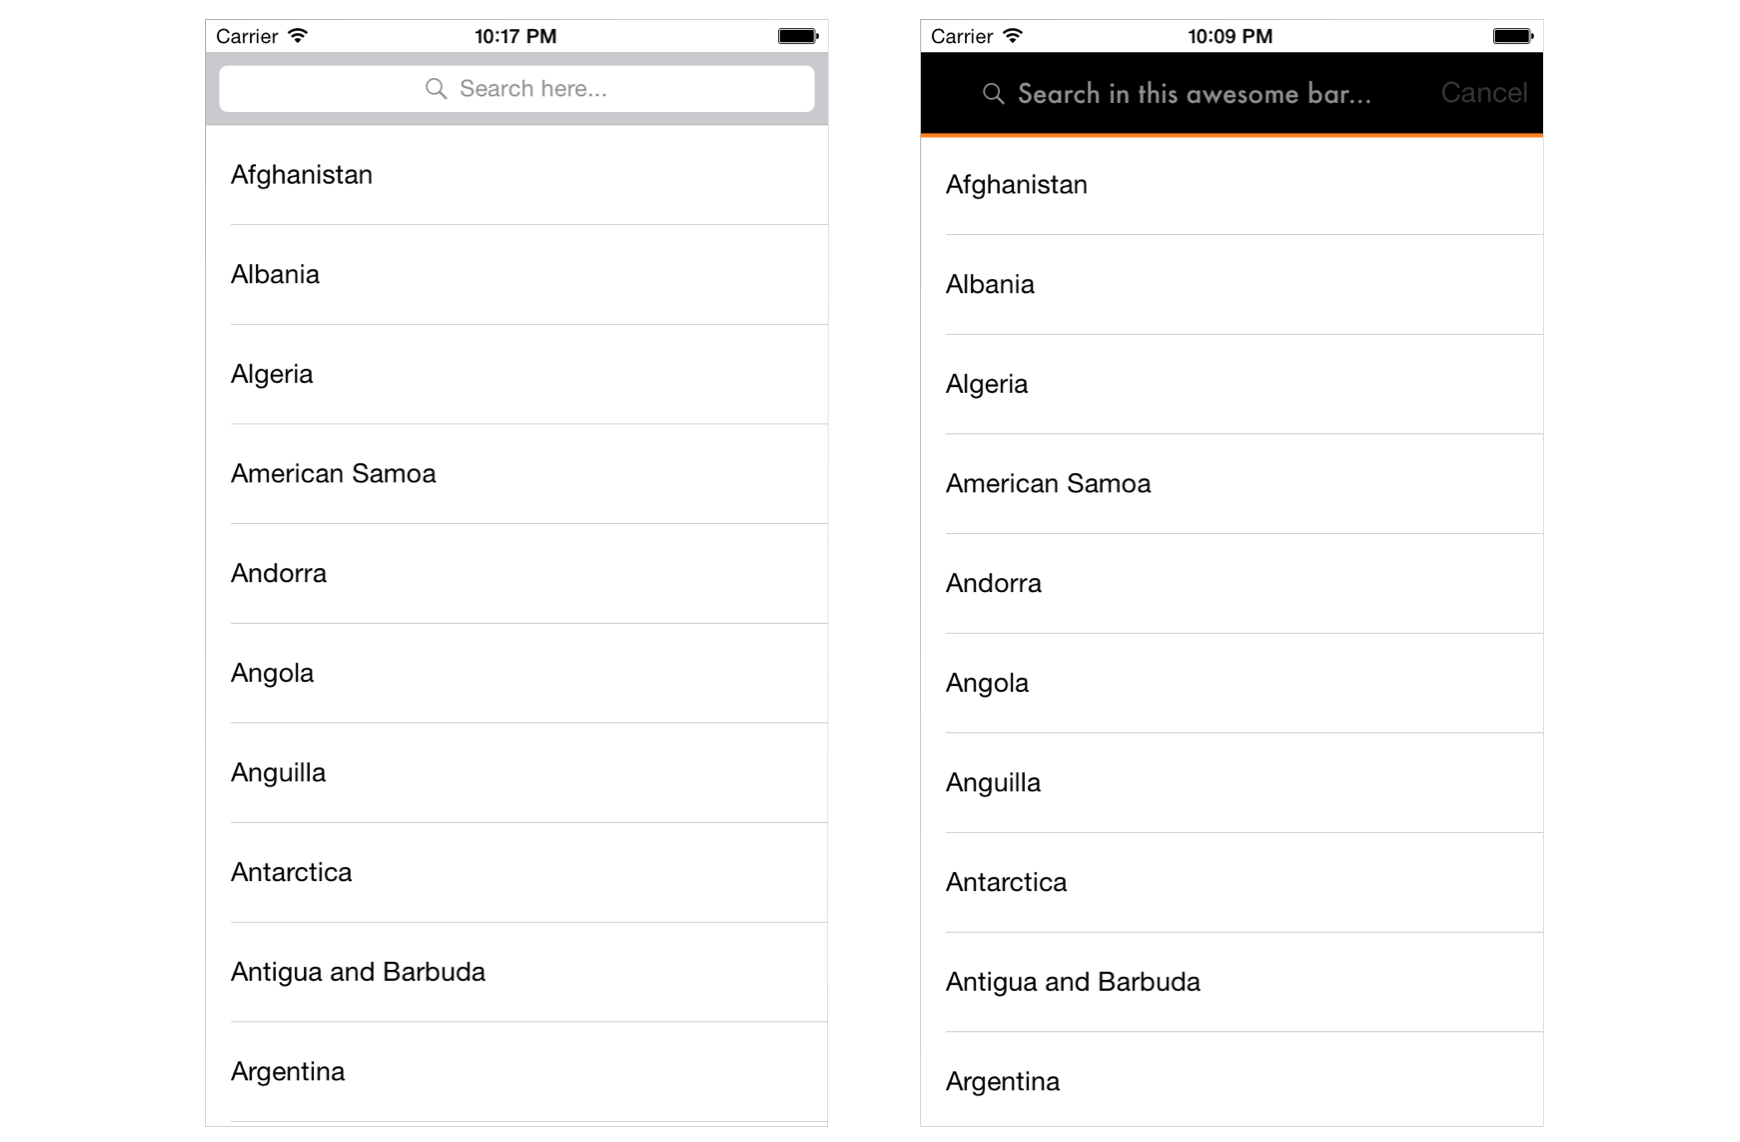
In the first one, you can see the default search bar using the UISearchController that was introduced in iOS 8. In the second image, the custom bar has been customized. You are going to see how both can be achieved both in the upcoming parts, but first, let’s say a few words about the project.
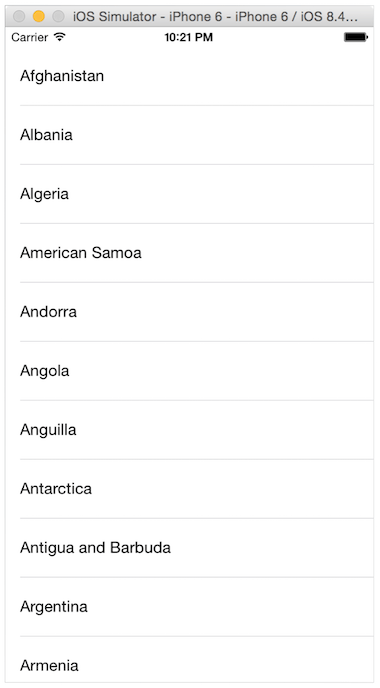
As usually happens, you can download a starter project to work with. When you get it, open it in Xcode and navigate yourself around. As the final app is simple, you won’t find much; there’s one scene in the storyboard containing a tableview, the one that will display our data, the search bar and the search results. Besides that, in the ViewController class you’ll find a minimal implementation of the needed UITableView delegate and datasource methods.
The sample data for our demo application is going to be a list with countries from all over the world. In the project you will find a file named countries.txt being already there, so all we will have to do it to load its contents to an array and use them in code. The countries list was created in this website.
Our whole work in the next parts can be separated in three general steps:
- Initially, we’ll load the sample data to the app, so it’s handy at any time later on when we’ll need it.
- We’ll implement the default search functionality using the new UISearchController.
- We’ll subclass and customize the search controller and the search bar so we change the default appearance.
So, having said that, let’s see each single step in details.
Loading and Displaying Sample Data
We are going to get started by loading the contents of the countries.txt file into an array so we have a datasource for our tableview. Also, we’ll display the entire list of countries in it. Once we do so, we can totally focus on the search functionality we’ll implement in two different ways.
Our initial move right before we load the contents of the file into an array, is to declare a few properties in the ViewController class. Then, we’ll be able to work using them directly. At the top of the class in the ViewController.swift file add the next three lines:
var dataArray = [String]()

var filteredArray = [String]()

var shouldShowSearchResults = false
Let me explain a bit now. The dataArray array will contain the contents of the file, meaning the list of the countries that will be displayed in the tableview. Note that this array will be used as a datasource only when no searching is being performed. In case the user has started searching, then the filteredArray array will be used as the datasource, as it will contain only the countries matching to the search term. The actual array that should be used as a datasource for the tableview will be specified by the value of the shouldShowSearchResults property. When it’s true, then the contents of the filteredArray will be used; when it’s false, the dataArray array will be used instead.
Now, let’s load the data from the countries.txt file into the dataArray, so we can use it with our tableview. In the starter project there is an initial implementation of the tableview, but we’re going to enrich it as we proceed. We’ll start coding a new custom function named loadListOfCountries(). Here’s what we’ll do here: At first we’ll load all the file contents into a string, and then we’ll “break” that string into an array based on the new line (enter) character. The resulting array will be the original datasource for the tableview. Let’ see it:
func loadListOfCountries() {
    // Specify the path to the countries list file.
    let pathToFile = NSBundle.mainBundle().pathForResource("countries", ofType: "txt")

    if let path = pathToFile {
        // Load the file contents as a string.
        let countriesString = String(contentsOfFile: path, encoding: NSUTF8StringEncoding, error: nil)!

        // Append the countries from the string to the dataArray array by breaking them using the line change character.
        dataArray = countriesString.componentsSeparatedByString("\n")

        // Reload the tableview.
        tblSearchResults.reloadData()
    }
}
The above function has to be called, and obviously this will happen in the viewDidLoad(…) function:
override func viewDidLoad() {
    ...

    loadListOfCountries()
}
We are ready now to update a couple of the tableview methods. Initially let’s specify the number of rows that will be returned depending on the used array:
func tableView(tableView: UITableView, numberOfRowsInSection section: Int) -> Int {
    if shouldShowSearchResults {
        return filteredArray.count
    }
    else {
        return dataArray.count
    }
}
Then, let’s specify the actual cell contents:
func tableView(tableView: UITableView, cellForRowAtIndexPath indexPath: NSIndexPath) -> UITableViewCell {
    var cell = tableView.dequeueReusableCellWithIdentifier("idCell", forIndexPath: indexPath) as! UITableViewCell

    if shouldShowSearchResults {
        cell.textLabel?.text = filteredArray[indexPath.row]
    }
    else {
        cell.textLabel?.text = dataArray[indexPath.row]
    }

    return cell
}
Now you can run the app for first time and see the countries list appearing in the tableview. What we’ve done so far isn’t something new or difficult, so let’s get going by configuring the search controller and displaying the default search bar.
Configuring the UISearchController
In order to use the UISearchController and perform search in the tableview data, it’s necessary to declare such a property first. So, in the top of the ViewController class just add the following line:
var searchController: UISearchController!
For our purpose we will implement a new custom function that we’ll name configureSearchController(). In it, we’ll initialize the property we declared right above, and then we’ll set a few properties of it. Actually, the search controller is a view controller having some additional special properties.
One of those properties is the searchBar which represents programmatically the search bar view that appears at the top of the tableview. Some of the properties we’ll set in the next method regard it as well. The search bar view doesn’t automatically appear to the tableview; we have to do that manually as you’ll see next. There are many things one can configure in both the search controller and the search bar so the default controls can be parameterized as much as possible. Detailed information you’ll find here and here.
Let’s get started with the new function where we’ll see almost one by one all the configuration we’ll do. At first, let’s initialize the searchController:
func configureSearchController() {
    searchController = UISearchController(searchResultsController: nil)
}
Here’s an important detail: In our demo application the tableview that displays the search results exists in the same view controller that the search controller exists. However there are cases where the view controller displaying the search results is other than the one the search is being performed, and the search controller has to know that somehow. The only way is through the above initializer. When the nil value is passed as an argument, the search controller knows that the view controller that exists to is also going to handle and display the search results. In any other case the results view controller is a different one.
There are two ways that we can use in order to be able to update the tableview with the search results as we type the search term. The first one is to use a delegate method of the search bar, and the second one is to make the ViewController class the delegate of the searchResultsUpdater property of the search controller. We’ll see how the first approach is used later when we’ll write our own custom search controller, so let’s stick to the second way for now. By doing so, we have to make the ViewController conform to a specific protocol, named UISearchResultsUpdating. This protocol has been first-presented in iOS 8, and it does what I described exactly: It updates the search results based on the search term we’re typing. There’s just one delegate method we’ll have to implement, but we’ll do so later. For now, let’s include it in the protocols that our class already conforms to:
class ViewController: UIViewController, UITableViewDelegate, UITableViewDataSource, UISearchResultsUpdating
Back to our new function again, let’s get going by adding the next line that will add one more piece to the puzzle:
func configureSearchController() {
    ...

    searchController.searchResultsUpdater = self
}
Further than than, you can add any other properties depending on your needs. For example, the following one dims view while we’re still typing the search term if it gets the true value:
func configureSearchController() {
    ...

    searchController.dimsBackgroundDuringPresentation = true
}
Usually there’s no reason to dim the view when the search controller exists in the same view controller with the results tableview. So, set the false value to the above property.
Let’s deal a bit with the search bar now, and let’s specify a placeholder text that will appear on it:
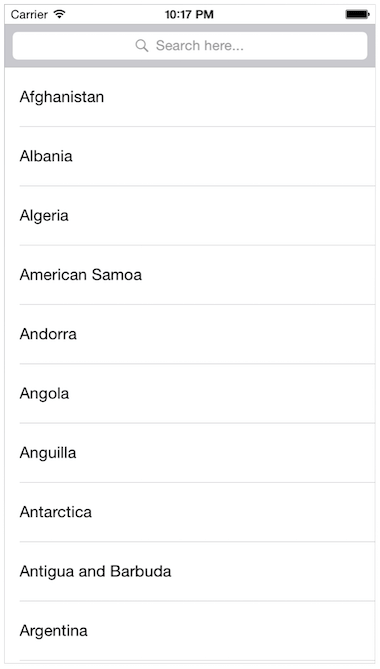
func configureSearchController() {
    ...

    searchController.searchBar.placeholder = "Search here..."
}
Also, let’s make our class the delegate of the search bar so we can use some delegate methods of it later on:
func configureSearchController() {
    ...

    searchController.searchBar.delegate = self
}
And here’s a small trick needed to make the search bar get its proper size and be displayed in the tableview:
func configureSearchController() {
    ...

    searchController.searchBar.sizeToFit()
}
Displaying the search bar in the tableview requires the following line:
func configureSearchController() {
    ...

    tblSearchResults.tableHeaderView = searchController.searchBar
}
Here’s the whole method in one place:
func configureSearchController() {
    // Initialize and perform a minimum configuration to the search controller.
    searchController = UISearchController(searchResultsController: nil)
    searchController.searchResultsUpdater = self
    searchController.dimsBackgroundDuringPresentation = false
    searchController.searchBar.placeholder = "Search here..."
    searchController.searchBar.delegate = self
    searchController.searchBar.sizeToFit()

    // Place the search bar view to the tableview headerview.
    tblSearchResults.tableHeaderView = searchController.searchBar
}
Now go to the top of the class and adopt the UISearchBarDelegate protocol as well:
class ViewController: UIViewController, UITableViewDelegate, UITableViewDataSource, UISearchResultsUpdating, UISearchBarDelegate
Lastly, in the viewDidLoad() function let’s call the above one:
override func viewDidLoad() {
    ...

    configureSearchController()
}
The above is what you need so you can display a search bar in a tableview using the brand new UISearchController. Now, we can proceed and handle the search results. For now, don’t mind about the errors Xcode is showing, they’ll be gone once we write the missing delegate functions.
Performing Search
Let’s handle and display the search results now. This step has two parts. Firstly, search results can be returned when a search term is typed in the search bar, and secondarily, when the search button in the keyboard is tapped. In the first case we’ll filter the displayed countries list as we type. Also, this case isn’t always mandatory to be implemented, so if you need to skip returning results while typing you’re allowed to do. However showing search results when the Search button in the keyboard is tapped is required, otherwise having a search bar in your tableview is totally pointless. In both cases the filteredArray array must become the datasource of the tableview, while when no searching is being performed the dataArray array is the default datasource according to what we implemented earlier.
We have already used the shouldShowSearchResults property which defines the actual datasource of the tableview, but so far we haven’t written a single line of code to change its value. Now, it’s time to do so, always depending on whether a search process is taking place or not.
With that in mind, let’s begin by defining the following two UISearchBarDelegate delegate methods. As you’ll see, with them we change the above property’s value and reload the tableview appropriately:
func searchBarTextDidBeginEditing(searchBar: UISearchBar) {
    shouldShowSearchResults = true
    tblSearchResults.reloadData()
}


func searchBarCancelButtonClicked(searchBar: UISearchBar) {
    shouldShowSearchResults = false
    tblSearchResults.reloadData()
}
The first one makes the filteredArray the datasource of the tableview when we begin searching. On the other hand, the second function makes the dataArray array the datasource when the Cancel button of the search bar is tapped.
The next step is to implement another delegate method that will display the search results and will resign the search field from first responder once the Search button in the keyboard gets tapped. Note that the if condition you’ll see next is useful in case you decide to disable the real-time searching and you only want to display results after the Search button is tapped.
func searchBarSearchButtonClicked(searchBar: UISearchBar) {
    if !shouldShowSearchResults {
        shouldShowSearchResults = true
        tblSearchResults.reloadData()
    }

    searchController.searchBar.resignFirstResponder()
}
As you assume from all the above delegate methods, by setting the proper value to the shouldShowSearchResults flag and by reloading the tableview, we manage to display the proper data each time to our view controller.
All the above are great, but still there’s a big piece missing here. Up until now we haven’t dealt with the filteredArray array at all, so the above delegate methods are not going to have the desired effect. In the previous part we adopted the UISearchResultsUpdating protocol, and there I had said that there’s just one delegate method that we have to implement. Well, in that method that you can see right next, we filter the original data based on the typed search term, and the matching results are stored in the filteredArray array. Here it is:
func updateSearchResultsForSearchController(searchController: UISearchController) {
    let searchString = searchController.searchBar.text

    // Filter the data array and get only those countries that match the search text.
    filteredArray = dataArray.filter({ (country) -> Bool in
        let countryText: NSString = country

        return (countryText.rangeOfString(searchString, options: NSStringCompareOptions.CaseInsensitiveSearch).location) != NSNotFound
    })

    // Reload the tableview.
    tblSearchResults.reloadData()
}
Let’s take a deeper look at what is going on here. At first, we access and store the typed search term in a local constant named searchString. We could have avoided doing this, but it makes our work more convenient.
The heart of the above method is right next, where we use the filter(…) method of the dataArray array. As its name says, it filters the data according to what we ask from it in the closure body, and stores the matching elements to the filteredArray array. Each country string in the source array is represented by the country parameter value of the closure. This string is converted to a NSString object named countryText, and that’s only because we want to make use of the rangeOfString(…) method that the NSString class provides. That method checks if the searched term (the searchString value) exists in the current country, and if so it returns its range (NSRange) in the country string. If the string we’re searching for doesn’t exist in the current country value, then it returns a NSNotFound value. As the closure expects a Bool value to be returned, all we have to do is to return the comparison result between the rangeOfString(…) return value and the NSNotFound value.
At the end, we reload the tableview data, so it displays the filtered countries. As you understand, what I presented right above is just an approach among many, and obviously it can be refined or modified with the functionality you desire each time.
Now run the application to test our new additions. Start typing a country name, and you’ll see the tableview get updated in real time. Use both the search and cancel buttons, and see how the app reacts. At the end, make any modifications you wish to whatever we’ve done so far, so you get a better understanding over the discussed content up to now.
At this point, the first part of the tutorial is over. In the remaining sections you’ll see how you can override the default behaviour of the search controller and the search bar, and how you can customize it so it fits to the app’s UI.
The Custom Search Bar
Customizing the search controller and the search bar does not really consist of a difficult process, as all you have to do is to subclass both of them and write the custom functionality and logic that you wish. Actually, that’s the process for every default behavior you want to override in iOS SDK classes, so whatever comes next is definitely something we all have done in the past.
We’ll begin the customization process by subclassing first the search bar (UISearchBar). Then, we’ll use this custom search bar in the subclass of the search controller, and at the end we’ll use both of them in the ViewController class.
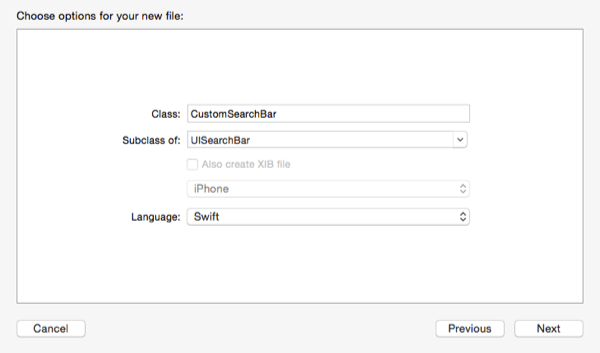
Initially we’ll create a new file in Xcode, therefore go to the File > New > File… menu. In the template selection, click to the Cocoa Touch Class in the Source category of the iOS section. In the next step, set the UISearchBar class in the Subclass of: field, and set the CustomSearchBar name for the new class as shown below:
Get finished with the new file creation, and then select it to open it. We’ll begin coding here by creating a custom initializer. In that, we’ll pass the desired frame, font, and text color of the search bar and search field, and later we’ll use them to do the customization. But prior to this, let’s declare the next two properties:
var preferredFont: UIFont!

var preferredTextColor: UIColor!
Now, let’s see the custom initializer:
init(frame: CGRect, font: UIFont, textColor: UIColor) {
    super.init(frame: frame)

    self.frame = frame
    preferredFont = font
    preferredTextColor = textColor

}
As you see, we set the parameter frame value as the search bar frame, and we store both the font and the text color for later use.
Our next duty is to change the default search bar style using the next line:
searchBarStyle = UISearchBarStyle.Prominent
This command results to a search bar with a translucent background and opaque search field. However, this is not enough, as we want both the search bar and the search field to be opaque, so it’s possible to apply the desired color to both and they look as one piece. Therefore, we’ll use the next command to achieve that:
translucent = false
After the above two additions, here’s once again the initializer:
init(frame: CGRect, font: UIFont, textColor: UIColor) {
    super.init(frame: frame)

    self.frame = frame
    preferredFont = font
    preferredTextColor = textColor

    searchBarStyle = UISearchBarStyle.Prominent
    translucent = false
}
Note: A search bar is not a single control that is parted only from a textfield (the search field). On the contrary, the search bar has a UIView view as a subview, and that view has two important subviews among others: The search field (actually a subclass of the UITextField class), and the search field background view. To make it more clear, if you type this in the following custom function:
println(subviews[0].subviews)
… here’s what you’ll get in the console:

Besides the custom initializer, we are required to add one more:
required init(coder aDecoder: NSCoder) {
    super.init(coder: aDecoder)
}
Based on the above note and considering that we want to access the actual search field (the textfield of the search bar), let’s write an auxiliary function that will return us the index of it in the search bar’s subviews:
func indexOfSearchFieldInSubviews() -> Int! {
var index: Int!
let searchBarView = subviews[0] as! UIView
for var i=0; i
The above is simple, and in alignment to what I explained right before. With that, we're able to proceed to the actual customization by overriding the drawRect(...) method of the class. In it, we'll perform two distinct tasks: We'll access the search field and we'll modify it as we want, and then we'll draw a custom line at the bottom side of the search bar.
Regarding the search field modifications, we'll perform the next changes:
- We'll change it's frame and we'll make it a bit smaller than the search bar's.
- We'll set the custom font.
- We'll set the custom text color.
- We'll change its background color. This will match to the bar's tint color and we'll specify it in the next part. By doing that we'll manage to make both the search bar and search field look as one control (refer to the app overview section to see what our final goal is).
Let's see all that in code now:
override func drawRect(rect: CGRect) {
// Find the index of the search field in the search bar subviews.
if let index = indexOfSearchFieldInSubviews() {
// Access the search field
let searchField: UITextField = (subviews[0] as! UIView).subviews[index] as! UITextField
// Set its frame.
searchField.frame = CGRectMake(5.0, 5.0, frame.size.width - 10.0, frame.size.height - 10.0)
// Set the font and text color of the search field.
searchField.font = preferredFont
searchField.textColor = preferredTextColor
// Set the background color of the search field.
searchField.backgroundColor = barTintColor
}
super.drawRect(rect)
}
As you see, we also make use of the custom function we implemented earlier.
Lastly, let's draw a line at the bottom side of the search bar. Actually we'll do two things: At first, we'll create a new bezier path with the line we want to draw. At second, we'll create a new CAShapeLayer layer to which we'll set the bezier path, and we'll specify the line's color and width. Eventually, this line will be added as a sublayer to the search bar's layer. Here we go:
override func drawRect(rect: CGRect) {
...
var startPoint = CGPointMake(0.0, frame.size.height)
var endPoint = CGPointMake(frame.size.width, frame.size.height)
var path = UIBezierPath()
path.moveToPoint(startPoint)
path.addLineToPoint(endPoint)
var shapeLayer = CAShapeLayer()
shapeLayer.path = path.CGPath
shapeLayer.strokeColor = preferredTextColor.CGColor
shapeLayer.lineWidth = 2.5
layer.addSublayer(shapeLayer)
super.drawRect(rect)
}
Of course, you can change both the line's color and width according to your taste or needs. In any case, it's clear how you can handle them.
Now the custom search bar is ready. For the time being we are unable to test it, as we're still missing the custom search controller, but we'll implement it in the next part. The important thing here is the fact that all the discussion in this part shows you the proper way to customize the search bar and make it fit to your app's look and feel.
The Custom Search Controller
Our custom search controller will be a subclass of the UISearchController class, and here we'll begin working in a similar way to the last part. So, initially create a new file as described previously, but this time make sure to set the UISearchController value in the Subclass of: field, and the CustomSearchController as the name of the new class:

Once the file gets created, select it in the Project Navigator to open it. At the top of the class declare a custom search bar property:
var customSearchBar: CustomSearchBar!
Next, we'll create a custom initializer here too. We'll provide it with the following five parameters:
- The search results view controller.
- The desired frame of the search bar.
- The search field font.
- The search field text color.
- The search bar tint color.
Here it is:
init(searchResultsController: UIViewController!, searchBarFrame: CGRect, searchBarFont: UIFont, searchBarTextColor: UIColor, searchBarTintColor: UIColor) {
super.init(searchResultsController: searchResultsController)
configureSearchBar(searchBarFrame, font: searchBarFont, textColor: searchBarTextColor, bgColor: searchBarTintColor)
}
The configureSearchBar(...) is a custom function we'll implement right away. As you assume from its name, in it we'll do all the proper search bar configuration.
However, before we see that function, let's add two more required init functions:
override init(nibName nibNameOrNil: String?, bundle nibBundleOrNil: NSBundle?) {
super.init(nibName: nibNameOrNil, bundle: nibBundleOrNil)
}
required init(coder aDecoder: NSCoder) {
super.init(coder: aDecoder)
}
Now, let's configure the search bar. What we'll do is simple, so let's see it as one piece:
func configureSearchBar(frame: CGRect, font: UIFont, textColor: UIColor, bgColor: UIColor) {
customSearchBar = CustomSearchBar(frame: frame, font: font , textColor: textColor)
customSearchBar.barTintColor = bgColor
customSearchBar.tintColor = textColor
customSearchBar.showsBookmarkButton = false
customSearchBar.showsCancelButton = true
}
As you see in the first line above, we make use of the custom initializer we created in the custom search bar. The rest is easy: We set the bar tint color of both the search bar (barTintColor) and its elements (tintColor), we "tell" it that we don't want to display the bookmark button, and finally we enable the appearance of the cancel button. Of course, you can change or add properties as per your demands.
Right now, the custom search controller is ready, even though we haven't adopted the UISearchBarDelegate to handle the search bar's delegate methods yet. We'll do so in the next section. However, we're able to put our two new custom classes into action.
Back in the ViewController class, let's begin by declaring the next property at the top of the class:
var customSearchController: CustomSearchController!
Next, let's define a really simple function to initialize the custom search controller, and specify the actual values for the frame, font and colors. Let's see it:
func configureCustomSearchController() {
customSearchController = CustomSearchController(searchResultsController: self, searchBarFrame: CGRectMake(0.0, 0.0, tblSearchResults.frame.size.width, 50.0), searchBarFont: UIFont(name: "Futura", size: 16.0)!, searchBarTextColor: UIColor.orangeColor(), searchBarTintColor: UIColor.blackColor())
customSearchController.customSearchBar.placeholder = "Search in this awesome bar..."
tblSearchResults.tableHeaderView = customSearchController.customSearchBar
}
By initializing the custom search controller as shown above, we're sure that the specified arguments will be passed to the custom search bar as well. Further than that, we set a placeholder text for the search field, and then we set it to the tableview header to display it.
In the viewDidLoad() method now, we have to do two things: To call the above function and to prevent the default search controller from appearing:
override func viewDidLoad() {
...
// configureSearchController()
configureCustomSearchController()
}
At the moment our custom controls won't work as expected, meaning that no searching will be performed. We'll fix that in the next part. However, now we are able to see the custom search bar, so launch the app to do that.

Performing Search Using The Custom Search Controller
The custom search controller class is going to be the delegate of the custom search bar, and that means that we'll control all the search-related functionality in the CustomSearchController class. Then, by implementing a custom protocol and adopting the delegation pattern, we'll let through custom delegate methods the ViewController class to handle the search results in a similar way we saw previously in the normal search controller.
So, let's bring all the above in life, and first of all open the CustomSearchController.swift file. Go in the configureSearchBar(...) function, and add the next line:
func configureSearchBar(frame: CGRect, font: UIFont, textColor: UIColor, bgColor: UIColor) {
...
customSearchBar.delegate = self
}
Having made the CustomSearchController class the delegate of the custom search bar, let's go to the class header line to adopt the UISearchBarDelegate:
class CustomSearchController: UISearchController, UISearchBarDelegate
Don't forget to adopt the UISearchBarDelegate protocol in the class header line:
class CustomSearchController: UISearchController, UISearchBarDelegate
Now, let's create a custom protocol with the following delegate functions (add the next lines before the CustomSearchController class):
protocol CustomSearchControllerDelegate {
func didStartSearching()
func didTapOnSearchButton()
func didTapOnCancelButton()
func didChangeSearchText(searchText: String)
}
I think it's pointless to explain what each one is for, as their names are self-explanatory. At the top of the CustomSearchController class let's declare a delegate property as shown below:
var customDelegate: CustomSearchControllerDelegate!
At this point we can add the missing search bar delegate functions, and call each time the proper delegate function of the CustomSearchControllerDelegate. Let's start with the one that is called when the editing begins in the search field:
func searchBarTextDidBeginEditing(searchBar: UISearchBar) {
customDelegate.didStartSearching()
}
When the search button in the keyboard gets tapped:
func searchBarSearchButtonClicked(searchBar: UISearchBar) {
customSearchBar.resignFirstResponder()
customDelegate.didTapOnSearchButton()
}
When the Cancel button in the search bar is tapped:
func searchBarCancelButtonClicked(searchBar: UISearchBar) {
customSearchBar.resignFirstResponder()
customDelegate.didTapOnCancelButton()
}
And finally, when the search text gets changed:
func searchBar(searchBar: UISearchBar, textDidChange searchText: String) {
customDelegate.didChangeSearchText(searchText)
}
All the above functions will inform the ViewController class when the search begins, ends, or the search string is changed. Now, open the ViewController.swift file, and initially go straight to the configureCustomSearchController() function. In it, add the next line:
func configureCustomSearchController() {
...
customSearchController.customDelegate = self
}
In the class header line, adopt the CustomSearchControllerDelegate protocol so we can implement its delegate functions:
class ViewController: UIViewController, UITableViewDelegate, UITableViewDataSource, UISearchResultsUpdating, UISearchBarDelegate, CustomSearchControllerDelegate
Lastly, let's see the implementations. In the next functions, we'll be taking the exact same actions as we did for the normal search controller. Let's go for them:
Begin of searching:
func didStartSearching() {
shouldShowSearchResults = true
tblSearchResults.reloadData()
}
Tap on the search button:
func didTapOnSearchButton() {
if !shouldShowSearchResults {
shouldShowSearchResults = true
tblSearchResults.reloadData()
}
}
Tap on the cancel button:
func didTapOnCancelButton() {
shouldShowSearchResults = false
tblSearchResults.reloadData()
}
Changes on the search text:
func didChangeSearchText(searchText: String) {
// Filter the data array and get only those countries that match the search text.
filteredArray = dataArray.filter({ (country) -> Bool in
let countryText: NSString = country
return (countryText.rangeOfString(searchText, options: NSStringCompareOptions.CaseInsensitiveSearch).location) != NSNotFound
})
// Reload the tableview.
tblSearchResults.reloadData()
}
The app now is fully functional and it's using our custom search controller and search bar. You can go and give it a final try.

Summary
Taking a quick look at what we've done in all the previous parts of this tutorial, it's easy to understand that working either with the UISearchController that iOS 8 provides, or by customizing the search bar and the search controller, the result is always the same: You can add search functionality in your apps pretty fast. If your application doesn't demand UI modification then you can stick to the default appearance of the search bar. If you need though to apply some custom touches, then you can do that too, as now you know the way. Hopefully this tutorial will be your guide in your future implementations, and with that I think it's time to leave you. Happy searching!
For reference, you can download the complete Xcode project here.


