At the time when you are reading this tutorial, millions, or billions of other users out there are probably browsing through an app on their smartphones. Having a smartphone with a huge collection of apps has already been an integral part of our lives. With so many users constantly engaging in mobile apps daily, we have to be certain that the User Interface (UI) runs smoothly, doesn’t frustrate users, and this can be achieved through well-written automation testings.
Special thanks to Sauce Labs, they have launched Appium in the recent years to help Test Engineers run automated UI tests, which are centralised in one platform. So in this tutorial, I will walk you through what Appium is and how you can make use of the tool to automate UI testing for iOS apps.
What is Appium?
First things first, what the heck is Appium? Appium is an open-source test automation tool. It is essentially a HTTP Web Server (client-server architecture) which is able to manage multiple WebDriver sessions and it exposes REST API. When coupled with Selenium WebDriver API and language-specific client libraries, it gets even more capabilities to write more advanced test cases that can cover from native to cross-platform apps. Moreover, you can write the test cases in the language of your choice (i.e. C#, .NET, Java, node, Perl, PHP, Python, Ruby, etc).
Appium is built on the idea that testing native apps shouldn’t require including an SDK or recompiling your app. And that you should be able to use your preferred test practices, frameworks, and tools. Appium is an open source project and has made design and tool decisions to encourage a vibrant contributing community.
The best part of Appium is that it supports most kinds of apps including native, mobile web and hybrid applications. This means you can run your tests on both iOS and Android!
How does the automation works?
I’m glad you ask! Simple! For example, your wrote your test cases in Python, which I am going to do so in this tutorial; Selenium’s WebDriver will translate it into native iOS and Android commands. These commands will then be sent to the native drivers on your simulators or real devices.
Tell me one more good thing about Appium!
Appium was designed to meet mobile automation needs according to a philosophy outlined by the following four tenets: 1. You shouldn’t have to recompile your app or modify it in any way in order to automate it; 2. You shouldn’t be locked into a specific language or framework to write and run your tests; 3. A mobile automation framework shouldn’t reinvent the wheel when it comes to automation APIs; 4. A mobile automation framework should be open source, in spirit and practice as well as in name!
Sure! Apps have their UI elements already wired up is ready to have their test cases run. They just need to simply pick out the app and the standard API will handle everything without the need to recompile the app! However, there is a catch. Since both native platforms (iOS and Android) has very different UI elements, you will need to write two suites of test cases.
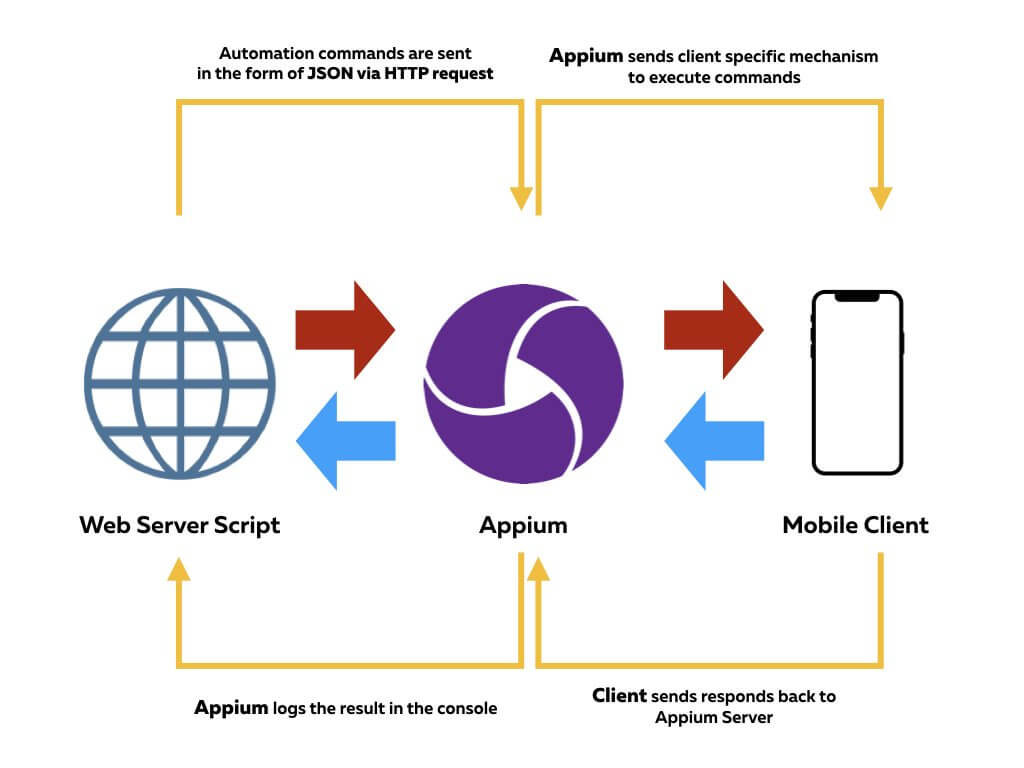
This diagram briefly suggests the communication paths between Appium, client and web script.
Pre-requisites
To follow this tutorial, you should equip yourself with the following:
- Some basic knowledge in iOS Programming in Swift.
- Xcode 9.4.1 or later installed on your macOS.
- A passion to learn how to run UI automation test on your iOS project.
What will you learn in this tutorial?
You will learn a ton about Appium including:
- How to setup Appium
- How to write Web Scripts Test Cases
- How to setup Xcode Project to be UI Test-Ready
- How to integrate Appium, Script & Client to automate test cases
Installing Appium
Firstly, you need to get the core component of this tutorial setup, Appium! Appium is written in Node.js. There are two ways to install the tool:
-
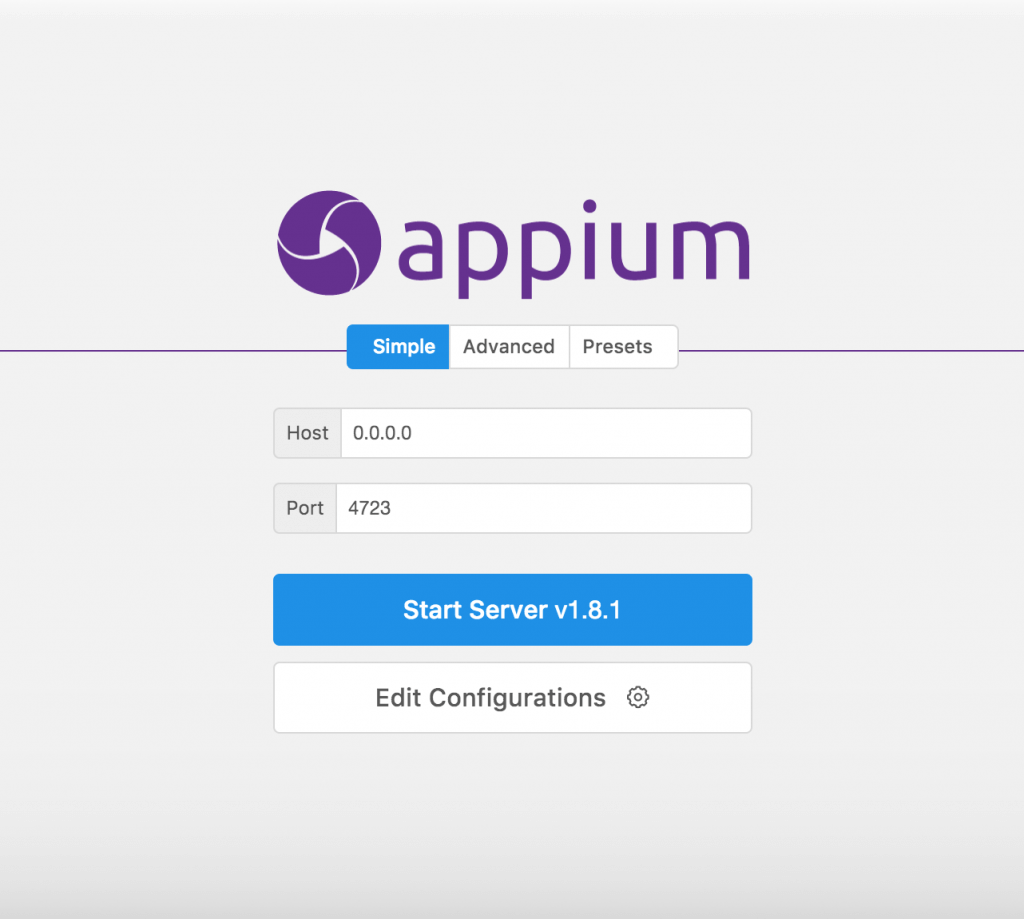
- Install from the source using Appium’s own GUI
- Install via NPM with the following command:
npm install -g appium
After you installed Appium, verify that you have appium setup by running appium in the terminal.

Great! Now that you have Appium setup, let’s move on to the client side.
Setting Up the Demo Project for UI Automation
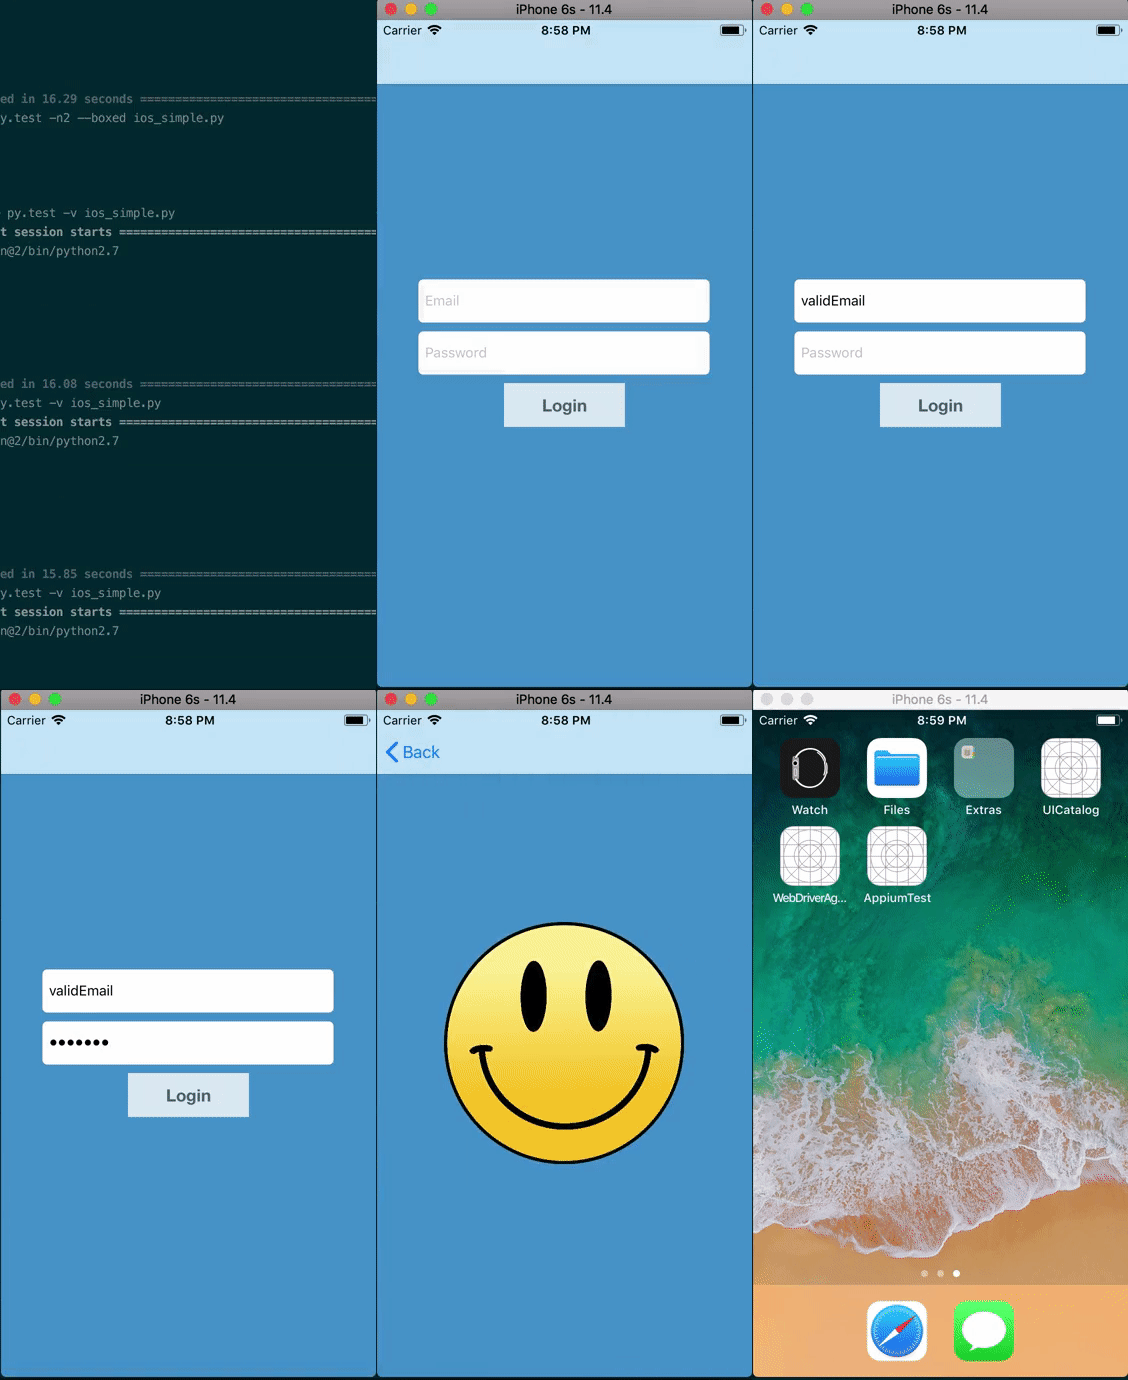
By the end of this tutorial, you will be able to automate UI Testing for the two screens above. In brief, here are the test cases:
- The user keys in his/her email in the text field such that the email address should be in a valid format.
- The user keys in his/her password in the password field that the password should be masked.
- When the user hits the Login button, the user should see a smiley image.
We will implement these test cases using Appium. To keep you focus on building your test cases, you can download the demo project here.
For UI test automation, there must be some ways for the test tool to identify the UI elements. One of the many ways for Appium to identify the right UI element for testing is through the Accessibility ID. Now open the Xcode project and go to Main.storyboard. Select the email text field and go to the Identity inspector. Under the Accessibility section, enable Accessibility for the field. Give the label a name like Email TextField and fill in the identifier as emailTextField. This is the unique ID that we will use in the Python test script for identifying the UI element.
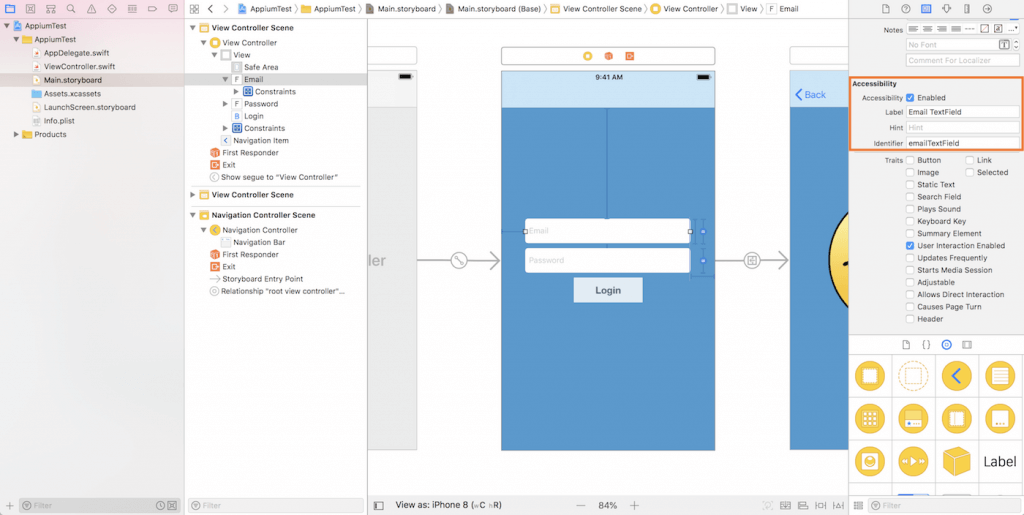
Repeat the sample procedures for the rest of the UI elements:
- Password field – Set the identifier to
passwordTextField - Login button – Set the identifier to
loginButton - The smiley image – Set the identifier to
smileyImage
Great! We have our client setup, ready to receive commands!
Setup Web Scripts
For the purpose of this project, I will be using Python script as my chosen language. You could explore other languages by looking through their API Documentation.
Next, select a folder to create your workspace. For me, I put it under Documents/workspace/appium-ios-basic/tests. Create a file named test_login.py where .py is a file extension for python.
You can use TextEditor like Sublime Text or IDE like Atom to edit your script. My personal preference is Atom because of the nice UI.
In the test_login.py file, insert the following commands:
import unittest
import os
from random import randint
from appium import webdriver
from time import sleep
from selenium.webdriver.common.keys import Keys
These are the basic functions we need for executing our test cases.
The LoginTests Class
Now let’s start writing our LoginTests class! As the purpose of this tutorial is just going through the steps to get your Appium UI Automation working, I will skip the explanation of Python syntax. You could read them on your own. First, insert the following line of code to create the class:
class LoginTests(unittest.TestCase):
Next, we are going to write several functions for the test class. We will first use an initialising function from unitTest to do some setting up:
def setUp(self):
        app = ('/Users/lawrey/Library/Developer/Xcode/DerivedData/AppiumTest-fubxvjmcpxiewkenopxpcerwhudw/Build/Products/Debug-iphonesimulator/AppiumTest.app')
        self.driver = webdriver.Remote(
            command_executor='http://127.0.0.1:4723/wd/hub',
            desired_capabilities={
                'app': app,
                'platformName': 'iOS',
                'platformVersion': '11.4',
                'deviceName': 'iPhone 6s'
            }
        )
A few points to note:
- You will need to replace the
appwith the absolute path to yourAppiumTest.appon your local machine. - Depending on the time you read this tutorial, you may need to adjust the
platformVersionanddeviceNameto suit your needs. - You could leave the rest as it is. However, if you are running Appium on another server, feel free to change the url.
Next, let’s create the tearDown function:
def tearDown(self):
    self.driver.quit()
After the test cases are fully executed, it is important to release the driver.
Test Case #1 – testEmailField
Our first test case is design to test the UI component for the Email TextField. In the test_login.py file, write the test case like this:
def testEmailField(self):
        emailTF = self.driver.find_element_by_accessibility_id('emailTextField')
        emailTF.send_keys("[email protected]")
        emailTF.send_keys(Keys.RETURN)
        sleep(1)
        self.assertEqual(emailTF.get_attribute("value"), "[email protected]")
Let me go through the code above with you:
self.driver.find_element_by_accessibility_idsearch for theemailTextFieldUI element and assign it toemailTF.- Next, we will key in a valid email address by using
send_keys. - Once done, we will press
Returnby usingKeys.RETURN. - Then we call
sleepto delay 1 second. - Lastly, we test if the value we retrieve from the text field is the same as the expected value using assert.
Test Case #2 – testPasswordField
The second test case is to check if the password field can automatically masked the input value. Continue to insert the following code in the Python script file:
def testPasswordField(self):
        passwordTF = self.driver.find_element_by_accessibility_id('passwordTextField')
        passwordTF.send_keys("validPW")
        passwordTF.send_keys(Keys.RETURN)
        sleep(1)
        self.assertNotEqual(passwordTF.get_attribute("value"), "validPW")
The code looks very similar to that of the first test case. The key difference here is that we use assertNotEqual. We want to make sure the value of the password field is masked.
Test Cases #3 – testLogin
Lastly, we are going to perform a UI Flow Test to ensure we see the smiley face after successful login. Insert the following code in the script file:
def testLogin(self):
        self.testEmailField()
        self.testPasswordField()
        self.driver.find_element_by_accessibility_id('loginButton').click()
        sleep(1)
        smiley = self.driver.find_element_by_accessibility_id('smileyImage')
        self.assertTrue(smiley.get_attribute('wdVisible'))
We simply call each test function sequentially. Then we locate the loginButton and call the click() function to click. Finally, we test the visibility of the smiley image and we are done!
Oh! Wait a minute, we need to call main to execute this entire class code for us!
if __name__ == '__main__':
        suite = unittest.TestLoader().loadTestsFromTestCase(LoginTests)
        unittest.TextTestRunner(verbosity=2).run(suite)
We are done with setting up our test cases. Now let’s get to the exciting part of running all these and seeing it in action!
Installing the Appium Python Client
To install Appium client, ensure that you have Python installed by running pip --version. The version I am using at the time of writing is pip 18.0, python 2.7. If you don’t have Python installed on your machine, you can use homebrew to install python:
brew install python
After installing Python, key in the following command to install the Appium Python Client:
pip install Appium-Python-Client
Alternatively, you can head over to Appium to download the source and install it. This is the main connector that is crucial to make sure Appium speaks the right language to our client.
Installing PyTest
This small python framework is a full-featured advance testing tool to aid in our testings! We may not need the full functionality of this framework in this tutorial but the very nice formatted loggings makes our test cases look pleasing to our eyes!
To install PyTest, you can run the following command in Terminal:
pip install -U pytest
Installing Carthage
Appium’s primary support for automating iOS apps is via the XCUITest driver. This driver leverages Apple’s XCUITest libraries under the hood in order to facilitate automation of your app. This access to XCUITest is mediated by the WebDriverAgent server.
In order to launch WebDriverAgent, your macOS will need to have Carthage installed. If you haven’t installed the software, please run the following command for installation:
brew install carthage
Building the App Using XcodeBuild
To prepare the app for testing, build it with a specific SDK using XcodeBuild. Assuming you’ve changed to your Xcode project folder, type the following command to create the build:
xcodebuild -sdk iphonesimulator11.4
This will compile the project and create the build under the build folder. You can find a build/Release-iphonesimulator directory that contains the .app package that you’ll need to communicate with the Appium server. Here is a sample path:
/Users/test/Downloads/appium-ios-basic-master/final/build/Release-iphonesimulator/AppiumTest.app
For the test_login.py file, please ensure you change the app path accordingly.
Running the test cases
Now is the moment to run the tests. In Terminal, execute the command below:
pytest test_login.py
And, your Appium server performs the automated commands!
You should see a message specifying the time taken to execute the test and how many of the test cases passed! Hurray!
Wrapping Up
So what have we achieved?
- We learnt in theory how Appium interacts with Web Script and Client.
- We learnt how to setup Appium.
- We learnt how to write Python Test Scripts.
- We learnt how to enable access UI elements in Xcode so they can be tested.
- We learnt how to integrate the 3 main components to automate a single flow of UI Automation Testing.
We all deserve a pat on our back, one for completing the write up for this tutorial, and one for you to follow through this lengthy process to get your automatic test running!
If you have any questions about the tutorial, please leave your comment below and let me know.
For the sample project, you can download the full source code on GitHub.
If you would like me to write follow-up tutorial with more advanced testing techniques for iOS using Appium, do not hesitate to drop me a comment.


