

As an iOS developer you already know that one of the tasks in the to-do list of any project is to set and configure constraints for any views and subviews added to it. It’s been proved that constraints can become tricky and end up to a real pain in the… app quite often, but everything is just a matter of understanding and a bit of experience. In truth, constraints are just rules you want to apply over the layout of any graphic elements you have on-screen; those rules regard the position, the size and the visual relationship of the views and subviews, and define a default behaviour of the UI even when the orientation of the devices gets changed.
Constraints can be set in two different general ways: Graphically and programmatically. Most people prefer the graphical way to set the constraints, working directly in the storyboard or XIB files. The big advantage of that option is that it offers immediate visual contact to the views that constraints should apply to, so you just “see and do”. However, and despite the easiness of this method, it’s highly possible to mess things up by setting contradictory constraints that cannot be satisfied simultaneously at runtime. Most of the times Xcode is quite helpful by indicating the misplaced constraints and providing tips on what’s wrong and problematic with the constraints, so you just proceed by fixing and updating your constraints until there are no more conflicts.
On the other hand, the programming way is a different approach to set constraints, and it includes two different options: The use of methods and properties that the UIKit provides for that purpose, and the use of a special formatting language, called Visual Format Language. If you have never worked with any of them, then this post is your opportunity to have your first experience with both. By the end of the tutorial you’ll be able to decide if working with constraints in code level is suitable for you, and which method you prefer to work the most with. Actually, both methods can be combined, and they should be combined, especially if you use the Visual Format Language (which admittedly is handy, but not that flexible sometimes). I’m not getting into more details now, as the following parts are dedicated to that, so any obscured points or second thoughts you might have now will be cleared out along the way.
Before we reach the end of this small introduction, there’s one small comment I’d like to make. It’s not always necessary to build your UI (user’s interface) using constraints, even though that’s the recommended way. This can happen when two conditions are met: First, you build your graphical elements (all the views including buttons, labels, etc) in code, meaning that you initialise and set their frames, their position in relation to other views and their visual behaviour in code (of course without setting constraints, but exact frames). Personally speaking, most of the times I prefer to create all of my views manually in code, so I just keep the scenes of the view controllers empty in the storyboards. I manage that way to have the ultimate control over the behaviour of my views, especially if some of them have to animate at some point. The second condition that should be met is that your app is meant to run in one orientation only, so the subviews don’t have to be repositioned when users change orientation. In any other case it’s going to be a hell to fix the frames and positions upon each orientation change, so constraints are still the best option. No matter what, what I just said is an attempt to make clear that there’s a way to make the UI without using the constraints, but that can happen under certain conditions only, and of course I’m not prompting you to do so; it’s up to you to decide the way you’ll build your UIs.
For your reference, here is the official documentation on how to programmatically create constraints, and the official guide to the Visual Format Language.
About the Demo Project
Before we put our fingers into the jar with the honey and taste the creation of constraints programmatically, there’s a starter project for you to download. It’s called Constraints, and in the ViewController class you’ll find a series of methods with their bodies being empty. Implementing them is what we’ll do next. Also, in the viewDidAppear(_:) method you’ll find the first method call enabled only, while the rest have been commented out. We will switch the commented state of each method call according to the part that we’re in. Finally, there are some views declared as properties in the class, which of course we are about to use next.
So, as there’s nothing more to say here, it’s about time to start discussing about the interesting stuff.
Creating Constraints – The Basics
We will get started with a really simple and basic example, so open the starter project, go to the ViewController.swift file, and then find the simpleView1() method. Add the following lines that create a simple UIView object:
func simpleView1() {
    let myView = UIView()
    myView.backgroundColor = UIColor.black

    self.view.addSubview(myView)
}
Nothing difficult here, we just initialise a view with black background color, we don’t specify a frame as it’ll result from the constraints in a while, and we add it to the default view of the ViewController as subview.
Let’s create now the leading constraint for the above view, indicating that we want the left side of our view being 50 points away from the left side of the parent view (or in other words that the X origin point to be 50 points away from the left side of the parent view):
let leading = NSLayoutConstraint(item: myView,
                                         attribute: .leading,
                                         relatedBy: .equal,
                                         toItem: self.view,
                                         attribute: .leading,
                                         multiplier: 1.0,
                                         constant: 50.0)
Let’s discuss about the parameters of the NSLayoutConstraint(...) method:
- The item is the graphic element that the constraint is applied to. In our case, it’s the
myViewview, but it could be anything else (button, label, image view, etc). - The attribute describes in simple words the type of the constraint we set (like leading, trailing, top, and so on), and it’s a NSLayoutAttribute value. When you start typing that value, Xcode auto-suggests all the possible values.
- The relatedBy indicates the relation between the
attributeproperty of the view that the constraint is applied to, and theattributeproperty of the other view that is related to, and it’s a NSLayoutRelation value. Simply, it provides the options to make first attribute parameter value equal, greater than or less than the attribute value presented next. Similarly as above, Xcode auto-suggests all the possible values. - The toItem is another view used as a “reference” for the constraint we create for our view. In certain cases it can be nil. In our example, the
self.viewis that view. - The attribute parameter (second time) is the constraint type of the reference view (here the
self.view) that is related to the attribute of the view that we create the constraint for. As mentioned already, therelatedByparameter value specifies the kind of that relationship. - The multiplier parameter multiplies the value of the second
attributeparameter by the value given as an argument. The default value that is usually set is 1.0, but we’ll see examples where we’ll set values other than that so you’ll understand how it works. - The constant value is actually added to the second
attributeparameter value, so the firstattributeparameter referring to the view set in theitemproduces the desired result.
In short, in the above snippet we create the leading constraint of the myView view and make it equal to the leading of its parent view, with a distance of 50.0 points between their left sides.
Let’s do the same as above now for the trailing constraint:
let trailing = NSLayoutConstraint(item: myView,
                                  attribute: .trailing,
                                  relatedBy: .equal,
                                  toItem: self.view,
                                  attribute: .trailing,
                                  multiplier: 1.0,
                                  constant: -50.0)
Everything is the same, except for the constant. In this case, a negative value is needed to indicate that the right side of our view is before (at the right of) the right side of the trailing of the parent view. Using a positive number will result in extending the myView view’s width by 50.0 points after the right side of the self.view.
With the above two constraints and the given settings we achieve two important things:
- First off, the view will appear horizontally centered, as the distance from the two sides of the screen is the same.
- The width of the
myViewview is specified and calculated automatically on the fly. More precisely, the width will be equal to:self.view.frame.width - 2 * 50.0.
The next step is to position our view vertically, so we’ll specify the top constraint:
let top = NSLayoutConstraint(item: myView,
                             attribute: .top,
                             relatedBy: .equal,
                             toItem: self.view,
                             attribute: .top,
                             multiplier: 1.0,
                             constant: 100.0)
Based on the constant value, we can tell that the view’s Y origin point will be 100.0 points away from the top side of the parent view.
At that point we have specified the origin point of the myView view with the leading and top constraints, as well as its width. There’s one last thing to do, and that is to tell the app how much the height should be. Let’s add one more constraint:
let height = NSLayoutConstraint(item: myView,
                                attribute: .height,
                                relatedBy: .equal,
                                toItem: nil,
                                attribute: .notAnAttribute,
                                multiplier: 1.0,
                                constant: 120.0)
There’s something new in the above snippet. Firstly, the toItem parameter value has been set to nil, as we don’t need any other view as a reference for setting a value for the height. For the same reason, we don’t need to use the attribute parameter as well (the second one), therefore we set a special value as an argument; the notAnAttribute. That way, this argument will be ignored when the view will layout on the screen. Other than that, the height of the view is set to 120.0 points (as given in the constant parameter).
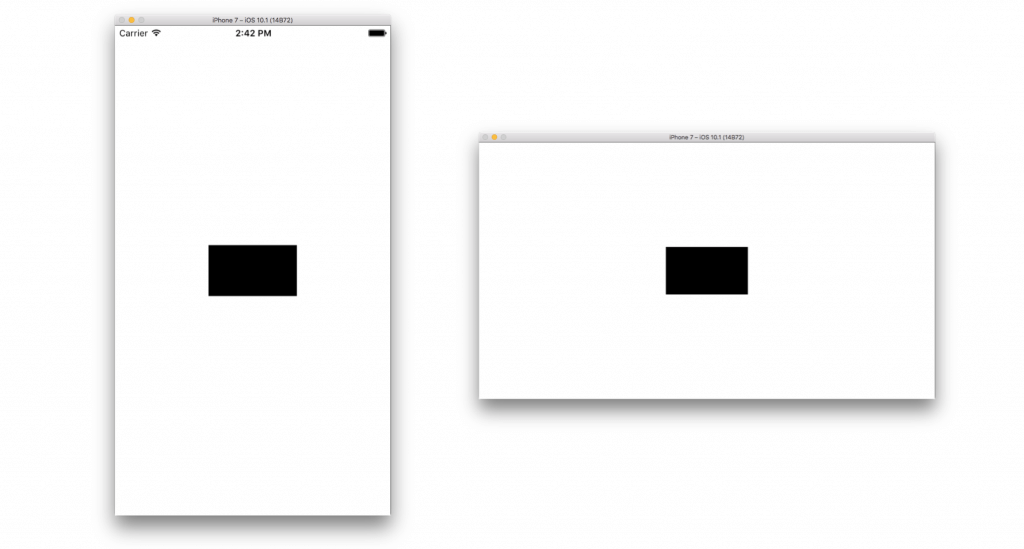
If we run the app now, nothing will appear on screen, even though we have already created the above constraints. That’s because the system doesn’t know about them yet, so let’s see how we can change that. There are three different ways to make use of constraint objects, and we’ll meet them all at this post. The first one is to add the constraints directly to the parent view of myView:
self.view.addConstraint(leading)
self.view.addConstraint(trailing)
self.view.addConstraint(top)
self.view.addConstraint(height)
Pay special attention that the constraints are added to the superview, and not to the view that constraints concern. And here it’s coming a general rule that you should always have in mind; when having simple views (like here) which do not relate to any other custom views, then the constraints you create for it are added to its parent view. However, when there are more views that are related together through their attributes (leading, trailing, etc), then the constraints referencing to those are added to the first common ascendant view of those views. We’ll make that clear later with a more complicated example. For now, stick to the fact that the constraints are added to the parent view as shown in the last snippet.
If you don’t like the above way, you can also use the following to activate your constraints:
NSLayoutConstraint.activate([leading, trailing, top, height])
That’s a faster way, and all you have to do is to provide an array with the constraints as an argument to the activate(...) class method of the NSLayoutConstraint class.
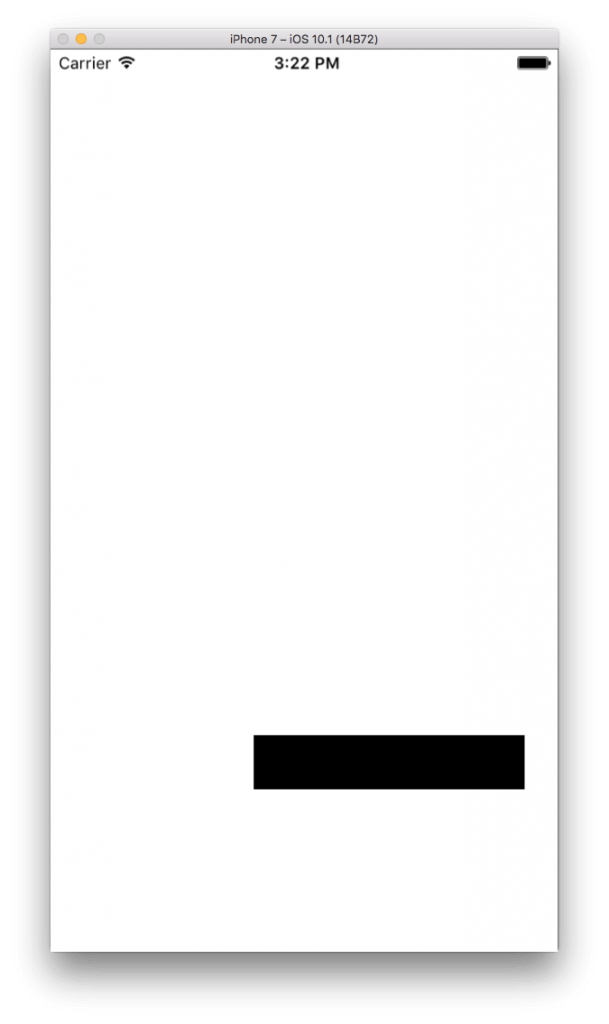
We are almost ready, but let’s give the app a try before we reach the end of this part. By launching it you’ll see that nothing appears on the screen, and there are messages on the console saying that not all constraints can be satisfied simulteanously:
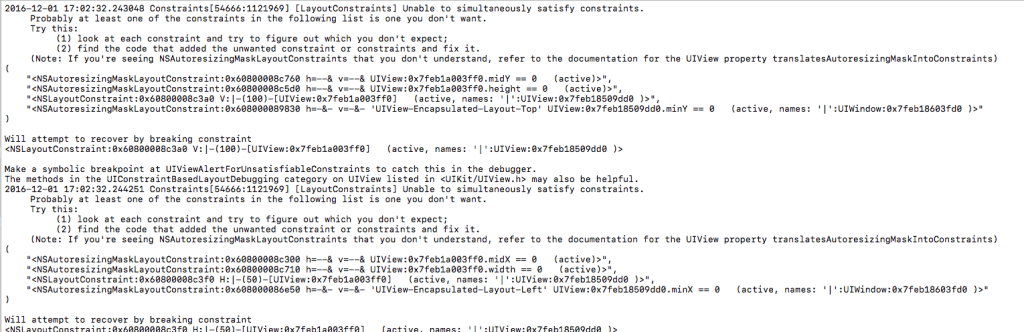
That’s happening because iOS is trying to create constraints automatically on its own, and we have to explicitly tell it not to do that. For that, we need to use the translatesAutoresizingMaskIntoConstraints property of the UIView class as shown next, and set it to false:
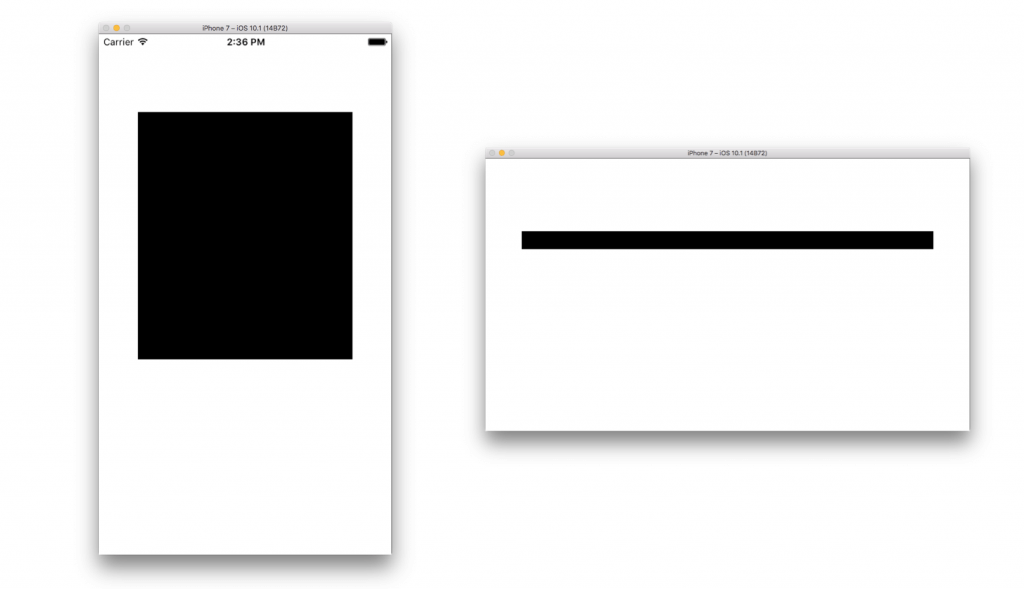
myView.translatesAutoresizingMaskIntoConstraints = false
Let’s run again now. This time the view is there, and you can verify that the constraints actually work by rotating the device:
If you’d like to go one step further, try to add the following constraint as well:
let bottom = NSLayoutConstraint(item: myView,
                                attribute: .bottom,
                                relatedBy: .equal,
                                toItem: self.view,
                                attribute: .bottomMargin,
                                multiplier: 1.0,
                                constant: -250.0)
This new constraint will set the bottom side of the myView view 250.0 pixels before the bottom side of the screen (similarly to the trailing constrain, notice the negative value here as well). Of course, we should not forget to add it to the collection of the activated constraints:
NSLayoutConstraint.activate([leading, trailing, top, height, bottom])
Run the app again now. You’ll see a new message on the console regarding conflicting constrains. That’s happening because the bottom and height constraints cannot be activated together at the same time. Why? Well, the height constraint sets a specific value as the view’s height. On the other hand, the combination of the top and bottom constraints specify another height on the fly (similarly to what we saw before regarding the width and the leading and trailing constraints). At the end, the myView view results with two given heights, and that’s unacceptable by the system. For the sake of the example, just remove the activation of the height constraint and see what’s happening by running again:
NSLayoutConstraint.activate([leading, trailing, top, bottom])
The new constraint is totally respected, and the 250.0 points distance between the bottom side of the view and the screen is always there.
Centering Views
Having made our introduction on how to set constraints programmatically, let’s see some working cases that could be proved useful, or they could just provide some guidance. One usual thing that all of us do when setting constraints graphically using the Interface Builder, is to center views both horizontally and vertically. That’s easy to in a storyboard file, but how about doing so in code as well?
Soon you’ll find out that it’s not that difficult; in truth, is fairly easy, as far as you’ve understood the basics discussed in the previous part. This time we’ll work in the simpleView2() method, so make sure that in the viewDidAppear(_:) method you comment out the simpleView1() and uncomment this one. Next, head into the body of that method.
We’ll begin in the same fashion as before, so we’ll initialise a new view object:
func simpleView2() {
    let myView = UIView()
    myView.backgroundColor = UIColor.black
    self.view.addSubview(myView)

    myView.translatesAutoresizingMaskIntoConstraints = false
}
Let’s create the constraint now that will center the view horizontally:
let centerHorizontally = NSLayoutConstraint(item: myView,
                                            attribute: .centerX,
                                            relatedBy: .equal,
                                            toItem: self.view,
                                            attribute: .centerX,
                                            multiplier: 1.0,
                                            constant: 0.0)
The new element here is the attribute value we provide as an argument (centerX) in combination to the constant value. I think it’s quite obvious that the center X-points of both views (myView and self.view) will have the same value, so it’s safe to say that our view will be horizontally centered. However, make sure that the constant argument always remains 0.0 for centering. A negative value would mean a horizontal center for our view moved by the specified value to the left, while a positive value would mean a horizontal center moved by the specified value to the right.
Let’s do the same now for the vertical centering:
let centerVertically = NSLayoutConstraint(item: myView,
                                                  attribute: .centerY,
                                                  relatedBy: .equal,
                                                  toItem: self.view,
                                                  attribute: .centerY,
                                                  multiplier: 1.0,
                                                  constant: 0.0)
No need for further discussion, just activate the two constraints:
NSLayoutConstraint.activate([centerHorizontally, centerVertically])
And let’s run the app:
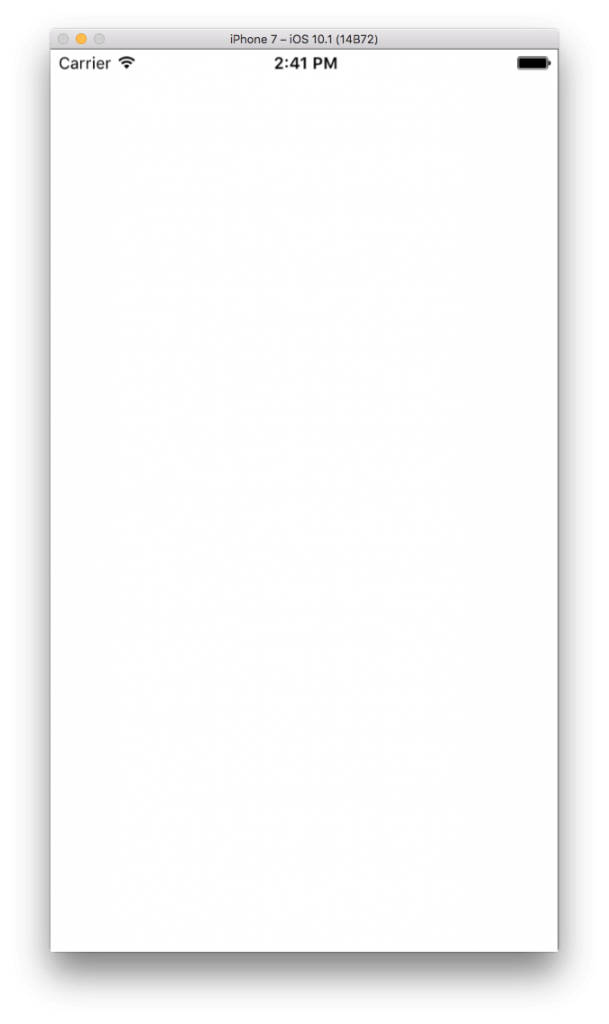
Interesting, nothing is shown there! But why?
Ah, yes! We did not specify the width and height of the view, so by default both of them are set to zero. Time to create two new constraints for them. However, this time we will activate each constraint upon initialization, and that’s the third and last way provided for activating constraints:
NSLayoutConstraint(item: myView,
                   attribute: .width,
                   relatedBy: .equal,
                   toItem: nil,
                   attribute: .notAnAttribute,
                   multiplier: 1.0,
                   constant: 120.0).isActive = true
Notice the isActive property at the closing parenthesis above. It’s a bool value and by making it true the constraint is activated. Further than that, we set the width of the view to 120.0 points.
Similarly, let’s specify the height:
NSLayoutConstraint(item: myView,
                   attribute: .height,
                   relatedBy: .equal,
                   toItem: nil,
                   attribute: .notAnAttribute,
                   multiplier: 1.0,
                   constant: 70.0).isActive = true
Now let’s run again and let’s see the results in both orientations:
Constraints In A View With Subviews
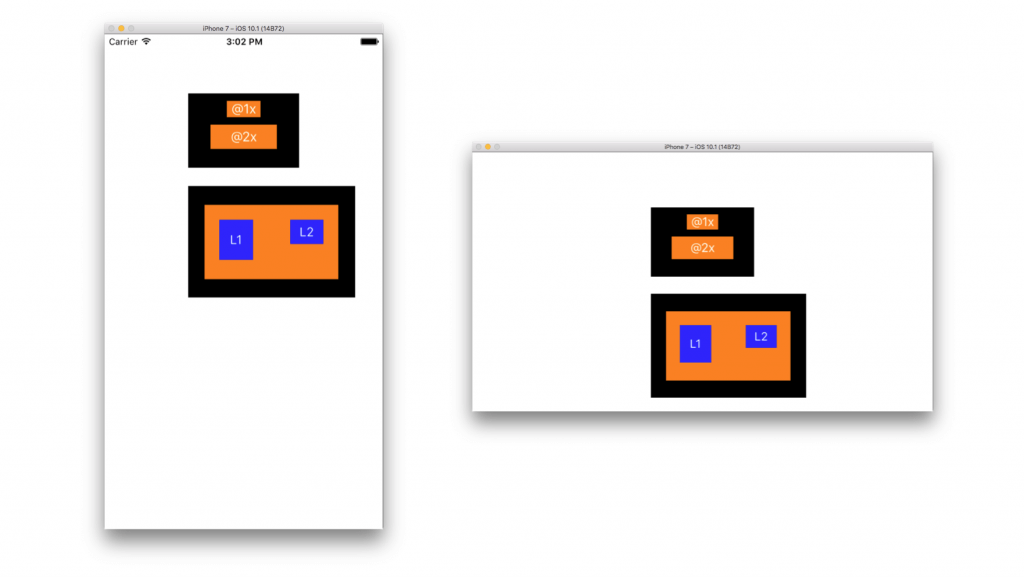
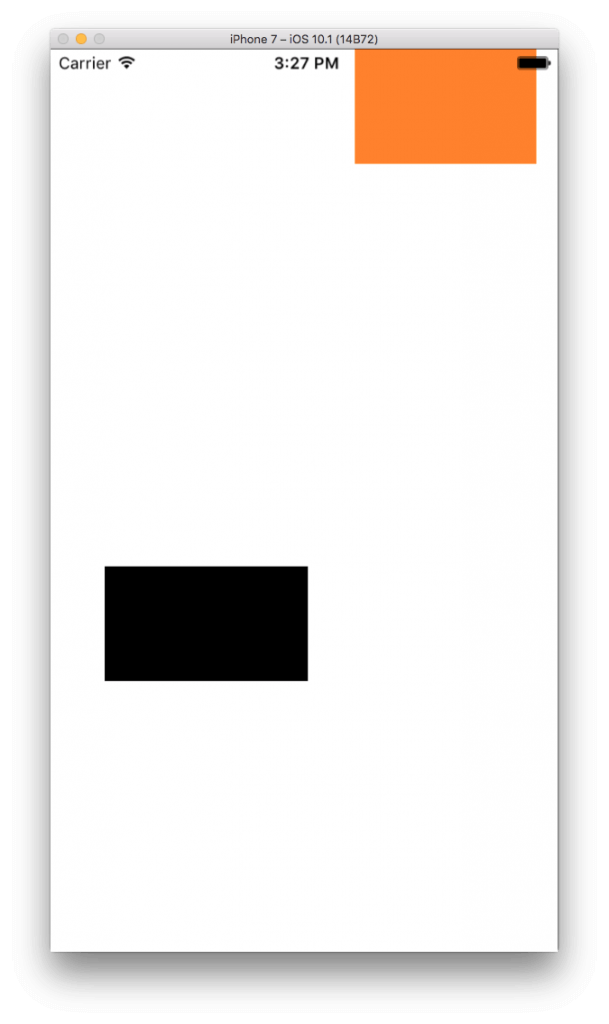
Okay, working with one view only and dealing with its constraints seems to be easy enough, but things are not that plain in the real world. There are views with subviews, which can also contain other subviews, and all of them should be sized and positioned properly, while, in most cases, they should work in both portrait and landscape orientation. So, let’s see a couple of more examples and learn how subviews are handled, without doing extreme things on the other hand. In this part, we’ll see how to create the following view, which even though remains simple enough, it indeed has things to teach us:
In the viewDidLoad(_:) method comment out the previous method call that we were working on, and enable the complexView1(). Then, go to its body and get ready for a few lines of code.
The first thing that we’ll create is the black container view. For starters, let’s initialise it:
func complexView1() {
    containerView1 = UIView()
    containerView1.backgroundColor = UIColor.black
    self.view.addSubview(containerView1)
    containerView1.translatesAutoresizingMaskIntoConstraints = false

}
Note that the containerView1, containerView2, containerView3, button1, button2, label1, label2 are views, buttons, and labels declared as properties in the ViewController class. I intentionally declared them that way, because we’ll need to reference to the views that we’ll create here in the next part as well.
Let’s proceed by setting containerView1 constraints, and based on what we’ve seen and learnt so far, here’s their configuration:
NSLayoutConstraint(item: containerView1, attribute: .centerX, relatedBy: .equal, toItem: self.view, attribute: .centerX, multiplier: 1.0, constant: 0).isActive = true
NSLayoutConstraint(item: containerView1, attribute: .top, relatedBy: .equal, toItem: self.view, attribute: .top, multiplier: 1.0, constant: 80.0).isActive = true
NSLayoutConstraint(item: containerView1, attribute: .width, relatedBy: .equal, toItem: nil, attribute: .notAnAttribute, multiplier: 1.0, constant: 150.0).isActive = true
NSLayoutConstraint(item: containerView1, attribute: .height, relatedBy: .equal, toItem: nil, attribute: .notAnAttribute, multiplier: 1.0, constant: 100.0).isActive = true
As you see, we create and activate them at the same time, so the amount of code we have to write is actually reduced.
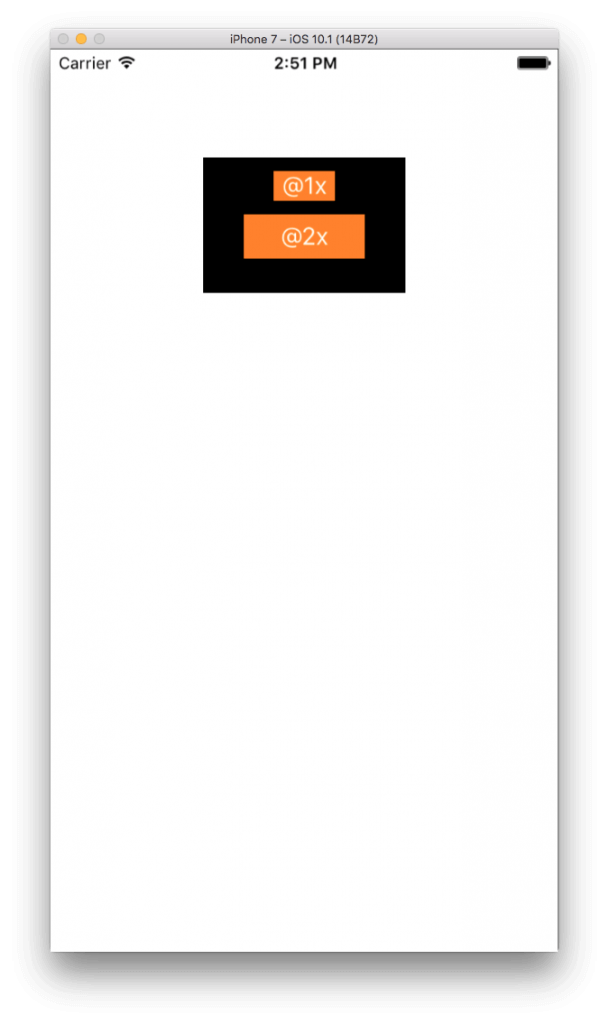
Next, let’s initialise the first button shown in the previous screenshot, which is the button1 property. The following code doesn’t contain anything new, it’s just a standard UIButton initialisation, therefore no comments:
button1 = UIButton(type: .custom)
button1.backgroundColor = UIColor.orange
button1.setTitle("@1x", for: .normal)
button1.setTitleColor(.white, for: .normal)
button1.translatesAutoresizingMaskIntoConstraints = false
I guess now that you are thinking of the constraints already, right? Because that’s going to be our next move, right? But no! Don’t rush because that you’ll find yourself in constraint troubles, so here’s one really important advice to always remember: Before create and active the constraints for any kind of view, make sure that the view has been added as a subview to its parent. In this case, that means that we have to do the following:
containerView1.addSubview(button1)
Easy thing, but it’s more easy to forget to write this line at the proper point!
Time for the button’s constraints. With the first one shown below, we’ll set its center in the horizontal axis:
let centerHorizontally = NSLayoutConstraint(item: button1, attribute: .centerX, relatedBy: .equal, toItem: containerView1, attribute: .centerX, multiplier: 1.0, constant: 0.0)
Notice that the reference view is the containerView1 this time, and not the self.view. For first time we’re using another subview as a reference so we can properly set the centerX attribute, but what we do is general; it could be any other attribute.
In the vertical axis, let’s make our button being 10.0 points away from the top of the container view:
let top = NSLayoutConstraint(item: button1, attribute: .top, relatedBy: .equal, toItem: containerView1, attribute: .top, multiplier: 1.0, constant: 10.0)
Do not forget that we need to set a width and height, as they won’t be calculated automatically from the previous constraints. So, there we go:
let width = NSLayoutConstraint(item: button1, attribute: .width, relatedBy: .equal, toItem: nil, attribute: .notAnAttribute, multiplier: 1.0, constant: 45.0)
let height = NSLayoutConstraint(item: button1, attribute: .height, relatedBy: .equal, toItem: nil, attribute: .notAnAttribute, multiplier: 1.0, constant: 22.0)
And just to refresh our memory, we’ll add the above constraints manually to the container view:
containerView1.addConstraint(centerHorizontally)
containerView1.addConstraint(top)
containerView1.addConstraint(width)
containerView1.addConstraint(height)
Finally, let’s initialise the button2 button:
button2 = UIButton(type: .custom)
button2.backgroundColor = UIColor.orange
button2.setTitle("@2x", for: .normal)
button2.setTitleColor(.white, for: .normal)
button2.translatesAutoresizingMaskIntoConstraints = false
containerView1.addSubview(button2)
Now, time for the last constraints. The first one that we’ll create for the button2 button regards its centering in the horizontal axis, where we’ll make the X center point of both buttons the same:
NSLayoutConstraint(item: button2, attribute: .centerX, relatedBy: .equal, toItem: button1, attribute: .centerX, multiplier: 1.0, constant: 0.0).isActive = true
Also, let’s position our button 10.0 points away from the bottom side of button1:
NSLayoutConstraint(item: button2, attribute: .top, relatedBy: .equal, toItem: button1, attribute: .bottom, multiplier: 1.0, constant: 10.0).isActive = true
Note that we relate here the top attribute of button2 to the bottom attribute of button1. The two buttons are in the proper order (from top to bottom), so we can do that without any problems at runtime.
As far as the width of the button is concerned, we want it to be twice the width of button1, and we’re going to say that exactly with the following line:
NSLayoutConstraint(item: button2, attribute: .width, relatedBy: .equal, toItem: button1, attribute: .width, multiplier: 2.0, constant: 0.0).isActive = true
For first time in our examples so far we’re using a reference view for calculating the width of another view. But not just that; notice the multiplier value. It’s set to 2.0, which means that the value of the reference view’s attribute (the width of button1 in other words) is doubled, and therefore we have the desired result. The above demonstrates clearly how easy it really is to refer to other views’ attributes and set constraints that fast!
Let’s do something similar for the height of our button:
NSLayoutConstraint(item: button2, attribute: .height, relatedBy: .equal, toItem: button1, attribute: .height, multiplier: 1.5, constant: 0.0).isActive = true
See, the height of button2 is 1.5 times greater than the height of button1. Generally speaking, realise that if you change the size or position of the first button (button1), then the button2 will be affected too.
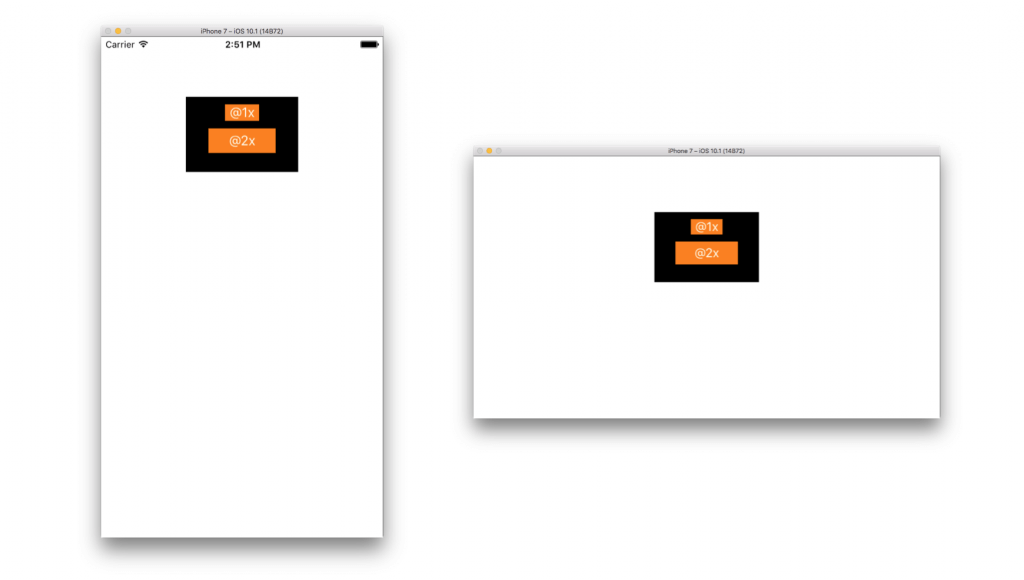
Now you can run the app and see the results.
For a deeper understanding regarding what we did here, play with the constraints and look how your changes affect the views.
More Views To Play With!
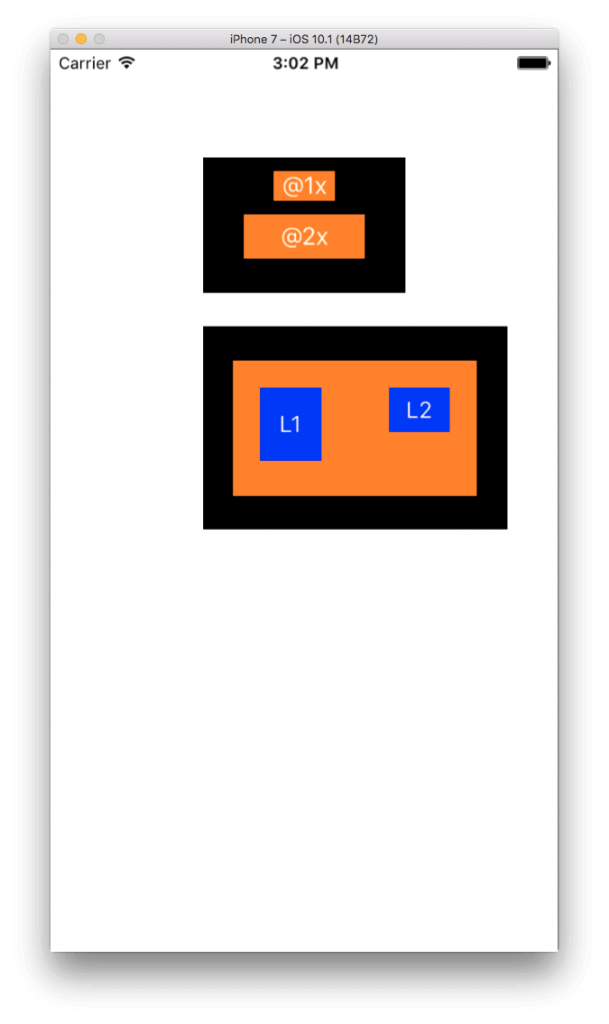
Fun never ends, therefore here we are going to extend what we did in the previous part by adding more views to the ViewController view controller. After we have finished our work, here’s what we’ll come up with:
Begin by going to the viewDidAppear(_:) method, and uncomment the complexView2() method call. Do not, however, comment out the call to the complexView1(), because the container view and the buttons created there will be used as reference views for the constraints that we’ll set next. Once you do so, navigate to the empty body of the complexView2() method.
First things first, so we’ll initialise the second container view as usual:
func complexView2() {
    containerView2 = UIView()
    containerView2.backgroundColor = UIColor.black
    containerView2.translatesAutoresizingMaskIntoConstraints = false
    self.view.addSubview(containerView2)

}
For the sake of the demonstration, we’ll align the left sides of both container views with the first constraint regarding the containerView2, as shown below:
NSLayoutConstraint(item: containerView2, attribute: .left, relatedBy: .equal, toItem: containerView1, attribute: .left, multiplier: 1.0, constant: 0).isActive = true
In other words, both containerView1 and containerView2 will have the same X origin point. Regarding the Y origin point, we’ll set it to 25.0 points below the bottom side of the containerView1:
NSLayoutConstraint(item: containerView2, attribute: .top, relatedBy: .equal, toItem: containerView1, attribute: .bottom, multiplier: 1.0, constant: 25.0).isActive = true
As for the width and height, we’ll make them 1.5 times greater than the width and height of the containerView1:
NSLayoutConstraint(item: containerView2, attribute: .width, relatedBy: .equal, toItem: containerView1, attribute: .width, multiplier: 1.5, constant: 0).isActive = true
NSLayoutConstraint(item: containerView2, attribute: .height, relatedBy: .equal, toItem: containerView1, attribute: .height, multiplier: 1.5, constant: 0).isActive = true
With all the above code, the second black view has been properly configured to be displayed as shown in the previous screenshot.
The next step is to add another view inside the containerView2 (the orange one in the screenshot), which will also work as a container for the labels that we’ll add in a while. First, the basics:
containerView3 = UIView()
containerView3.backgroundColor = UIColor.orange
containerView3.translatesAutoresizingMaskIntoConstraints = false
containerView2.addSubview(containerView3)
We want to make this view (containerView3) have the same center point with the containerView2 view, so we’ll play with the centerX and centerY attributes:
NSLayoutConstraint(item: containerView3, attribute: .centerX, relatedBy: .equal, toItem: containerView2, attribute: .centerX, multiplier: 1.0, constant: 0).isActive = true
NSLayoutConstraint(item: containerView3, attribute: .centerY, relatedBy: .equal, toItem: containerView2, attribute: .centerY, multiplier: 1.0, constant: 0).isActive = true
As you see, it’s so straightforward to set the same center points for two views! But that’s not enough to display the orange view; we need to specify the width and height, and we’ll do it simply, as we’ve already seen it in the previous examples:
NSLayoutConstraint(item: containerView3, attribute: .width, relatedBy: .equal, toItem: nil, attribute: .notAnAttribute, multiplier: 1.0, constant: 180).isActive = true
NSLayoutConstraint(item: containerView3, attribute: .height, relatedBy: .equal, toItem: nil, attribute: .notAnAttribute, multiplier: 1.0, constant: 100.0).isActive = true
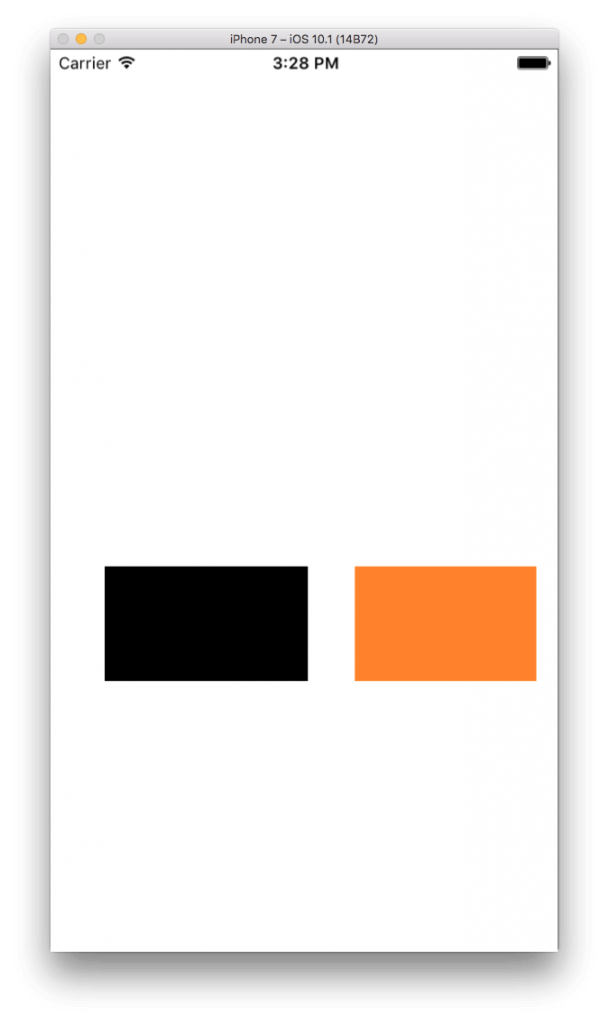
The third (and last) container view is now ready, and if you run the app you’ll see it there.
Let’s create and position the labels now, having as a guide the screenshot from the beginning of this part. We start from the label to the left side by initialising it:
label1 = UILabel()
label1.backgroundColor = UIColor.blue
label1.text = "L1"
label1.textColor = UIColor.white
label1.textAlignment = .center
label1.translatesAutoresizingMaskIntoConstraints = false
containerView3.addSubview(label1)
The origin point for that label will be set to (20.0, 20.0). That means that we have to create one constraint that will position the label properly on the horizontal axis, and one constraint to position it to the vertical axis. For the first one, we’ll use the leading attribute, and we’ll set its constant value to 20.0 (obviously):
let leading = NSLayoutConstraint(item: label1, attribute: .leading, relatedBy: .equal, toItem: containerView3, attribute: .leading, multiplier: 1.0, constant: 20.0)
Note that we do not activate the constraint at once like we did before. The same will apply to the following constrains as well. That’s intentional, and you’ll understand the reason pretty soon.
In the next constraint, we’ll use the top attribute to position the label vertically:
let top1 = NSLayoutConstraint(item: label1, attribute: .top, relatedBy: .equal, toItem: containerView3, attribute: .top, multiplier: 1.0, constant: 20.0)
There’s noting to discuss here, as there’s nothing new.
We’ll use now another view created earlier, the button1 button to specify the width of our label. Actually, we want to make both widths equal:
let width1 = NSLayoutConstraint(item: label1, attribute: .width, relatedBy: .equal, toItem: button1, attribute: .width, multiplier: 1.0, constant: 0)
As for the height, we’ll make it 1.2 times greater than the width:
let height1 = NSLayoutConstraint(item: label1, attribute: .height, relatedBy: .equal, toItem: label1, attribute: .width, multiplier: 1.2, constant: 0)
Obviously, if you modify the width of button1, the size of label1 will change too.
The really interesting part is coming now that we must add those constraints to the view. But what view exactly? If you remember, I had mentioned earlier that the constraints must be always added to the first common ascendant view (common superview) of the views referenced in the constraint initialisation. Let’s make that clear by examining the above constraints one by one:
The leading constraint refers to two views upon initialisation: The label1 and containerView3. What’s the common ascendant view for those two?
The answer is simple: It’s the containerView2, so this is where we should add the constraint:
containerView2.addConstraint(leading)
With the same logic, we add the top constraint to the containerView2 as well:
containerView2.addConstraint(top1)
Let’s see the width1 now. The views referenced in that constraint’s initialisation are the label1, and the button1. However, they don’t have the same superview, so what’s the common superview we find if we go up to the hierarchy? It’s the self.view:
self.view.addConstraint(width1)
As a note for later, if you want to see the importance of that logic, try to use the containerView2 instead of the self.view above. You’ll see the app crashing, and it’ll be useful to read the returned log.
Lastly, let’s see the height1 constraint. In its initialisation the label1 is referenced only, therefore it’s safe to add it to the containerView3 view:
containerView3.addConstraint(height1)
The above are really valuable to understand how constraints are added to views and superviews. Of course, if you follow any of the other two methods we met to activate constraints, you don’t need to get into that trouble, but no matter what, if you do constraints programmatically, then definitely that’s a knowledge you should possess.
There’s one more label left to be added to the view (label2), so let’s initialise it before we see its constraints:
label2 = UILabel()
label2.backgroundColor = UIColor.blue
label2.text = "L2"
label2.textColor = UIColor.white
label2.textAlignment = .center
label2.translatesAutoresizingMaskIntoConstraints = false
containerView3.addSubview(label2)
There’s nothing new here, so let’s see the constraints: The first one is going to be a trailing constraint; it will specify a space of 20.0 points between the right side of the label and the right side of the superview:
let trailing = NSLayoutConstraint(item: label2, attribute: .trailing, relatedBy: .equal, toItem: containerView3, attribute: .trailing, multiplier: 1.0, constant: -20.0)
Once again, note the negative constant value.
According to the screenshot in the beginning of this part, we want the two labels have the same Y origin point, so we can make their top attributes equal:
let top2 = NSLayoutConstraint(item: label2, attribute: .top, relatedBy: .equal, toItem: label1, attribute: .top, multiplier: 1.0, constant: 0.0)
Also, let’s let our labels have the same width:
let width2 = NSLayoutConstraint(item: label2, attribute: .width, relatedBy: .equal, toItem: label1, attribute: .width, multiplier: 1.0, constant: 0.0)
Regarding the height, we’ll make the label2 as high as the button2.
let height2 = NSLayoutConstraint(item: label2, attribute: .height, relatedBy: .equal, toItem: button2, attribute: .height, multiplier: 1.0, constant: 0.0)
Finally, instead of adding manually the constraints into the proper views, we’ll use the activate(…) method of the NSLayoutConstraint class:
NSLayoutConstraint.activate([trailing, top2, width2, height2])
That way there’s no reason for us to search and find the common ascendant for the views we used in the constraints initialisation.
If you run the app, here’s what you’ll see in both orientations:
The Visual Format Language
The Visual Format Language (VFL) it’s not really a programming language, but it is a descriptive way to create constraints between views, and rules regarding the layout of all the visual elements on the screen. VFL does not seem to be as flexible or powerful as what we’ve seen already; however, you can make from simple to complex constraint descriptions by just setting distances and sizes, equalities and inequalities in a single string. Quite often is used in combination to the previous method for achieving the final desired results. We’ll see the basics here, so the more you practice after that, the easier will be for you to use it.
To start, go to the viewDidLoad(_:) method and comment out any method calls we’ve used so far. Uncomment the call to the vflExample(), and then go to its empty body.
The first thing (as always) is to initialise the view that will use next. This will be the containerView1 that’s already declared in our class:
func vflExample() {
    containerView1 = UIView()
    containerView1.backgroundColor = UIColor.black
    containerView1.translatesAutoresizingMaskIntoConstraints = false
    self.view.addSubview(containerView1)

}
Let’s have now our first meet with the VFL, and let’s specify the width of the view:
let descHorizontal = "H:[containerView1(200)]"
When the above string gets used, it will set the width of the container view to 200.0 points. But there are some rules in the syntax, and we’ll start talking about them with the “H:” substring at the beginning of the string. When appeared, it means that the constraints regard the horizontal axis only. For the vertical axis, you use the “V:” prefix (see next). Note that the use of the “V:” is mandatory, while the “H:” can be omitted; the system will automatically “understand” that it’s the horizontal axis that you refer to.
Next, it’s the [containerView1(200)] part in the descHorizontal string. Generally speaking, when using the syntax [XXX], then you specify the view you’re targeting to, and in our case it’s the containerView1. Something important: The “containerView1” shown above is just a string value, so it could be anything, not necessarily that one, and at the moment does not point to the real view object. For example, I could have set the following without causing any difference at all:
let descHorizontal = "H:[iLoveConstraints(200)]"
The connection between the view name given above and the actual view will be done in a while in a quite specific way.
Lastly, the parenthesis with the number right next to the view’s name declares the width.
Let’s do the same as above now, but for the height:
let descVertical = "V:[containerView1(150)]"
The system will know that the value 150 regards the height because we start the description of the constraints with the “V:” prefix.
As you see, we don’t specify any origin point for our view. For now that’s okay, and the system will position automatically the view to the (0, 0) point. With the above two simple descriptions made, it’s time to try to put them in motion. Our next step is to make the actual matching between the descriptive name of the view given above, and the real view object. For that reason we’ll create a Dictionary, as shown below:
let viewsDict = ["containerView1": containerView1]
In case of many views, our dictionary would have several entries also. If you forget to match a view with its description in that dictionary, or if you mistype anything, the app will just crash.
The next step is to create the actual constraints by using whatever we prepared above. We’ll start by the horizontal axis:
let horizontalConstraints = NSLayoutConstraint.constraints(withVisualFormat: descHorizontal,
                                                           options: NSLayoutFormatOptions(rawValue: 0),
                                                           metrics: nil,
                                                           views: viewsDict)
The above method returns an array of constraints, and not a single constraint. For the time don’t bother about the options and metrics parameters, just note how we use the descHorizontal string and the viewsDict as arguments. As a side note, we could have avoided creating the strings and the dictionary as distinct objects; instead, we could have provided the real values as arguments directly.
Now, the constraints in the vertical axis:
let verticalConstraints = NSLayoutConstraint.constraints(withVisualFormat: descVertical,
                                                         options: NSLayoutFormatOptions(rawValue: 0),
                                                         metrics: nil,
                                                         views: viewsDict)
Of course, we should never forget to add them to the superview of our view:
self.view.addConstraints(horizontalConstraints)
self.view.addConstraints(verticalConstraints)
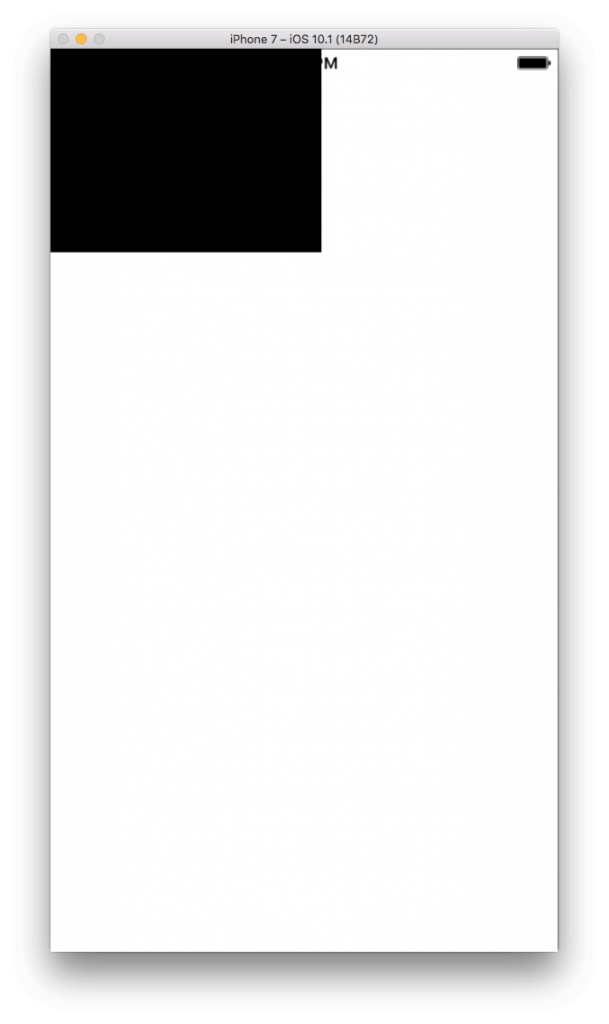
At this point, you can run the app. You’ll see a black view appearing at the top-left side of the screen having the size we specified above.
More On The VFL
Now that we’ve met the basic rules regarding the Visual Format Language, let’s see a few more useful things, as creating only views positioned to the top-left corner makes no good at all. Continuing on the same code again, let’s modify the two strings as shown below:
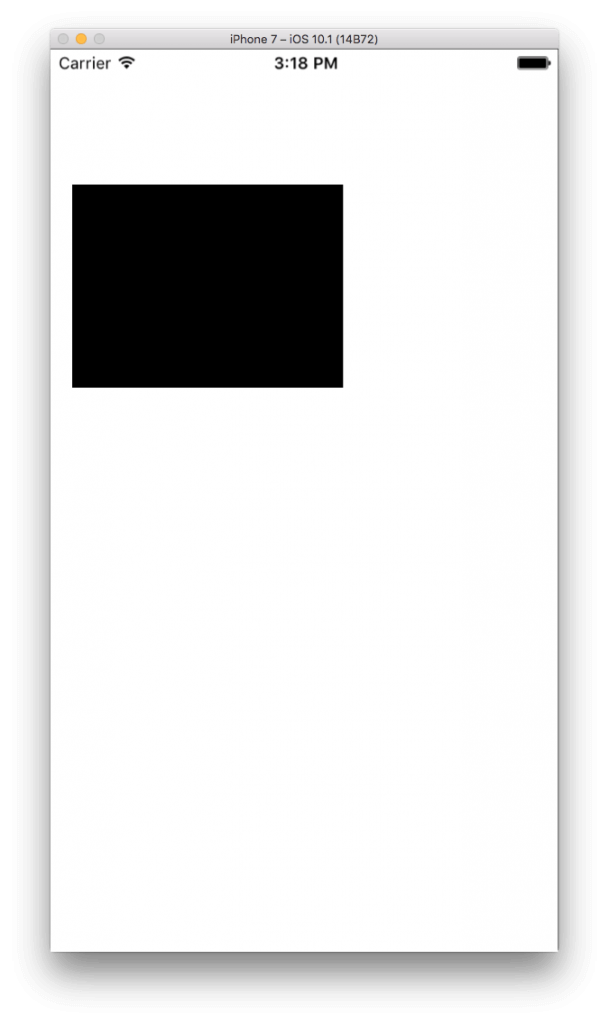
let descHorizontal = "H:|-[containerView1(200)]"
let descVertical = "V:|-100-[containerView1(150)]"
The new element in the first line is the “|-” substring. The “|” symbol indicates the superview of the described view, and when it’s on the left side of the view it indicates the left side of the superview as well (we could also say that we describe the leading constraint that way). If we would want to indicate the right side (to describe the trailing constraint), then we should place it after the reference on the view in a way similar to the following:
let descHorizontal = "H:[containerView1(200)]-|"
The dash symbol “-” indicates in general the distance between two referenced views. When it’s used as shown above, then some default spacing will be used automatically by the system between the left side of our view and the left side of its superview (a default value for the leading constraint). However, when the form “-X-” is used like in the descVertical string, then the given specific value describes the distance between the two views. So, in other words, the "H:|-[containerView1(200)]" means that the X origin point for the containerView1 will be set automatically by the system using a default spacing value, while the "V:|–100-[containerView1(150)]" means that the Y origin point of the view will be 100.0 points from the top of the view. You can see that if you just run the app:
Let’s see another example:
let descHorizontal = "H:|-40-[containerView1]-100-|"
let descVertical = "V:[containerView1(40)]-120-|"
With the first line, the containerView1 will be positioned 40.0 points away from the left side of the superview, and 100.0 points away from the right side. Note that we don’t specify a width in that case; it would lead to unsatisfied constraints and to logged messages by Xcode. It would be like we were trying to set the leading, trailing and width constraints all together at the same time. On the vertical axis, we set the height of our view to 40.0 points, and we make it appear 120.0 points away from the bottom side of the screen:
Let’s suppose now that you don’t want to provide specific values for the distance of our view from the left and right, but you’d like to calculate them first and then use them. To keep things simple, we won’t make any calculations, instead we’ll assign a couple of values to properties:
let leftDist: CGFloat = 150.0
let rightDist: CGFloat = 25.0
Modify now the descHorizontal string according to what you see next:
let descHorizontal = "H:|-distanceLeft-[containerView1]-distanceRight-|"
Similarly to what we did for matching the view name with the actual view object, we’ll create a new dictionary to match the distanceLeft and distanceRight substrings to the real values:
let metrics = ["distanceLeft": leftDist, "distanceRight": rightDist]
Let’s update the creation of the horizontal constraints now, and let’s pass the metrics dictionary as an argument to the metrics parameter:
let horizontalConstraints = NSLayoutConstraint.constraints(withVisualFormat: descHorizontal,
                                                           options: NSLayoutFormatOptions(rawValue: 0),
                                                           metrics: metrics,
                                                           views: viewsDict)
The above makes clear what the metrics parameter is for, and how it can be used.
Time to put another view into play, so add the following initialisation:
containerView2 = UIView()
containerView2.backgroundColor = UIColor.orange
containerView2.translatesAutoresizingMaskIntoConstraints = false
self.view.addSubview(containerView2)
Then, change the descHorizontal constraints description so it includes the containerView2 view as well:
let descHorizontal = "H:|-40-[containerView1(150)]-35-[containerView2]-|"
With the above we’re saying that the X origin point of the containerView2 should be 35.0 points after the right side of the containerView1. Keep in mind that it’s not necessary to describe the constraints of the views in one description string only; you can have more than one. For example, for the vertical constraints of the containerView1 view we’ll have the following description:
let descVertical = "V:[containerView1(85)]-200-|"
The above sets a height of 85.0 points to the view, and places it 200.0 points from the bottom of the superview. Now, for the containerView2 we’ll create another string to specify the constraints in the vertical axis:
let descVertical2 = "V:[containerView2(==containerView1)]"
Note something new above: We set the height, and we make it equal to the height of the containerView1 view. That means that this view will depend on the height of the first view, and if that gets changed, this one will change too. Generally, you can use the following symbols to define the relationship between two values regarding view sizes and positions: == (equal), >= (greater than), <= (less than).
Before we see the above running, there are two things left to be done: First, update the viewsDict dictionary so it includes the containerView2 view as well:
let viewsDict = ["containerView1": containerView1, "containerView2": containerView2]
Second, create a new collection of constraints based on the descVertical2 description:
let verticalConstraints2 = NSLayoutConstraint.constraints(withVisualFormat: descVertical2,
                                                          options: NSLayoutFormatOptions(rawValue: 0),
                                                          metrics: nil,
                                                          views: viewsDict)
Do not forget to add the constraints to the superview:
self.view.addConstraints(verticalConstraints2)
Here are the results by running the app:
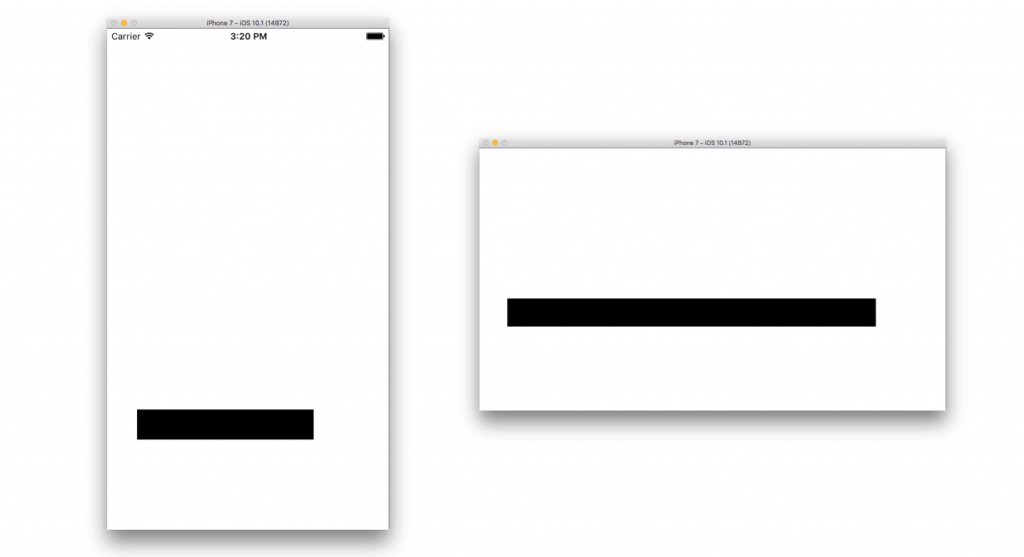
So far we haven’t used the options parameter value of the constraints(...) method. This one exists to set alignment options between the views referenced on the description string, and there are several options you could use. Note however that, depending on the constraints configuration you make, not all alignment options can actually work. In our example, let’s update once again our code and let’s try to align the bottom sides of the views in the horizontalConstraints initialisation:
let horizontalConstraints = NSLayoutConstraint.constraints(withVisualFormat: descHorizontal,
                                                           options: .alignAllBottom,
                                                           metrics: nil,
                                                           views: viewsDict)
All the alignment options are constants of the NSLayoutFormatOptions structure, so visit that link to see them all.
Run the app again and see how the bottom alignment affects the views:
Summary
If you’re the kind of developer who prefer to create their user interfaces programmatically, then knowing how to deal with constraints in code is definitely a must-thing. In my opinion, using the programming method that we met in the first parts of the post to create and set constraints consists of the most powerful option you could have on your hands. The Visual Format Language is a good alternative, but if you start trying to use it in complex UIs you’ll realise that there’s no way to manage to set all the constraints you need with it only. In most cases, when VFL is used, a combination between VFL and the programming method is required to achieve the final result, but as we didn’t see such an example in this post I leave it to you as an exercise. In any case, which method you select to set the constraints of a project eventually depends on your personal preferences, and on the project needs of course. I’m closing this post hoping that you’ve been motivated enough so you start handling the constraints in code. Have fun!
For reference, you can check out the full project on GitHub.


