iOS Programming 101: How To Create Swipeable Table View Cell to Display More Options
When iOS 7 was first released, one of the many visual changes that particularly interested me was the swipe-to-delete gestures in the Mail app. By now you should be very familiar with the feature. After you swipe a table cell, you’ll see the Trash button, plus a new button named More. The More button will bring up an action sheet that shows a list of options such as Reply, Flag, etc.
I thought it’s a great feature to provide additional options for manipulating a table record. However, as you know, Apple didn’t make this feature available to developers in iOS 7. You can only create the swipe-to-delete option in table cell. The More feature is only limited to the stock Mail app. I have no idea why Apple keeps such great feature to its own app. Fortunately, some developers have created free solutions (such as UITableView-Swipe-for-Options, MCSwipeTableViewCell) and made them available freely.
In this tutorial, I’ll use SWTableViewCell and see how to implement swipe-to-show-options feature in your app. SWTableViewCell is pretty to easy to use. If you understand how to implement UITableView, you shouldn’t have any problem with SWTableViewCell. On top of that, it supports utility buttons on both swipe directions. You’ll understand what it means in a minute.
Let’s get started and build our demo app.
Xcode Project Template for Demo App
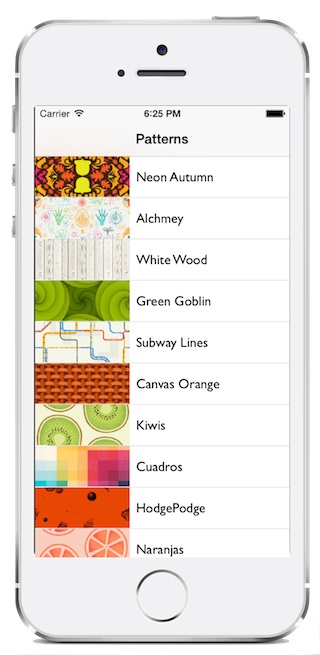
I encourage you to create the project from scratch. The demo app is simply a table view app showing a list of custom table cell. However, as the focus of this tutorial is on SWTableViewCell, I have pre-built the project for you. You can download the project template from here. If you know how to create a custom table view, you should understand how the template works. After downloading the template, you can compile it and have a trial run. The app should display a list of pattern images (courtesy of ThePatternLibrary.com).
Adding the SWTableViewCell Library
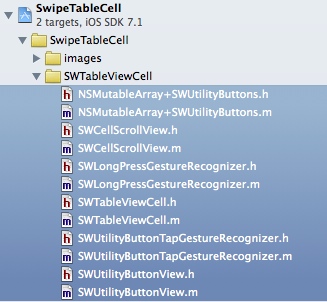
The SWTableViewCell library is developed by Chris Wendel. It’s freely available on GitHub. To use the library, first download it from the GitHub, extract the zipped archive and add the files under SWTableViewCell/PodFiles to your Xcode project. For better organization, you may create a new group and put the files there.
Using SWTableViewCell
SWTableViewCell is very easy to integrate. If you’re familiar with UITableView and UITableViewCell, you shouldn’t have any problem with the integration. In general, here are the few things you need to do to use SWTableViewCell:
- Extend your custom table view cell from SWTableViewCell class instead of UITableViewCell – the SWTableViewCell is actually a subclass of UITableView Cell but provides additional utility buttons when user swipes across a table cell.
- Update the cellForRowAtIndexPath: method to create the utility buttons – the SWTableViewCell comes with two properties named leftUtilityButtons and rightUtilityButtons. These two properties represent the utility buttons to display depending on the swipe direction. You’ll need to create an array of buttons and assign it to the property. It’s not required to create both leftUtilityButtons and rightUtilityButtons.
- Implement the SWTableViewCellDelegate protocol – optional methods of the protocol allow developers to manage the actions of the utility buttons. When user swipes a table view cell, the cell will reveal a set of utility buttons. Depending on the direction of the swipe, the didTriggerRightUtilityButtonWithIndex: or didTriggerLeftUtilityButtonWithIndex: method will be called when the utility button is tapped. You’ll need to implement these methods to trigger the action of the utility buttons.
Okay, let’s modify the project template to use SWTableViewCell.
Extend Custom Table View Cell from SWTableViewCell Class
First, open the CustomTableViewCell.h and change the parent class to SWTableViewCell. Your code should look like this after the change:
|
1 2 3 4 5 6 7 8 |
#import <UIKit/UIKit.h> #import "SWTableViewCell.h" @interface CustomTableViewCell : SWTableViewCell @property (weak, nonatomic) IBOutlet UIImageView *patternImageView; @property (weak, nonatomic) IBOutlet UILabel *patternLabel; @end |
Creating Utility Buttons
Next, we’ll update the cellForRowAtIndexPath: method in the SwipeTableViewController.m to create the utility buttons. But before we do, add the following import statement and implement the SWTableViewCellDelegate protocol in the SwipeTableViewController.h. We’ll talk about the protocol in the next section but let’s update the code first. Your code should look like this after the change:
|
1 2 3 4 5 6 |
#import <UIKit/UIKit.h> #import "SWTableViewCell.h" @interface SwipeTableViewController : UITableViewController <SWTableViewCellDelegate> @end |
Open the SwipeTableViewController.m and update the cellForRowAtIndexPath: method:
|
1 2 3 4 5 6 7 8 9 10 11 12 13 14 15 16 17 18 19 20 21 22 23 24 25 26 27 28 29 30 31 32 33 34 35 36 37 38 39 40 |
- (UITableViewCell *)tableView:(UITableView *)tableView cellForRowAtIndexPath:(NSIndexPath *)indexPath { static NSString *cellIdentifier = @"Cell"; CustomTableViewCell *cell = (CustomTableViewCell *)[tableView dequeueReusableCellWithIdentifier:cellIdentifier forIndexPath:indexPath]; // Add utility buttons NSMutableArray *leftUtilityButtons = [NSMutableArray new]; NSMutableArray *rightUtilityButtons = [NSMutableArray new]; [leftUtilityButtons sw_addUtilityButtonWithColor: [UIColor colorWithRed:1.0f green:1.0f blue:0.35f alpha:0.7] icon:[UIImage imageNamed:@"like.png"]]; [leftUtilityButtons sw_addUtilityButtonWithColor: [UIColor colorWithRed:1.0f green:1.0f blue:0.35f alpha:0.7] icon:[UIImage imageNamed:@"message.png"]]; [leftUtilityButtons sw_addUtilityButtonWithColor: [UIColor colorWithRed:1.0f green:1.0f blue:0.35f alpha:0.7] icon:[UIImage imageNamed:@"facebook.png"]]; [leftUtilityButtons sw_addUtilityButtonWithColor: [UIColor colorWithRed:1.0f green:1.0f blue:0.35f alpha:0.7] icon:[UIImage imageNamed:@"twitter.png"]]; [rightUtilityButtons sw_addUtilityButtonWithColor: [UIColor colorWithRed:0.78f green:0.78f blue:0.8f alpha:1.0] title:@"More"]; [rightUtilityButtons sw_addUtilityButtonWithColor: [UIColor colorWithRed:1.0f green:0.231f blue:0.188 alpha:1.0f] title:@"Delete"]; cell.leftUtilityButtons = leftUtilityButtons; cell.rightUtilityButtons = rightUtilityButtons; cell.delegate = self; // Configure the cell... cell.patternLabel.text = [patterns objectAtIndex:indexPath.row]; cell.patternImageView.image = [UIImage imageNamed:[patternImages objectAtIndex:indexPath.row]]; return cell; } |
Here we create two sets of utility buttons. One will be revealed when user swipes the cell from left to right. The other set will be displayed when the cell is swiped in the opposite direction. We create a set of sharing buttons for the leftUtilityButtons, while we just create a “More” and “Delete” button for the rightUtilityButtons. As you can see from the above code, you can simply create a NSMutableArray and add the button using the sw_addUtilityButtonWithColor: method.
You’re now ready to compile and test the app. Once launched, try to swipe any of the table cell and you should see the utility buttons. However, the buttons do not work properly. It’s a known issue as we haven’t implemented any methods of the SWTableViewCellDelegate protocol. Let’s move on.
Implementing the SWTableViewCellDelegate Protocol
The SWTableViewCellDelegate protocol provides optional methods to manage the action of the utility buttons. If you read the code in the previous section carefully, you should notice the SwipeTableViewController is assigned as the delegate of the SWTableViewCell. We’ll then implement these two methods in the SwipeTableViewController.m:
- didTriggerLeftUtilityButtonWithIndex: method – triggered when any of the left utility buttons is tapped.
- didTriggerRightUtilityButtonWithIndex: method – triggered when any of the right utility buttons is tapped.
Add the following code in the SwipeTableViewController.m:
|
1 2 3 4 5 6 7 8 9 10 11 12 13 14 15 16 17 18 19 20 21 22 23 24 25 26 27 28 29 30 |
- (void)swipeableTableViewCell:(SWTableViewCell *)cell didTriggerLeftUtilityButtonWithIndex:(NSInteger)index { switch (index) { case 0: { UIAlertView *alertView = [[UIAlertView alloc] initWithTitle:@"Bookmark" message:@"Save to favorites successfully" delegate:nil cancelButtonTitle:@"OK" otherButtonTitles: nil]; [alertView show]; break; } case 1: { UIAlertView *alertView = [[UIAlertView alloc] initWithTitle:@"Email sent" message:@"Just sent the image to your INBOX" delegate:nil cancelButtonTitle:@"OK" otherButtonTitles: nil]; [alertView show]; break; } case 2: { UIAlertView *alertView = [[UIAlertView alloc] initWithTitle:@"Facebook Sharing" message:@"Just shared the pattern image on Facebook" delegate:nil cancelButtonTitle:@"OK" otherButtonTitles: nil]; [alertView show]; break; } case 3: { UIAlertView *alertView = [[UIAlertView alloc] initWithTitle:@"Twitter Sharing" message:@"Just shared the pattern image on Twitter" delegate:nil cancelButtonTitle:@"OK" otherButtonTitles: nil]; [alertView show]; } default: break; } } |
To keep thing simple, we’ll just display an alert message whenever any of the sharing button is tapped. In real app, you may need to implement Facebook and Twitter sharing.
For the right utility buttons, we implement the didTriggerRightUtilityButtonWithIndex: method with the following code:
|
1 2 3 4 5 6 7 8 9 10 11 12 13 14 15 16 17 18 19 20 21 22 23 24 |
- (void)swipeableTableViewCell:(SWTableViewCell *)cell didTriggerRightUtilityButtonWithIndex:(NSInteger)index { switch (index) { case 0: { // More button is pressed UIActionSheet *shareActionSheet = [[UIActionSheet alloc] initWithTitle:@"Share" delegate:nil cancelButtonTitle:@"Cancel" destructiveButtonTitle:nil otherButtonTitles:@"Share on Facebook", @"Share on Twitter", nil]; [shareActionSheet showInView:self.view]; [cell hideUtilityButtonsAnimated:YES]; break; } case 1: { // Delete button is pressed NSIndexPath *cellIndexPath = [self.tableView indexPathForCell:cell]; [patterns removeObjectAtIndex:cellIndexPath.row]; [patternImages removeObjectAtIndex:cellIndexPath.row]; [self.tableView deleteRowsAtIndexPaths:@[cellIndexPath] withRowAnimation:UITableViewRowAnimationLeft]; break; } default: break; } } |
Again, the code is simple and straightforward. When the More button is tapped, the app brings up an action sheet showing a list of social sharing options. For the delete action, we simply remove the item from the patterns and patternImages arrays, followed by calling the deleteRowsAtIndexPaths: method to remove the record from table view.
That’s it! You can now compile and run the app again. The utility buttons should work now.
Summary
The SWTableViewCell makes it really easy to implement the swipe-for-option feature in table view. When you develop your next app, consider to add this feature. I believe it’ll take the user experience to the next level.
Though we can develop our own solution or use some third-party solutions, I truly hope that Apple will consider to open up such feature to all developers in the next iOS update.
For your reference, you can download the final Xcode project from here. As always, leave me comment and share your thought.

Founder of AppCoda. Author of multiple iOS programming books including Beginning iOS Programming with Swift and Mastering SwiftUI. iOS App Developer and Blogger. Follow me at Facebook, Twitter and Google+.
Comments
 ohdowload
Authorthanks for new article. could you please tell me when you usually post new article and how many times per week did you post an article because i think i just fall in love with this website. there is so many high quality tutorial to learn. thank you for making the tutorial for us. cheers
 Simon Ng
AuthorWe used to publish tutorial article weekly. We’re now growing our team and hopefully we can create tutorials more frequently in near future.
 ohdowload
Authorcan i request a tutorial about how to learn to use any third party project from github. could you please do a walkthrough for SWTableViewCell as an example because as a novice sometimes i can’t understand even though there is readme/guide documentation there. cheers.
 Simon Ng
AuthorPlease send your suggestion to [email protected]. We’ll see if we can create a tutorial for it.
 hemanthgk
AuthorHi Simon,
I get problem using push segue with it. It doesn’t navigate me to the next screen. What can I do to get that resolved.
 AnthonyMarchenko
AuthorThanks! Exactly what I need to implement in current project 🙂
 PAVAN
PAVAN
AuthorHow can I reduce width of buttons as per requirement.
 Brian Mendez
AuthorThis is my question as well.
 durden
Authorgreat article, exactly what I’m looking for! but…is it just me or something, the final sample project code does not work, you cannot swipe at all…
 LittlePeculiar
AuthorThank you for this. Fantastic.
 Zucca86
AuthorGreat tutorial !!
Is there a way to create a segue connection from one swipe option to another controller with storyboard ??
Thank you.
 Tobias Mann
Authorhave you found a solution?
have the same problem right now
 SwedishDev
AuthorJust use [self performSegueWithIdentifier:] in the table view controller and create a segue in Storyboard with an identifier that you plug into that message.
 rycill
Authorhow can we add dynamic text under a png button. like number of votes or something like that.
thanks
 rycill
Authornot under but over (sorry i’m french 😉
 GJC
GJC
AuthorGreat!
 raj
raj
AuthorHaving trouble unzipping your starter template zip file. I’ve tried downloading several times, and used different extractors, but none of them work.
 Simon Ng
AuthorJust tested again. I had no problem unzipping the file using Mac’s archive utility. Please re-download the file and try again.
 raj
raj
AuthorThanks, Simon. I haven’t retried yet, as I just saw your message right now. However, when I had the same problem with another site’s code, I realized that there’s a weird situation when downloading from Dropbox that sometimes happens. In these cases, the zip file is not downloading fully. So, re-downloading usually seems to do the trick.
 raj
raj
AuthorNope, still having problems, even after re-downloading the template and final zip files. They just will not unzip.
 محمد عبد الرازق
Authorhi I have a problem I did the whole thing but when I click on the cell it doesn’t make a push seque , I have my UIcontrollerView concatenated to UInavigationController to make push segues but after I changed the cell SWCell it doesn’t do segues
 hemanthgk
AuthorWere you able to solve the issue. I am having the same problem using it.
 Cool Fish
AuthorIt looks like if i keep the auto-generated implementation for
– (void)tableView:(UITableView *)tableView commitEditingStyle:(UITableViewCellEditingStyle)editingStyle forRowAtIndexPath:(NSIndexPath *)indexPath;
Then i will get complaints when swiping a cell to left like the following
Unable to simultaneously satisfy constraints.
Probably at least one of the constraints in the following list is one you don’t want. Try this: (1) look at each constraint and try to figure out which you don’t expect; (2) find the code that added the unwanted constraint or constraints and fix it. (Note: If you’re seeing NSAutoresizingMaskLayoutConstraints that you don’t understand, refer to the documentation for the UIView property translatesAutoresizingMaskIntoConstraints)
(
“”,
“”
)
Will attempt to recover by breaking constraint
Break on objc_exception_throw to catch this in the debugger.
The methods in the UIConstraintBasedLayoutDebugging category on UIView listed in may also be helpful.
 サンプラー
サンプラー
Authorhey have you resolved this issue? I having the same, and I don’t have any idea what to do next
 Cool Fish
AuthorYes, you don’t need to implement the delegate method. You just capture the button press event for table data changes.
 ISwearImNotTrolling
Authorcould you elaborate on you don’t need the delegate method because i have the same problem and don’t know which specific delegate your talking about
 Rajesh Maurya
AuthorIt looks like there is problem in Xcode 6(beta). More and delete option not showing in Xcode 6(beta) while right swiping. I am implemented this code into swift. Left swipe works as usual but right swipe not shows any option.
 maddoggy1979
AuthorIt’s an iOS8 issue: https://github.com/CEWendel/SWTableViewCell/issues/170
 Shiya
Shiya
AuthorI downloaded the project template, compiled it on my phone and the swipe function is not working O_o, can anyone give me some help, I’m using Xcode 5.1 and iOS 7.1.
 Tobias Mann
Authorthe finished project have a problem somewhere, do it on your own, takes 5 mins to go through the tutorial and it works 😉
 Ejiro Ogagarue
AuthorHOW DO YOU EDIT THE ICON POSITION,SIZE AND CHANGE THE BACKGROUND COLOR I HATE THE YELLOW USED
 Yan
Yan
AuthorThank you so much for the tutorial! It is very helpful! Even works on iPhone6!
 IOSBeginner
AuthorGreat Tutorial – any idea how to close the current cell when a different cell is swiped open?
 SwedishDev
AuthorI’m getting an error with conflicting constrains upon running my test app with the library described in this article. Here is the error: (which repeats for each row in the table)
“”,
“<NSLayoutConstraint:0x7ff491f20570 SWUtilityButtonView:0x7ff491f1ef90.width ”
Anyone got some tips on how to get rid of this error? It seems as it has to do with the width of the utility button.
 F90530 .
AuthorSorry to bother you guys with silly questions but I have issues with the SWTableViewCells file that we were supposed to download and add to our project on this site. I have followed the first two steps and tried to launch my project but it couldn’t because of 13 errors which are all related to the NSMutableArray+SWUtilityButton .m & .h files.
In .h file:
#import
@interface NSMutableArray (SWUtilityButtons)
“- (void)sw_addUtilityButtonWithColor:(UIColor *)color title:(NSString *)title;
– (void)sw_addUtilityButtonWithColor:(UIColor *)color attributedTitle:(NSAttributedString *)title;
– (void)sw_addUtilityButtonWithColor:(UIColor *)color icon:(UIImage *)icon;
– (void)sw_addUtilityButtonWithColor:(UIColor *)color normalIcon:(UIImage *)normalIcon selectedIcon:(UIImage *)selectedIcon;”
the problem is that it says “expected a type” for all the four and for the last two 2 and 3, respectively.
In .m file:
“- (void)sw_addUtilityButtonWithColor:(UIColor *)color title:(NSString *)title”
‘expected a type’
UIButton *button = [UIButton buttonWithType:UIButtonTypeCustom];
button.backgroundColor = color;
[button setTitle:title forState:UIControlStateNormal];
Use of undeclared identifier ‘button’ for all three
#import “NSMutableArray+SWUtilityButtons.h”
@implementation NSMutableArray (SWUtilityButtons)
“- (void)sw_addUtilityButtonWithColor:(UIColor *)color attributedTitle:(NSAttributedString *)title
– (void)sw_addUtilityButtonWithColor:(UIColor *)color icon:(UIImage *)icon
– (void)sw_addUtilityButtonWithColor:(UIColor *)color normalIcon:(UIImage *)normalIcon selectedIcon:(UIImage *)selectedIcon
for all three it states ‘expected a type’
Do you guys maybe know how to solve this problem? I am completely new to the programming world and apologise for these silly questions. I have not changed anything in the downloaded files. Thank You in advance!
 ppalancica
AuthorInsert the
#import
line in the NSMutableArray+SWUtilityButtons.h file.
 michalZak
Authorthank!
 rajat gabhane
AuthorIts not working
 Chris
Chris
AuthorHow do you reset the title of the leftmost right button and disable it once pressed? thanks.
 traceur
AuthorIs there any difference of “swipe to delete” between iOS7 and iOS8? (I am just asking for swipe to delete, not swipe for more options). My app has swipe to delete feature and it works fine on iOS8. I also tested it on several iOS7 devices. When I swipe, it does show the delete button, however, the table cell will not be deleted after I tap the delete button.
 DB
DB
AuthorI”m having this same issue with the button not displaying in ios 7 but works fine in ios8. did you solve this issue.
 traceur
AuthorNot yet. Hope someone can give us an answer.
 Praveen
AuthorThis is not working in ios 8 version device
 Mubashir Mohammed
AuthorI am getting parse error in iOS 8
 ryan
ryan
AuthorHow would you change what happens when “More” is pressed and the otherButtonTitles:@””,@”” are then pressed……like if one of the otherButtonTitles: is pressed…i would want to log the data to the logger window of the cell.row selected. I plan i doing more than just logging this data but once I know where to edit this, i can change the rest myself.
 ryan
ryan
AuthorNevermind. I figured it out! Let me know if anyone else needs this answer too. Not going to post an answer to my own question!!! (unless someone wants to know also!)
 ciscoboy
AuthorThis works perfectly fine in the new xCode and IOS 8, but the question is how to add actions to the button? For example i want to add action for the Download option instead of Delete? is there anyway to add action within this code ? there are many solutions but how about this code ?
 Ilan Levy
AuthorNow in iOS 9 – we get a WARNING: WARNING: A Gesture recognizer (<UILongPressGestureRecognizer: 0x14f7f4cc0; state = Possible; view = >) was setup in a storyboard/xib to be added to more than one view (-><UITableViewCellContentView: 0x14f794150; frame = (0 0; 320 43.5); clipsToBounds = YES; opaque = NO; gestureRecognizers = ; layer = >) at a time, this was never allowed, and is now enforced. Beginning with iOS 9.0 it will be put in the first view it is loaded into.
Does the team intend to publish a swifty solution more adapted to iOS9 ?
 himanth maddi
Authorhow can I manage scroll view scrolling speed?
 Janbask – Online IT Training
AuthorI want to say that this article is awesome, great written and include almost all vital info’s. I would like to see extra posts like this .
 Chris H
AuthorNicely done. Did Apple make this feature/code available in later releases of iOS?
Chris
 Muhammad Usman Zia Akram
Authorhow can i use this in swift??
 Cooper Edmunds
AuthorHow do you change the width of the buttons?
Thanks
 Леонид Алексеев
Author[cell setRightUtilityButtons:rightUtilityButtons WithButtonWidth:100.f];
 JanBask Training
AuthorThis is another very helpful post. Thanks..really it’s very helpful for beginners as well as experienced.
 Amir Khanzada
AuthorHow to Add image with empty title .. i don’t talk about background image remember