Hello, and welcome to the notifications in iOS 10 tutorial! Today, we will be talking about how to implement notifications in iOS 10. iOS 10 features a plethora of changes and additions to the notifications APIs, which includes a new, powerful notification request system based off of triggers, which we will talk more about shortly. The biggest change to notifications in iOS 10 is part of a framework called UserNotificationsUI, which lets us embed custom view controller in our notifications! This allows us to create powerful new notifications that simply weren’t possible before.
In this tutorial, we will be covering various types of local notifications on iOS, starting with basic text notifications and working our way up to embedding an image and an action in our notification. Follow along for more and feel free to comment any questions you may have.
Simple User Notifications
Not all of the notifications we want to show will be fancy and interactive. For this reason, we will start by demonstrating how to show a basic text notification. Download the starter project and open up NotificationsUI.xcodeproj. Looking around, you’ll see it’s pretty empty: we have Main.storyboard for the user interface, along with ViewController.swift and AppDelegate.swift.
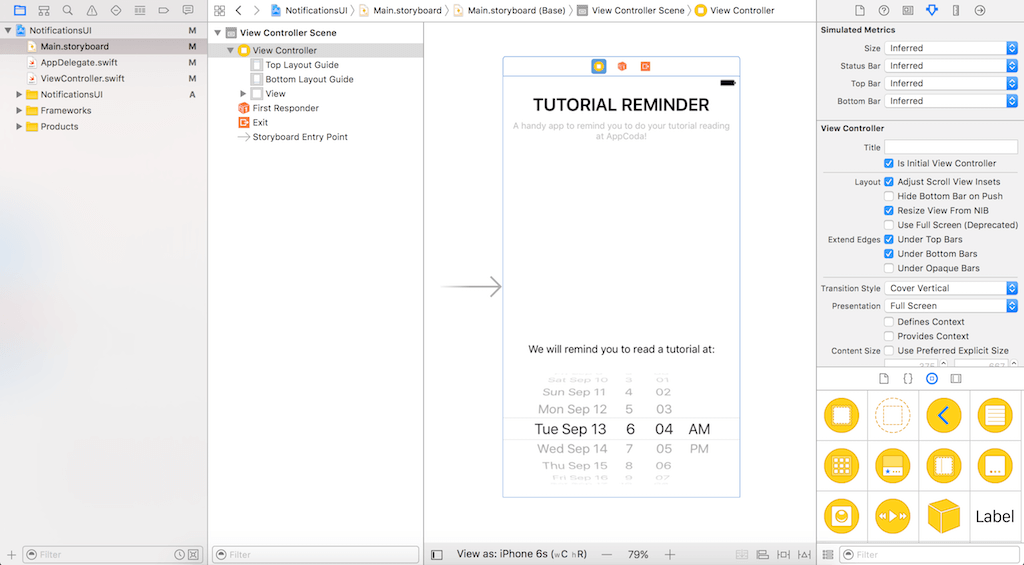
Open up Main.storyboard and take a look at ViewController. The app we’re making today is going to remind its users to go online and read an AppCoda article. It lets users pick a date and time for a notification reminder. The first change we’re going to make to this app is simple: we’re going to enable notifications! Currently, picking a date and time does nothing. We’re going to update the app so that setting a date and time creates a notification at the specified time.
Go ahead and open ViewController.swift. Let’s get started.
When you open ViewController.swift, you’ll notice it’s pretty empty. There is only an action method named datePickerDidSelectNewDate that will be invoked when a new date is selected in the date picker. As mentioned before, right now, the app does nothing instead of creating a notification. Let’s implement the feature.
The process for creating a notification has changed slightly in iOS 10. Developers must now create requests, which are requests to iOS to present a notification. These requests consist of 2 components: triggers and content. A trigger is a set of conditions that must be met for a notification to deliver. To show a notification in iOS 10, we begin with a trigger. The class we use for date based triggers is UNCalendarNotificationTrigger. Apple provides a few others, such as UNLocationNotificationTrigger (which triggers a notification when the user arrives a particular location).
The first step to displaying a notification on iOS, as stated above, is creating a trigger. Let’s go ahead and make one now.
Go to AppDelegate.swift, and make sure you import the UserNotification framework. All the notification-related APIs are organized in this framework:
|
1 |
import UserNotifications |
Next, add a function called scheduleNotification(at date: Date). As its name implies, this function will be responsible for scheduling a notification at a provided date.
|
1 2 3 4 5 |
func scheduleNotification(at date: Date) { let calendar = Calendar(identifier: .gregorian) let components = calendar.dateComponents(in: .current, from: date) let newComponents = DateComponents(calendar: calendar, timeZone: .current, month: components.month, day: components.day, hour: components.hour, minute: components.minute) } |
In the above code, we use the Gregorian calendar to separate a provided date into components. Dates and components are beyond the scope of this tutorial, but all you need to know is that a date consists of components. An individual component represents a piece of a date, such as the hour, minute, second, etc. The code we have written so far separates the date parameter into components and it saves these components in the components constant. The reason we do this is that UNCalendarNotificationTrigger requires date components, not dates, to function. However, one other oddity of UNCalendarNotificationTrigger is that the complete set of components taken directly from a date do not seem to work. Instead, we need to construct our own instance of DateComponents using some information from the existing instance we have. The third line does just that: it creates a new instance of DateComponents using only the relevant information from date.
Now that we have the components from date, let’s go ahead and make a calendar notification trigger. Like most other things in iOS, Apple has made this process pretty easy. Just add the following line of code in the function:
|
1 |
let trigger = UNCalendarNotificationTrigger(dateMatching: newComponents, repeats: false) |
As you can probably infer, this line creates a new UNCalendarNotificationTrigger using the date components we extracted above. We have set repeats to false because we only want the notification to be appeared once.
Now that we have created a trigger, the next thing is to create some content to display in our notification. This can be done through the UNMutableNotificationContent class. You can add the following lines of code to create the notification content. Simply put the code snippet right below the trigger variable:
|
1 2 3 4 |
let content = UNMutableNotificationContent() content.title = "Tutorial Reminder" content.body = "Just a reminder to read your tutorial over at appcoda.com!" content.sound = UNNotificationSound.default() |
These lines are pretty self explanatory: we create a new instance of UNMutableNotificationContent, and then set its title, body, and sound accordingly.
It looks like we’re all ready to show our first notification! However, there are still a couple of steps left: 1. creating a notification request, 2. providing it to the system, that tells iOS to show our notification.
To create a notification request, you instantiate a UNNotificationRequest object with the corresponding content and trigger. You also need to give it a unique identifier for identifying this notification request. Insert the following line of code in the scheduleNotification function:
|
1 |
let request = UNNotificationRequest(identifier: "textNotification", content: content, trigger: trigger) |
Easy, right? We create a request with 3 parameters:
identifier: This is a unique identifier for our request. As you’ll see shortly, this identifier can be used to cancel notification requests.content: This is the notification content we created earlier.trigger: This is the trigger we would like to use to trigger our notification. When the conditions of the trigger are met, iOS will display the notification.
Okay, the last thing we have to do is add the request to the notification center that manages all notifications for your app. The notification center will listen to the appropriate event and trigger the notification accordingly.
Before we add the notification request to the notification center, it is good to remove any existing notification requests. This step helps prevent unnecessary duplicate notifications. Insert the following code snippet in the function:
|
1 2 3 4 5 6 |
UNUserNotificationCenter.current().removeAllPendingNotificationRequests() UNUserNotificationCenter.current().add(request) {(error) in if let error = error { print("Uh oh! We had an error: \(error)") } } |
The first line of code gets the shared instance of the notification center and calls the removeAllPendingNotificationRequests method to remove all pending notification requests. And then we add the request to the notification center. The method also takes in a completion handler. In our implementation, we use this handler to print an error. Before we continue, make sure your scheduleNotification function looks something like this:
|
1 2 3 4 5 6 7 8 9 10 11 12 13 14 15 16 17 18 19 20 21 |
func scheduleNotification(at date: Date) { let calendar = Calendar(identifier: .gregorian) let components = calendar.dateComponents(in: .current, from: date) let newComponents = DateComponents(calendar: calendar, timeZone: .current, month: components.month, day: components.day, hour: components.hour, minute: components.minute) let trigger = UNCalendarNotificationTrigger(dateMatching: newComponents, repeats: false) let content = UNMutableNotificationContent() content.title = "Tutorial Reminder" content.body = "Just a reminder to read your tutorial over at appcoda.com!" content.sound = UNNotificationSound.default() let request = UNNotificationRequest(identifier: "textNotification", content: content, trigger: trigger) UNUserNotificationCenter.current().removeAllPendingNotificationRequests() UNUserNotificationCenter.current().add(request) {(error) in if let error = error { print("Uh oh! We had an error: \(error)") } } } |
If it does, you’re ready to go! All we need to do now is configure ViewController.swift to call on scheduleNotification(date:) when the user picks a date. In ViewController.swift, insert the following code in the datePickerDidSelectNewDate method:
|
1 2 3 |
let selectedDate = sender.date let delegate = UIApplication.shared.delegate as? AppDelegate delegate?.scheduleNotification(at: selectedDate) |
The above lines fetch the current instance of AppDelegate that our application is using and schedule a notification using the function we wrote earlier. Let’s try it out! Run your app and select a future time. Wait for your device’s clock to reach the time and see what happens!
Ooops! The notification didn’t appear. But why?
There are a couple of reasons it doesn’t work.
First, Apple strives to maintain a flawless user experience on iOS, and part of this experience is giving users ultimate control over the notifications they receive from apps. The user hasn’t granted us access to display notifications yet, which is why they aren’t being delivered.
Let’s fix this. Add the following at the method in AppDelegate.swift:
|
1 2 3 4 5 6 7 8 9 10 |
func application(_ application: UIApplication, didFinishLaunchingWithOptions launchOptions: [UIApplicationLaunchOptionsKey : Any]? = nil) -> Bool { UNUserNotificationCenter.current().requestAuthorization(options: [.alert, .sound]) {(accepted, error) in if !accepted { print("Notification access denied.") } } return true } |
Here we call the requestAuthorization method of the notification center to ask the user’s permission for using notification. We also request the ability to display alerts and play sounds.
Now run the app again. When the app is launched, you should see the authorization request. Make sure you accept it, and the app is allowed to send notifications to the device.
The other thing you have to take note is that the notification will not be presented in-app. Therefore, once you set the date, make sure you go back to home screen or lock screen.
If you’ve done all the things correctly, the notification should be delivered!

See? It’s not so hard to send notifications to users on iOS, we just need to take a few precautionary steps first, such as requesting notification access. Now that we’ve sent simple text, let’s move on to attaching an image!
Attaching an Image in the Notification
The notification is now in text-based. This is nothing new! Let’s explore some other features, like displaying an image in a notification.
In the starter project, I have already bundled an image: named logo.png. If you haven’t seen it, it may be because it’s buried in the NotificationsUI group. Anyhow, the image is in the starter project. Let’s see how to display it in the notification.
The UserNotification framework provides the UNNotificationAttachment class for developers to add attachments to the notification. The attachment can be audio, images, and videos. It also supports a variety of file formats. For details, you can check them out on the Apple Developer Website.
Creating an attachment is rather easy, just like most tasks in UserNotifications.framework. We simply initialize an instance of UNNotificationAttachment and add it to the notification content. Update the scheduleNotification method and Insert the following code snippet right before the request variable:
|
1 2 3 4 5 6 7 8 9 10 |
if let path = Bundle.main.path(forResource: "logo", ofType: "png") { let url = URL(fileURLWithPath: path) do { let attachment = try UNNotificationAttachment(identifier: "logo", url: url, options: nil) content.attachments = [attachment] } catch { print("The attachment was not loaded.") } } |
The above code loads the path for our logo image, converts it to a URL, and then initializes an attachment using the image. The initializer for UNNotificationAttachment is marked as throwing, so we include a catch block to handle any errors. Once we have created an attachment, we add it to content. Let’s test out the app again. Once it loads, pick a time and wait for the notification to appear.
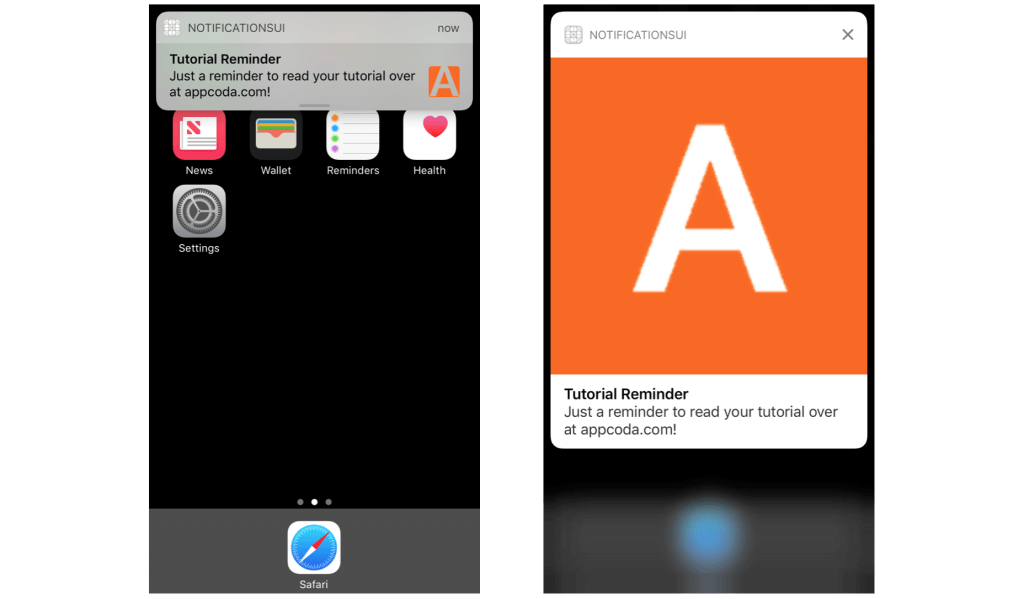
Wow! Look at that, we’ve sent a notification with an image bundled. This is a new feature that was first introduced in iOS 10. This is pretty cool, but I think it will be even better if we can add a “remind me later” button that allows users to temporarily ignore a reminder.
Let’s do that now.
Adding a Reminder Using Notification Actions
Adding actions to notifications is slightly complex, due to the way the APIs are set up. However, it’s nothing we can’t handle. To add an action in the notification, you need to utilize UNNotificationAction and UNNotificationCategory.
First, we need to define categories for our actions. We’ll keep it simple and define just a single category and one action. Insert the following lines of code in the application(_:didFinishLaunchingWithOptions:) method:
|
1 2 3 |
let action = UNNotificationAction(identifier: "remindLater", title: "Remind me later", options: []) let category = UNNotificationCategory(identifier: "myCategory", actions: [action], intentIdentifiers: [], options: []) UNUserNotificationCenter.current().setNotificationCategories([category]) |
The above code creates an action and a category, and it registers the category with UNUserNotificationCenter.
Probably, you’re wondering why categories exist. They do serve a distinct purpose. Think of a category as a group of actions. Once you create a category, you can set a field in UNNotificationContent to add a category to a notification. All of the actions contained within that category will be present on this notification.
In this demo, we only have one action in our category, but if we had multiple actions, assigning this category to our notification would result in all of them being used. So that’s why Apple’s engineers provide UNNotificationCategory for managing the notification actions.
Now that we have created an action and a category and registered the category, let’s use it. Modify the section of your code that creates content and add the following:
|
1 |
content.categoryIdentifier = "myCategory" |
This tells the system that we would like to use “myCategory” with our new notification. Now, build and run the app again to see what happens:
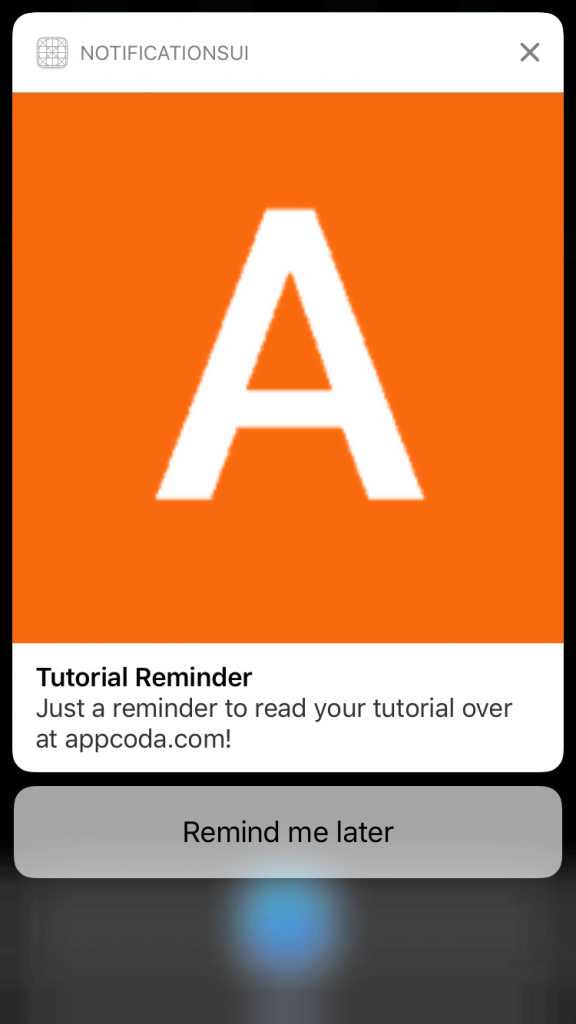
Awesome! Our notification has a lovely action button now. But if you tap the button, it just dismisses the notification. All we have left to do is to write code to respond to the action.
The UNUserNotificationCenterDelegate protocol defines methods for responding to actionable notifications. So, to respond to the action, let’s extend AppDelegate to implement the UNUserNotificationCenterDelegate protocol:
|
1 2 3 4 5 |
extension AppDelegate: UNUserNotificationCenterDelegate { func userNotificationCenter(_ center: UNUserNotificationCenter, didReceive response: UNNotificationResponse, withCompletionHandler completionHandler: @escaping () -> Void) { } } |
The userNotificationCenter(_:didReceive:withCompletionHandler:) method is called when the user selects an action. You can determine which action the user has selected by accessing the actionIdentifier of the given UNNotificationResponse. Let’s implement the method like this:
|
1 2 3 4 5 6 7 |
func userNotificationCenter(_ center: UNUserNotificationCenter, didReceive response: UNNotificationResponse, withCompletionHandler completionHandler: @escaping () -> Void) { if response.actionIdentifier == "remindLater" { let newDate = Date(timeInterval: 900, since: Date()) scheduleNotification(at: newDate) } } |
The above code schedules a new notification 900 seconds (60 seconds * 15 minutes) after the current date. Finally, set the default notification center’s delegate to AppDelegate in the scheduleNotification(at:) method:
|
1 |
UNUserNotificationCenter.current().delegate = self |
Now run the app again and schedule a notification to test it out. When the notification appears, tap the Remind me later button. You should receive another notification after 15 minutes.
Wrapping up
I hope you enjoy reading this introductory tutorial for the UserNotifications framework. In part 2, we will discuss notifications in more depth and learn about embedding custom view controllers in our notifications.
For reference, you can download the demo project on Github.

A high school student who loves to make apps during spare time, and really enjoy teaching people how to create apps. When he is not making apps, he love to ski, play golf, soccer, and spend time with my friends.