It’s often said that coders turn coffee into computer programs. Let’s take that to the next level by coding an app that shows you the nearest coffeeshop!
In this coding guide, you’ll use the following techniques:
- Swift, Xcode and Interface Builder (Auto Layout, Constraints and Storyboards)
- Realm, the lightweight Core Data replacement for local data storage
- Foursquare, with “Das Quadrat” library to connect to their REST API
- CocoaPods and Geolocation
The app monitors your location in a 500 by 500 meter region, and fetches venue data from Foursquare accordingly. You’ll use a map view (MKMapView) and a table view (UITableView) to display the data. Also, you’ll filter data with Realm and then sort it with a closure.
You can check out the full source code and Xcode project for this guide on GitHub: reinderdevries/CoffeeGuide.
Neat, right? Let’s get started!
Setting Up Xcode
First you’re setting up Xcode. Start up the IDE and choose File -> New -> Project ….
Choose Single View Application from the iOS -> Application category. Then, fill out the wizard like below.
- Product Name: Coffee
- Organization Name: Pick any
- Organization Identifier: Pick any, use this format: com.mycompanyname
- Language: Swift (of course)
- Devices: iPhone
- Uncheck Use Core Data, Include Unit Tests, and Incluse UI Tests
Pick a good project location, and you don’t have to create a local Git repository.
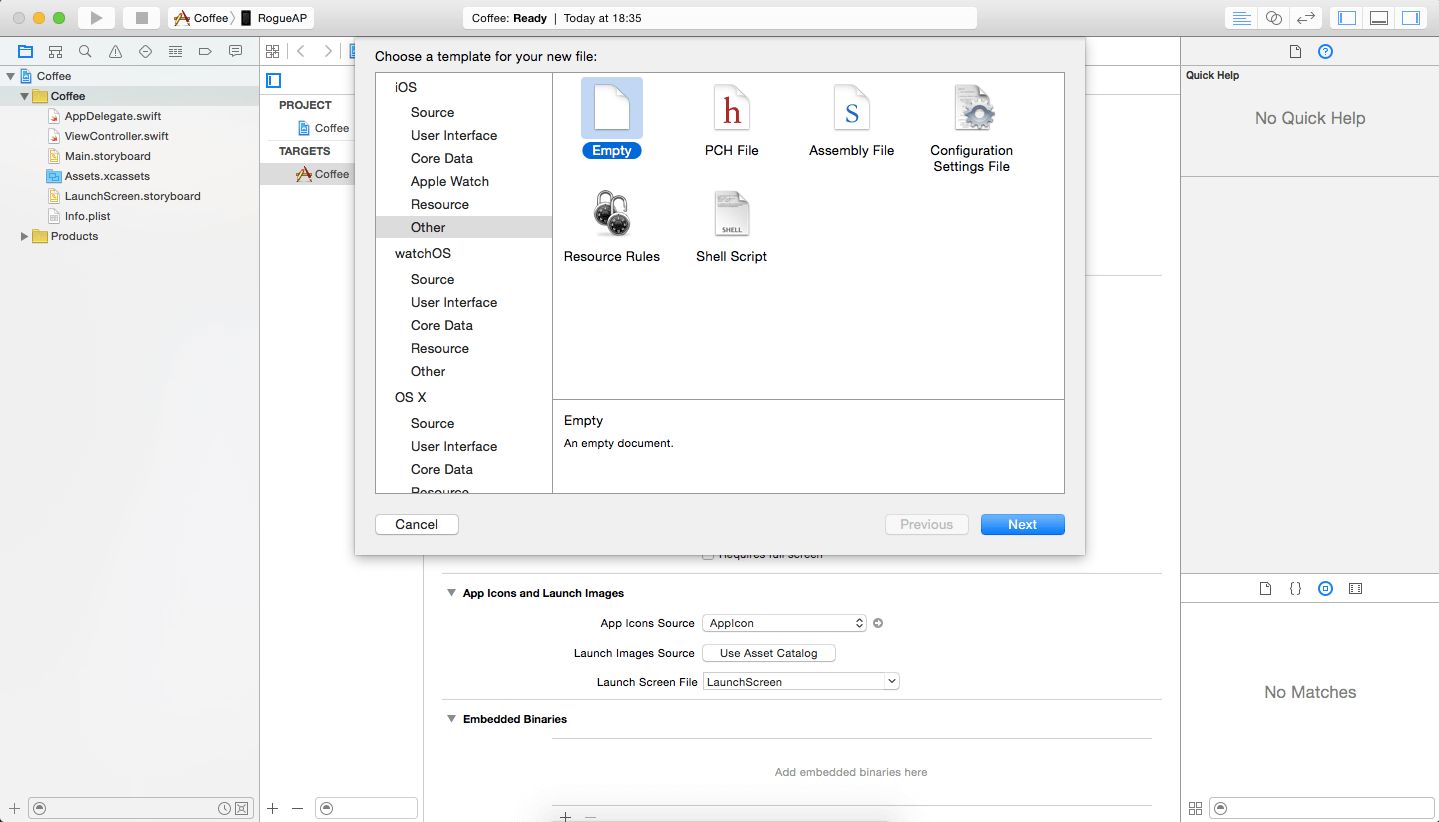
Next, let’s create the Podfile. Right-click on the project bar in the Project Navigator and choose New File…. Just like the screenshot below, choose the Empty template from the iOS -> Other category.
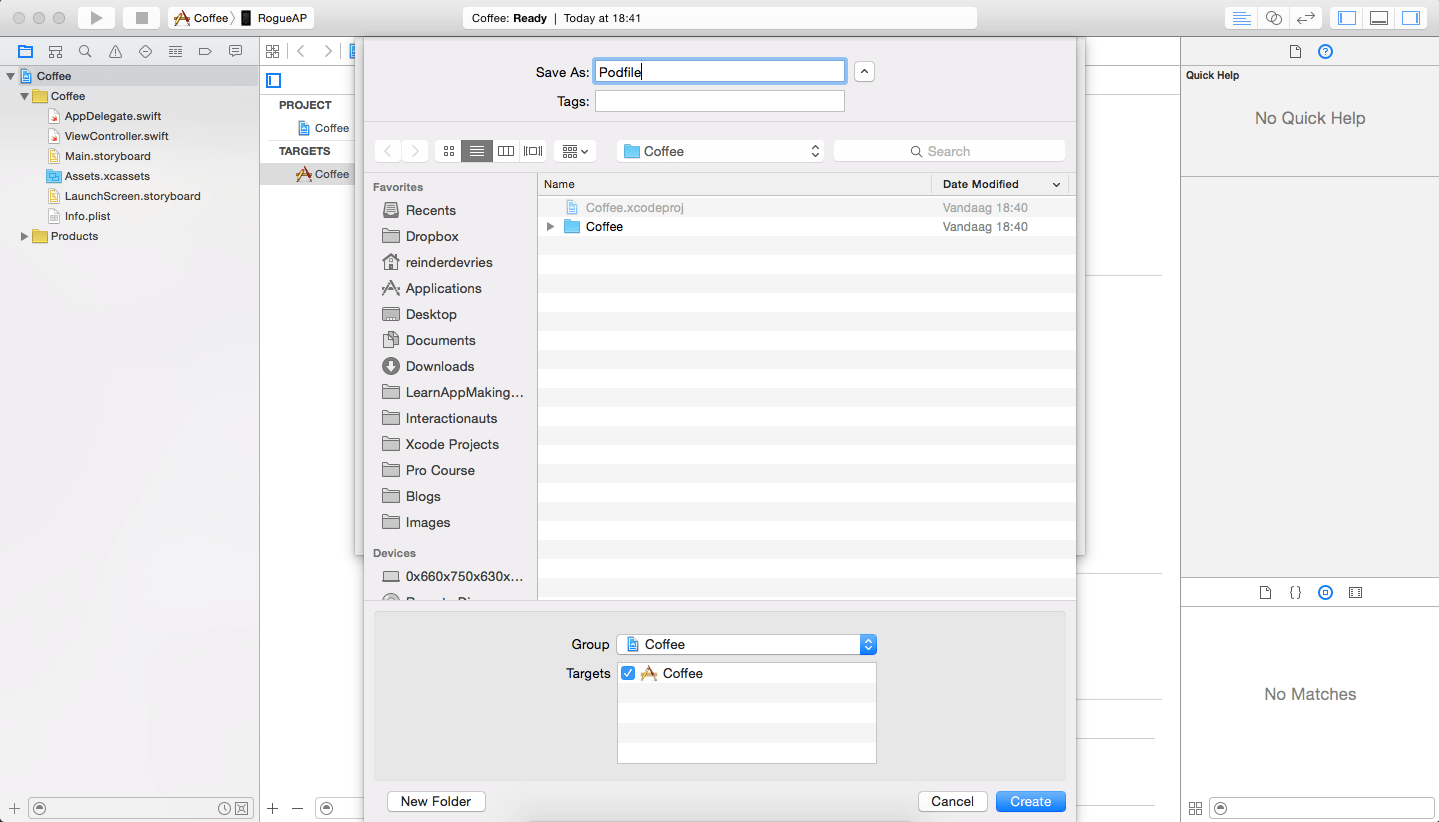
Name the file Podfile (no file extension) and make sure you save it in the same directory as your .xcodeproj file! Last, make sure the checkbox before Coffee, next to Targets is ticked.
Then, paste the following code in the Podfile.
|
1 2 3 4 5 6 |
source 'https://github.com/CocoaPods/Specs.git' platform :ios, '8.0' use_frameworks! pod 'QuadratTouch', '>= 1.0' pod 'RealmSwift' |
We’ll use 2 external libraries for this project: Realm and Das Quadrat, a Swift library for the Foursquare REST API.
Then, close the project and then close Xcode. Open up the OS X Terminal app and cd into your project directory. Don’t know how? Do this:
- Open Terminal
- Type cd (c-d-space)
- Open Finder
- Locate your project root directory in Finder, but don’t go into it.
- Drag-and-drop the project directory from Finder to Terminal.
- Most likely, the absolute path will now appear next to cd.
- Press the enter key
- You’ve now cd-ed into the right directory!
In Terminal, now type this:
|
1 |
pod install |
It may take a couple of minutes, but ultimately a bunch of lines show up. Cocoapods has installed the requirements for your project into Xcode. Also, it turned our project into a workspace (a compilation of projects).
Next up: find the new .xcworkspace file in Finder and open it. It’s in your project’s root directory.
Note: When you open the workspace in Xcode, it could happen that your project is collapsed. When that’s the case, you’ve still got the original project file opened in Xcode. Close it, close the workspace, then open the workspace again. It should now not be collapsed anymore.
Alright, that’s all you need to do to set up the Xcode project for the app. If every step went OK, you now have a workspace with two projects. The Pods project contains the library code from Realm and Das Quadrat.
Building The UI With Storyboards
OK, the UI for the Coffee app is incredibly easy. It consists of no more than two UI elements: a map view and a table view.
Xcode has done most of the work for you. The Single View Application has a single Storyboard called Main.storyboard, which serves as the starting point of the app.
To set up the map view, do this:
- Open Main.storyboard
- Locate the Map Kit View (MKMapKitView) in the Object Library at the right bottom of Xcode.
- Drag it to the Editor area and position it in the top-left corner. Make sure it takes up rougly half of the height of the editor area, and the full width.
- Next up, locate the Table View (UITableView) in the Object library and drag it to the editor. Make sure it takes up the full width, and the lower half of the screen.
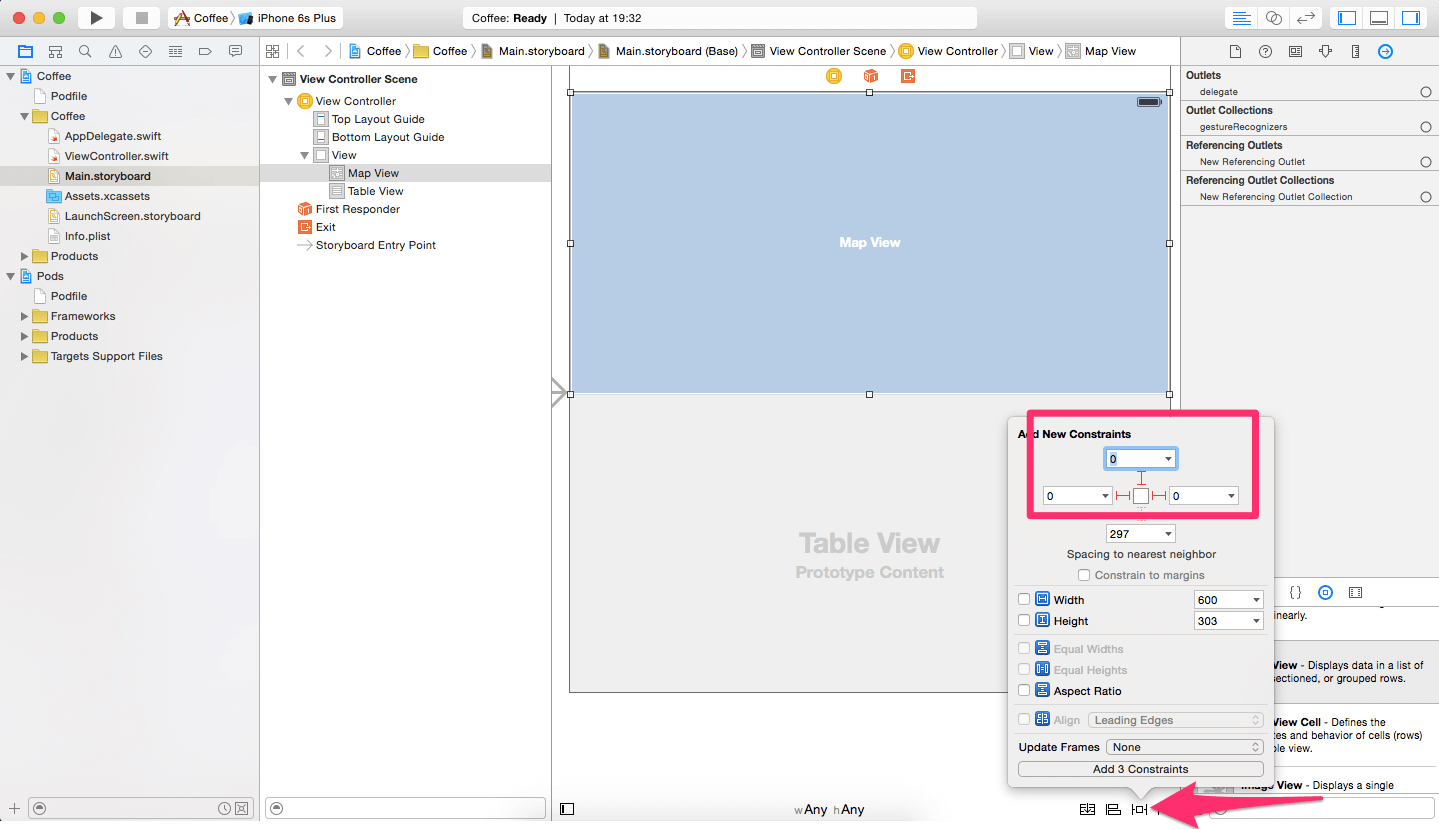
Next, let’s set the right Autolayout constraints for both views. First, select the map view. With the view selected, click on the Pin button in the lower right of the editor area. It’s the second button from the right and it looks like a Tie Fighter from Star Wars…
A gizmo pops up. Do the following:
- Untick the checkbox next to Constrain to margins.
- Click the left, top and right struts. They now become bright red.
- Each of the three struts has an input box next to it. Make sure to set them all to 0.
- Finally, click Add 3 constraints.
Next, do the same for the table view. Instead of selecting the top strut, select the bottom one (and left and right). Again, make sure the Constrain to margins checkbox is not ticked, and click the Add 3 constraints button.
You now have constrained both views to the top and the bottom respectively, setting their widths to the full width of their parent view. One last action remains, namely making sure both views will vertically take up exactly 50% of the entire screen.
You can use multiple constraints to get there, but this is the easiest:
- Select both the map view and the table view. (Use the Command-key and click them both.)
- Click the Pin button.
- Tick the Equal Heights checkbox.
- Click Add 1 constraint.
OK, now Xcode probably complains there’s a conflict somewhere. No worries, let’s fix that.
- Click the map view, then click the Pin button.
- Untick Constrain to margins, then click the bottom strut, then edit its input field to 0.
- Click Add 1 constraint.
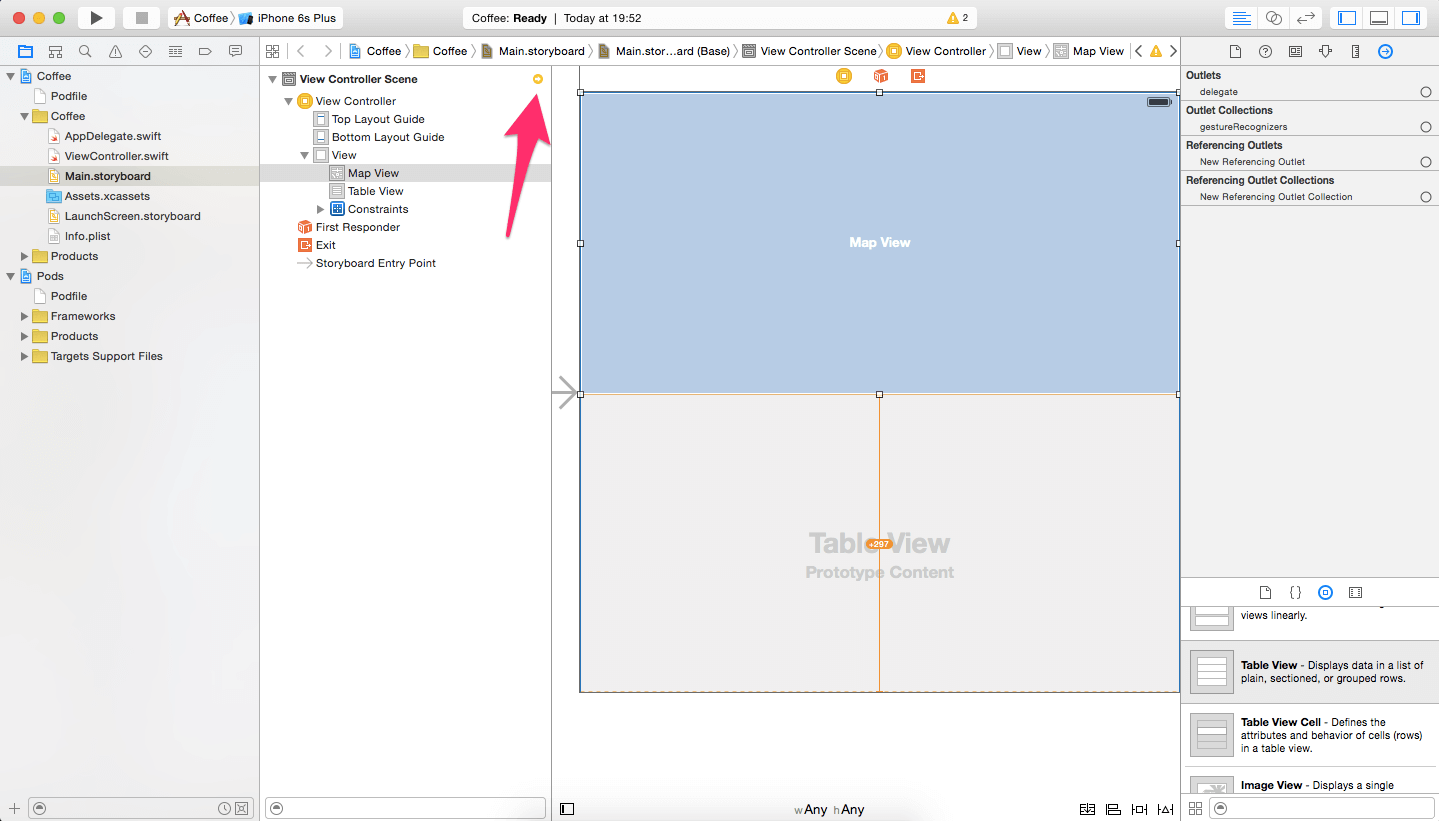
The red lines now disappear, and Interface Builder most likely now shows yellow lines. It means that the editor doesn’t reflect the constraints properly. All constraints are set up right, it’s just that Interface Builder isn’t showing them correctly to you.
To solve it, click the yellow circle with an arrow in it. It’s located in the top right corner of the Document Outline.
When you’ve clicked it a new interface appears. In it, click the yellow triangle, then click Update frames, then click Fix misplacement. Repeat for all the yellow triangles. Unfortunately updating frames doesn’t always have the effect you intended, so always make sure your constraints are set up correctly and then make sure the frame is OK too.
A lot can go wrong with constraints, unfortunately. When you think you made a mess, simply delete each and every constraint from the Document Outline and do it over.
Building The App And Fixing Errors
OK, let’s see if the app worked. You need to run your app regularly, during development, to check if the changes you made actually work.
When you get better at making apps, you’ll notice you can edit much more without really checking if it’s OK. Inherently, you know you didn’t make mistakes. If you’re still a beginner, try to make your edit steps small. Fix one thing at a time and then check if it works. If it doesn’t work, but did before, you know your app broke at the spot you last edited. Easy, right?
To run the app, do this: Press Command-B or Command-R. This respectively builds, and builds and then runs the app. In the top left corner of Xcode you can select on which iPhone you want to run your app. If you’ve connected your own iPhone or iPad device to your Mac, and it’s eligible for development, you can select it here too.
Is it working?
Chances are the app doesn’t work! Let’s find and fix the error. See if you can find the Debug Window, it’s at the bottom of Xcode. On the right side you probably see an error.
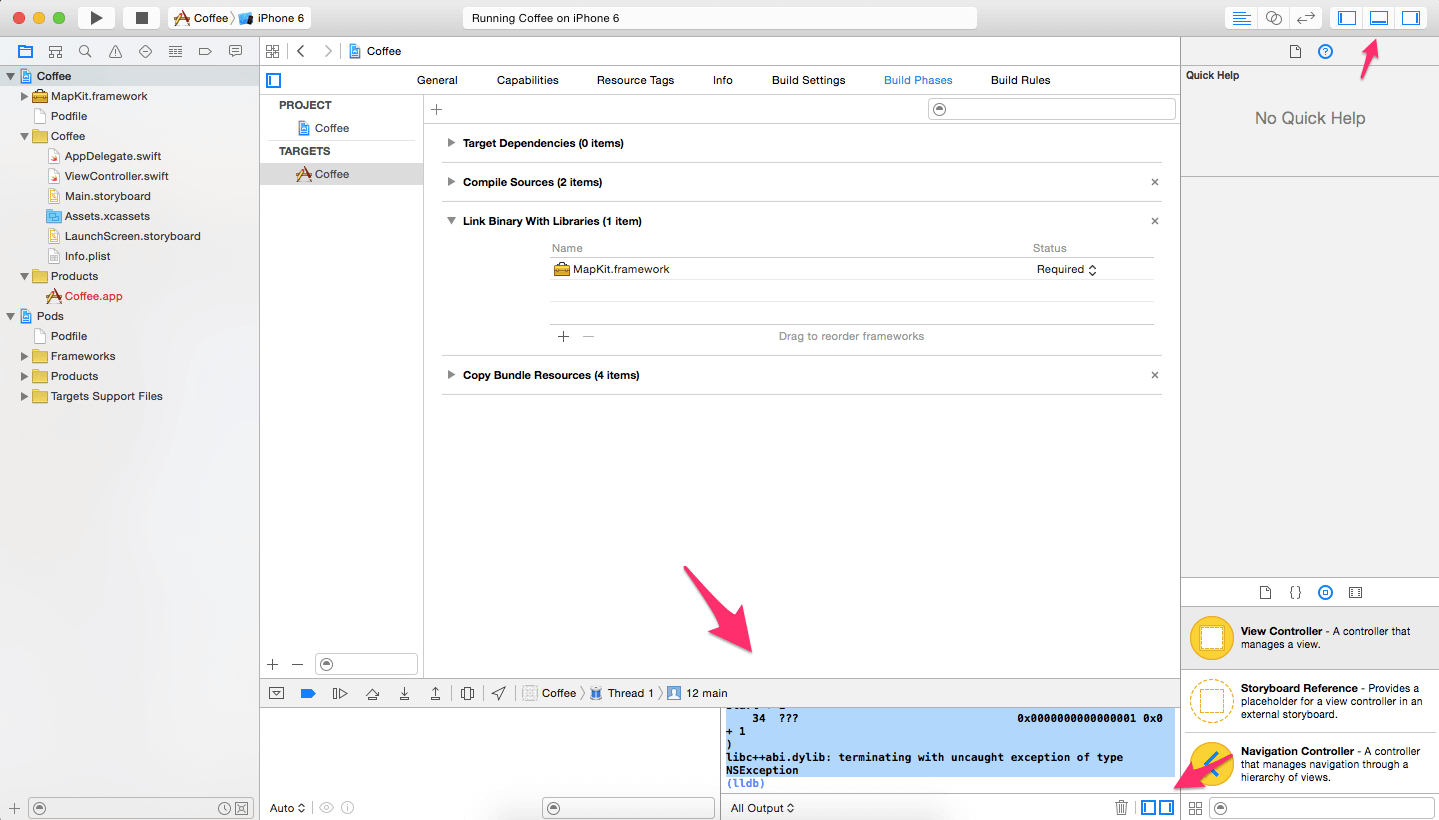
If you can’t see it, use the buttons in the top-right corner and the bottom-right corner to bring it up.
Alright, this is the error:
|
1 2 3 4 |
2015-11-04 14:37:56.353 Coffee[85299:6341066] *** Terminating app due to uncaught exception 'NSInvalidUnarchiveOperationException', reason: 'Could not instantiate class named MKMapView' *** First throw call stack: ( 0 CoreFoundation 0x0000000109fdff65 exceptionPreprocess + 165 |
Unfortunately programming error messages can be a bit cryptic, and sometimes there isn’t even an error message at all. Most runtime errors consist of an exception, a message, and a call stack.
All three items will lead you to the origin of the error. For instance, you can use the exception to find the piece of code that threw the error. The call stack is a list of methods and classes that were called before the error occurred. It’s often called a backtrace, to literally trace back the lines of code to the error.
Focus on the error message for now, because it’s the easiest to work with. It says:
|
1 |
Could not instantiate class named MKMapView |
Right. You know MKMapView, right? You’ve used it in Interface Builder, it’s the map view up top of the app UI. Instantiating is a bit of programmer lingo, it means the compiler (the part of Xcode that turns code into an app binary) couldn’t create a copy of MKMapView for you to use. It simply means: I couldn’t create the map view.
Unfortunately, 99% of all error messages don’t tell you the solution for a problem. They only tell you what happened, but the cause for it often remains invisible.
Now what? Well, you can do two things:
- Go home and give up app making
- Copy and paste the error message into Google (recommended)
Go ahead, and copy and paste the error message in Google using your favourite browser. Most likely, you’ll see something like this:
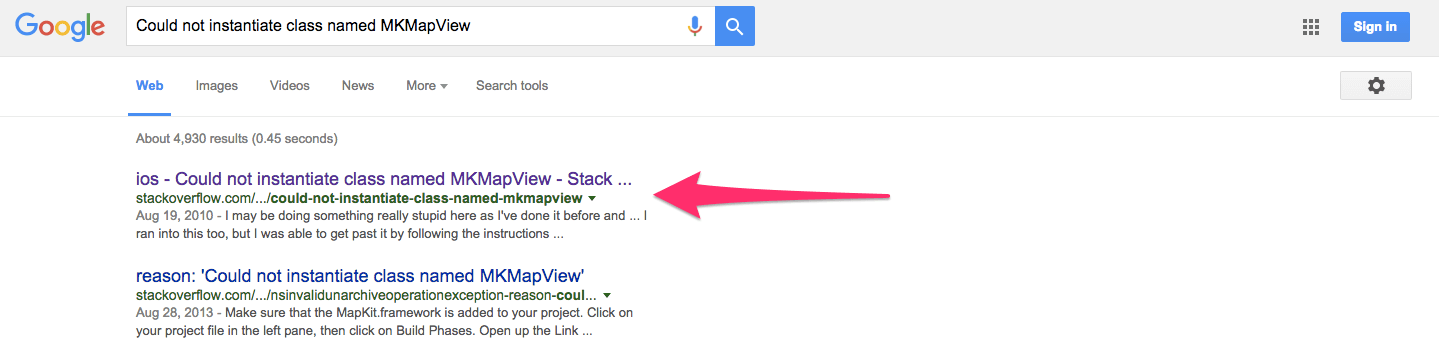
Click the top link. It’ll lead you to StackOverflow, a Q&A website for programmers. They’ve got issues with almost every language on the planet, and thankfully solutions too.
This is what you should do, when browsing a StackOverflow answer:
- Check if the question has 1 or more answers. If it doesn’t have answers, move on to another question (via Google). When you’ve found the answer to an unanswered question, feel free to add it yourself later.
- Glance over the original question, up top. Read the title, scan and skim the text and read the comments below it. Those comments often contain additional information.
- Check out the accepted answer, which is marked with a green check icon. Read the comments too, they’re often more helpful than the accepted answer. Often, the accepted answer isn’t the best one. Check out the number on the left, between the up and down error. That’s how many upvotes (i.e. a vote of “This is a great answer!”) the answer has. The accepted answer doesn’t have to be the most helpful, so make sure to dig through the page to get more information.
- It is recommended that you don’t blindly follow the solution, but understand why it is the solution. When you’re learning to code this may take up a lot of time, but it’ll definitely help you in the future. Almost every coder has gaps in their knowledge and that undermines skill. If you learn how to avoid mistakes in the future, and why, you’ll immediately place yourself in the top 1% of coders in the world.
OK, so what ended up being the problem? The MapKit framework wasn’t linked to the project. Apparently, the code for MKMapView is stored in an external framework. This code must be present in the project, although we don’t directly work with the map view from the code.
If you read through the page, you’ll find that there are a number of side-cases that will trigger this error too.
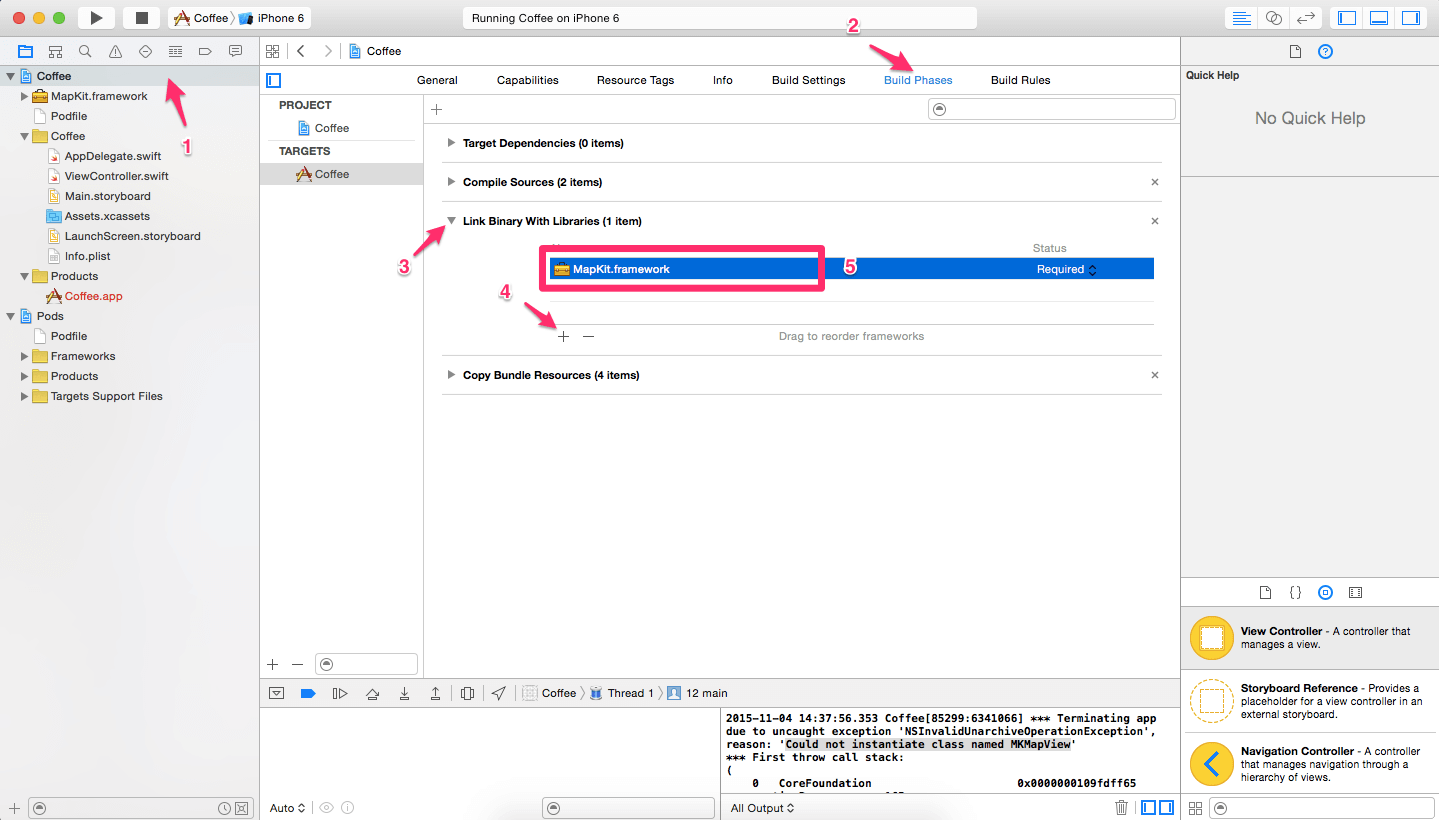
Now, let’s resolve the issue. Do this:
- Go back to Xcode and click on the Project Properties in the Project Navigator. It’s the blue bar up top.
- Click on the Build Phases tab.
- Then, click on the error to the left of Link Binary With Libraries. A list slides out.
- Click on the +-sign at the bottom of the list. A popup appears.
- Type in the input field: mapkit. The list now filters.
- Finally, double-click on MapKit.framework.
This adds the framework to the list, and to the project.
Working With The User’s Geolocation
OK, now that your app’s working you can continue with the next functionality: geolocation. Let’s show the user’s position in the map view.
First, you have to connect the map view in the Storyboard with the app’s code. When you set up the project in Xcode, a file was created for you: ViewController.swift. It’s the code that powers the view controller in the Storyboards.
Just for fun: check if this connection between Storyboard and code actually exists. Do this:
- Open ViewController.swift and look for the line that says: class …. This is the class definition. It defines the name of the class, what superclass it has, and what protocols it implements. In this case, the class name is ViewController.
- Next, open Main.storyboard and click the topmost item in the Document Outline on the left. It’s most likely named “View Controller Scene”.
- Next, in the top right corner, click the Identity Inpector. It’s the third icon from the left.
- Finally, look up the text in the Class field. What does it say?
That’s it: proof that the Storyboard is connected to the code in ViewController, thanks to the class directive. If you were to add another view controller to the Storyboard, you could set a class name for it too.
Creating The Map View Outlet
Now you know there’s a connection with the code, let’s add the outlet that connects to the map view. Before you can extend the map view with your own code, a connection needs to be made with the instance of the map view.
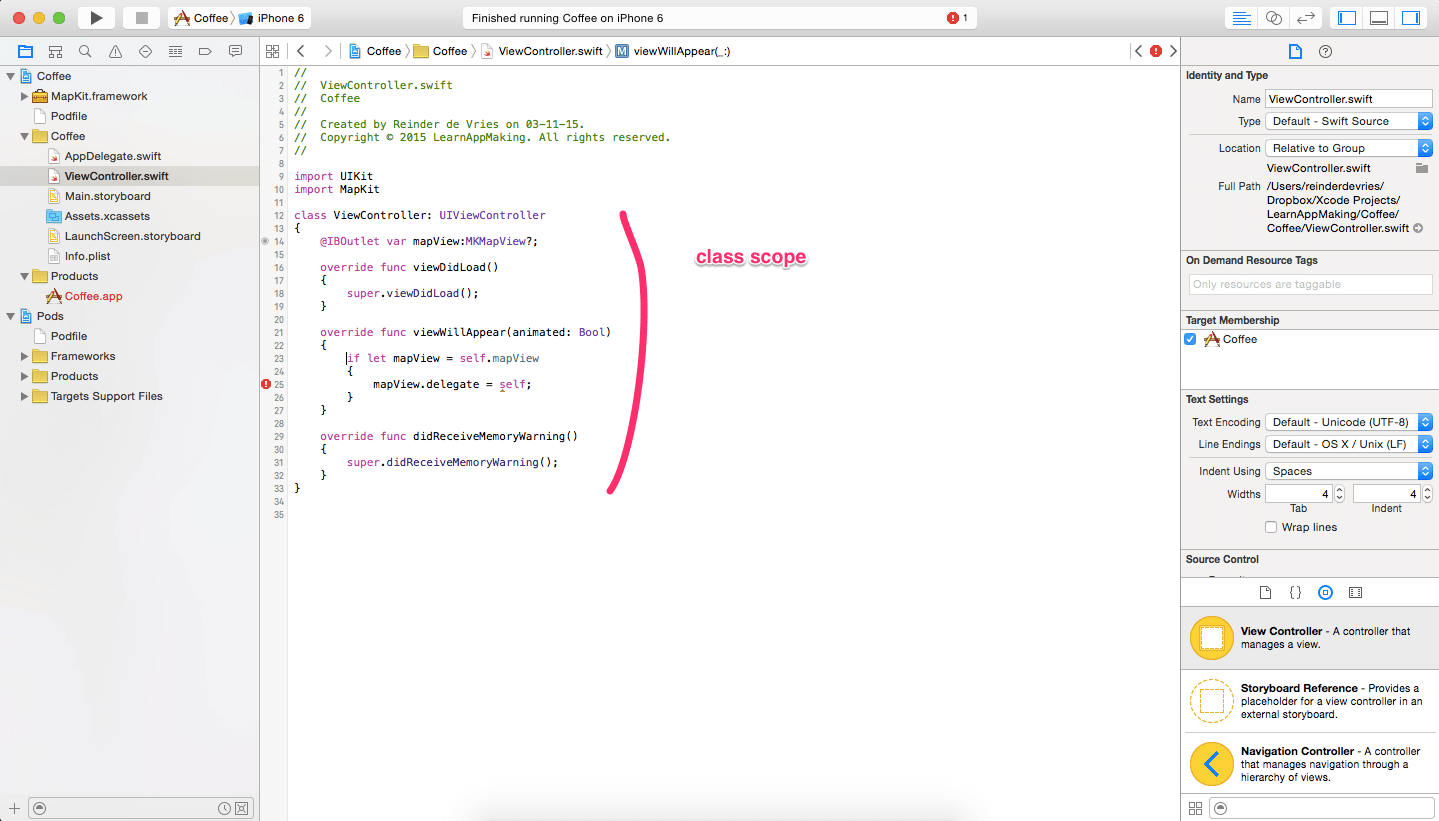
Open ViewController.swift and write this on the first line after the first {:
|
1 |
@IBOutlet var mapView:MKMapView? |
Why code that line? This is why:
- In Swift, you first need to declare variables before you can use them. When a variable is declared, it can also be initialized. In the above line, the variable is not initialized so it remains nil (empty).
- The code you just wrote creates an instance property. That’s a variable that’s tied and unique to every instance of the class ViewController. The opposite of a instance property is a class property, which is identical for every instance of the class.
- The name of the property is mapView, and it’s type is MKMapView. That’s a class from the MapKit library.
- The directive @IBOutlet indicates to Xcode that we want to use this property as an outlet. An outlet connects code to a Storyboard (or XIB) UI item.
- The var directive means this variable is mutable; it can change. It’s opposite is let, a constant that’s immutable and can’t change.
- The question mark ? at the end of the class name indicates that this variable is an optional. Optionals are special in Swift. They indicate that a variable can be nil, as opposed to non-nil. Nil means empty, nothing. Optionals were introduced in Swift to make the code safer and easier to use. More on optionals later.
- Why is this code on this exact line? Well, the line it’s on is technically the top of the class. It’s in the class scope, which means that this variable is available throughout the class. Other scopes are the method scope, which means the variable is only available in the method it was declared in, and the global scope, which means that the variable is accessible from (almost) everywhere.
Confused with variables and properties? A variable is simply a package you put data in. A property is also a variable, but then it belongs to a class. There’s two kinds of properties: instance and class properties.
Confused with classes, instances, and types? A class is simply a “die” (as in die casting), a blueprint that’s used to create copies of one master object. These copies are called instances. A “type” is used ambiguously, but you can assume that it’s identical to the meaning of class.
Confused with declaration, initialization and instantiation? OK, first declaration: that’s simply telling the compiler you want to use a variable with a name and a type. Initialization means you’ll give it an initial value. You assign a value to it, right after it’s declared. When you don’t do that, the value will be nil. Instantiation means you assign the variable an instance (a “copy” of a class). Technically, a variable is a reference to an instantiated object.
Alright, let’s get back to the project. Most likely Xcode will throw an error for the line you just added. It’ll say:
|
1 |
Use of undeclared type MKMapView |
That’s because you haven’t added MapKit to the current file yet! So, import it by adding the following line above the class definition. Yes, right below import UIKit:
|
1 |
import MapKit |
Now, let’s create the outlet connection.
- First, open Main.storyboard.
- Then, click on View Controller Scene in the Document Outline.
- Then, open the Connections Inspector in the panel on the right.
- Then, check if the list includes your mapView property.
- Finally, click-and-drag from the tiny circle right next to mapView, to the map view in the editor.

Writing The First Method
OK, now let’s code the map view implementation. First, add the following code to class ViewController.
|
1 2 3 4 5 6 7 8 9 |
override func viewWillAppear(animated: Bool) { super.viewWillAppear(animated) if let mapView = self.mapView { mapView.delegate = self } } |
What, where? Anywhere! As long as it’s between the right squiggly brackets…
All methods must be added to a class scope. The class scope starts at the first squiggly bracket { after the class definition, and ends with the last squiggly bracket }.
You can say that this is balanced, or that each opening squiggly bracket must be matched with a closing squiggly bracket. Moreover, programmers use indentation to indicate “levels” of scope. Generally, you indent by 1 tab or 4 spaces after a opening squiggly bracket (and unindent at the closing bracket).
Now, let’s look at that method. It’s this:
- A method is a block of code that belongs to a class. It’s often a number of isolated code lines that perform one specific action. Methods can be called from within the class, or from other parts of the app code.
- The method’s name is viewWillAppear, and it has one parameter. A parameter is a variable that’s provided to the class when it is called. It can be used in the method scope, i.e. the entire method. In the method above, the parameter animated of type Bool (boolean, yes or no) is used in the call to method viewWillAppear on the superclass.
- All methods must start with the keyword func, short for “function”. In this case the method is overridden, thanks to the override keyword. It replaces the superclass implementation of the same method, with the method you wrote. The superclass and overriding concepts belong to the paradigm of Object Oriented Programming. We won’t cover that here, because it’s as exciting as watching glue dry.
- The meat of the method is this: first we optional-bind self.mapView to constant mapView. Using optional binding you can check if an optional is nil, and if it isn’t, the if-statement will be executed. At the same time, the mapView variable is made available within the scope of the if-statement.
- In the if-statement, the delegate property of mapView is set to self. In other words, when self.mapView isn’t nil, the delegate of mapView is assigned self. In short, the current class becomes delegate of mapView if it isn’t empty. More on delegation later.
OK, now Xcode throws us an error once more. This time it’s telling us that it can’t assign self as a delegate, because your class ViewController isn’t of type MKMapViewDelegate?. Let’s fix that.
Adjust the class definition so it’s the same as this:
|
1 |
class ViewController: UIViewController, MKMapViewDelegate |
Getting The User’s Location
OK, now that the map view is set up you can focus on getting the user’s location.
Add the following two properties to the ViewController class:
|
1 2 |
var locationManager:CLLocationManager? let distanceSpan:Double = 500 |
The first one is a variable called locationManager and of type CLLocationManager. It’s an optional, so it can be nil. The second one is a constant of type Double, and it is set to 500. A Double is a floating-point number with double precision (i.e. it can be twice as long as a Float).
Alright, now add the following method to the class. You can insert it right below the viewWillAppear method.
|
1 2 3 4 5 6 7 8 9 10 11 12 |
override func viewDidAppear(animated: Bool) { if locationManager == nil { locationManager = CLLocationManager() locationManager!.delegate = self locationManager!.desiredAccuracy = kCLLocationAccuracyBestForNavigation locationManager!.requestAlwaysAuthorization() locationManager!.distanceFilter = 50 // Don't send location updates with a distance smaller than 50 meters between them locationManager!.startUpdatingLocation() } } |
Whoah, what happens here?
- First, we check if locationManager is nil with an if-statement.
- Then, we instantiate an instance of CLLocationManager and assign it to locationManager. In other words: the variable locationManager now holds a reference to a new instance of CLLocationManager. We’ve just created the location manager, an object we need to get the user’s location.
- Then, we set a bunch of properties of the locationManager. It’s delegate gets set to the current class, we configure the GPS accuracy and call method requestAlwaysAuthorization(). This method will cause a popup in the app asking for permission to use the GPS location data.
- Finally, method startUpdatingLocation is called. This will cause the location manager to poll for a GPS location, and call a method on the delegate telling it the new GPS location. If we tap into that delegate method, we can access the user’s location data!
Did you notice the exclamation mark, right after the locationManager? OK, you know locationManager is an optional; it can be nil. When we want to access the variable, i.e. do something with it, we need to unwrap it. This is a rule. Unwrapping can be done in two ways:
- Optional binding. With if let definitiveValue = optionalValue { ….
- Forced unwrapping. With optionalValue!.
You’ve seen optional binding before. With an if let statement you assign a new variable when the optional is not nil.
Force unwrapping is the less subtle approach. You simply type an exclamation mark after the variable name you want to unwrap, and it will immediately “convert” it from optional to non-optional. Unfortunately, when you force unwrap an optional that is nil at that time, your app will crash.
You can’t force unwrap an optional that is nil. In the code above, force unwrapping isn’t a problem. Why? Because right before we use the force unwrapping, the locationManager optional variable gets assigned an instance. Therefore, we can be certain that locationManager is not nil at that point.
OK, back to the code. You’ve added the new method and now Xcode throws an error… again. Let’s fix it!
The error points out that we want self to be the delegate of locationManager, but we don’t conform to the right protocol. Adjust the class definition to make it conform to the protocol:
|
1 |
class ViewController: UIViewController, MKMapViewDelegate, CLLocationManagerDelegate |
OK, now add the following method to the ViewController class. It’s a delegate method. You can insert it right below the previous method.
|
1 2 3 4 5 6 |
func locationManager(manager: CLLocationManager, didUpdateToLocation newLocation: CLLocation, fromLocation oldLocation: CLLocation) { if let mapView = self.mapView { let region = MKCoordinateRegionMakeWithDistance(newLocation.coordinate, distanceSpan, distanceSpan) mapView.setRegion(region, animated: true) } } |
What happens here?
- First, the method signature is locationManager:didUpdateToLocation:fromLocation. The method uses named parameters, which means that the name of the parameter (variable inside the method) is different from the argument used when calling the method. In short, the method has 3 parameters: the location manager that called the method, the new GPS location, and the old GPS location.
- Inside the method, first self.mapView is unwrapped using optional binding. When self.mapView is not nil, mapView now contains the unwrapped non-optional value, and the if-statement is executed.
- In the if-statement, a region is calculated from the new GPS coordinate and the distanceSpan we created earlier. Technically, it creates a rectangular region of 500 by 500 meters with the newLocation coordinate in the center.
- Finally, it calls setRegion on the map view. The named parameter animated is set to true, so the region change is animated. In other words: the map will pan and zoom so it shows the map for the user’s location and 500×500 square meter around it.
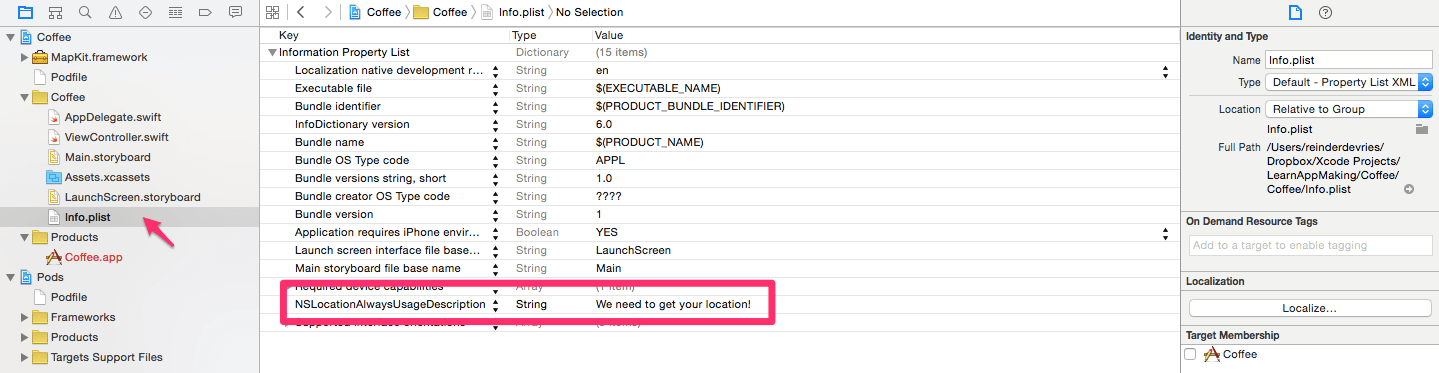
One last thing. In order to get access to the user’s location, you need to set a special permission token in Xcode. This token contains the reason, in text, for accessing the user’s location. The iPhone will show that to the user when the permissions popup is shown (when we call requestAlwaysAuthorization()).
To configure the token, do this:
- Open the Info.plist file using the Project Navigator.
- Right-click on the list that appears and choose Add Row.
- In the key column, input NSLocationAlwaysUsageDescription.
- In the type column, set it to String.
- In the value column, type We need to get your location!
Run The App
Now, let’s run the app. Make sure you have an iPhone Simulator target selected, then press Command-R. The app fires up, and hopefully shows you the permission screen. Click Allow.
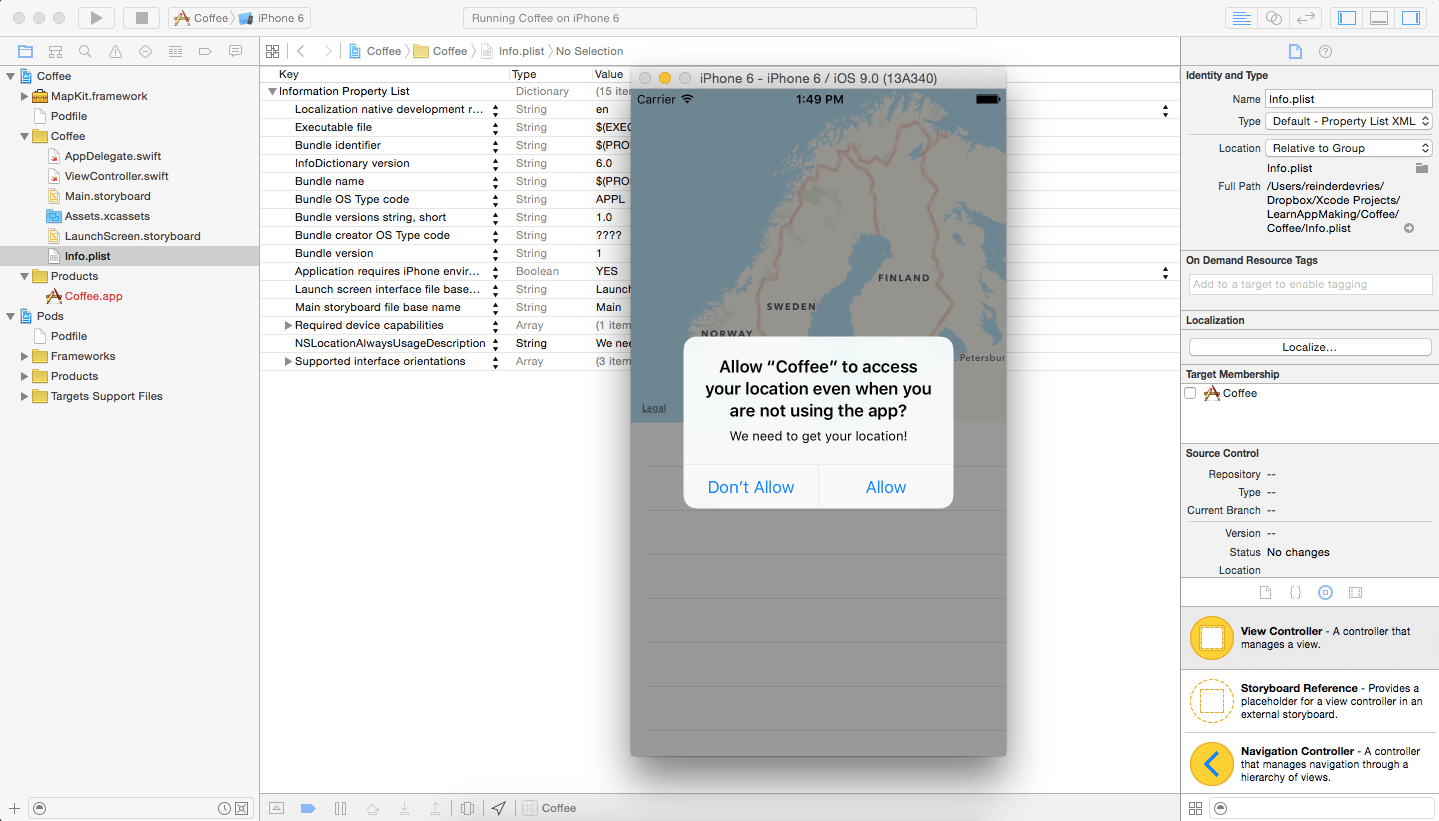
Now, when you’ve clicked Allow the map view most likely won’t update. The Simulator doesn’t have GPS, so we need to, well… simulate that.
Use one of the following menu options, when the app is running in the simulator:
- iPhone Simulator: Debug -> Location -> Apple.
- Xcode: Debug -> Simulate Location -> [Pick one].
When you’ve clicked on a location, the map view should update and zoom in on that location.
Is it working? NEAT!
Getting Venue Data With Foursquare
Alright, this app is about to get a lot more interesting! You’re going to use the Das Quadrat library to get data from Foursquare, and Realm to store it locally in the app.
Before you can use Foursquare’s API, you need to register the app using their developer website. It’s incredibly easy, fortunately.
- First, make sure you have a Foursquare account. You can register yourself at foursquare.com.
- Then, hop over to developer.foursquare.com and click on My Apps in the blue menu bar up top.
- Then, click the green Create a new app button on the right.
- Then, fill out the following fields:
- App Name: Coffee
- Download / Welcome page URL: http://example.com
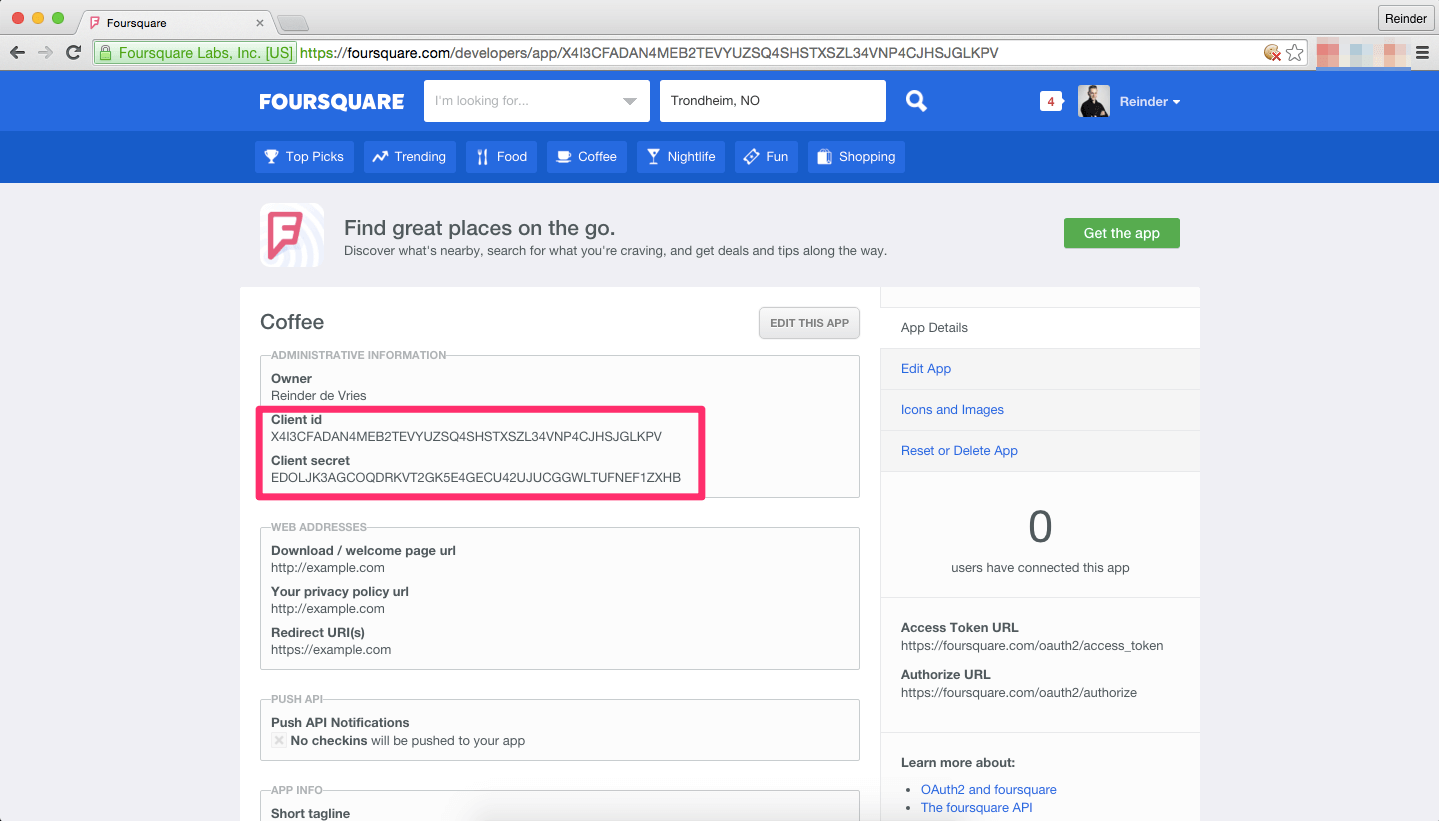
- Finally, click Save Changes.
When saved, the website redirects you to the app’s page. Note the Client ID and Client Secret, you will need it later.
Building The Foursquare API Connector
OK, now let’s write the code that connects to Foursquare. You will do this using the singleton paradigm. It’s perfect for what we want to do with it.
A singleton is an instance of a class, of which only one copy is allowed. You can’t make two instances of a singleton. Why use singletons? Although its use is highly criticized, singletons are good for one thing: avoiding multiple concurrent connections to an external resource.
Think about it. What happens if you send two signals to a webserver, and both attempt to write to a specific file? The message could get all garbled up, unless the webserver knows which signal has precedence over the other.
A singleton ensures that only one part of the app can make requests to an external resource. Within the singleton, a number of implementations can ensure that no conflicting requests can exist. Queueing and sequencing of requests is one of those solutions, but it’s outside the scope of this coding guide.
Starting off, do this:
- Right-click on the Coffee folder in the Project Navigator of your Xcode workspace.
- Choose New File ….
- Pick the Swift File template from the iOS -> Source category, and click Next.
- Name the file CoffeeAPI.swift, make sure the target Coffee is selected, and save the file alongside the other Swift files by clicking Create.
Whoah, scary empty file! Let’s change that. At the beginning of the file, just below the first import, type this:
|
1 2 3 |
import QuadratTouch import MapKit import RealmSwift |
Next, code this:
|
1 2 3 4 5 |
struct API { struct notifications { static let venuesUpdated = "venues updated" } } |
That’s pretty straightforward code, right? First you import the right libraries (Quadrat, MapKit, Realm) and then you code a struct-of-structs that contains one static constant called venuesUpdated. Later, you’ll use that struct like this:
|
1 |
API.notifications.venuesUpdated |
Next up, type this:
|
1 2 3 4 5 |
class CoffeeAPI { static let sharedInstance = CoffeeAPI() var session:Session? } |
The code does this:
- Tell the Xcode compiler that you are coding a class named CoffeeAPI. It’s a pure Swift class, and doesn’t subclass NSObject!
- Declare a static class constant called sharedInstance, of type CoffeeAPI. This “shared instance” is only accessible through the class CoffeeAPI, and is instantiated when the app starts (eager loading).
- Declare a class property called session, of type Session? (from Das Quadrat).
Later, we’ll access the Coffee API singleton as CoffeeAPI.sharedInstance. You can do this from anywhere in the code and you’ll always reference the same object, which is exactly how a singleton behaves.
Next up, the constructor. Code this right below the properties, within the squiggly brackets of the class:
|
1 2 3 4 5 6 7 8 9 10 |
init() { // Initialize the Foursquare client let client = Client(clientID: "...", clientSecret: "...", redirectURL: "") let configuration = Configuration(client:client) Session.setupSharedSessionWithConfiguration(configuration) self.session = Session.sharedSession() } |
A constructor is the method that’s called when an instance of a class is instantiated. It’s the first method that’s automatically called when an instance is created.
Remember the Client ID and Client Secret you copied from the Foursquare developer website? Paste those in for the … in the constructor code. You can leave the redirectURL parameter blank. Like this:
|
1 |
let client = Client(clientID: "X4I3CFADAN4MEB2TEVYUZSQ4SHSTXSZL34VNP4CJHSJGLKPV", clientSecret: "EDOLJK3AGCOQDRKVT2GK5E4GECU42UJUCGGWLTUFNEF1ZXHB", redirectURL: "") |
OK, one last thing. Copy the following code to CoffeeAPI.swift and make sure you paste it outside the CoffeeAPI class. That means after the last squiggly bracket of the file.
|
1 2 3 4 5 6 7 8 9 10 11 12 13 14 15 16 17 |
extension CLLocation { func parameters() -> Parameters { let ll = "\(self.coordinate.latitude),\(self.coordinate.longitude)" let llAcc = "\(self.horizontalAccuracy)" let alt = "\(self.altitude)" let altAcc = "\(self.verticalAccuracy)" let parameters = [ Parameter.ll:ll, Parameter.llAcc:llAcc, Parameter.alt:alt, Parameter.altAcc:altAcc ] return parameters } } |
What’s that for? It’s called an extension, it extends a base class with extra functionality. Instead of creating a new class, you extend the base class CLLocation with an extra method parameters(). Every time a CLLocation instance is used in your code, and this extension is loaded, you can call the method parameters on the instance, even when it’s not part of the original MapKit code.
Note: Don’t confuse the Swift extension with the programming keyword extend. The former indicates the decoration of a base class with new functionality, the latter means you’re creating a subclass from a super class.
The parameter method returns an instance of Parameters, which is in turn a simple key-value dictionary that contains parameterized information (GPS location and accuracy).
Making The Request To Foursquare And Processing It
Alright, let’s get the data from Foursquare. Internally, Foursquare has an HTTP REST API that returns JSON. Fortunately we don’t see anything of that, it’s all abstracted away thanks to the Das Quadrat library.
Requesting data from Foursquare is as simple as calling a property on session (the one we just created), and using one of many methods on that property. The method returns an instance of Task, a reference to an asynchronous background task. We can provide the method with a completion closure; code that’s executed when the task finishes like this:
|
1 2 3 4 5 6 |
let searchTask = session.venues.search(parameters) { (result) -> Void in // Do something with "result" } |
The venues property on session contains all the information to communicate with the “venues” end-point on the Foursquare API. You provide it’s search method with parameters. You provide the method search with a second parameter, a closure, which is executed when the task finishes. Also, the method returns a reference to the time-intensive background task. You could use that to stop the task before it’s finished, or to check it’s progress at another point in your code.
OK, now check out the following method. Copy and paste it in your code, right below the init constructor method, and before the closing squiggly bracket of the class CoffeeAPI. We’ll look at what the code does in a minute.
|
1 2 3 4 5 6 7 8 9 10 11 12 13 14 15 16 17 18 19 20 21 22 23 24 25 26 27 28 29 30 31 32 33 34 35 36 37 38 39 40 41 42 43 44 45 46 47 48 49 50 51 52 53 54 55 56 57 58 59 60 61 62 63 64 65 66 67 68 69 70 71 72 73 74 75 76 |
func getCoffeeShopsWithLocation(location:CLLocation) { if let session = self.session { var parameters = location.parameters() parameters += [Parameter.categoryId: "4bf58dd8d48988d1e0931735"] parameters += [Parameter.radius: "2000"] parameters += [Parameter.limit: "50"] // Start a "search", i.e. an async call to Foursquare that should return venue data let searchTask = session.venues.search(parameters) { (result) -> Void in if let response = result.response { if let venues = response["venues"] as? [[String: AnyObject]] { autoreleasepool { let realm = try! Realm() realm.beginWrite() for venue:[String: AnyObject] in venues { let venueObject:Venue = Venue() if let id = venue["id"] as? String { venueObject.id = id } if let name = venue["name"] as? String { venueObject.name = name } if let location = venue["location"] as? [String: AnyObject] { if let longitude = location["lng"] as? Float { venueObject.longitude = longitude } if let latitude = location["lat"] as? Float { venueObject.latitude = latitude } if let formattedAddress = location["formattedAddress"] as? [String] { venueObject.address = formattedAddress.joinWithSeparator(" ") } } realm.add(venueObject, update: true) } do { try realm.commitWrite() print("Committing write...") } catch (let e) { print("Y U NO REALM ? \(e)") } } NSNotificationCenter.defaultCenter().postNotificationName(API.notifications.venuesUpdated, object: nil, userInfo: nil) } } } searchTask.start() } } |
Quite some code, eh? See if you can distinguish between the 5 main tasks that happen in this method.
- Setup, configuration and start of the API request.
- Completion handler of the request (it’s the closure).
- “Untangling” of the request result data, and the start of the Realm transaction.
- The for-in loop that loops over all the venue data.
- The end of the completion handler, it sends a notification.
OK, now let’s read it line by line:
Setting Up The Request
First, with optional binding you check if self.session is not nil. If it isn’t, constant session contains the unwrapped value.
Then, method parameters is called on location. Where did that location come from? Check that it is provided as an parameter in the method getCoffeeShopsWithLocation. Every time you call that method you have to give it a location argument too. Also, check that parameters is in fact the extension you coded earlier.
Then, we add a new item to the parameters dictionary. It uses the Parameter.categoryId constant as a key, and the string 4bf58dd8d48988d1e0931735 as a value. That string is just the hard-coded ID for the “Coffeeshops” category on Foursquare, so nothing special.
Configuring The Request Itself
Then, you set up the actual request. You call venues on session, and search on venues. The method search takes two (not one!) arguments: the parameters you created, and also the closure that’s below it. This way of writing is known as a trailing closure. The closure is the last parameter of the method, so instead of writing it within the method call parentheses, you can write it outside and wrap it inside squiggly brackets. The method search returns a reference to the lengthy task. It doesn’t start automatically, we start it later (near the end of the method).
Writing The Closure
Then, we go inside the closure. It’s important to note that although these code lines are consecutive, they won’t get executed after another. The closure is executed when the search task completes! Check that the app will jump from the let searchTask … code line to the searchTask.start() line, and will jump to the if let response = … line when the data from the HTTP API is returned to the app.
The closures signature (called closure expression syntax) is this: (result) -> Void in. It means that within the closure a parameter result is available, and that the closure returns nothing (Void). It’s sorta similar to the signature of an ordinary method.
Untangling The Result
Then, we check using optional binding if:
- result.response is not nil, and if not, assign it to constant response (and continue execution of the if-statement)
- response[“venues”] is not nil and if it can be cast (“converted”) to type [[String: AnyObject]].
The casting makes sure we are working with the correct type. If the cast fails, the optional binding fails, so the if-statement isn’t executed. Working like this hits two birds with one stone: you check if the value isn’t nil, and at the same time safely attempt to cast the value to a more favorable type.
Can you name the type of venues? It’s array-of-dictionaries, and the dictionary type is key string and value anyObject.
Autoreleasing Memory
Then, a cool thing happens: we start an autorelease pool. It’s a whole topic of its own, though. Do you know how the iPhone handles memory management?
Essentially, objects in memory that no one uses will be removed from memory at one point. Kind of like garbage collection, but different. When a variable in an autorelease pool is released, it’s tied to that autorelease pool. When in turn the pool itself is released, all memory in the pool is released too. It’s like batching the release of memory.
Why do that? Well, by creating your own autorelease pool you’re helping the iPhone system manage memory. Since we could be working with hundreds of venue objects within the autorelease pool, the memory could clog up with undiscarded memory. The earliest point in time where the normal autorelease pool discards memory is at the end of the method! Thus, you run the risk of running out of memory because the autorelease mechanism doesn’t discard quickly enough. By creating your own autorelease pool, you can influence the discarding of released memory and avoid being stuck for free memory.
Starting Up Realm
Then, you instantiate a Realm with line let realm = try! Realm(). You need a realm object before you can work with data from Realm. The try! keyword is part of Swift’s error handling. With it, we tell: we’re not handling errors that come from Realm. This is not recommended for production environments, but it makes our code considerably easier.
Beginning The Transaction
Next up, the beginWrite method on the realm instance. That code will start what’s known as a transaction. Let’s talk about efficiency for a second. What’s more efficient:
- Creating a file pointer, opening the file, writing 1x to the file, closing the file, and starting over (50x).
- Creating a file pointer, opening the file, writing 50x to the file, closing the file.
Exactly: the last one. Realm stores its data (like almost any other database system) in ordinary text files. Working with files means that the OS needs to open the file, give write access to the program, and write data bit by bit from the program into the file.
Instead of writing all the Realm objects one by one, you open up the file once and then write 50 objects to it in one go. Since the data is fairly similar between objects, and they can be written successive (“back-to-back”) it’s way faster to open once, write 50, and close once. That’s what transactions do!
Just for the sake of being complete: if one write in a transaction fails, all writes fail. This comes from banking and accounting: if you write 50 transactions to a ledger and one of them turns out to be wrong (no money in account), you don’t want to have to cherry pick that transaction. You could end up corrupting the whole ledger! Instead, transactions make sure that all-or-nothing is correct and this mitigates the risk of data corruption.
Iterating Over The Venue Data
OK, now look at the for-in loop. You already created the venues variable, in the optional binding statement above. With the for-in loop you iterate over the array, and within the loop you provide the individual array item as venue.
First up is the creation of venueObject of type Venue. This line will throw an error for now, because there’s no such thing as a Venue class. You’ll have to code that later, so let’s leave it for now.
Then, a number of optional binding statements follow. Each of the bindings attempts to access a key-value pair of venue and at the same time attempts to cast it to a favorable type. For example, when venue contains a key id, attempt to cast it to String and if that succeeds, assign it to the id property of venueObject.
The location binding looks a bit complicated, but it really isn’t. Look closely, and check that keys lat, lng and formattedAddress are part of the location key (and not part of venue). They’re essentially one level down in the data structure.
Next up, the last line of the for-in loop: realm.add(venueObject, update: true). This line of code will add the venueObject to Realm, and write it to the database (still inside the transaction). The second update argument indicates that when this object already exists, Realm should overwrite it with the new data. Later you’ll indicate a unique key for each of the Venue objects, so Realm knows which objects already exists.
Handling Errors
OK, now Realm has saved up all the write data in the transaction and will attempt to write it to the Realm database file. This can go wrong, of course. Fortunately Swift has an extensive error handling mechanism you can use. It goes like this:
- Do dangerous task.
- If error occurs, throw the error.
- The caller of the dangerous task catches the error.
- The catcher handles the error.
In most languages this mechanism is known as try-catch, but Swift’s engineers called it do-catch (and yes, they renamed do-while to repeat-while…). In your code, it looks like this:
|
1 2 3 4 5 6 7 8 |
do { try realm.commitWrite() print("Committing write...") } catch (let e) { print("Y U NO REALM ? \(e)") } |
The dangerous task, realm.commitWrite() is enclosed in squiggly brackets after do. Also, before the code line try is written. Track back your code and locate the try! (with exclamation mark). The exclamation mark suppresses the errors.
When an error is thrown inside the do { } block, the catch block is invoked. It has one parameter, let e, for which e will contain the exception that explains the error. In the code block above, we print out an error message and include e. When the app runs and the error is thrown, the printout will tell us the cause of the exception.
You understand that the error handling in this code block is very basic. Imagine that with a solid error handling system like this, you can not only catch errors but you can also work with them. For instance, when you write data to a file and the disk is full, you can show the user a popup saying that the disk is full. In earlier versions of Swift, handling errors was much harder and often meant your code crashed if you didn’t work with it properly.
Swift’s error handling is more or less enforced. You either have to handle the error, or suppress it, but it can’t make the error go by unnoticed. Handling errors makes your code stronger, so make it a habit to work with a do-catch loop instead of suppressing errors with try!.
OK, onto the two last pieces of code in this method. First up, this line:
|
1 |
NSNotificationCenter.defaultCenter().postNotificationName(API.notifications.venuesUpdated, object: nil, userInfo: nil) |
This code will send a notification to every part of the app that listens to it. It’s the de facto notification mechanism in apps, and it’s very effective for events that affect multiple parts of your app. Consider that you’ve just received new data from Foursquare. You may want to update the table view that shows that data, or some other part of your code. A notification is the best way to go about that.
Keep in mind for the future that notifications sent on one thread will remain in that thread. If you update your UI outside of the main thread, i.e. on a thread that sent a notification, your app will crash and throw a fatal error.
Note the API.notifications.venuesUpdated hard-coded string? Instead of this code we could have written “venuesUpdated”. Instead you chose to make your code safer by using hard-coded compile-time constants. If you made an error, the compiler would have picked it up. If you made an error in “venuesUpdated”, the compiler would have missed it!
Then, finally, outside the closure this code is written:
|
1 |
searchTask.start() |
Note once more that this code is executed right after the let searchTask … code, independent of the execution of the closure above it. What does the code do? Now that we’ve set up the request, given it all parameters it needs, this code simply starts the search task.
The Das Quadrat library sends a message to Foursquare, waits for it to come back, and then invokes the closure you wrote to process the data. Neat, right?
Leave the code for now, because you’re going to write that Venue object next.
Coding The Realm Venue Object
You know what’s so cool about Realm? The entire coding structure is very transient. To work with Realm, you essentially just need one class file. You create a bunch of instances of that class, write them to a Realm file, and BAM! you’ve just made your own local datastore.
Out of the box, Realm comes with a number of neat features like sorting, filtering, and working with native Swift data types. It’s so fast you don’t need an NSFetchedResultsController (from Core Data) to load up tens of thousands of objects in a table view. Realm comes with it’s own rudimentary data browser, too.
OK, next up: the Realm Venue object. Do this:
- Right-click the Coffee folder in the Project Navigator (in Xcode).
- Choose New File … and pick the Swift File from the iOS -> Source category, then hit Next.
- Name the file Venue.swift and make sure it’s got the target Coffee selected.
- Finally, hit Create.
Alright, another empty file. This one’s going to contain the code for the Realm object itself, Venue.
Start with importing the right libraries. Right below the import for the Foundation package, add this:
|
1 2 |
import RealmSwift import MapKit |
Below, type this:
|
1 2 3 4 |
class Venue: Object { } |
This is the class signature for Venue. The colon indicates that you want to extend the Object class. As a part of Object Oriented Programming you can create a superclass-subclass relation between classes, which is called extending. In the code above you’re extending the Object class, which is part of Realm.
In short, you copy all the methods and properties of the superclass and add functionality to it as a subclass. Note that this is different from creating an extension, which is just decorating an existing class with new functionality (without creating a distinct new class).
Next up, copy the following code into the class. Add it between the squiggly brackets.
|
1 2 3 4 5 6 7 |
dynamic var id:String = "" dynamic var name:String = "" dynamic var latitude:Float = 0 dynamic var longitude:Float = 0 dynamic var address:String = "" |
What does it do? It’s simple: you’re adding 5 properties to the class. You can use these properties to attach data to class instances, just like you did in the CoffeeAPI code.
The dynamic property ensures that the property can be accessed via the Objective-C runtime. It’s a topic on its own, but let’s assume that Swift code and Objective-C code run inside their own “sandbox”. Before Swift 2.0 all Swift code ran in the Objective-C runtime, but now Swift’s got its own runtime. By marking a property as dynamic, the Objective-C runtime can access it, which is in turn needed because Realm relies on it internally.
Each of the properties has a type: String or Float. Realm supports a number of native variable types, including NSData, NSDate (with second precision), Int, Float, String, etcetera.
Next, add this below the line with the address property.
|
1 2 3 |
var coordinate:CLLocation { return CLLocation(latitude: Double(latitude), longitude: Double(longitude)); } |
It’s a computed property. It won’t be saved with Realm because it can’t store computed properties. A computed property is, like the name says, a property that’s the result of an expression. It’s like a method, but then it’s accessed as if it were a property. In the above code the computed property turns the latitude and longitude into an instance of CLLocation.
It is convenient to use an intermediary like this, because we can just access venueObject.coordinate and get back an instance of the exact right type, without creating it ourselves.
OK, next up, paste this code below the last block:
|
1 2 3 4 |
override static func primaryKey() -> String? { return "id"; } |
This is a new method, which is overriden from the superclass Object. It’s a customization point and you use it to indicate the primary key to Realm. A primary key works like a unique identifier. Each object in the Realm database must have a different value for the primary key, just like each house in a village must have a unique and distinct address.
Realm uses the primary key to distinguish objects from one another, and determines whether an object is unique or not.
The return type of the method is String, so we can return a string with the name of the property that should be regarded as the primary key, or nil if we don’t want to use a primary key.
You can imagine that Realm object properties (like id, and name) kind of work like columns in a spreadsheet. The return value for method primaryKey is the name of one of the columns, in this case id.
Now, finally, build the app by pressing Command-B to make sure all is working smoothly. There’s no point in running the app because we haven’t changed front-end facing code. Instead, just check that you haven’t made any errors by compiling the app. If you were to check inside the CoffeeAPI.swift file, you see that the error around the venueObject line has disappeared.
Displaying Venue Data In The Map View
OK, now let’s do something with the data we’re downloading. You’re gonna put them on the map view you created earlier, as annotations.
First, switch over to the ViewController.swift file. Check that it has the code to show the user’s location on the map view.
Then, at the top of the file, add the following import statement:
|
1 |
import RealmSwift |
Then, at the top of the class file, add these properties (right below distanceSpan):
|
1 2 |
var lastLocation:CLLocation? var venues:Results? |
You need the RealmSwift library to work with Realm, and you need those two properties to work with the location and venue data.
Next, locate the locationManager:didUpdateToLocation:fromLocation method in the file. See it? OK, find the closing squiggly bracket of the method. Paste the following code below it.
|
1 2 3 4 5 6 7 8 9 10 11 12 13 14 15 16 17 18 19 20 21 22 23 24 25 26 |
func refreshVenues(location: CLLocation?, getDataFromFoursquare:Bool = false) { if location != nil { lastLocation = location } if let location = lastLocation { if getDataFromFoursquare == true { CoffeeAPI.sharedInstance.getCoffeeShopsWithLocation(location) } let realm = try! Realm() venues = realm.objects(Venue) for venue in venues! { let annotation = CoffeeAnnotation(title: venue.name, subtitle: venue.address, coordinate: CLLocationCoordinate2D(latitude: Double(venue.latitude), longitude: Double(venue.longitude))) mapView?.addAnnotation(annotation) } } } |
Whoah, big method! What does it do?
Let’s start with those two location code lines. The first one checks if location is not nil, the second one checks if the property lastLocation isn’t nil (with optional binding).
Those two lines look very similar, although they do very different things. Let’s back up a second. Check if the following statements are true:
- All location data in the app originates from the locationManager:didUpdateToLocation:fromLocation method. It is the only place where a CLLocation instance enters the app, based on data from the GPS hardware.
- The refreshVenues method requires a location as a parameter, a value or nil.
- The refreshVenues method could be called when no location data is available, i.e. from a place in your code that is disconnected from the location data method.
The last statement is very important. It’s quite simple, really: because we want to call refreshVenues independently from method locationManager:didUpdateToLocation:fromLocation we need to store the location data separate from that method.
So, every time the refreshVenues method is called we store the location parameter in the lastLocation property if it isn’t nil. Then, we check with optional binding that lastLocation isn’t nil. The if-statement executes only when it contains a value, so we can be 100% certain that the code block inside the if-statement always contains a valid GPS location!
Provided that the refreshVenues method actually gets this location data, of course. You’ll make sure it does, in a second. Re-read the above paragraphs if you don’t get it. The code is quite clever, and coding like this makes sure your app’s data is safe and still decoupled.
OK, next line in the method refreshVenues. What does it do? This block uses your CoffeeAPI shared instance to request data from Foursquare:
|
1 2 3 4 |
if getDataFromFoursquare == true { CoffeeAPI.sharedInstance.getCoffeeShopsWithLocation(location) } |
It only executes when the getDataFromFoursquare parameter is true, of course. It’s a simple ping to the CoffeeAPI to request the data. Keep in mind that we need to listed to the notification in CoffeeAPI if we want to get an update when the data fetch is finished. We’ll code that later.
Next up, this code:
|
1 2 |
let realm = try! Realm() venues = realm.objects(Venue) |
It seems insignificant, but the meat of the code happens here. First, a reference to Realm is made. Then, all the objects of class Venue are requested from Realm and stored in the venues property. This property is of type Results?, which is essentially an array of Venue instances (with a little extra stuff).
Finally, a for-in loop that iterates over all the venues and adds it as an annotation to the map view. Most likely this code will throw an error, but we’ll solve that.
Creating The Annotation Class
To create the annotation class, please do this:
- Right-click on the Coffee folder and choose New File ….
- Pick Swift File from the iOS -> Source category, hit Next.
- Name the file CoffeeAnnotation.swift and hit Create.
Then, paste the following code in the file:
|
1 2 3 4 5 6 7 8 9 10 11 12 13 14 15 16 17 |
import MapKit class CoffeeAnnotation: NSObject, MKAnnotation { let title:String? let subtitle:String? let coordinate: CLLocationCoordinate2D init(title: String?, subtitle:String?, coordinate: CLLocationCoordinate2D) { self.title = title self.subtitle = subtitle self.coordinate = coordinate super.init() } } |
It’s pretty straightforward:
- You’re creating a new class called CoffeeAnnotation that inherits from NSObject and implements the MKAnnotation protocol. That last part is important: before you can use a class as an annotation, it needs to conform to the annotation protocol.
- Then, a bunch of properties get created. These properties are required to be part of the class, because the protocol dictates so.
- Finally, a constructor method is created, filling up the class properties based on the method parameters.
Switch back to the ViewController.swift file and check if the error around CoffeeAnnotation have disappeared.
Next up, add the following method to the ViewController class. It’s relatively standard code that ensures that the annotations you add to the map are actually shown.
|
1 2 3 4 5 6 7 8 9 10 11 12 13 14 15 16 17 18 |
func mapView(mapView: MKMapView, viewForAnnotation annotation: MKAnnotation) -> MKAnnotationView? { if annotation.isKindOfClass(MKUserLocation) { return nil } var view = mapView.dequeueReusableAnnotationViewWithIdentifier("annotationIdentifier") if view == nil { view = MKPinAnnotationView(annotation: annotation, reuseIdentifier: "annotationIdentifier") } view?.canShowCallout = true return view } |
Just like a table view, a map view utilizes reusable instances to smoothly display pins on the map. In the above code, this happens:
- First, check if the annotation isn’t accidentally the user blip.
- Then, dequeue a pin.
- Then, if no pin was dequeued, create a new one.
- Then, set that the pin can show a callout (little blurb with information).
- Finally, return the view so it can be displayed.
Note that this method is part of the delegation paradigm. You earlier set the map view delegate to self. So, when the map view is ready to display pins it will call the mapView:viewForAnnotation: method when a delegate is set and thus the app will get to the code you just defined. Delegation is a terrific way to customize code without overriding an entire class.
Responding To The Venue Data Notification
Alright, let’s tie it all up. Add the following line to viewDidLoad in ViewController.swift, right below the super… line:
|
1 |
NSNotificationCenter.defaultCenter().addObserver(self, selector: Selector("onVenuesUpdated:"), name: API.notifications.venuesUpdated, object: nil) |
This will tell the notification center that self (the current class) is listening to a notification of type API.notifications.venuesUpdated. Whenever that notification is posted the method onVenuesUpdated: of ViewController is invoked. Clever, right?
Add this method to the ViewController class:
|
1 2 3 4 |
func onVenuesUpdated(notification:NSNotification) { refreshVenues(nil) } |
See what happens here?
- When location data from Foursquare is received, refreshVenues is called.
- The method does not include location data, and does not provide the getDataFromFoursquare parameter. That parameter is false by default, so no data from Foursquare is requested. You get it: this would in turn trigger an infinite loop in which the return of data causes a request for data ad infinitum.
- Essentially, the return of Foursquare data triggers a draw of annotations on the map view!
One vital part of the code remains. Add the following line of code to the locationManager:didUpdateToLocation:fromLocation: method, right at the end of the inner if-statement:
|
1 |
refreshVenues(newLocation, getDataFromFoursquare: true) |
The method contents now looks like this:
|
1 2 3 4 5 6 7 |
if let mapView = self.mapView { let region = MKCoordinateRegionMakeWithDistance(newLocation.coordinate, distanceSpan, distanceSpan) mapView.setRegion(region, animated: true) refreshVenues(newLocation, getDataFromFoursquare: true) } |
What does the code do? Easy: it calls refreshVenues with the GPS location of the user. Additionally, it tells the API to request data from Foursquare. Essentially, every time the user moves new data is requested from Foursquare. Thanks to the settings that only happens once every 50 meters. And thanks to the notification center, the map is updated!
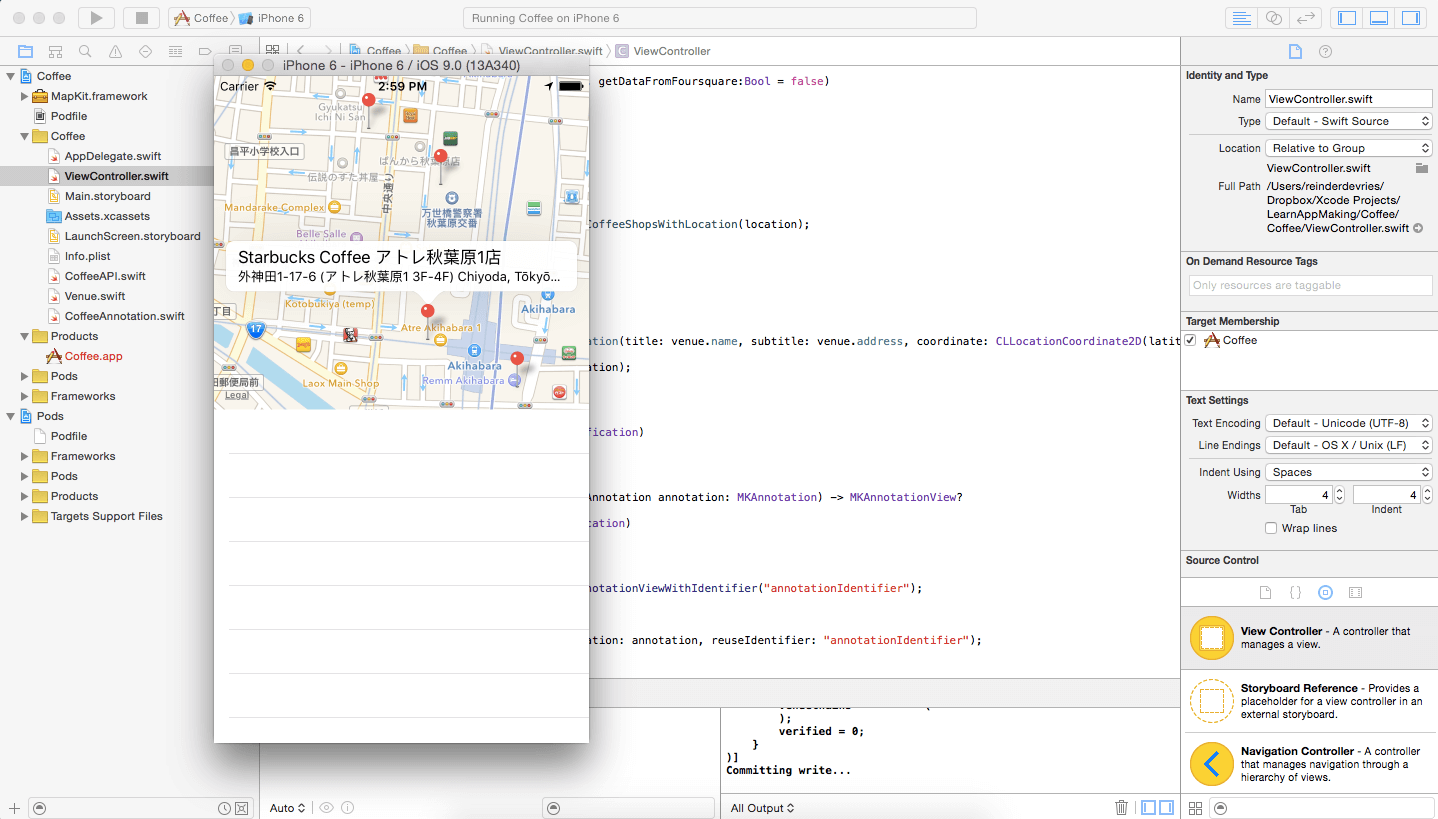
Run the app and verify that it’s all working correctly. Is it? Awesome!
Displaying Venue Data In The Table View
Now that the map view is set up you can complete the app by displaying the same set of data in the table view. The implementation is pretty straightforward.
First, add the instance property and its outlet to ViewController. Add this to the top of the class, right below the property mapView.
|
1 |
@IBOutlet var tableView:UITableView? |
Next, switch to Main.storyboard and select the View Controller Scene. Locate the Connections Inspector and drag a line from tableView to the table view in the editor. You’ve now connected the outlet to your code.
Add the following code to viewWillAppear: in ViewController.swift, in a similar manner to the optional binding of self.mapView.
|
1 2 3 4 5 |
if let tableView = self.tableView { tableView.delegate = self tableView.dataSource = self } |
Add the following delegate protocols to the class definition of the ViewController class:
|
1 |
UITableViewDataSource, UITableViewDelegate |
Next up, add these two methods to the class:
|
1 2 3 4 5 6 7 8 9 |
func tableView(tableView: UITableView, numberOfRowsInSection section: Int) -> Int { return venues?.count ?? 0 } func numberOfSectionsInTableView(tableView: UITableView) -> Int { return 1 } |
These two methods are part of the table view delegate protocol. The first one determines how many cells the table view has, and the second one determines how many sections the table view has. Note that the ?? is called a nil-coalescing operator. It basically says: when venues is nil, use 0 as a default value.
Next, add this method to the ViewController class:
|
1 2 3 4 5 6 7 8 9 10 11 12 13 14 15 16 17 |
func tableView(tableView: UITableView, cellForRowAtIndexPath indexPath: NSIndexPath) -> UITableViewCell { var cell = tableView.dequeueReusableCellWithIdentifier("cellIdentifier"); if cell == nil { cell = UITableViewCell(style: UITableViewCellStyle.Subtitle, reuseIdentifier: "cellIdentifier") } if let venue = venues?[indexPath.row] { cell!.textLabel?.text = venue.name cell!.detailTextLabel?.text = venue.address } return cell! } |
Most of this is boilerplate code. It does this:
- Attempt to dequeue a cell.
- If no cell exists, create a new one with style Subtitle.
- If venues contains an item for index indexPath.row, assign it to constant venue. Use the data to populate the textLabel and detailTextLabel of the cell.
- Return the cell.
Just like with the map view, the method tableView:cellForRowAtIndexPath: is called when the table view code wants a table view cell. You can use the method to customize your table view cells. It’s easier than subclassing!
Next one, the last method for the table view. Add this method to the ViewController class:
|
1 2 3 4 5 6 7 8 |
func tableView(tableView: UITableView, didSelectRowAtIndexPath indexPath: NSIndexPath) { if let venue = venues?[indexPath.row] { let region = MKCoordinateRegionMakeWithDistance(CLLocationCoordinate2D(latitude: Double(venue.latitude), longitude: Double(venue.longitude)), distanceSpan, distanceSpan) mapView?.setRegion(region, animated: true) } } |
It’s the delegate method that’s called when the user taps a cell. The code is simple: when an item for index exists in venues, use it to set the map view region around that item. In other words: the map view centers on the tapped item!
The only thing that remains is refreshing the table view data based on the notification event. You want to show the new data once it’s come in.
Add this to the refreshVenues: method, at the end of the second if-statement. Locate the if let location = lastLocation line, and find it’s ending squiggly bracket (right after the for-in loop). Add this:
|
1 |
tableView?.reloadData() |
OK, now check if your app is working. Run it with Command-R and verify the result. If all went well, the venue data should show up in the table view.

## Filtering The Venue Data Based On Location
OK, now a strange thing happens. The table view shows ALL the data! If you’ve been to Japan in the app, and then to San Francisco, you still end up with Japanese coffeeshops in the table view…
Well, you don’t want that. So, let’s work some Realm magic and get the right data worked out.
First, change the venues property of class ViewController. Instead of Results?, set it to this:
|
1 |
var venues:[Venue]? |
What’s the difference? Well, it’s type of course! The first one is an instance of Results that contains Venue objects. It’s part of Realm. The second, new type is simply an array of Venue instances.
The big difference is lazy loading. Realm is super efficient with loading only the data it needs to use, the data that is accessed by your code. Unfortunately, Realm doesn’t support a feature we need (sorting based on computed properties). Therefore, we need to load all data from Realm and then perform our own filtering on it. Normally you’d let Realm handle the data retrieval (using lazy loading) and simply give it a filter. Well, not today!
OK, remember these two lines?
|
1 2 |
let realm = try! Realm() venues = realm.objects(Venue) |
Replace it with this code:
|
1 2 3 4 5 6 7 8 9 |
let (start, stop) = calculateCoordinatesWithRegion(location) let predicate = NSPredicate(format: "latitude < %f AND latitude > %f AND longitude > %f AND longitude < %f", start.latitude, stop.latitude, start.longitude, stop.longitude) let realm = try! Realm() venues = realm.objects(Venue).filter(predicate).sort { location.distanceFromLocation($0.coordinate) < location.distanceFromLocation($1.coordinate) } |
Before you continue, add the following method to ViewController.
|
1 2 3 4 5 6 7 8 9 10 11 12 13 14 |
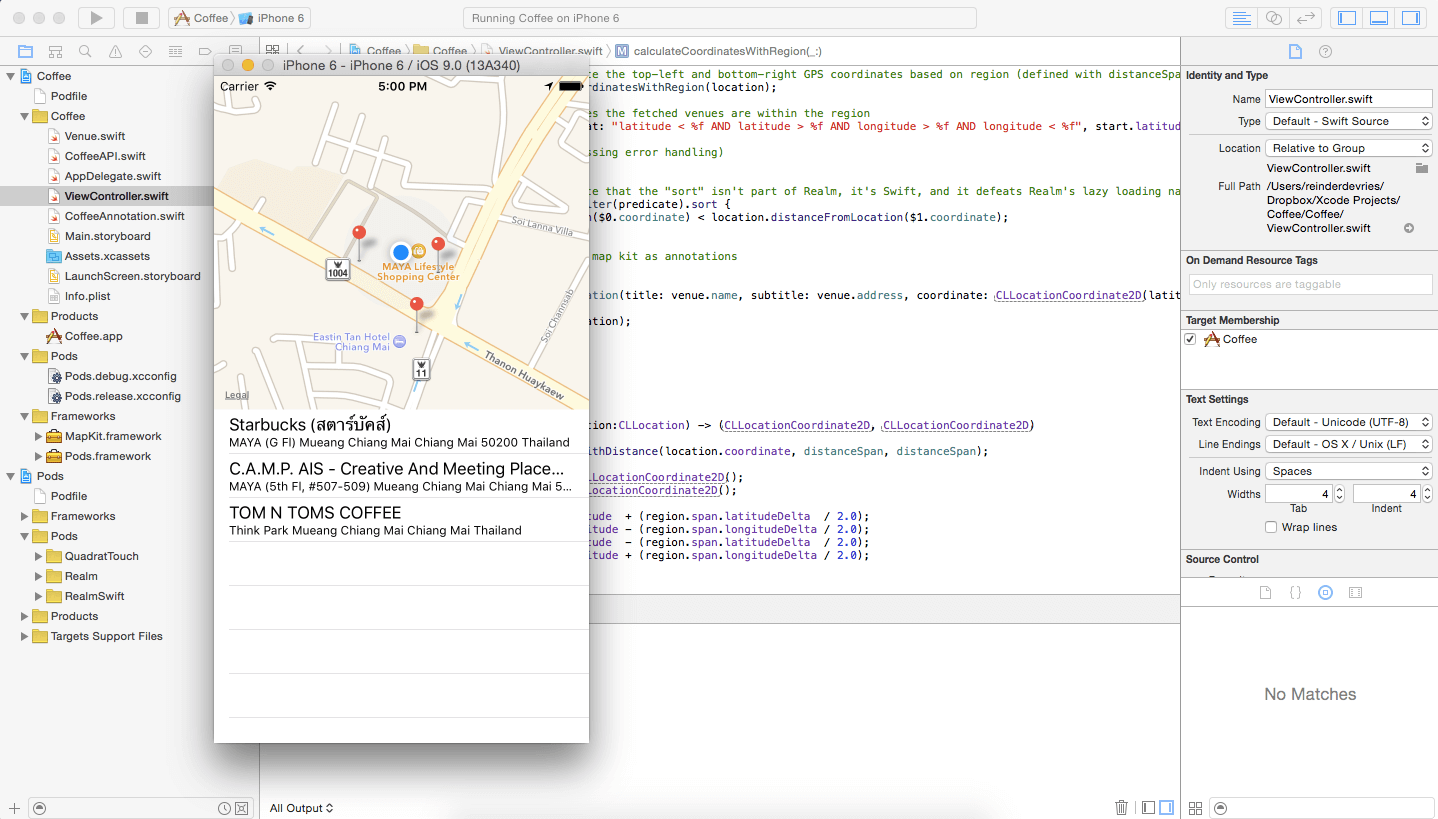
func calculateCoordinatesWithRegion(location:CLLocation) -> (CLLocationCoordinate2D, CLLocationCoordinate2D) { let region = MKCoordinateRegionMakeWithDistance(location.coordinate, distanceSpan, distanceSpan) var start:CLLocationCoordinate2D = CLLocationCoordinate2D() var stop:CLLocationCoordinate2D = CLLocationCoordinate2D() start.latitude = region.center.latitude + (region.span.latitudeDelta / 2.0) start.longitude = region.center.longitude - (region.span.longitudeDelta / 2.0) stop.latitude = region.center.latitude - (region.span.latitudeDelta / 2.0) stop.longitude = region.center.longitude + (region.span.longitudeDelta / 2.0) return (start, stop) } |
OK, this method is nothing special. Just basic maths to turn a CLLocation instance into a top-left and bottom-right coordinate, based on a region distance span.
On the first line, a region is created based on the location and the property distanceSpan. Then, the locations are set up and their latitude and longitude set. Those are calculated from the horizontal and vertical deltas from the center coordinate. Finally, the method returns a tuple: two ordered variables, packed as one.
Tuples are ordinal sequences of variables. They’re enclosed in parentheses and can be “unpacked” into named variables. They’re sort of immutable arrays, with a very specific order.
OK, back to the crazy filtering code. Let’s look at it line by line.
- First, two constants are created: start and stop. They’re the returned result from calculateCoordinatesWithRegion:. That method returns a tuple, and with the let (start, stop) line you unpack the tuple variables into separate local variables. The calculateCoordinatesWithRegion: is provided with one argument: the location of the app user.
- Then, a predicate is created. Predicates are verbose filters you can apply to arrays, sequences, etcetera. This predicate defines a simple region in which the GPS coordinate of the venues must fall in between. It’s used to filter the data from Realm (on the line below). Note that this predicate assumes that GPS coordinate are planar, when the globe is obviously spherical. For now it’s OK, but you’ll run into trouble finding coffeeshops around the North and South poles.
- Next, let’s dissect the individual parts of the Realm object fetching. All methods are chained, which means that every method call is called upon the result of the previous call.
- First, realm is invoked: the Realm reference object.
- Next, all objects of Venue are lazy loaded: objects(Venue).
- Next, the objects are filtered with filter(predicate). Realm handles filtering extremely efficient, and won’t just brute-force filter all objects but only filter them as they get accessed.
- Next, the native Swift method sort is invoked. This is not part of Realm, Realm’s sort method is called sorted. In other words: you lose part of the power of Realm here. The sort method will access all Realm objects, meaning they all will be loaded into memory, and you lose the lazy loading characteristic of Realm. The sort method takes one argument: a closure that determines the order of two unsorted objects. By returning true or false, the closure indicates which of the two objects precedes the other. In your code, you determine the order based on distance from the user’s location. This is where the coordinate computed property comes into play. The $0 and $1 are shorthands for the two unsorted objects. Basically, the method sorts the venues on distance from the user’s location (closer = higher).
And that’s it! This is extremely dense but effective code. Thanks to Realm’s optimized nature, method chaining, and using native Swift sorting you’ve gone from a big pile of venues to a very specific list of close-by venues. And the cool thing is: it all updates when you move the GPS location!
That’s it! Try out your app by pressing Command-R. Is it working? Well done!
Note: Unfortunately, the data you get back from Foursquare is pretty thin when it comes to the simulated GPS coordinates from Xcode (Tokyo, NY, Honolulu). If you want more data you can uncomment the hard-coded category in CoffeeAPI or simulate a spot that has more coffeeshops!
What do you think about this tutorial? Leave me comment and share your thoughts.

Reinder de Vries is an indie app maker who teaches aspiring app developers and marketers how to build their own apps at LearnAppMaking.com. He has developed 50+ apps and his code is used by millions of users all over the globe. When he’s not coding, he enjoys strong espresso and traveling.