Welcome to the second part of the Core ML tutorial series. In this tutorial you will learn how to set up a Python virtual environment, acquire a data model not in the Core ML format, convert that model into a Core ML format, and finally integrate it into your app. It is highly recommended that you read the previous tutorial before continuing with this one.
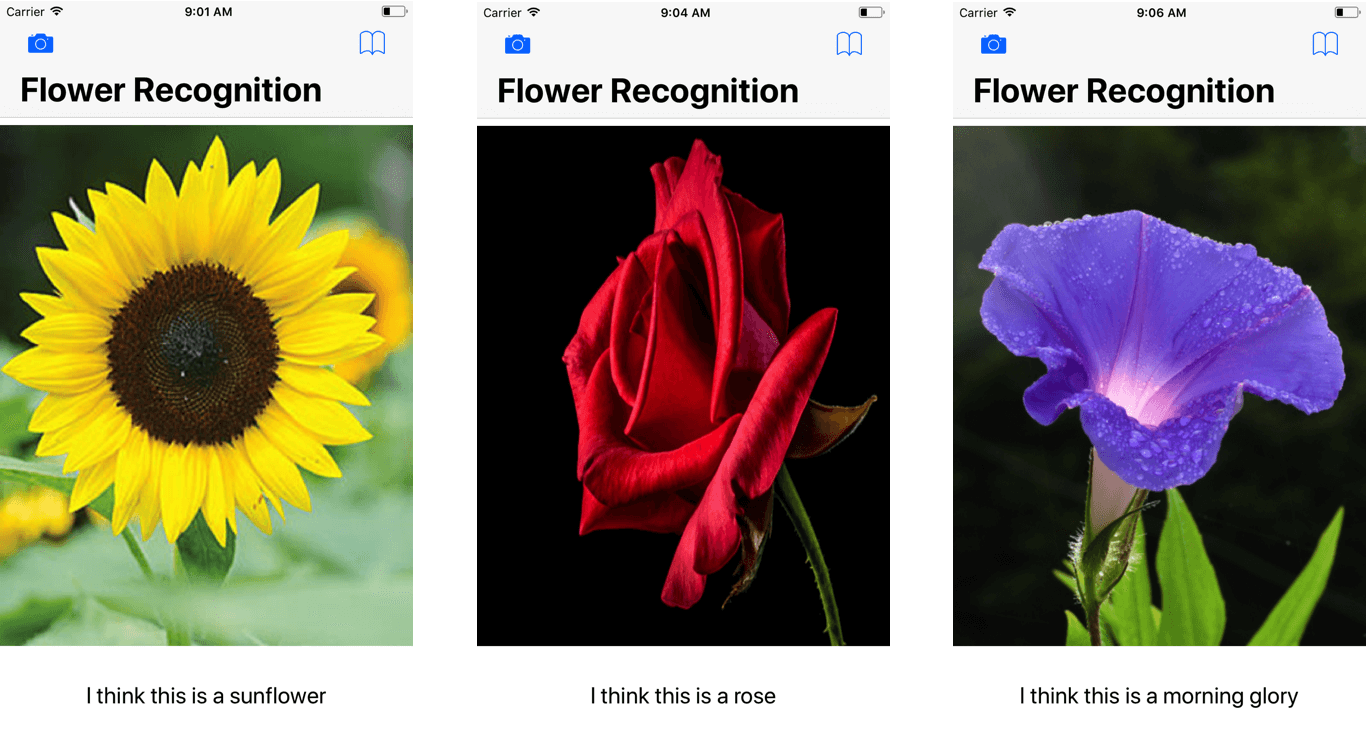
In this project, we will build a flower recognition app that will look similar to below. The main focus, however, is to show you how to get a trained model and convert it into Core ML format for iOS app development.
Before We Begin…
The purpose of this tutorial is to help you learn how to convert data models in various formats into the Core ML format. However before we begin, I should give you some background about machine learning frameworks. There are many popular deep learning frameworks out there which provide developers the tools to design, build, and train their own models. The model which we are going to use is from Caffe. Caffe was developed by Bekerley Artificial Intelligence Research (BAIR) and it is one of the most commonly used framework for creating machine learning models.
Apart from Caffe, there are also plenty other frameworks such as Keras, TensorFlow, and Scikit-learn. All of these frameworks have their own advantages and disadvantages which you can learn about here.
In machine learning, everything starts with the model, the system that makes predictions or identifications. Teaching computer to learn involves a machine learning algorithm with training data to learn from. The output generated from training is usually known as machine learning models. There are different types of maching learning models that solve the same problem (e.g. object recognition) but with different algorithms. Neural Networks, Tree Ensembles, SVMs are some of these machine learning algorithms.
At the time of publication, Core ML doesn’t support the conversion of all of these models from different frameworks. The following image, provided by Apple, shows the models and third-party tools supported by Core ML.
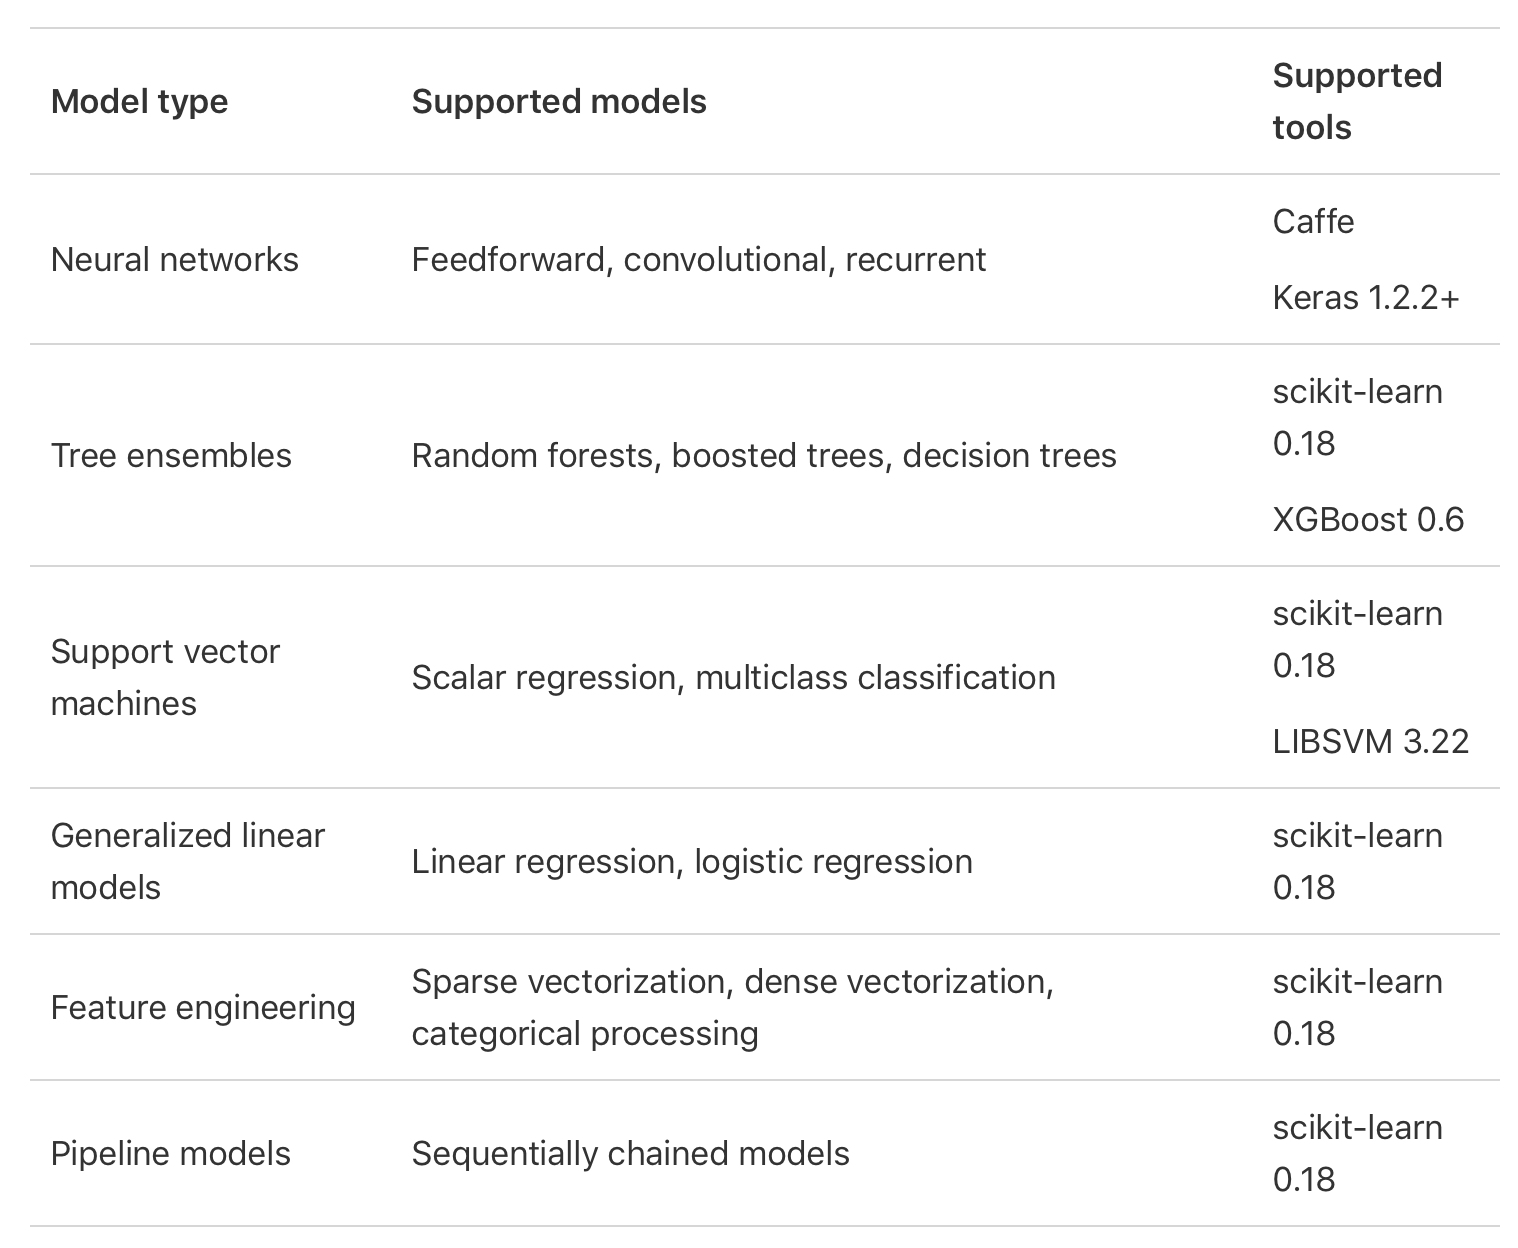
To convert the data models to Core ML format, we use a software called Core ML Tools. In the next section, we will be using Python to download these tools and use them for the conversion.
Installing Python and Setting Up the Environment
Lots of researchers and engineers have made Caffe models for different tasks with all kinds of architectures and data. These models are learned and applied for problems ranging from simple regression, to large-scale visual classification, to Siamese networks for image similarity, to speech and robotics applications.
– Caffe Model Zoo
You can find different pre-trained Caffe models on GitHub. To effectively share the models, BAIR introduces the model zoo framework. And, you can find some of the available models here. In this tutorial, I use this Caffe model to show you how to convert it to Core ML format, as well as, implementing flower identification.
To begin, download the starter project here. If you open the project and look at the code, you can see that the code required to access the camera and photo library are already filled out. You might recognize this from the previous tutorial. What is missing is the Core ML model.
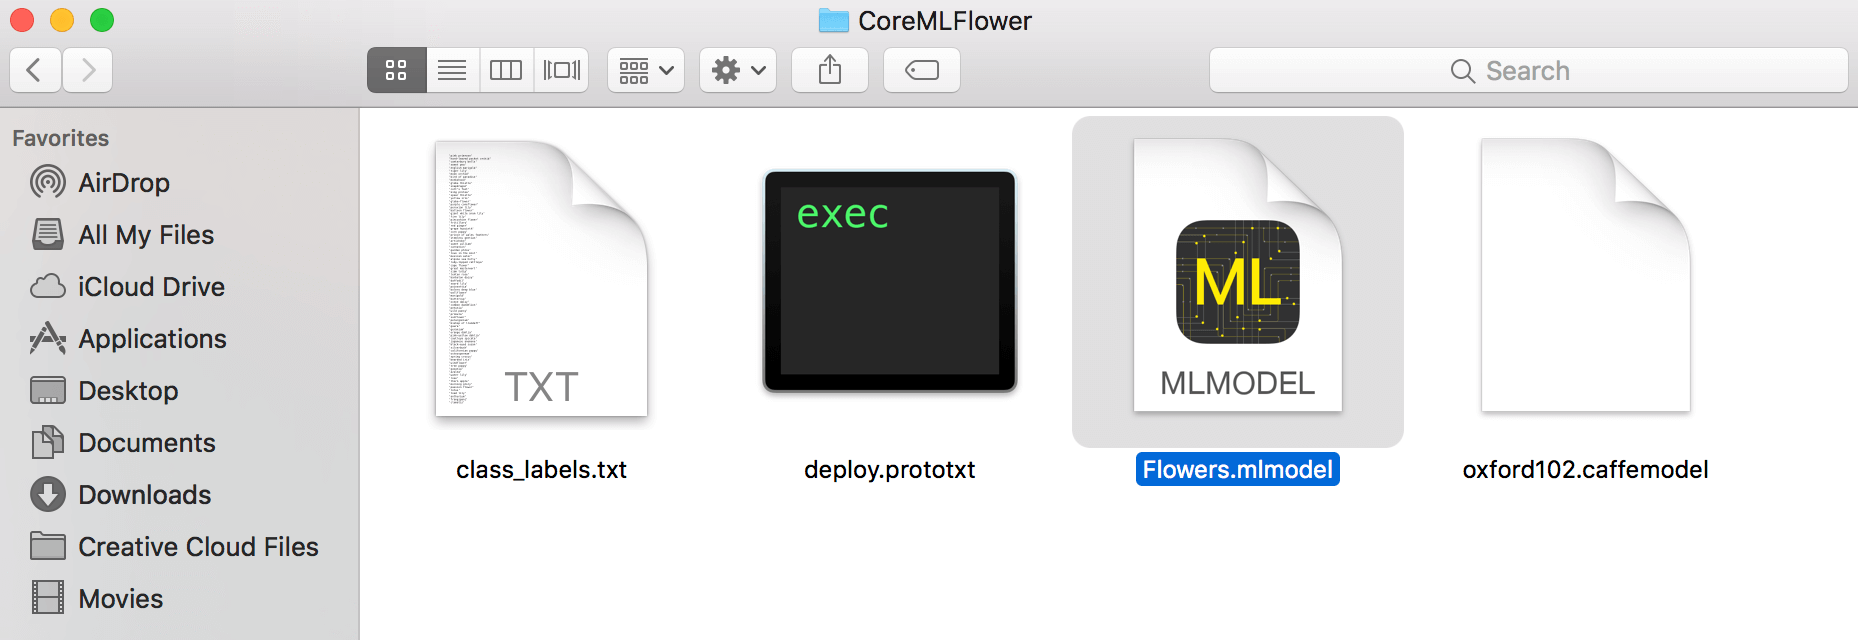
You should also notice 3 more files in the project bundle: oxford102.caffemodel, deploy.prototxt and class_labels.txt. This is the Caffe model and files that we will use for demo. I will discuss in details with you later.
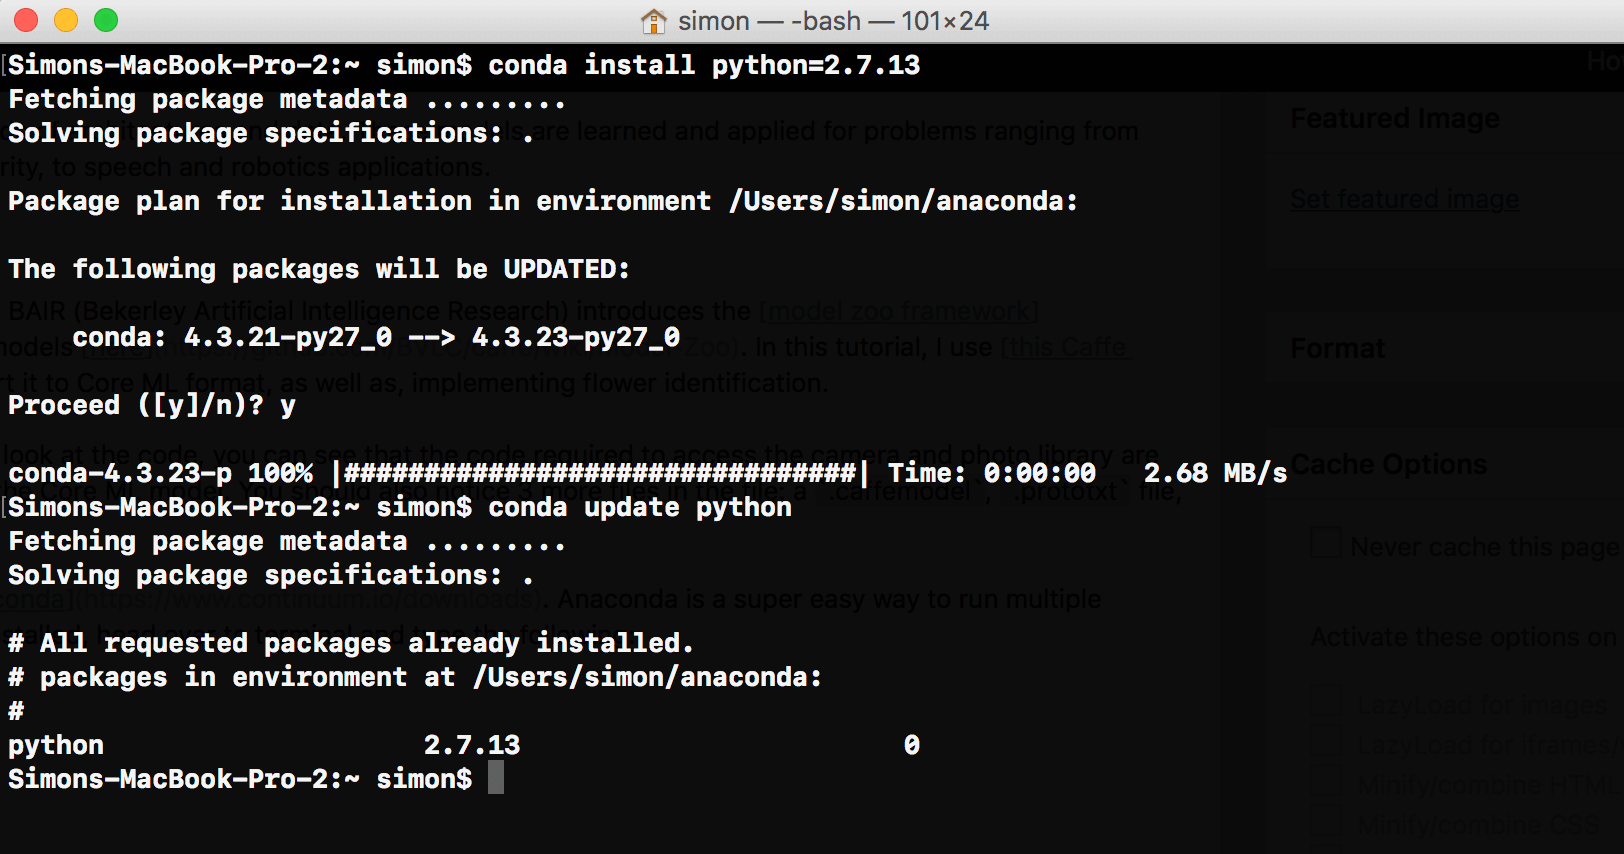
To use the Core ML tools, the first step is to install Python on your Mac. First, download Anaconda (Choose Python 2.7 version). Anaconda is a super easy way to run Python on your Mac without causing any problems. Once you have Anaconda installed, head over to terminal and type the following:
|
1 2 |
conda install python=2.7.13 conda update python |
In these two lines of code, we install the python version we want. At the time this tutorial was written, the latest version of Python 2 was 2.7.13. Just in case, once Python installed, type the second line so it updates to the latest version.
The next step is to create a virtual environment. In a virtual environment, you can write programs with different versions of Python or packages in them. To create a new virtual environment, type the following lines of code.
|
1 |
conda create --name flowerrec |
When Terminal prompts you,
|
1 |
proceed ([y]/n)? |
Type “y” for yes. Congrats! Now, you have a virtual environment named flowerrec!
Lastly, type the following command to install the Core ML Tools:
|
1 |
pip install -U coremltools |
Converting The Caffe Model
Open Terminal again and type the code that will take you to your virtual environment:
|
1 |
source activate flowerrec |
Then change to the directory of your starter project that contains the three files: class_labels.txt, deploy.prototxt and oxford102.caffemodel.
|
1 |
cd |
Once you are in the folder, it’s time to initiate python. Simply type python and you will be taken to the Python interface within Terminal. The first step is to import the Core ML tools so that is exactly what we’ll do.
|
1 |
import coremltools |
The next line is really important, so please pay attention. Type the following line but don’t press enter.
|
1 |
coreml_model = coremltools.converters.caffe.convert(('oxford102.caffemodel', 'deploy.prototxt'), image_input_names='data', class_labels='class_labels.txt') |
Now while this is a really short line, there is a lot going on here. Let me explain what these 3 files were about.
deploy.prototxt– describes the structure of the neural network.oxford102.caffemodel– the trained data model in Caffe format.class_labels.txt– contains a list of all the flowers that the model is able to recognize.
In the statement above, we define a model named coreml_model as a converter from Caffe to Core ML, which is a result of the coremltools.converters.caffe.convert function. The last two parameters of this line are:
image_input_names='data'class_labels='class_labels.txt'
These two parameters define the input and output we want our Core ML model to accept. Let me put it this way: computers can only understand numbers. So if we do not add these two parameters, our Core ML Model will only accept numbers as an input and output rather than an image and string as a input and output, respectively.
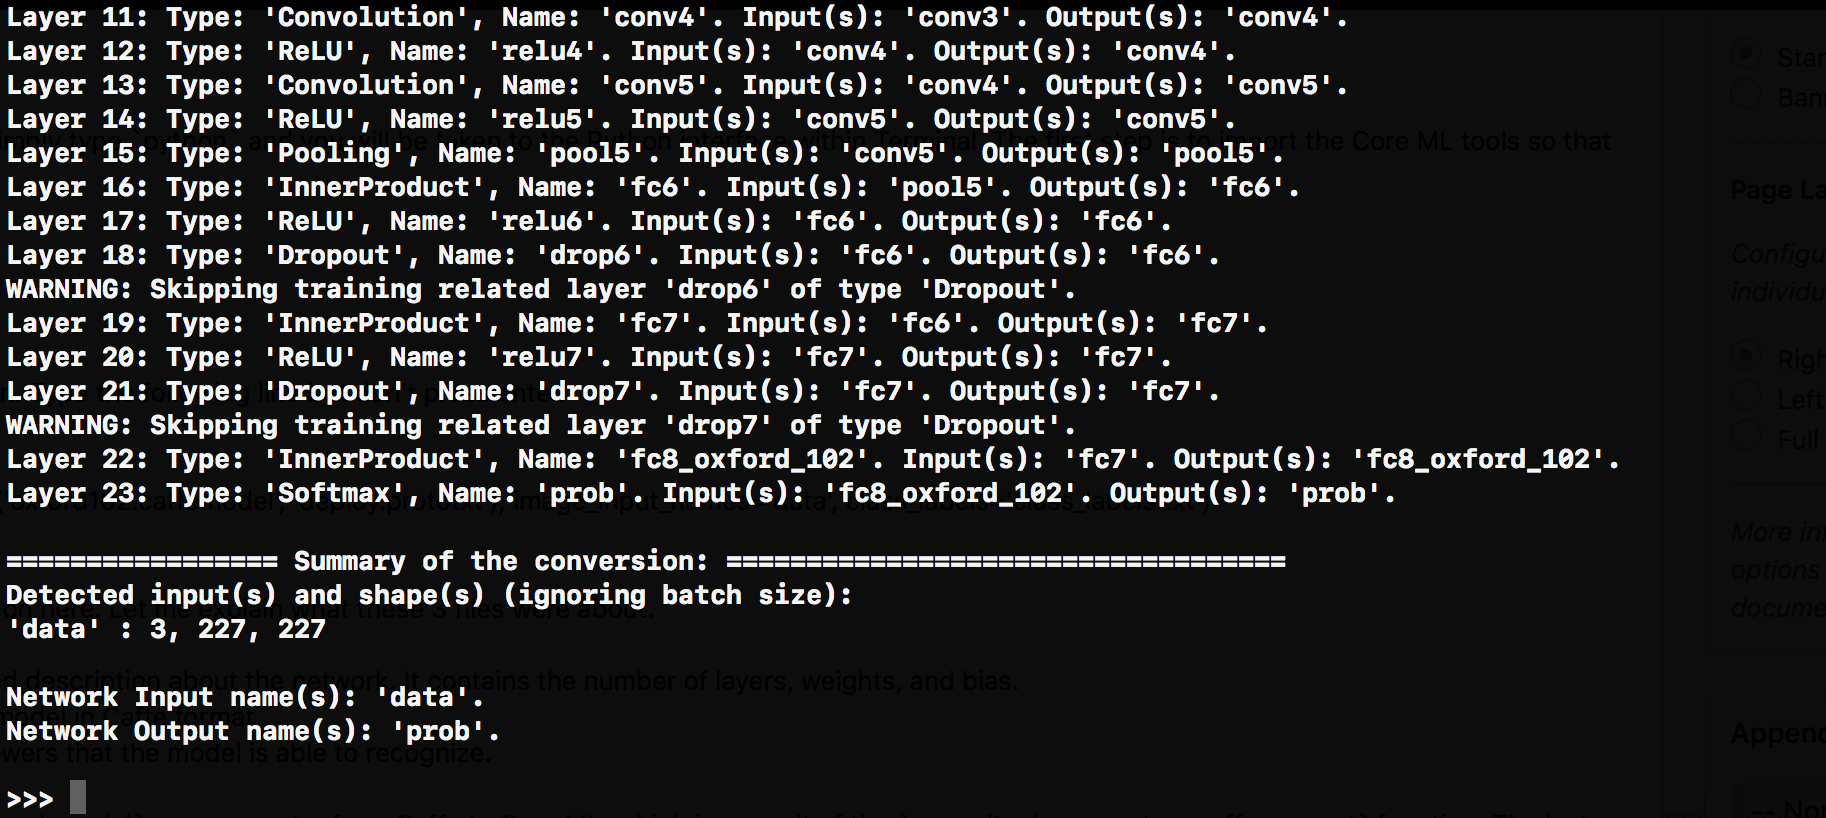
Now, you can press ENTER and treat yourself to a break. Depending the computational power of your machine, it will take some time for the converter to run. When the converter finishes, you will be greeted with a simple >>>.
Now that the Caffe model is converted, you need to save it. You can do this by typing
|
1 |
coreml_model.save('Flowers.mlmodel') |
The .mlmodel file will save in the current folder/directory.
Integrating the Model into Xcode
Now we come to the final step to integrate the model we just converted into the Xcode project. This part should be familiar to you if you’ve read my previous tutorial. Open the starter project and based on what you have learned so far, I’m challenging you to integrate the Core ML model into the app.
I hope you were able to accomplish the task or at least try. If you didn’t get it, don’t worry and follow along!
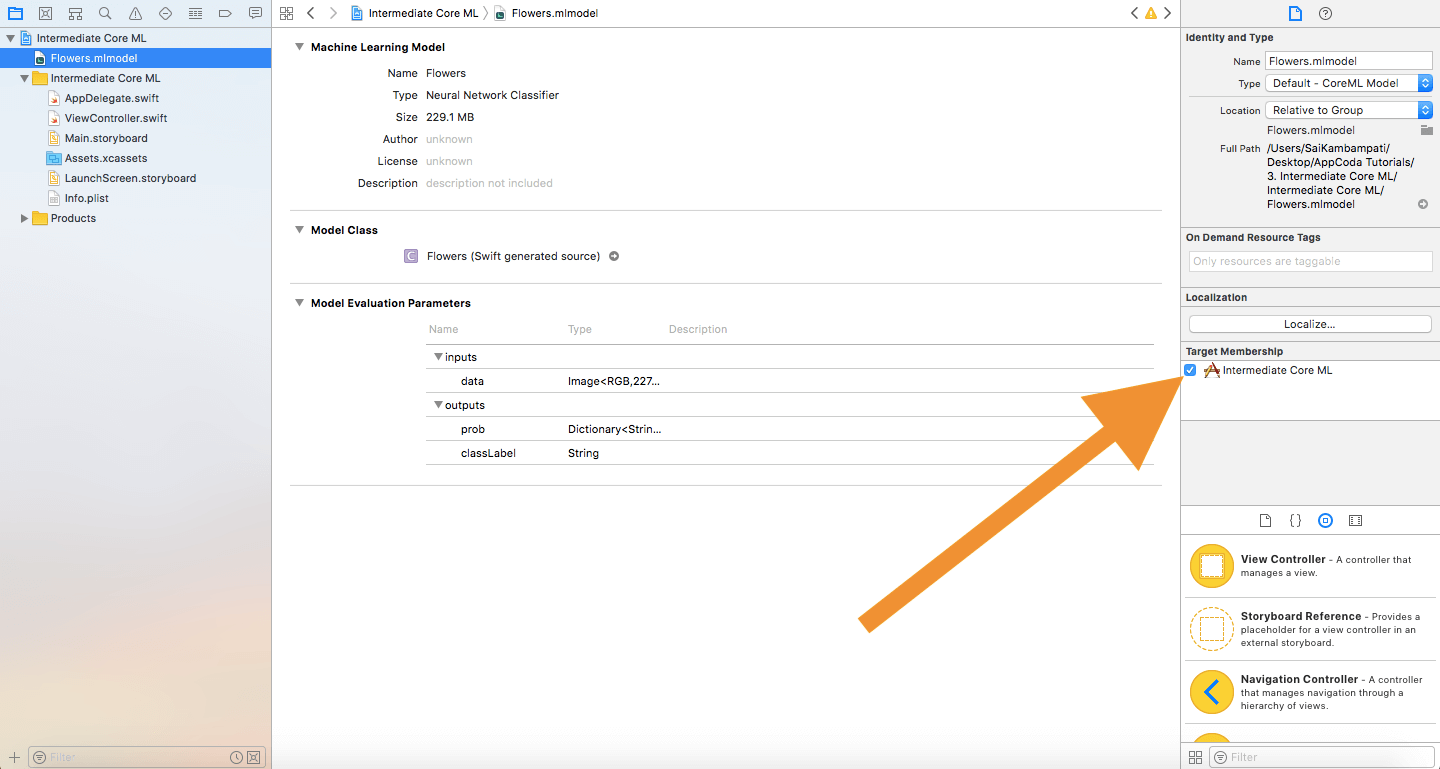
The first step is to drag and drop the Flowers.mlmodel into our Xcode project. Make sure that the box for Target Membership is checked.
Now, we navigate over to ViewController.swift and we define the following:
|
1 2 3 4 5 |
var model: Flowers! override func viewWillAppear(_ animated: Bool) { model = Flowers() } |
In these 2 lines of code, we define our data model and initialize it right before the view appears.
Next, we just have to define the constant prediction equal to the data from the model’s prediction. Type the following after imageView.image = newImage in the extension of ViewController.
|
1 2 3 4 5 |
guard let prediction = try? model.prediction(data: pixelBuffer!) else { return } classifier.text = "I think this is a \(prediction.classLabel)." |
That’s all! Build and run the app, you should see it working similar to the image recognition app in the previous tutorial. The only difference is that this is only specific to flowers and we have the satisfaction of knowing that we were able to convert a Caffe model into a Core ML model.
Conclusion
Now that you know how to convert data models, you are probably wondering where you can find data models. A simple Google search will give you tons of results. You can find data models for almost any category such as different types of cars, plants, animals, and even a model that can tell which celebrity you look like the most. Here are a couple of places to get you started!
If you can’t find a model that supports your needs, you are probably wondering if you can create your own data model. It can be done, but it will be difficult to do so. If you feel like you are up to the challenge, I would recommend you start with either Scikit-Learn or TensorFlow by visiting their homepage.
For reference, you can refer to the complete Xcode project on GitHub.
For more details about converting Core ML models, you can refer to the following sources:
- Apple Developer’s Article on Conversion of Models
- Python Documentation on Core ML
- Coremltools Package Documentation
- Coremltools Package Documentation on Different Converters
What is your thought on this tutorial? If you find it useful or have any comments, please do let me know.

Sai Kambampati is an app developer and designer currently attending the University of California, Santa Cruz. He is working towards his Bachelor of Science in Computer Science and Cognitive Science. Awarded Apple’s WWDC scholarship multiple times, he is proficient in many programming languages. When he's not busy studying, you can find him working on his many successful apps available on the App Store. Follow him @HeySaiK.
Comments
 王显朋
王显朋
AuthorIt’s so COOL!! Looking forward to your more articles!! Thanks to share!!!
 Sai Kambampati
AuthorThanks! I’m glad you enjoyed it and I hope to see some of your work soon!
 Hubert
Authorcoreml_model = ….
RuntimeError: Unable to open caffe model provided in the source model path: oxford102.caffemodel
! not really good tutorial, too complicated procedure
 dandan
AuthorHey Thanks for the tutorial!
I was wondering how can we create the mlmodel for the age and gender repository available on the openu website?
it has different caffemodel, does it mean we have to create different mlmodels?
Thanks 🙂
awesome tutorial BTW, very easy to follow, you should make it more.
 Sai Kambampati
AuthorYes you’ll have to create another ML model. It shouldn’t be hard though because the process is very similar to how we created the conversion in this tutorial. However, because Core ML is really taking off, there are 2 Github repositories which have a compilation of all the different ML models online converted to Core ML:
https://github.com/SwiftBrain/awesome-CoreML-models
https://github.com/likedan/Awesome-CoreML-Models
You can use these repositories to immediately download your model in the Core ML format. Hope that helps! Thanks for the compliment, I do have a lot more tutorials planned!
 Sai Kambampati
AuthorI believe there’s on on GitHub already in Core ML format!
 Tristan Wolf
AuthorThanks for the tutorial!
The model used doesn’t appear to be trained when I run the example app, I am getting completely different results for the same picture every time. Do you have any idea how I could fix this?
 Sai Kambampati
AuthorHi! This model is trained. If you followed all the instructions above, it should work well. Now, if you give it complicated objects it will definelty show the wrong object but a simple google for optimizing ML models can help you out! Hope this helps!
 Sundeep Sharma
Authorvery nice tutorials. Actually I need to count number of same patterns objects like circles images like nut and bolts images. Please help me to find out the caffe train modal
like this image
I need to count nuts showing in this image. Is there any caffe train modal available so that I can convert it to core ML Modal and use in my app.
Thanks in advance
https://uploads.disquscdn.com/images/2af045e2c802a63c5360ab36edc024773eea57b7ac88a109f25b600c0a9b3bbd.jpg
 ismail
AuthorHi,
thanks for this nice tutorial.
I get an error.
Hi,
I am trying to create a core ml model by an existeing caffe model on github here: https://github.com/magnusja/GTSRB-caffe-model
I am using this tutorial: https://www.appcoda.com/core-ml-tools-conversion/
But end the and I get this error
RuntimeError: Unable to load caffe network Weights file: snapshot_iter_19140.caffemodel.
see my commands:
python
Python 2.7.13 |Anaconda, Inc.| (default, Sep 30 2017, 13:16:00)
[GCC 4.2.1 Compatible Clang 4.0.1 (tags/RELEASE_401/final)] on darwin
Type “help”, “copyright”, “credits” or “license” for more information.
>>> import coremltools
>>> coreml_model = coremltools.converters.caffe.convert((‘snapshot_iter_19140.caffemodel’, ‘deploy.prototxt’), image_input_names=’data’, class_labels=’labels.txt’)
Traceback (most recent call last):
File “”, line 1, in
File “/Users/ihyildiz/miniconda2/lib/python2.7/site-packages/coremltools/converters/caffe/_caffe_converter.py”, line 191, in convert
predicted_feature_name)
File “/Users/ihyildiz/miniconda2/lib/python2.7/site-packages/coremltools/converters/caffe/_caffe_converter.py”, line 255, in _export
predicted_feature_name)
RuntimeError: Unable to load caffe network Weights file: snapshot_iter_19140.caffemodel.
 fukattsoft
Authorhttps://fukatsoft.com/b/section-144/
Section 144 of the crook procedure code (CRPC) of 1973 authorizes the executive Justice of the Peace of any country or territory to trouble an order to restrict the assembly of four or greater people in an area. Consistent with the law, every member of such ‘unlawful assembly’ may be booked for undertaking rioting.
 ertugrul series
AuthorWe are making Interesting and Entertaining videos for Kids.
Now, you can watch the first-ever Animated Cartoon of the Most Popular and Historical Drama Series “Ertugrul Ghazi” in Urdu.
only on our Youtube Channel “My Kids Tube”.
Appreciate our hard work because your Appreciation is our Motivation.
https://www.youtube.com/watch?v=CzPQZVtf8SA&ab